zKars
Supporting Member
-
Joined
-
Last visited
Everything posted by zKars
-
There are no stock wires in that area. The wire harness typically goes up overtop of the evap tank, goes through one of the holes in a support beam at the back, and then runs along the back panel beneath the tail lights. There is a branch that goes down through the hatch floor to the fuel level sender, and fuel pump. This branch has a ground lug that attaches under the hatch floor above the gas tank. What I see is a harness in the bottom of that area below the filler that normally shouldn't be there.
-
While the 260/280 consoles are quite a bit larger than the 240 consoles, and this cover may more than have enough material to cover your 73 consoles, there may be detail differences that leave an area blank. I wouldn't chance it. BTW the 2+2 consoles have an ashtray on the very back vertical end cap. Other wise they are interchangable with the coupe version
-
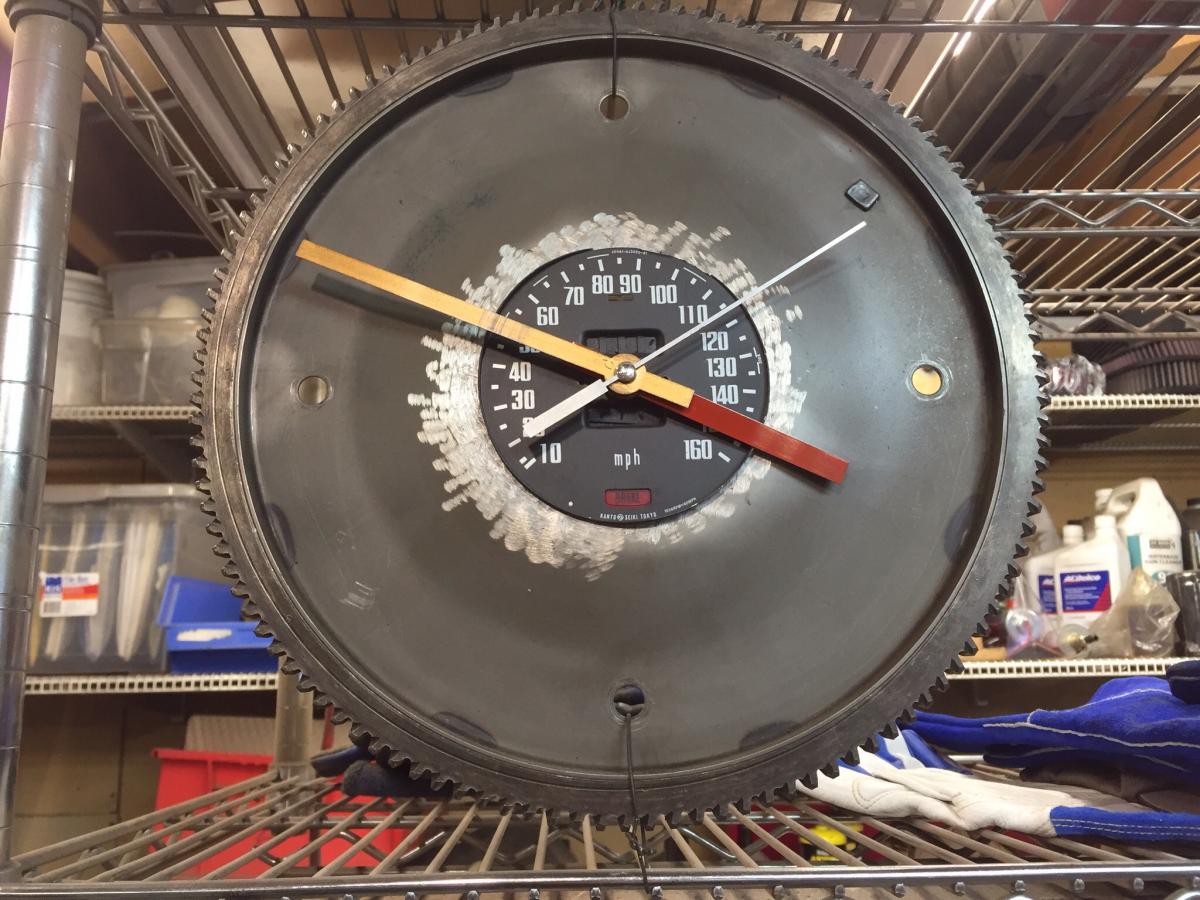
That's going to be tough to find. I have one, but its busy... And I had to cut out the back to make the clock fit.... Sorry....

-
oh oh... I hope that exhaust valve has the same installed length as the others..... i'm thinking it's "different"... They should all adjust the same way.
-
Great advice all, thanks! 123100-P0100 flywheels are hard to find. Rock auto only lists 2+2 flywheels (20 mm) . Ebay has nothing. Clutch kits come up with nothing that includes a flywheel, where as only a few years ago, there were none. Don't really want a Fidenza alloy flywheel. Well I do, but not at the current exchange rates! Anyone with a source? I'm fresh out of used ones.
-
What say you good Z'ers? When putting in a new clutch, what is your SOP on the flywheel resurfacing? Wet sand with Silcon carbide paper till deglazed? Always take in for a skim resurface to local rebuilder? Don't bother? Share your experience. Yes, I admit it, this is a silly question is based on being cheap, and in a hurry to get a clutch swap done in one go without a day or two "in the shop" waiting for a proper skim to get done....
-
Very cool! good eye. I especially like the little old lady tossing the tire in disgust! That could have been my mother!
-
ok, THIS is cool. Thanks!
-
oil level cannot exceed a certain point or it just overflows internally and gets burned. It's possible to have too little, but not too much. As long as your not really low, or you've overfilled and it hasn't had a chance to overflow and stabilize, oil quantity can't have much impact on performance.
-
I've used POR-15 and Chassis Saver on several projects with outstanding results, and I can say that both products appear, smell, apply and perform nearly identically. Chassis Saver is marginally cheaper in my market. Prep is the secret. You cannot skimp on prep, degrease and cleanliness and application directions. Follow directions as mentioned. Did I say clean?
-
The 73 mounting brackets and bumpers are unique as you've discovered. The four studs on the back side of the 73 bumpers are not the same location or spacing as the earlier bumpers. 73's do have both the pair of holes in the body that the 70-72's had to mount their simpler earlier brackets, as well as the ones for the 73 brackets, so you can use earlier bumpers, but not the other way around with out some fabricating to make things match up. Did I make that clear? ish?
-
What are the chances. Watching James Bond on TV, "You only live Twice", and admiring another lovely car, the Toyoto 2000GT. White of course....
-
And welcome back ZODB! The old noggin still tuned to spotting Z shapes, I see.
-
Man, I sure have a soft spot for Aston's. Never really knew about that one. mightly S30'ish though, ain't it? The recent Vanquish shapes have always been what I had hoped Nissan would do the "new" S30. My dream don't seem to have any hope of coming true though do they?
-
Stunning. Be lucky if it brings the lower end of the estimate with the poor condition of the silver trim on the console and deplorable state of the shifter boot laces. Or you can just call that "Patina" and learn to live with it.
-
You should take it back to the people that caused the problems. It is not possible for us to figure out what was done as it involves a bunch of custom work and changes. Did they remove the dash? Very likely they did hook up the wiring properly or completely when they put it back together
-
You care only about one thing. With the engine running, the ammeter should be one the + side (right). It will wiggle and wander in response to many things that draw current and control it, but it must be on the right (+). Being on the plus (+) side means the alternator can push current into the battery, which is a good thing as it means that the alternator voltage is higher than the battery voltage. On the left side means its discharging, which is a bad thing. With the engine off, turning on ANYTHING should make it go left of center as the battery is supplying the current. The ammeter then tells you if the battery is charging (+ good) or discharging (- bad).
-
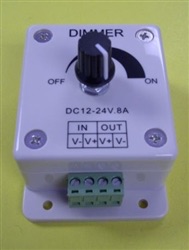
I recently had to purchase an LED dimming controller for my Z. I upgraded the crap lighting in my Vintage Air control panel, which made them too bright. So I needed LED dimming, which is best done with a PWM module. (see recent posts re LED dimming). I started looking around at the local electronics supplies and other that sell LED lighting. I found two quickly. One at B&E electronics and another at Lee Valley. http://www.be-electronics.com/product_p/69-dim2.htm http://www.leevalley.com/en/wood/page.aspx?p=70325&cat=1,43349,70322 Lee Valley was $30 and B&E was $20. Not bad, I bought the one at B&E. Unpackaged it and installed the tiny circuit board and remoted the control knob. Nice dimmable heater panel. Yeah me. Being the inquisitive type, I checked on EBay for PWM dimmers, and no surprise, found literally thousands in various configurations and power ranges. The best part was finding the same one as what I bought at B&E. Wait for it, for $2.54 (USD, $3.73 CAN). Pretty much 10% of the retail. http://www.ebay.ca/itm/PWM-Dimming-Controller-for-LED-Lights-Ribbon-Strip-12-24-Volt-12V-24V-8-Amp-W8-/321826421881?hash=item4aee597c79:g:UAUAAOSwT6pVxNqq (check out the range of prices for the same thing. Quite remarkable. Another lesson about buying stuff on ebay. Also note the prices from US suppliers of this same part. Magically 5-10 times more.... hmmmm....) So I had to buy some. Took 21 days to get here, but now when I need to do this to the next Z, I have parts, AND I can sell it to that Z owner for $20!! Capitalism at its best! I love it! PS. My apologies to Blue for buying stuff from china, but buying it at B&E in Calgary for 1000% markup, when they came from China to start with, well, what's the harm... Maybe I'll install one of these in my LED trouble light with the WAY TOO FREAKING BRIGHT LED strip.
-
Suiting up for what will probably be the last drive of the season. Weather is cooling right off with some snow flurries this weekend, so better make this one a good one. Don't know whether to laugh or cry.... Mind you, heater works, choke works, underside is waterproof, just what's stopping me from driving any dang time I want again? (insert face palm emota-thingy here...)
-
I just put some spacers between the horns and the frame, and used longer bolts, to clear the fan. Lengthening the wires should not stop you. Just make small extension cables with 1/4" spade connectors. Then its reversible to stock without modification. Or how making an angle bracket, or mount them upside down?
-
http://www.classiczcars.com/topic/45114-retractable-seat-belt-restoration-for-my-1972/?hl=%2Bseat+%2Bbelt+%2Brestoration
-
-
I'll let our friends at wiki-impedia explain Canadian Thanksgiving. Not too surprising. https://en.m.wikipedia.org/wiki/Thanksgiving_(Canada)
-
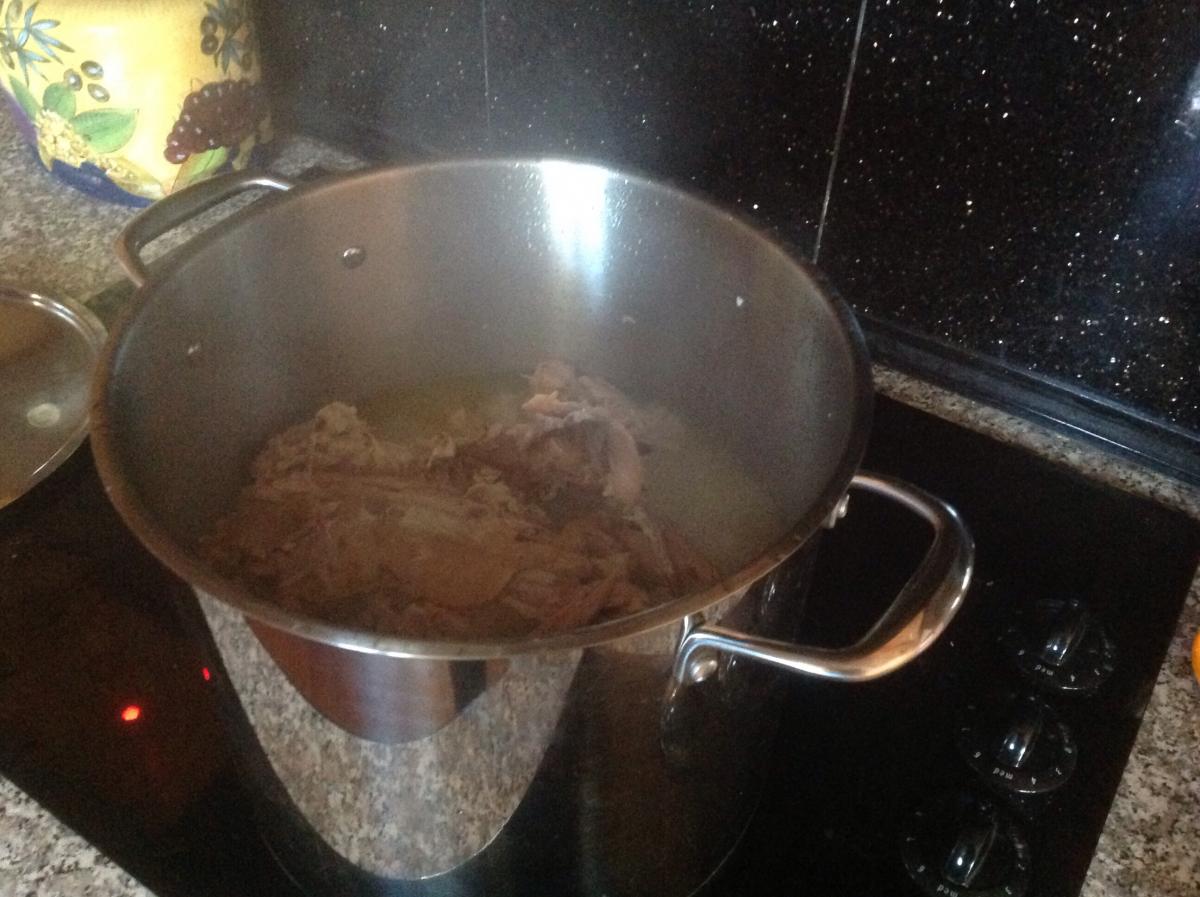
Thanks! What do you get when you put a 28 lb turkey and 20 hungry friends and relatives together? Nothing but enough scraps to make a pot of soup out of.... What am I supposed to eat for lunch for the rest of the week now?.. Good thing I love my friends and relatives.

-