


240260280z
Free Member
-
Joined
-
Last visited
Everything posted by 240260280z
-
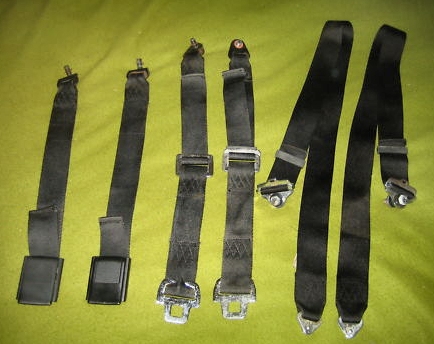
 I am sorry I have the mounting point and clip point of the shoulder strap reversed.
Here are mounting details:
I am sorry I have the mounting point and clip point of the shoulder strap reversed.
Here are mounting details: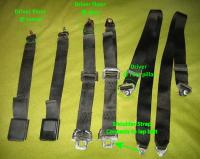 http://atlanticz.ca/zclub/techtips/timing/timinmark/index.htm
Here is a set on ebay: Jan 1970: http://cgi.ebay.com/ebaymotors/Datsun-240z-Seat-Belts-Black-Complete-NICE-RARE-/220793096778?pt=Motors_Car_Truck_Parts_Accessories&hash=item33684b4a4a#ht_500wt_1182
http://atlanticz.ca/zclub/techtips/timing/timinmark/index.htm
Here is a set on ebay: Jan 1970: http://cgi.ebay.com/ebaymotors/Datsun-240z-Seat-Belts-Black-Complete-NICE-RARE-/220793096778?pt=Motors_Car_Truck_Parts_Accessories&hash=item33684b4a4a#ht_500wt_1182 Yeah I am pretty sure it is the throttle vane switch (aka TPS) and it is easy to resolve. Check here and follow calibration procedure and you should be good to go. The problem is that when this switch sticks in the idle position, the computer goes into coast-down mode when the revs are above 3000rpm and cuts off fuel until revs go below 3000. It is probably the world's first rev limiter albeit by accident. http://atlanticz.ca/zclub/techtips/tps/index.html
You can push it more than 10 but watch for detonation when hot or when on hills under load. You should check total advance at 3000 rpm too. ~ 30-35degrees is what most run stock.
Here is a Feb 1970 240z (photos not great but they may help):
thanks all! John that would be great for the pierce-loving civic dudes that and a tow ring.. bling bling Willoughby Z great link! much thanks Fastenal has 'em http://www.fastenal.com/web/products/detail.ex?sku=0987689&ucst=t
A mod for better aerodynamics and cooling is to box in the front of the radiator to the grill; top, bottom and sides if you really want to seal things up
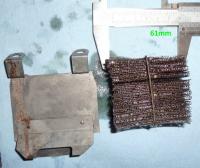
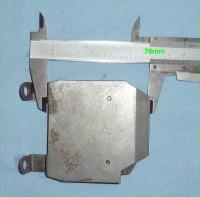
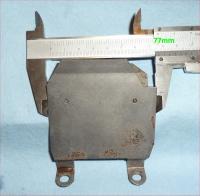
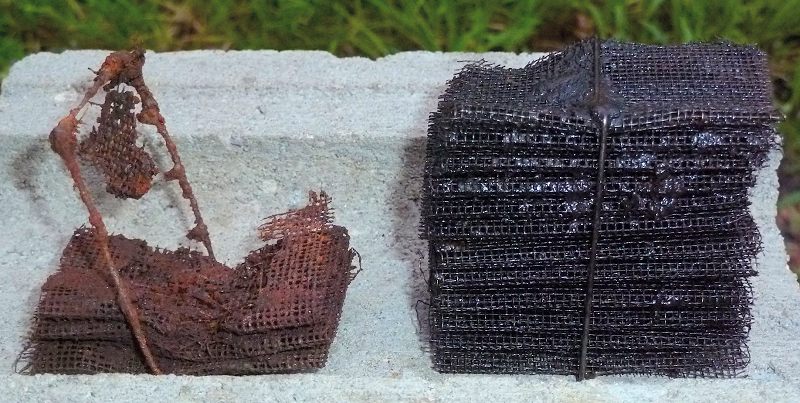
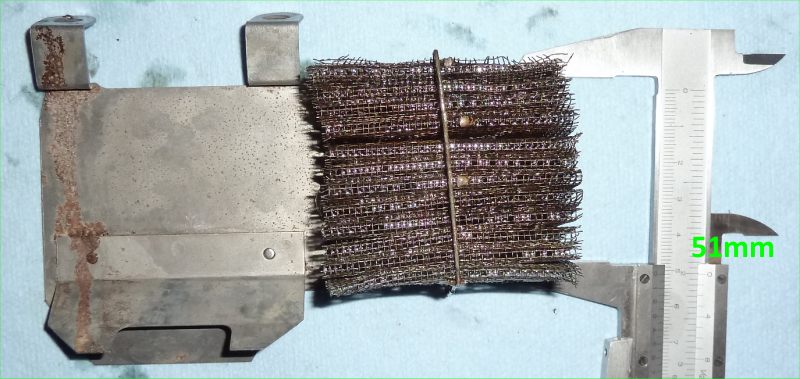
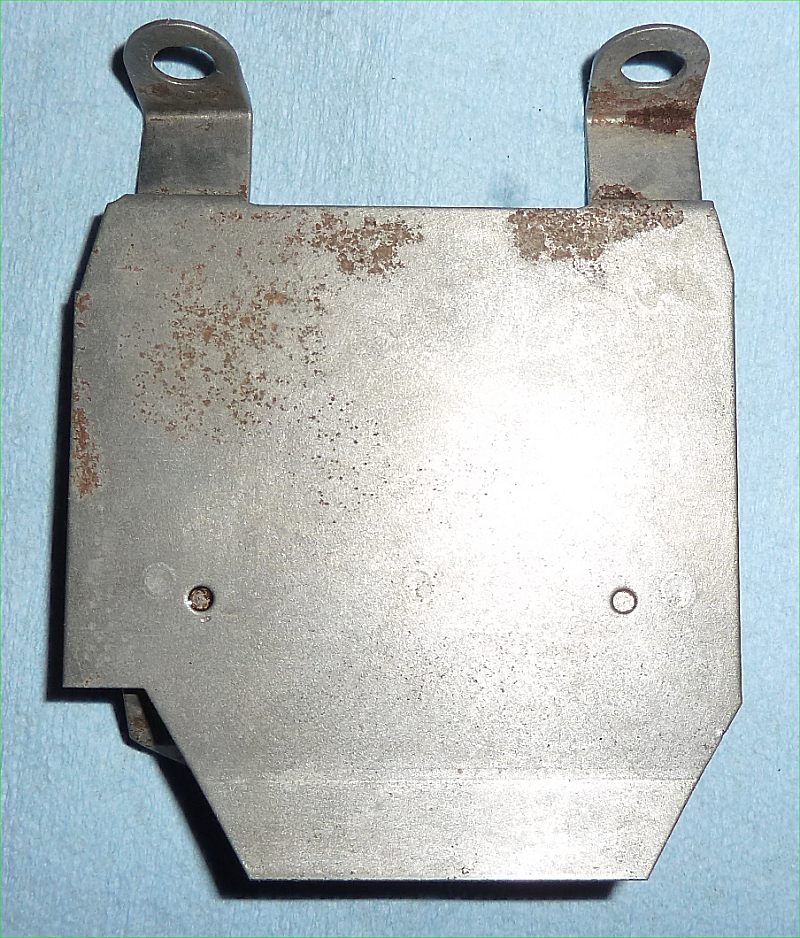
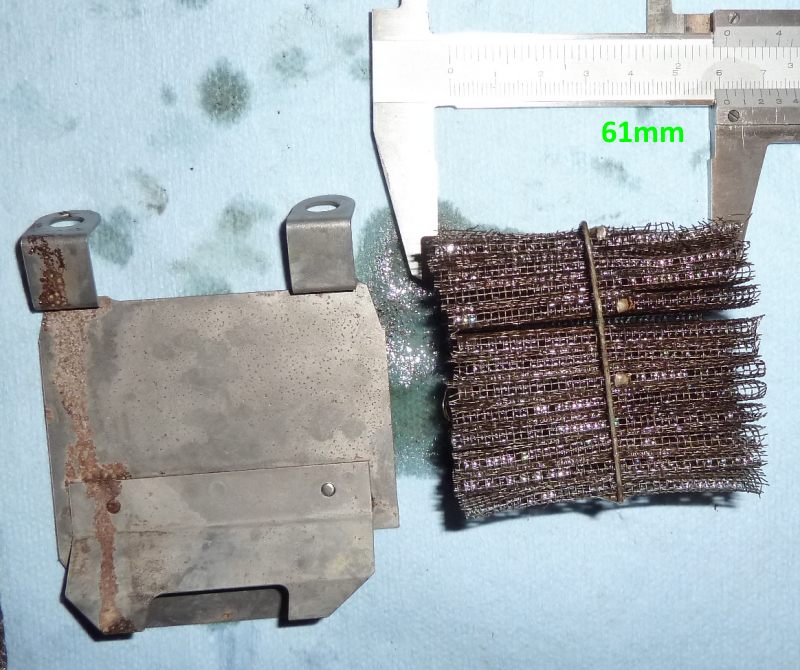
71 filter that has not been started for a long time. Acidic engine fumes and sludge coupled with water vapor has taken its toll. Beside it is a dirty oily filter from a '79 zx motor that will replace it. A wire with solder blobs maintains the shape of the folded filter. If refreshing I think stainless steel mesh would be a good alternative than the plain steel mesh.
Yeah I am pretty sure it is the throttle vane switch (aka TPS) and it is easy to resolve. Check here and follow calibration procedure and you should be good to go. The problem is that when this switch sticks in the idle position, the computer goes into coast-down mode when the revs are above 3000rpm and cuts off fuel until revs go below 3000. It is probably the world's first rev limiter albeit by accident. http://atlanticz.ca/zclub/techtips/tps/index.html
You can push it more than 10 but watch for detonation when hot or when on hills under load. You should check total advance at 3000 rpm too. ~ 30-35degrees is what most run stock.
Here is a Feb 1970 240z (photos not great but they may help):
thanks all! John that would be great for the pierce-loving civic dudes that and a tow ring.. bling bling Willoughby Z great link! much thanks Fastenal has 'em http://www.fastenal.com/web/products/detail.ex?sku=0987689&ucst=t
A mod for better aerodynamics and cooling is to box in the front of the radiator to the grill; top, bottom and sides if you really want to seal things up
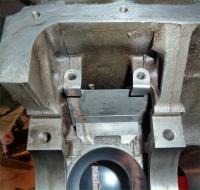
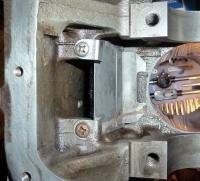
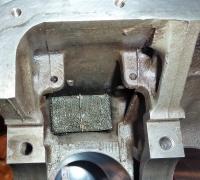
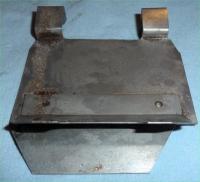
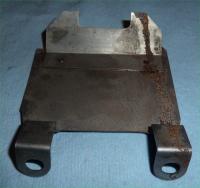
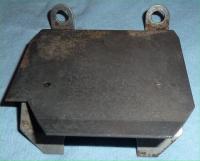
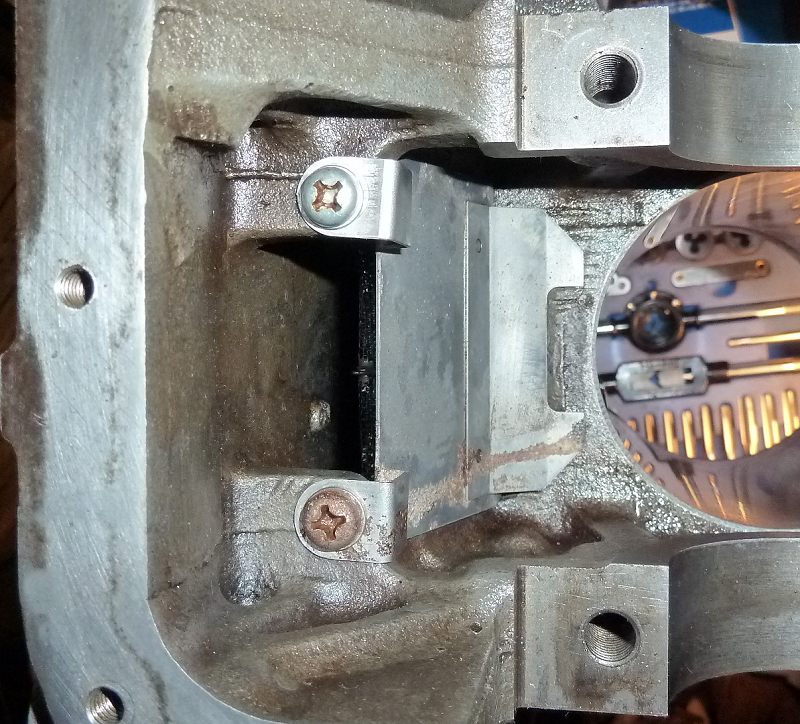
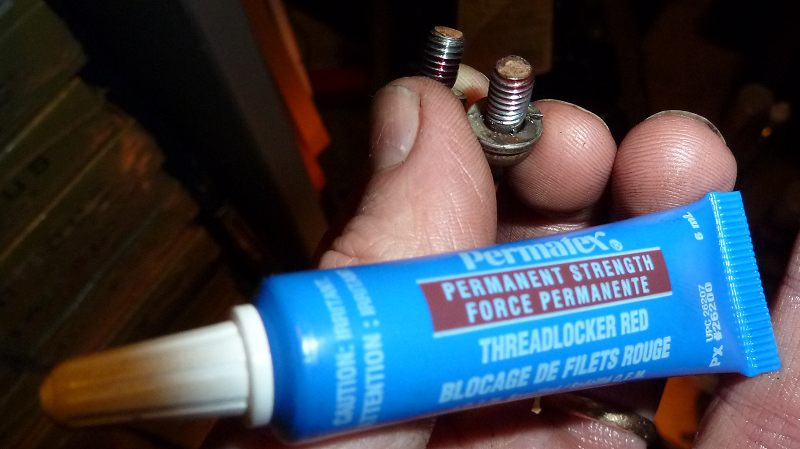
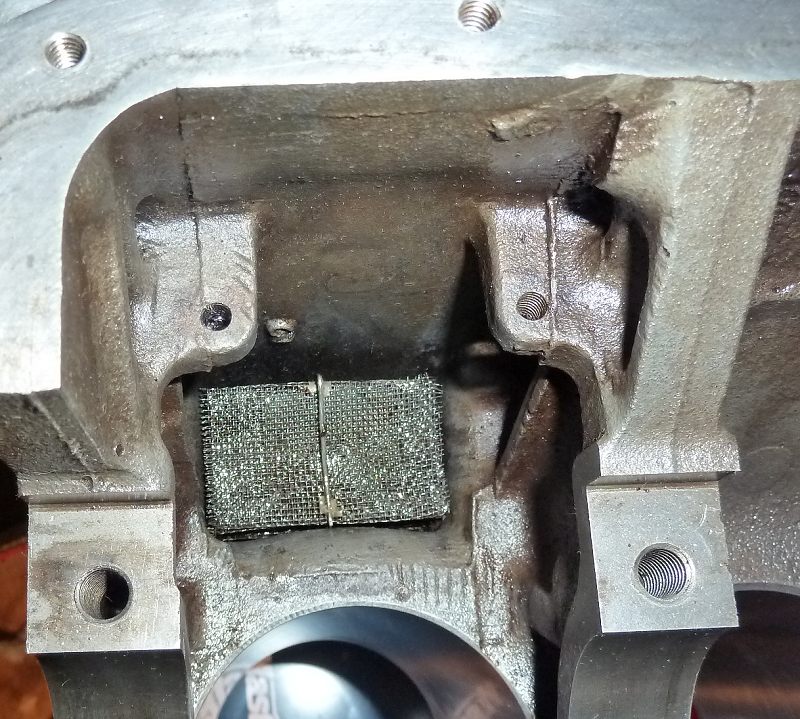
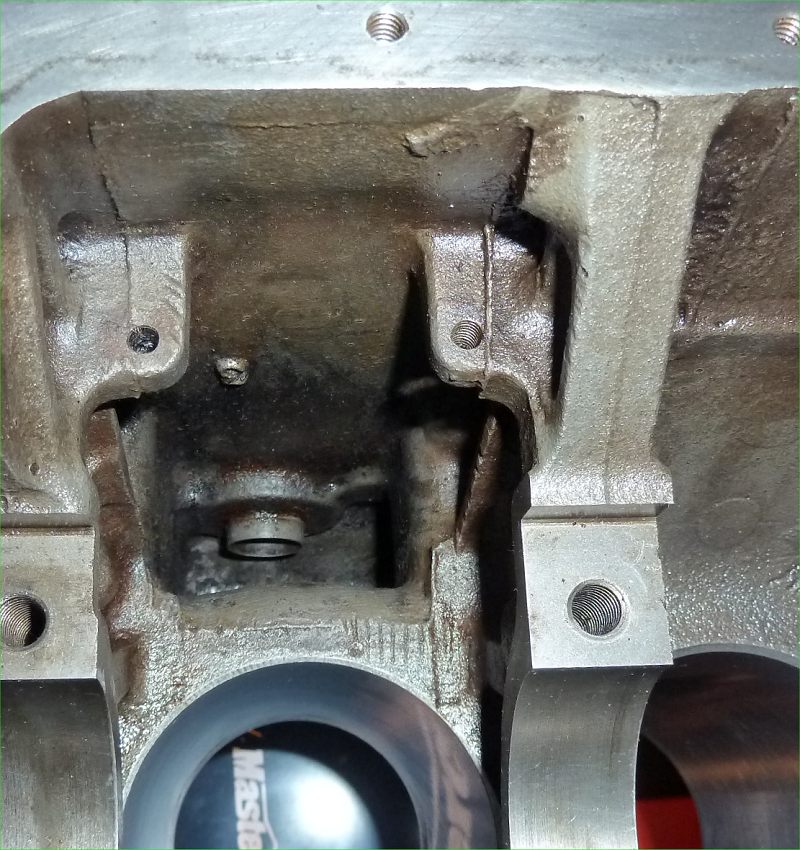
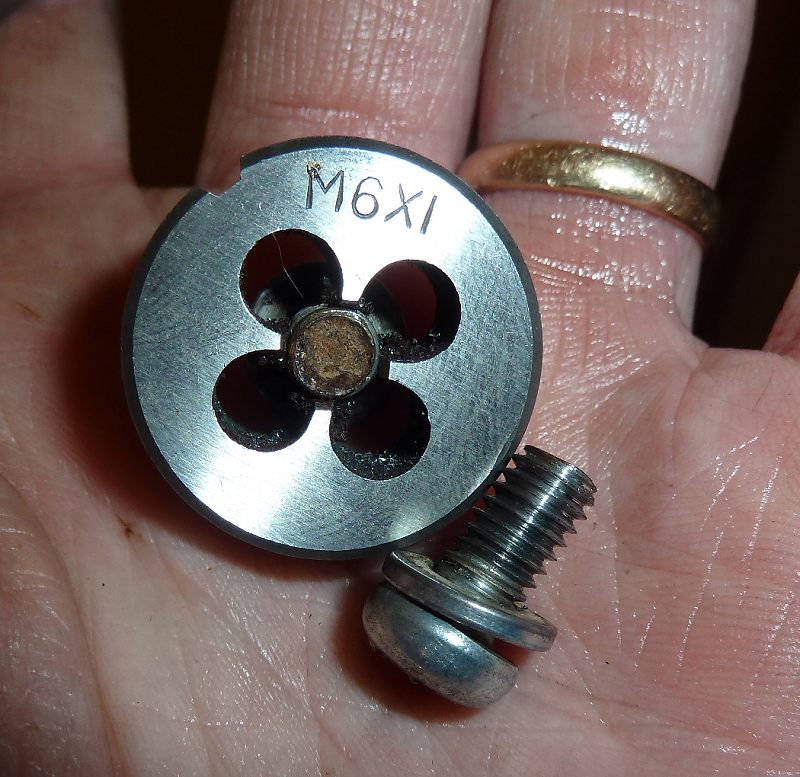
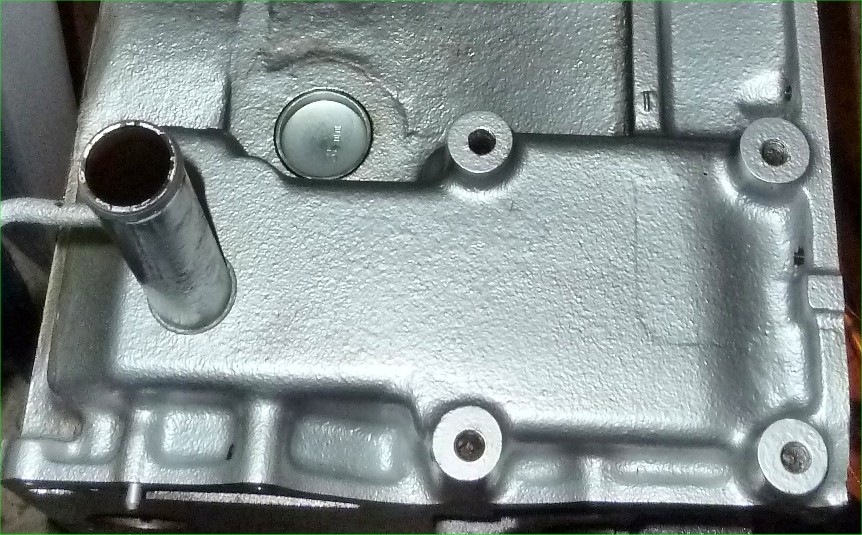
71 filter that has not been started for a long time. Acidic engine fumes and sludge coupled with water vapor has taken its toll. Beside it is a dirty oily filter from a '79 zx motor that will replace it. A wire with solder blobs maintains the shape of the folded filter. If refreshing I think stainless steel mesh would be a good alternative than the plain steel mesh.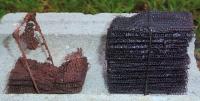 Cleaned up filter area. It was filled with disintegrated/rotted filter and oil. Used Ospho acid, scrubbing and soapy rinse followed by ATF wipe. Filter soaked in solvent, blasted with brake cleaner then oiled and installed. Any hardware and threaded holes in the engine should be chased before installing. Loctite any hardware that can come loose and press down firmly on screwdriver when fastening. Done!
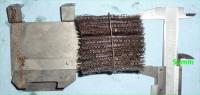


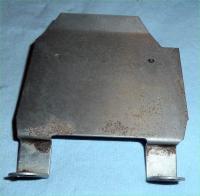
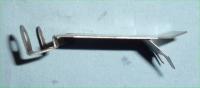
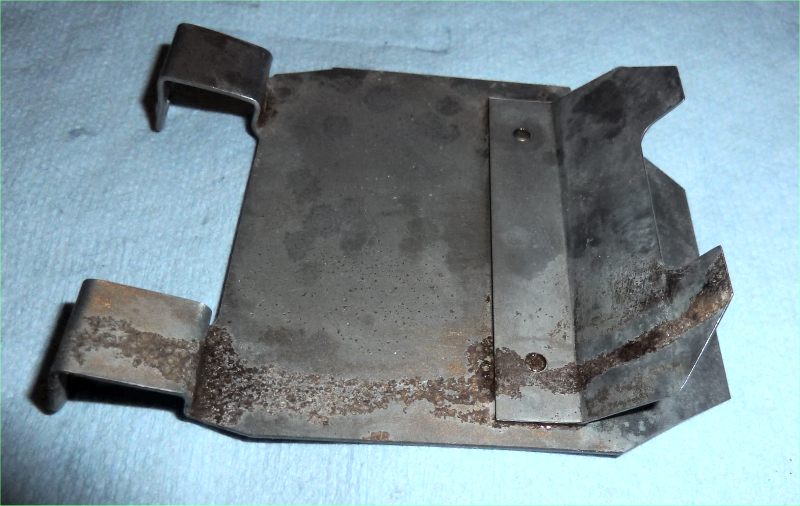
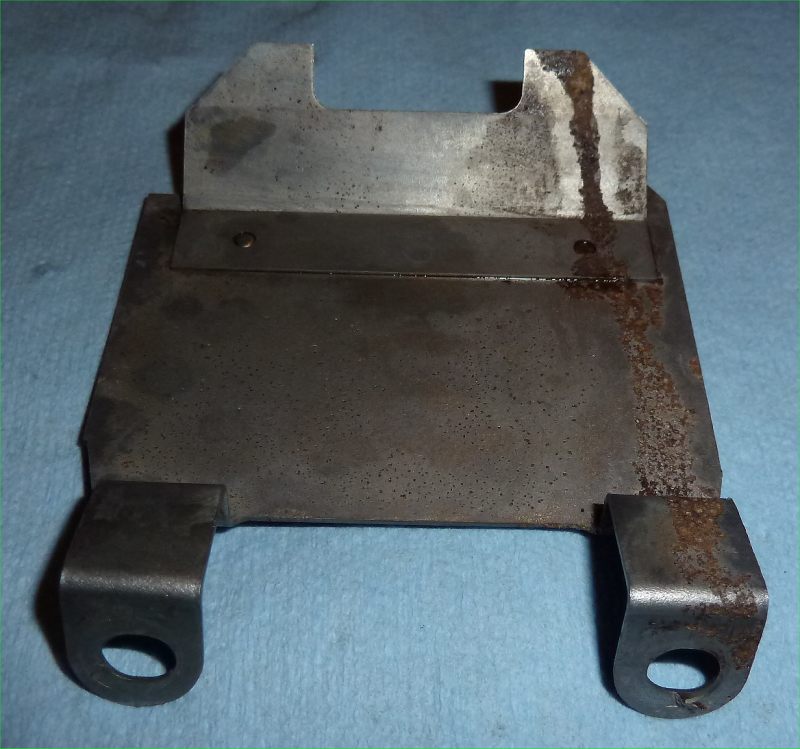
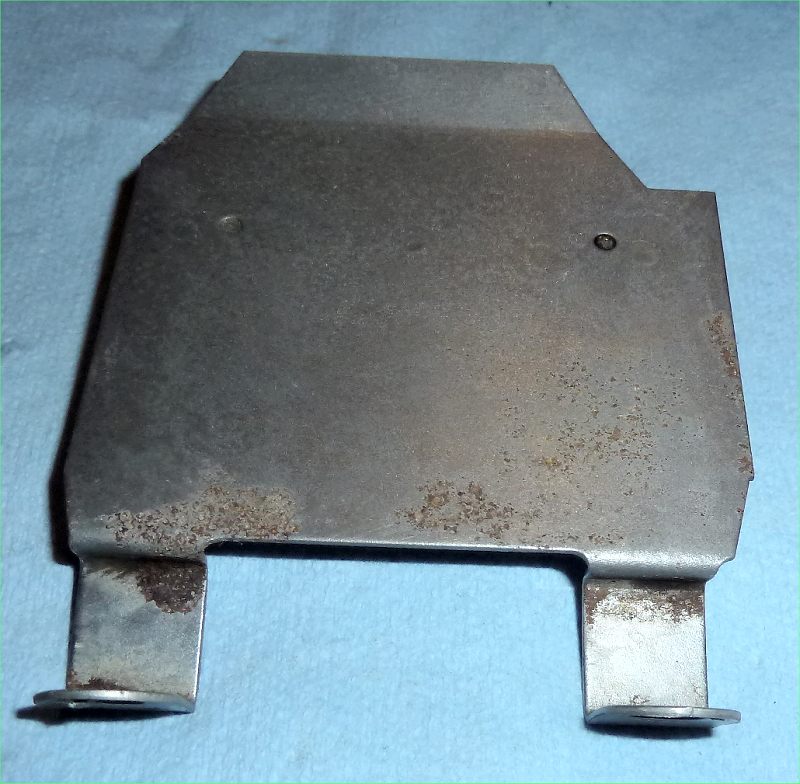
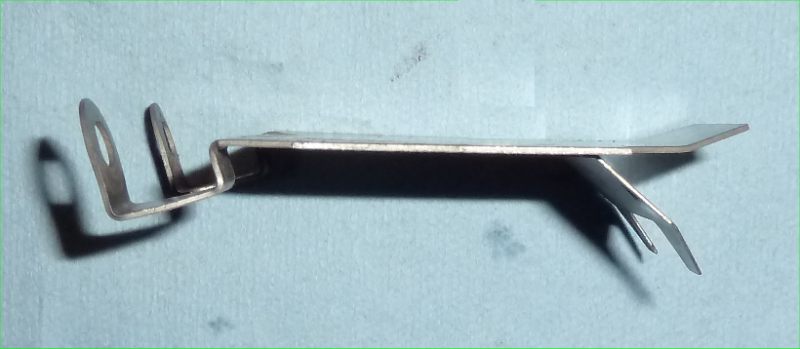
 I finally took photos. Here they are for completeness: keywords: 240z 260z 280z L24 L26 L28 pcv baffle plate ventilation engine breather filter acid emission
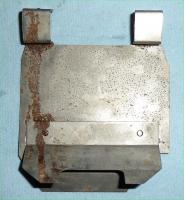


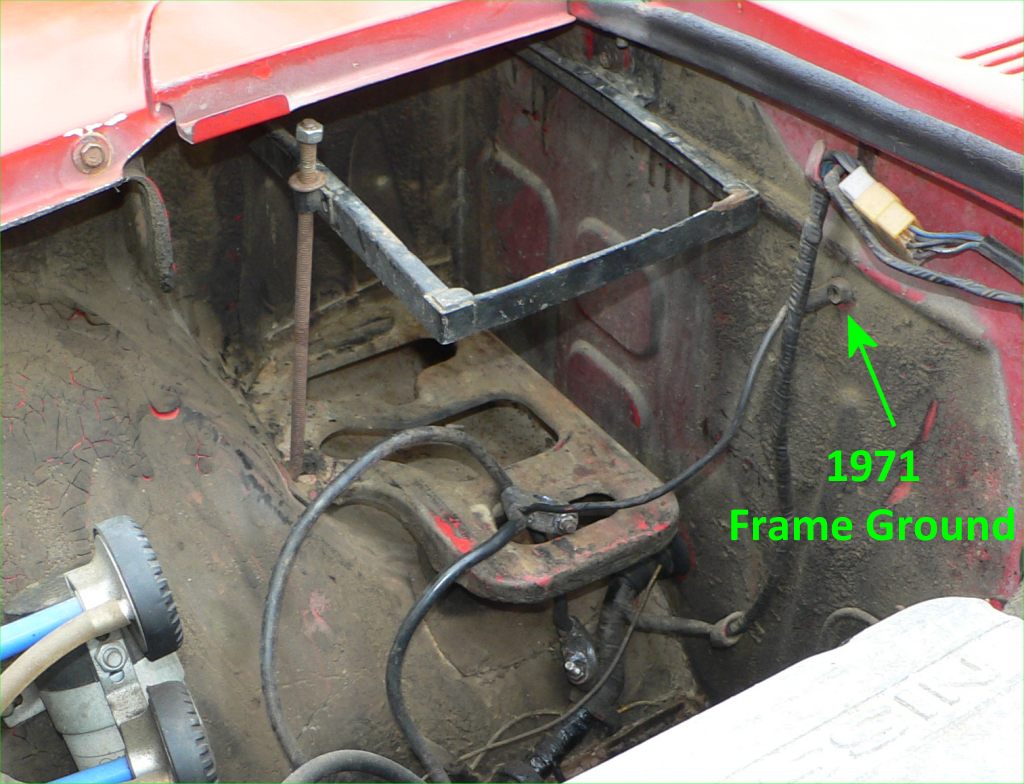
 According to the 71 wiring diagram, there is a black and yellow wire that runs from the ignition to the starter solenoid. This wire's terminal should be cleaned at the solenoid too.
Also, here is a tech tip on connector cleaning for a 77 EFI. Some of it is applicable to 71 http://atlanticz.ca/zclub/techtips/electricalconnections/index.html
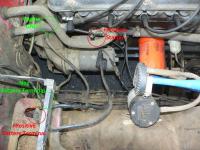
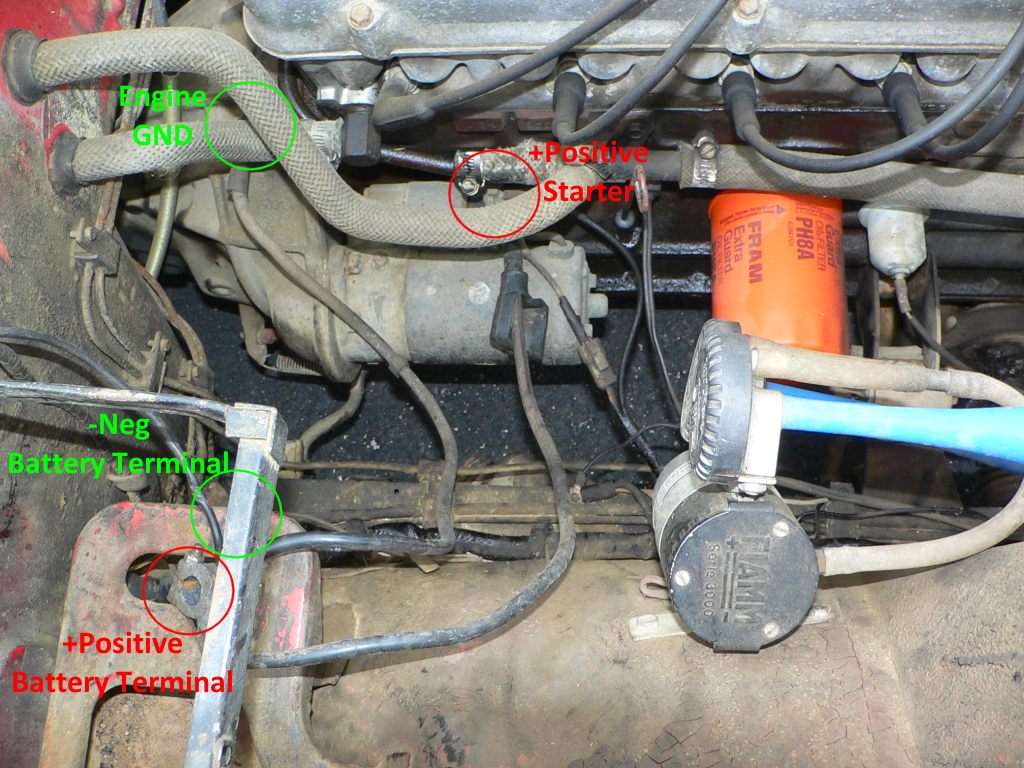
Here are some photos showing the connections to refresh. A new pos and neg battery cable from autozone would be a good replacement upgrade. Note: The -neg terminal is on the battery tray and the +pos has fallen through it (see 2nd photo for this detail)
According to the 71 wiring diagram, there is a black and yellow wire that runs from the ignition to the starter solenoid. This wire's terminal should be cleaned at the solenoid too.
Also, here is a tech tip on connector cleaning for a 77 EFI. Some of it is applicable to 71 http://atlanticz.ca/zclub/techtips/electricalconnections/index.html
Here are some photos showing the connections to refresh. A new pos and neg battery cable from autozone would be a good replacement upgrade. Note: The -neg terminal is on the battery tray and the +pos has fallen through it (see 2nd photo for this detail)
 Maybe heat from exhaust passes through to dry behind bumper and slow rusting.
If the starter is only clicking: 1. There is not enough power to turn it 2. It is faulty For #1 a. you have to have a strong battery that is chargers. 12.6V should be OK b. all contacts/connections from the battery to the starter should be cleanr. This includes the contacts at the starter. c. The ground wires returning to the battery -Neg terminal and associated contacts/connections should be in good order. d. All wires to/from battery and starter should be in good order (no corroded, frayed or white/green flakey stuff). Once you get these minor issues resolved, you will have a fun ride.
I used a micrometer and measured 4 ball bearings and they all were 7/16" Here is a diagram of a halfshaft. The ball bearing is #20 I rang a bearing shop today and the only had hardness of 50 on a scale that went to 500. Did not ask the name of the scale.
Cut (with saw) 2 coils off front and two coils off back. Spring coefficient will go up 30% to 35% Reference: 0.5" drop = cutting upper and lower coil 1.5" to 2" drop = cutting upper two coils or lower two coils (recommended) 2" to 2.5" drop = cutting upper 2 coils and lower coil
I am refreshing the halfshafts from a 240z and would like to replace the 24 X 7/16" ball bearings. Would anyone know the hardness rating/grade of the originals? btw From my web searches it seems some halfshafts and drawings show 3 of the teflon/plastic spacers in each groove and others have only 2 spacers in each groove. My 71 240z halfshafts have 3 bearings and 2 spacers in each of the 4 grooves.
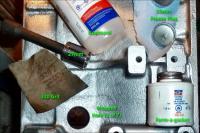
Just doing this job so I figured I would add to the site's content: The form-a-gasket is great stuff: Cleans up with alcohol and not as messy as RTV. I found that using a socket as a driver without the extension works best. FYI I used the Black Dragon kit that includes the 7 side freeze plugs, the front and back freeze plugs as well as the front oil passage plug. I have read that the brass "marine grade" plugs are best as they do not rust. Procedure I followed: 0. Engine in normal position. 1. Remove old freeze plug: Use 1/4" punch and hammer to drive in on the right side, grab edge with pliers and use claw on hammer against block to lever on pliers. 2. Engine at 90 degrees on stand so that working surface with plug holes is like a table. 3. Sand edge of hole and edge of plug with 320 grit. Wipe with alcohol. 4. Apply sealant to edge of hole and to edge of plug. 5. Sit plug on hole and align. 6 . Repeat with other plugs on same side. (this allows the first plug's sealant time to set. 7. Drive plugs in with 27mm socket. Plug edge is flush with motor. 8. Wipe up sealant with alcohol
Maybe heat from exhaust passes through to dry behind bumper and slow rusting.
If the starter is only clicking: 1. There is not enough power to turn it 2. It is faulty For #1 a. you have to have a strong battery that is chargers. 12.6V should be OK b. all contacts/connections from the battery to the starter should be cleanr. This includes the contacts at the starter. c. The ground wires returning to the battery -Neg terminal and associated contacts/connections should be in good order. d. All wires to/from battery and starter should be in good order (no corroded, frayed or white/green flakey stuff). Once you get these minor issues resolved, you will have a fun ride.
I used a micrometer and measured 4 ball bearings and they all were 7/16" Here is a diagram of a halfshaft. The ball bearing is #20 I rang a bearing shop today and the only had hardness of 50 on a scale that went to 500. Did not ask the name of the scale.
Cut (with saw) 2 coils off front and two coils off back. Spring coefficient will go up 30% to 35% Reference: 0.5" drop = cutting upper and lower coil 1.5" to 2" drop = cutting upper two coils or lower two coils (recommended) 2" to 2.5" drop = cutting upper 2 coils and lower coil
I am refreshing the halfshafts from a 240z and would like to replace the 24 X 7/16" ball bearings. Would anyone know the hardness rating/grade of the originals? btw From my web searches it seems some halfshafts and drawings show 3 of the teflon/plastic spacers in each groove and others have only 2 spacers in each groove. My 71 240z halfshafts have 3 bearings and 2 spacers in each of the 4 grooves.
Just doing this job so I figured I would add to the site's content: The form-a-gasket is great stuff: Cleans up with alcohol and not as messy as RTV. I found that using a socket as a driver without the extension works best. FYI I used the Black Dragon kit that includes the 7 side freeze plugs, the front and back freeze plugs as well as the front oil passage plug. I have read that the brass "marine grade" plugs are best as they do not rust. Procedure I followed: 0. Engine in normal position. 1. Remove old freeze plug: Use 1/4" punch and hammer to drive in on the right side, grab edge with pliers and use claw on hammer against block to lever on pliers. 2. Engine at 90 degrees on stand so that working surface with plug holes is like a table. 3. Sand edge of hole and edge of plug with 320 grit. Wipe with alcohol. 4. Apply sealant to edge of hole and to edge of plug. 5. Sit plug on hole and align. 6 . Repeat with other plugs on same side. (this allows the first plug's sealant time to set. 7. Drive plugs in with 27mm socket. Plug edge is flush with motor. 8. Wipe up sealant with alcohol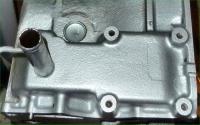
 Dang I would swap you for the N47. I have a P79 here as well as N47 E31's and some N42's.... but we are nearly on opposite sides of the planet Latitude: 44° 38', North. Longitude: 63° 35', West I am looking forward to hearing how your build goes. A guy going by Zolorin on Zcar.com did a similar awhile ago but I never followed closely.
It is sometimes called the "finisher". It is the fake leather panel at the bottom of the hatch on the inside of the car. Just remove it and seal the big hole(s) behind it. This helps a lot however there are other areas where fumes can come in. In your case the evaporating coolant can also come in through the front area where it is dripping on the hot block so maybe some grommet holes in the firewall could be checked. I am having fun with Avatars. Time for a new one.
If you change your oil regularly and keep the PCV system in good shape you should not require one.
Dang I would swap you for the N47. I have a P79 here as well as N47 E31's and some N42's.... but we are nearly on opposite sides of the planet Latitude: 44° 38', North. Longitude: 63° 35', West I am looking forward to hearing how your build goes. A guy going by Zolorin on Zcar.com did a similar awhile ago but I never followed closely.
It is sometimes called the "finisher". It is the fake leather panel at the bottom of the hatch on the inside of the car. Just remove it and seal the big hole(s) behind it. This helps a lot however there are other areas where fumes can come in. In your case the evaporating coolant can also come in through the front area where it is dripping on the hot block so maybe some grommet holes in the firewall could be checked. I am having fun with Avatars. Time for a new one.
If you change your oil regularly and keep the PCV system in good shape you should not require one.


Important Information
By using this site, you agree to our Privacy Policy and Guidelines. We have placed cookies on your device to help make this website better. You can adjust your cookie settings, otherwise we'll assume you're okay to continue.