Matthew Abate
Free Member
-
Joined
-
Last visited
Everything posted by Matthew Abate
-
 Waiting for a reply. The ones from T3 also found on Amazon are made by "Rare Parts" which sounds sketchy AF to me.
 -
If the ones at Z Car Depot were OEM or Moog I would agree, but we don't know who makes them so what are we being sure of?
-
I was wondering about those inner ends. I see they are on Amazon too for around $90 each. Not bad! (Edit: 240z racks there are $347 - http://www.carsteering.com/addtocart/1973_Nissan/240Z/Manual_Steering_Rack/80-70090.html) I keep seeing places say that the ZX inner TREs work on Zs, but that can't be right. They look totally different (https://zcardepot.com/tie-rod-end-inner.html?gclid=Cj0KCQjwsNfOBRCWARIsAGITapav6ihEQy_Zt8wIeCAtvXUYBShoFOken7iHYZfG6FZiOdqNRCIFvVMaAlgkEALw_wcB). Anyone know for sure, because you can get them for $18.
-
Stock driver's side is reverse threaded. Nissan doesn't make left side parts any more. I am currently looking into where to get inner and outer tie rod ends and the only place I'm seeing the inners is Z Car Depot, and I have no idea who makes them. I do know they aren't OEM. If anyone has another source, please let me know. Another option is getting a remanufactured steering rack, but I don't know if those would be reverse threaded on the driver's side. I'll post when I have more information. Sent from my iPhone using Classic Zcar Club mobile
-
240zs had nothing as far as I can tell. Looks like Courtesy has the bellow/dust cover (54055-n3700) for $48, but the snap ring (54057-n3700) is discontinued. Also, MSA says 2 required per car, but also that they're sold individually, which should mean 4 per car. Curious.
-
I would have thought the 280z travels less because the insulator is thicker, but now that I think of it that doesn't necessarily mean anything. MSA shows the Nissan bellows in stock for $60 each. I don't know. Is this a waste of money or good insurance?
-
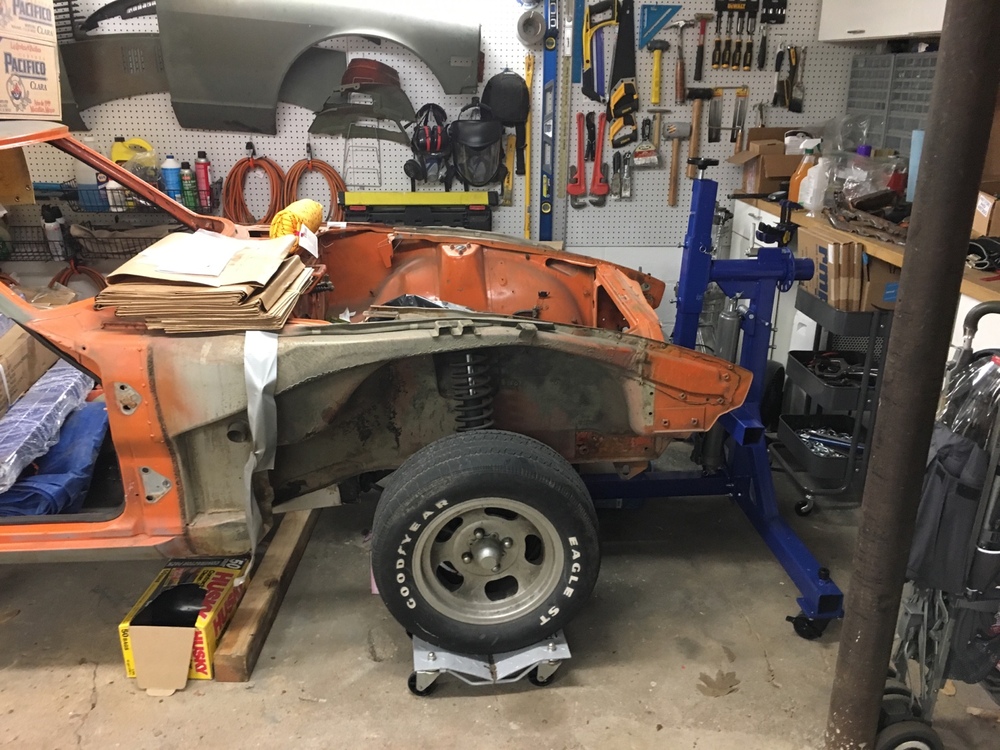
Pretty much ready to media blast. Just need to mask the sensitive bits and pull a few more bolts off.
-
So there aren't any differences between the 240z and 280z struts that would make this a problem? If not then I think I'll spring for the OEM ones even though I could technically not run any at all. Don't want any issues should I need to use the warranty.
-
I just went through the forum and can't find any specific mention of whether or not the strut bellows off a 280z work on a 240z. The reason I am asking is that I have seen mention of Tokico voiding the warranty if you install their structs without bellows, and I have also seen that OEM 280z bellows are available. I have poly bump stops that came on the car and had intended to use them. If the 280z strut is essentially the same dimensionally as the 240z strut and there's nothing that should keep them from fitting, I'll pick up the OEM ones... because I like OEM stuff unless there's a good argument for aftermarket. If any one has specific knowledge of a better option or that this plan won't work, please let me know.
-
Delivery #2
-
Delivery #1
-
Oh, sorry, I might be using the wrong terms. I'm talking about the par that is attached to the differential by one big nut and then bolts to the u-joint, not the pat on the end of the drive shaft. Looks like this: http://3.bp.blogspot.com/-DyZu3deEqvw/UscFs2zm6TI/AAAAAAAAI3w/AHy5E4zd_fA/s1600/IMG_0644.JPG
-
Question: anyone have the input flange that connects the driveshaft u-joint to the differential and want to sell it? Sent from my iPhone using Classic Zcar Club mobile
-
Been a while so here are some random pictures. The car is at the shop so there's not a ton happening. Started disassembling the struts last week. Finished today. Took the bald tires off the rims and hit them with some soapy water. Some elbow grease will have these in usable condition. Not sure if I should bother fixing the dings, though.
-
Any chance you have an input flange that connects the driveshaft u joint to the differential? Sent from my iPhone using Classic Zcar Club mobile
-
Crushed glass. Warping subsided after a day sitting out of the box. Painter didn't want the metal treated with anything. Sent from my iPhone using Classic Zcar Club mobile
-
Nope! First time. Just read a lot first. I got a ton of flash rust over the last three weeks, so it's being blasted again and they are going to finish the welding for me and prime it. Then we will figure out the plan for paint. Depends on my cash flow. Spent about $2,000 to blast it myself, the reblast will be about $700, so I saved $1,300, which is going toward the welding I would have done myself. In the end I am spending the same money I would have spent if I had just sent them the car in the first place. At least it's not more, I guess. Plus I have all these tools now.
-
Pressed for time so just gonna throw some photos up.
-
First off, forgive me if this should have gone in the Parts Swapping forum, but since I'm looking for Datsun parts info I think this is a better place... I am doing the Subaru swap, and while I totally understand what my options are with the axles, I'm less clear on what I want to do with the input end. The Subaru propeller/drive shaft companion flange is different from the Datsun one. No surprise given the 41-year gap between their manufacture. What IS surprising is the sheer number of Datsun companion flanges that were used with just three differentials (r160, r180, & r200). My first question is this: does anyone know if any of the other companion flanges will mate an r180 to a 240z drive shaft? I found one off a Skyline but the part number is 38210-P0103. The stock one's part number is 38210-E7401. There are about 10 million other ones that look really similar but are probably different by fractions of a millimeter here or there. My second question is: What would you do with this situation if you could find a loose flange? I can get a Subaru to 1310-u-joint adapter and buy an aftermarket driveshaft ($$$). I can take the companion flange off my Datsun r180 and reduce my ability to sell it if I ever want to. I can modify my existing drive shaft so work with the 1310 u joints (ouch!).
-
Front wheels are off. I'm down to just the suspension in the front. This is about an hour's work (rusted in lug nuts).
-
Found the answer to my own question. They are M.A.G. Princess Anne Alloys, most commonly found on British cars like MGBs and Scimitars. They are not the Dunlops that I have seen floating around here. Apparently these are crazy hard to find, although it looks like they cam in a 15x7" version.
-
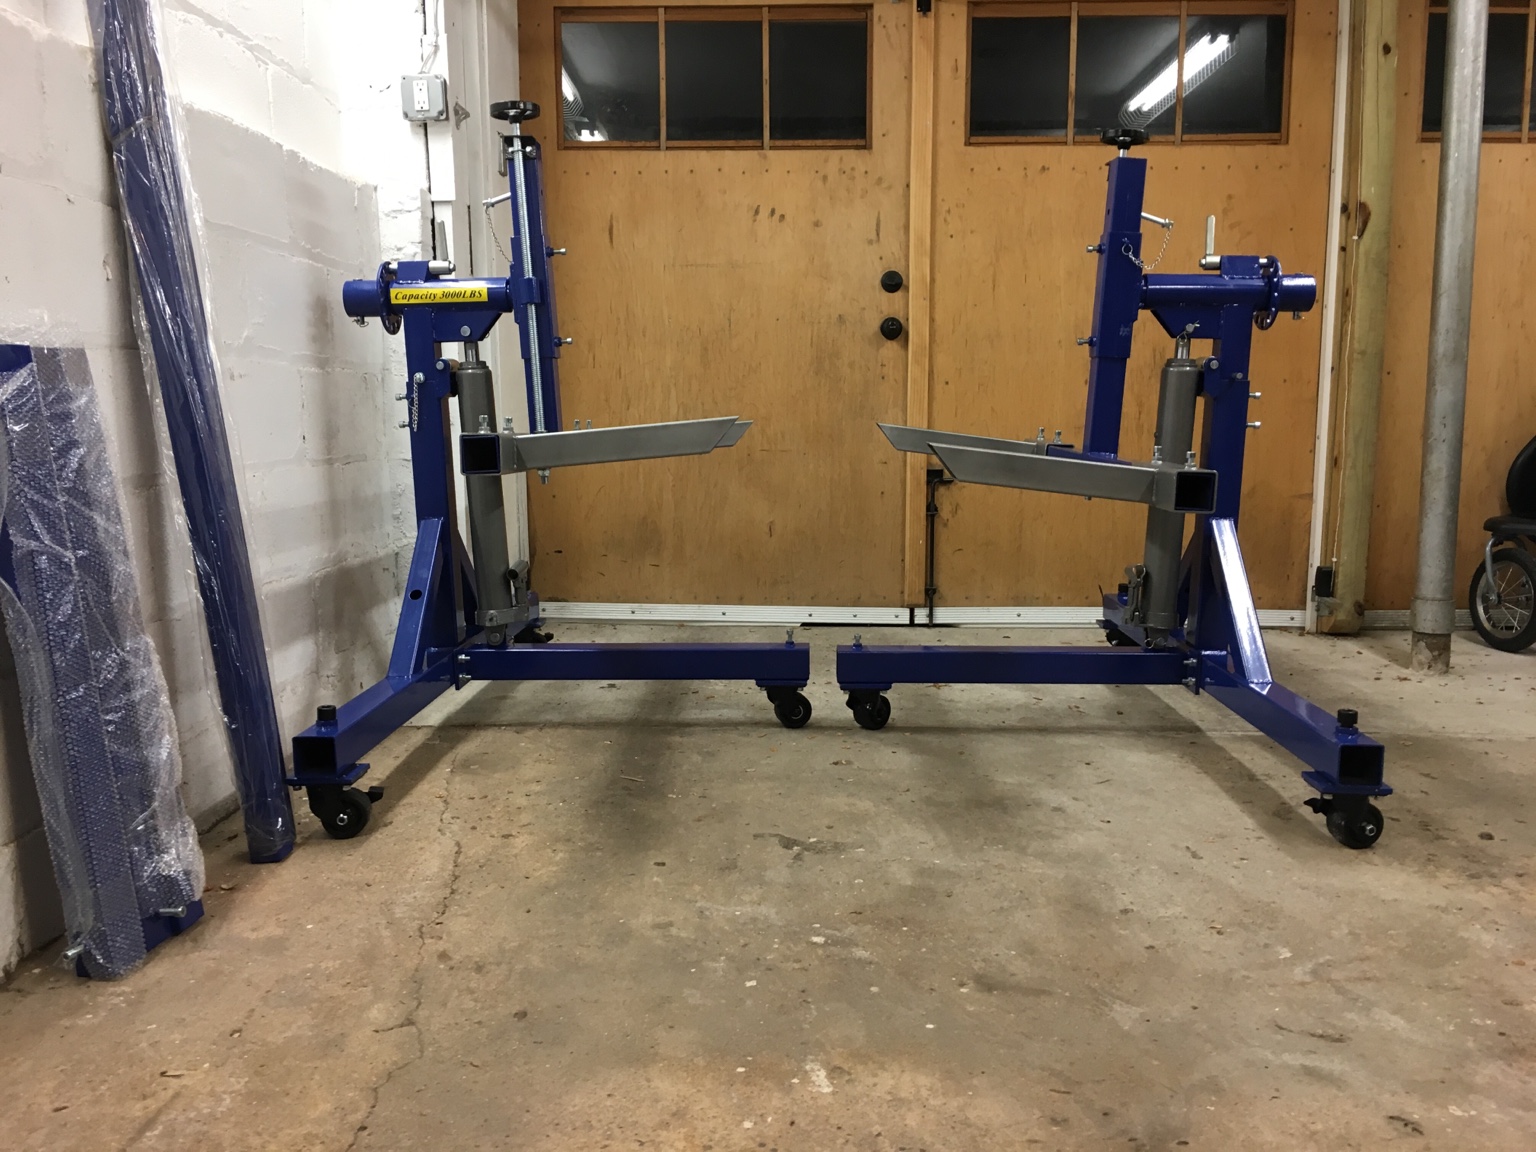
I think this Tuxedo/Kernel rotisserie is going to be just fine for home use. The real question ended up being how to mount it. I bought a few sets of brackets but ended up not using everything. Here's how it went... First, I had read that the Auto Twirler mopar valence mounts attach to the the 240z front bumper mounting holes. This is not the case. I tried turning them 90 degrees and fitting them to the tow hook mounting spot just under that, but I did not think this through correctly and drilled the brackets in such a way that the Tuxedo valence arms could quite reach the brackets. I ended up drilling the silver Tuxedo arms to mount to the tow hook mount point as a solution. This meant a small set of holes for the bolts in the top and a larger set of holes underneath to get the socket in (see previous post). I was concerned about the potential for mushrooming, so I drilled some of the Tuxedo valence plates to act as a washer to spread the pressure and hopefully mitigate that. Next I made some plates to go between the Auto Twirler Mopar rear bumper brackets and the car. I drilled these plates and the brackets, then welded them together and ground them down to fit into the cavity for the bumper brackets. Last was just mounting the brackets and lining up the T-arms with the brackets. I tightened it all up and now the car is hung! The next steps are to remove the suspension and balance the car on the rotisserie. Then I'm in business.
-
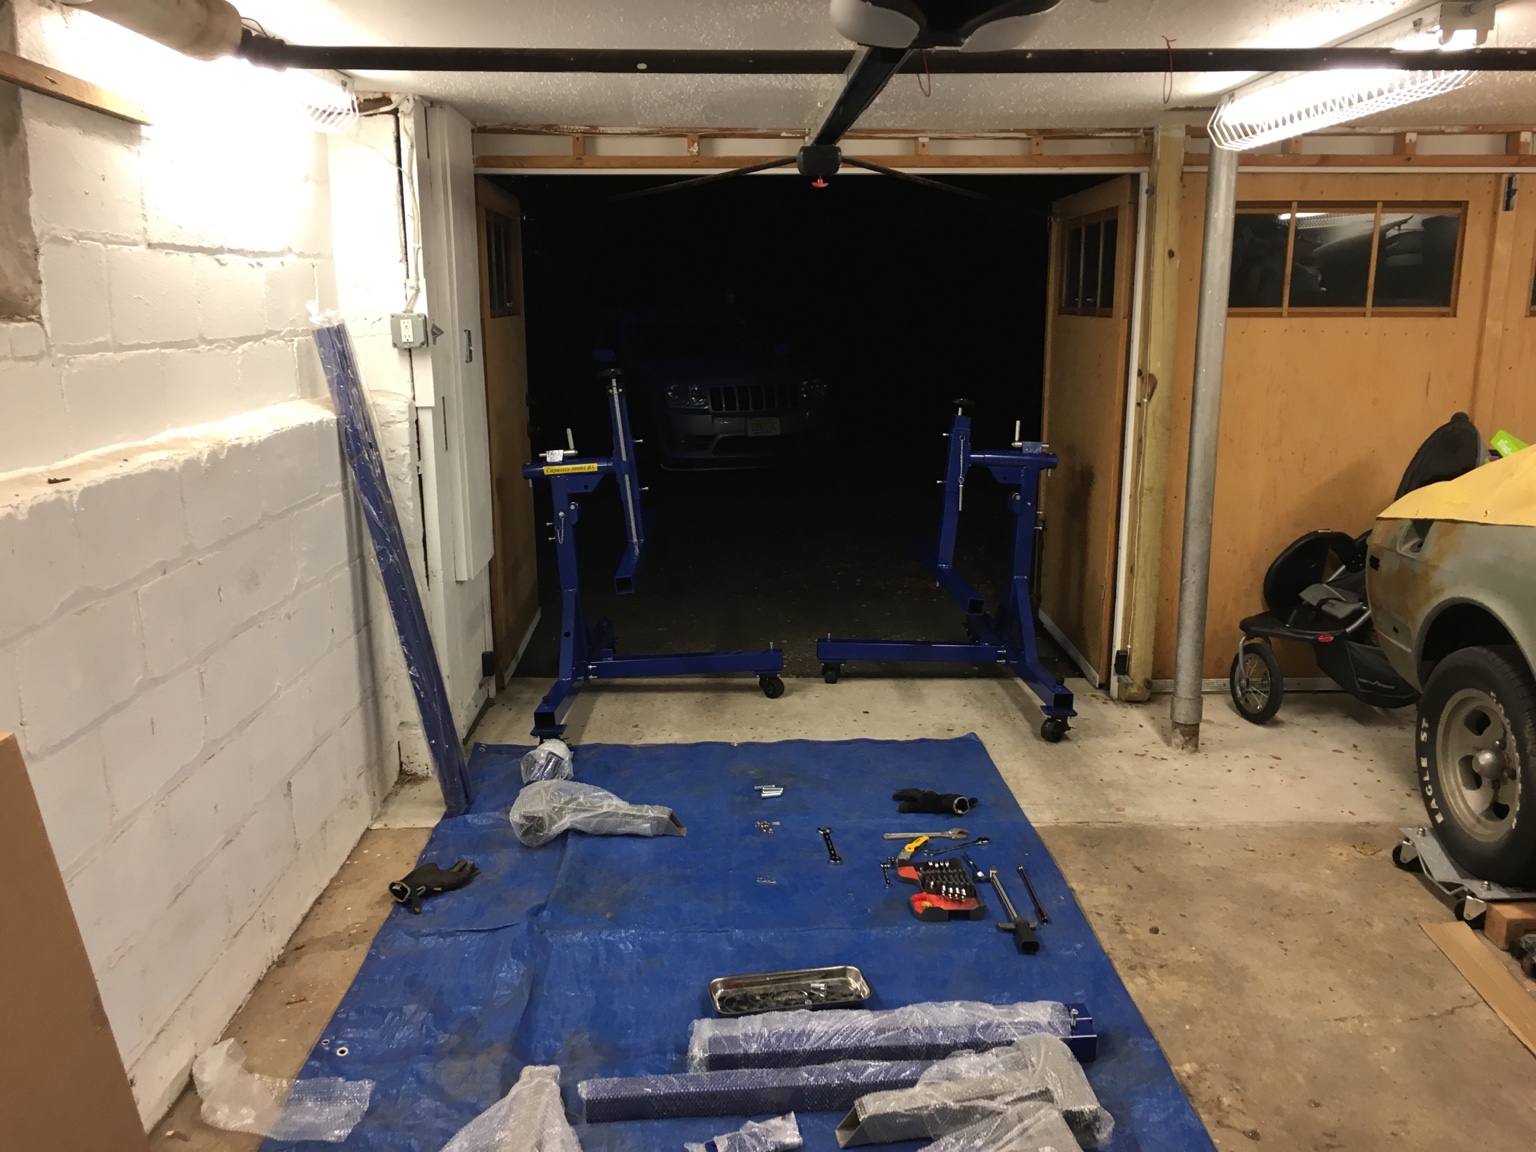
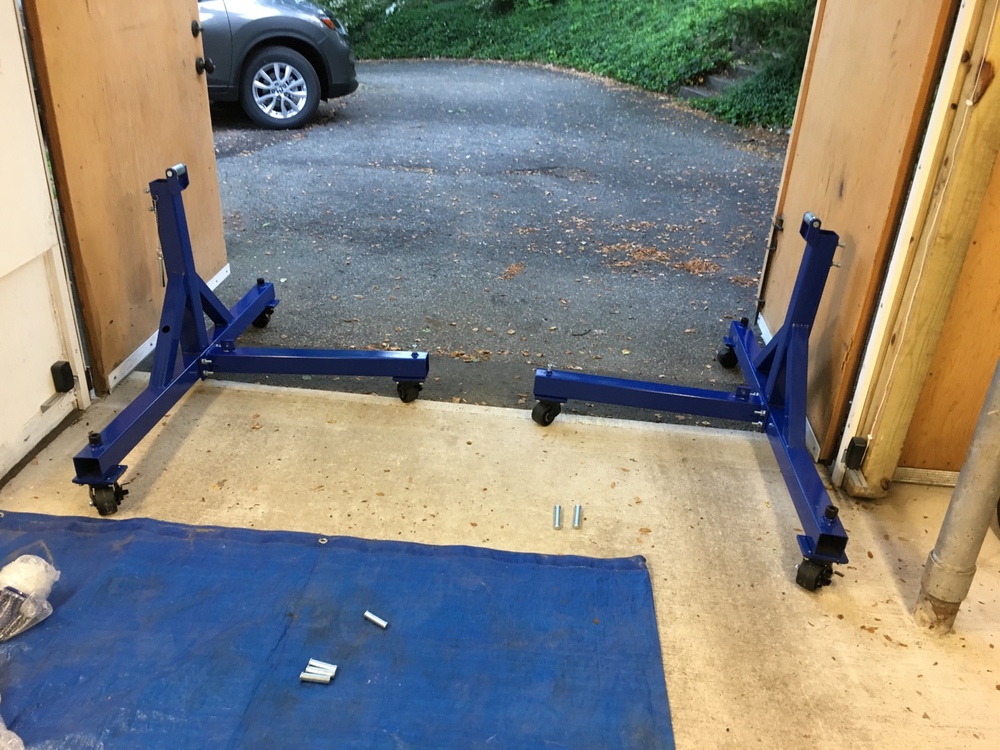
The rotisserie arms are ready to mount on the front. I feel like I need to make an insert to spread the pressure from the bolts in order to prevent mushrooming, and then wait for the rear mounts to arrive in the mail, which should happen tomorrow. ... In other news, can anyone identify these wheels? I've seen them discussed before but can't begin to think of how to search for that discussion. I believe the manufacturer starts with M but I'm blanking on it.
-
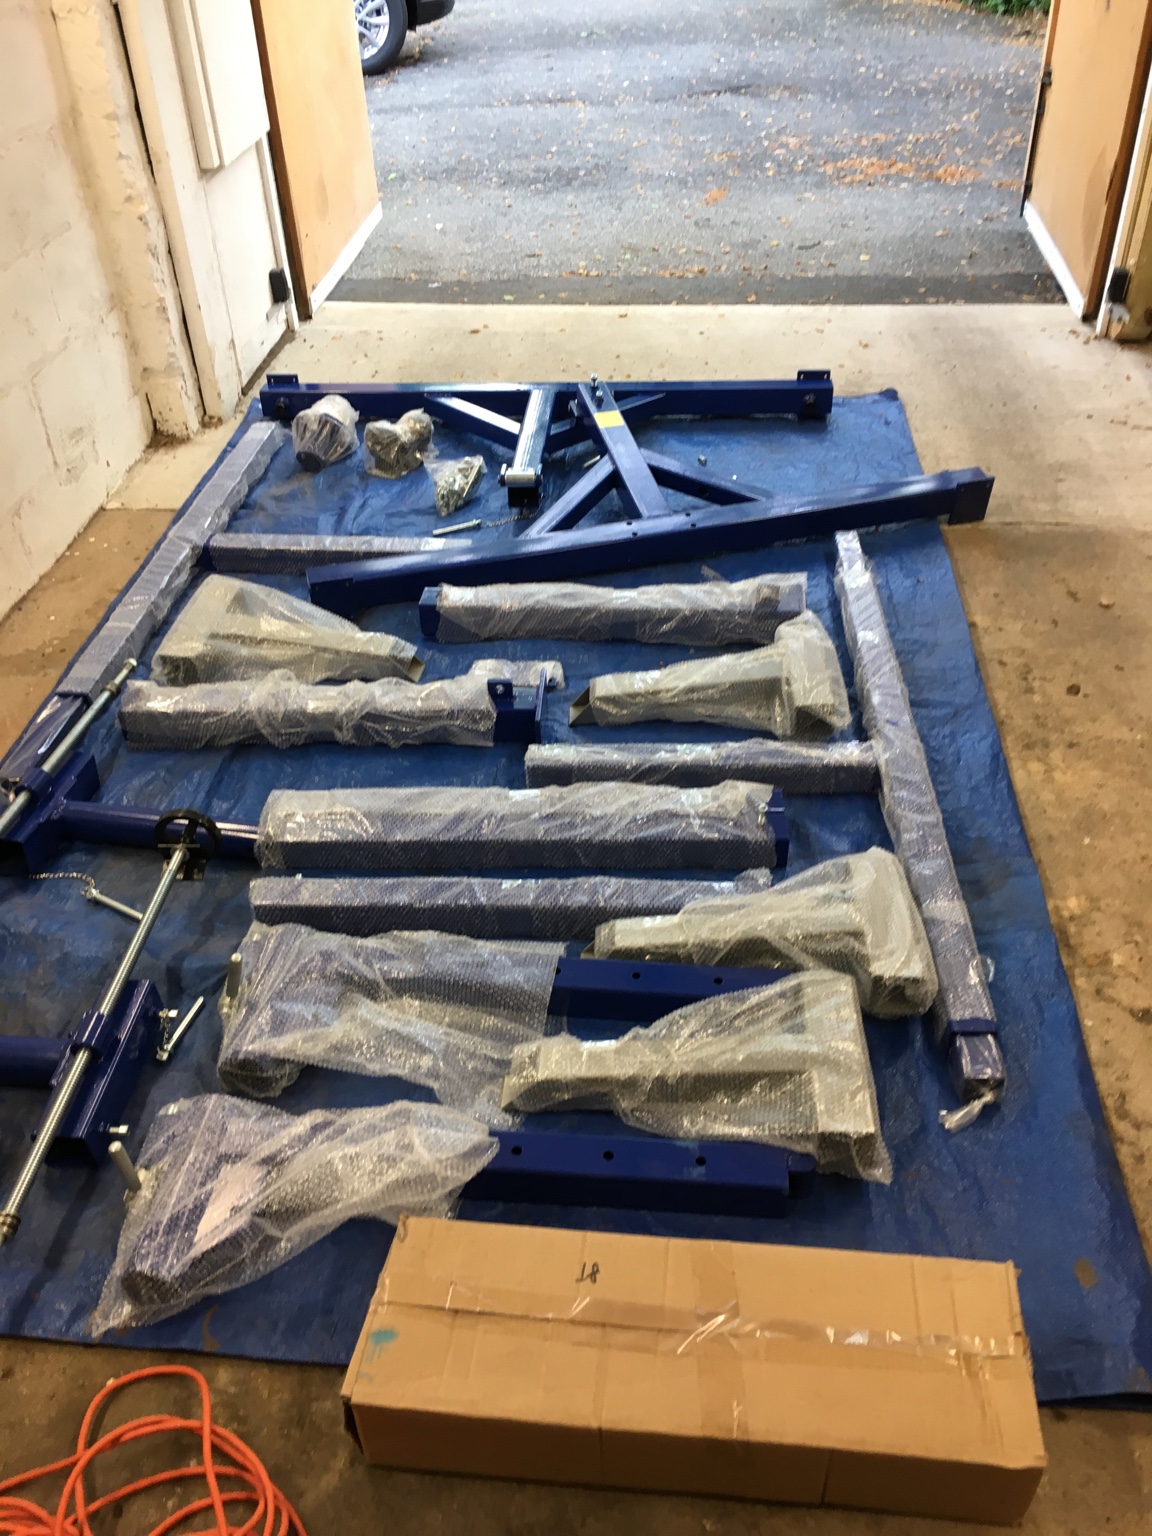
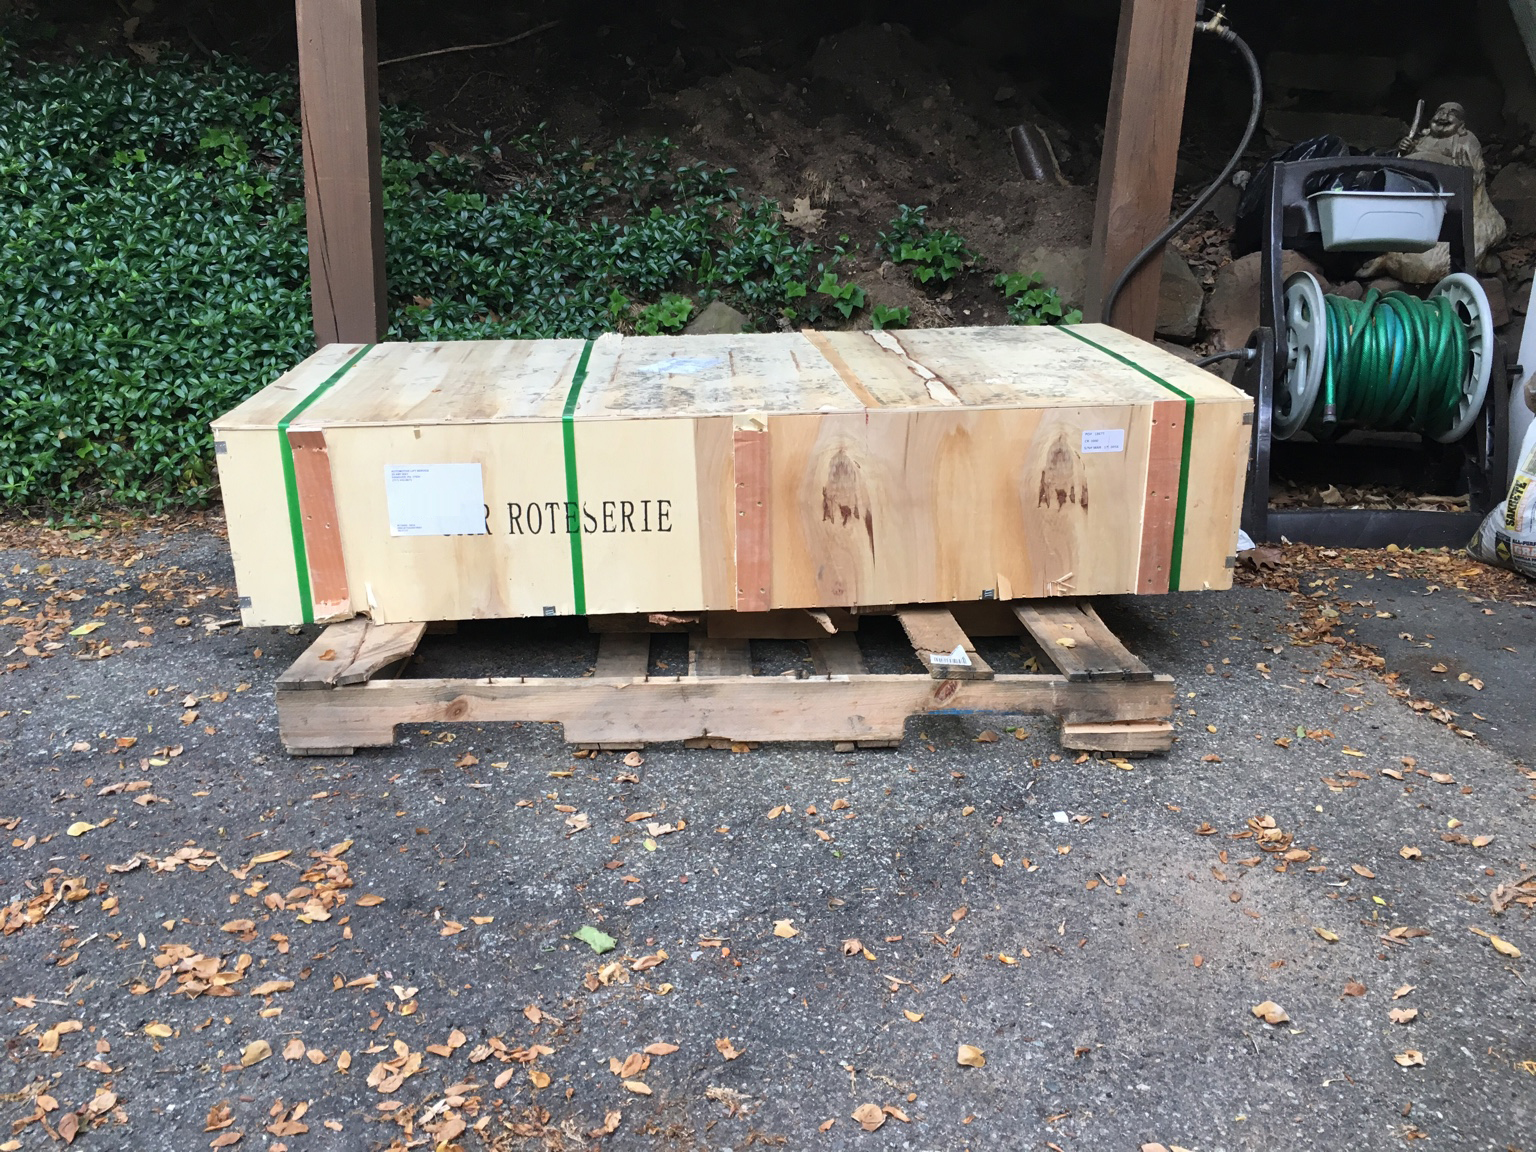
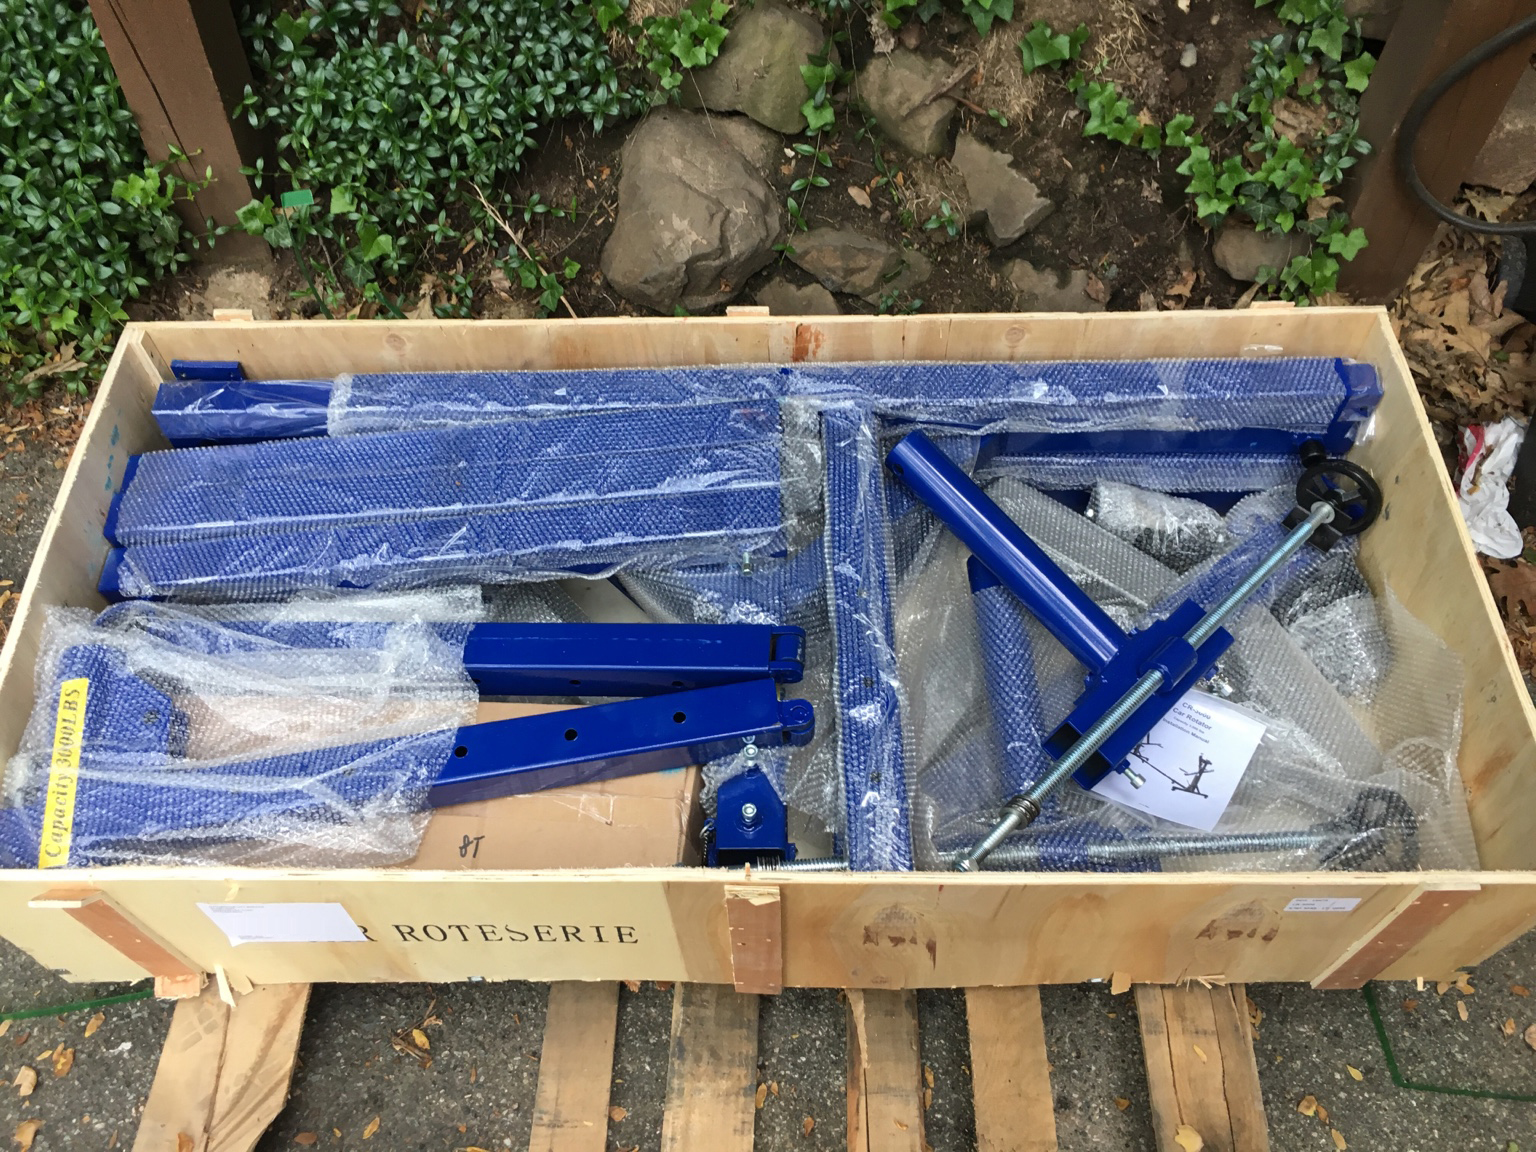
Saturday night: This is the Tuxedo CR-3000, $917 from Best Buy Automotive Equipment, not including lift-gate service, shipment tracking, brackets, and tip for the driver who muscled it up my driveway on a hand lift while I was at work. I was nervous it was going to be cheap and maybe even dangerous, but my assessment is that this thing is going to be perfectly fine once I upgrade 8 of the bolts to better hardware. The fact that the T-arms are 2.5" tubes instead of 3" might actually make it more usable because I can get more creative with how I make the rear brackets. Could I have gotten a better one? Sure, but this is good enough to get the job done, which is what matters on this budget. If you do get one for yourself, remember not to over tighten the nut on the end of the screw that adjusts the height of the T-arm. If you do it won't spin when you turn the handle, which will cause the handle to come off because of the way that it attaches.


-
UPDATE: Rotisserie purchased!