Ptero
Free Member
-
Joined
-
Last visited
Everything posted by Ptero
-
 Excellent suggestions. Thanks! I'll be back with updates and a second round of questions I'm sure.
 -
s30 with a 5spd. Not sure exactly which transmission it is, but it only has one exhaust hanger. Parked the car a couple of years ago and due to having some issues with shifting. My memory is bad on the best of days, but from what I remember it seemed as though the clutch would only engage part way when stepping on it. (Engage? Disengage? Not sure if I'm using the correct wording) Fast forward to today. -Checked the master cylinder and it was full /w no leaks. -Checked the slave cylinder and it's moving the clutch fork roughly 1" when pressed all the way in -Bled the slave cylinder which gave lots of nasty colored fluid that had been sitting in there. Kept topping it up with new fluid and now it's nice and clear when bleeding. -Still the same issue. To add to that, it really doesn't want to go into gear when the car is off. Never mind on. I can sometimes get it into a few of the gears while it's off, but some I have to push to get in gear while others are smooth and others are simply a no go. I've seen lots of posts on here where it'll go in gear with the car turned off, but not on, which tends to be something with the master/slave/clutch pedal assembly. But it doesn't appear to be any of those from what I've seen. I'm trying to narrow things down before I pull the tranny to inspect for damage with the clutch/fork/etc. Any help or suggestions would be appreciated.
-
It took me almost 3 years to start working on the car so you're still ahead of me haha.
-
Alright. Got it straightened out. Initially I was adjusting the float upside down and relying on the spring inside the float needle to keep the measured distance. This didn't seem to work for me as it would keep the float needle closed regardless of where the float sat in the bowl. What I ended up doing was adjusting the float as it were sitting in the bowl, not upside down. Made a tool for the 9/16 measurement and raised the float up to that measurement while blowing air into the fuel inlet. I could hear air coming through the float needle right up until I raised the float to the desired measurement and then I could not longer blow air through. I'm probably using the wrong words again, but hopefully this makes sense. So, the 2 problems were floats set incorrectly and probably old fuel gunked up in the rear float bowl which stopped proper flow of fuel to the carb.
-
haha yeah I'm probably using the wrong words. The words coming from you are what my words are trying to say. I pulled the float needle apart and made sure it wasn't binding. Trying to find out the year of the carbs as we speak. Was looking to see if I could find any sort of identifier. Looking at this attachment, there are different float levels for the different years of carbs. They're round top carbs. TechnicalSupportBulletin-TS73-10.PDF
-
Alright, making some progress. Rear carb had something plugging the line from the float. Now we're firing on all 6 cylinders. Front float still wasn't filling, but maybe I misunderstood ztherapy's way of adjusting the float. I removed the float top and tried to blow air through the fuel inlet while the float was hanging down (which should mean fuel can flow in) but it was blocked. Couldn't blow air through. In the video he's adjusting the float while it's upside down and measuring the 9/16 as his adjustment. If I do this, it closes the valve to let fuel in regardless of the float being up or down. Is the 9/16 measurement only from when the tab on the float touches the grose jet? Also I did clean the float filters.
-
Car was running when last parked 2 years ago. Emptied the old gas and put in new. I can get the car to start but it'll use up the fuel in the front float and then die. Rear float doesn't seem to be doing a whole lot and it seems as though I'm running on the front 3 cylinders only. I had 2 extra float tops sitting around so I adjusted them both as per the ztherapy video suggestion. Installed those and same thing. I've removed the fuel supply line to the front float and started the car. Fuel came out of the supply line so I know there is fuel going through the rail. Anyone have suggestions or thoughts on why the front float is not filling back up?
-
Figured this may interest some. Located in my hometown but I haven't had the chance to take a look at it yet. http://www.kijiji.ca/v-classic-cars/winnipeg/1972-datsun-240z/1166727950?enableSearchNavigationFlag=true The Datsun 240Z has been in storage 43 years 2000 original miles, repair in 1973 was done on the right front fender and the whole car was repainted ( difficulty matching paint ) , Interior needs to be reinstalled. Asking: $9900 CDN
-
Found TDC by using the method I mentioned above. It's the middle marker of the 5 of the damper. Once lined up on the middle marker, the cam timing marker was exactly matched as well. I separated the engine from the transmission which was way, way, way, way easier than expected. Now to clean it up and swap it with the one that's in the car now. I'm making it sound way easier than it probably is.
-
-
I'm gonna try this method later to get a more precise TDC. "Now pull the oil dip stick out and put it in the # 1 spark plug hole. Put a 27 mm socket on the crankshaft damper pulley bolt and turn the engine clockwise with a ratchet until the dip stick just starts to go down. Put a chalk mark on the damper pulley where 0 TDC pointer is. Now turn the crank the other direction (counter-clockwise) until the dip stick starts to go down again. Mark the damper pulley one more time. Exactly half way between the two chalk marks is true TDC."
-
-
-
Valves & pistons look pretty dirty but I'm not sure what's a normal amount of carbon build up. Whatever was on the pistons was pretty soft so I'm wondering if that would just burn off or get blown out once it was started. Pics are not great but I was just using what I had kicking around. First piston picture is the cleanest one and the 2nd pic is what most of the others look like. What's normal wear on the timing chain guides? Can't see that well from this picture but the notch is slightly to the left of the marking on the cam when at TDC. About half of the notch was to the left of the marking. I don't fully understand these numbers and markings yet. This is where the timing marks are on the damper but which notch is the one that is supposed to be used? I'm starting to think I might toss this engine in the car to see how it runs and end up rebuilding my other engine that's in the car right now. It's been leaking oil from a number of places for a while and could use some refreshing.
-
Amazing what adjusting the valves can do! It seemed the clearances were way off initially. Couldn't even fit a .006 for some of the intake lobes. I adjusted the valves to .010 for intake and .012 for exhaust. Yes, I know those are what they're supposed to be hot but, I was trying to loosen them as Blue suggested. Here are the new numbers after the valve adjustment: 1 - 146 2 - 165 3 - 157 4 - 147 5 - 132 6 - 137 Things are looking a lot more even than when I first started but, still not ideal.
-
I'll give that a shot and see if there is any change. The intake is barely even attached so I'm pretty sure it has sufficient air but I'll double check. The block is also N42. Haha, yeah I'll probably take it apart but opinions and suggestions are always welcome from people who have done this all before. Thanks for the extra info about the other parts! I would have never known.
-
Took a bit of a closer look at the engine last night. It's an L28 with an N42 head. I managed to run a dry and wet compression test but the results were inconsistent at times. I could test a cylinder 3 times in a row and each test would be a little higher than the last. Ran a dry test twice. Tested all cylinders and then tested them all again because I was seeing inconsistencies. Cylinder # 1 - 105 dry, 120 dry, 130 wet 2 - 140 dry, 143 dry, 157 wet 3 - 122 dry, 120 dry, 145 wet 4 - 98 dry, 123 dry, 135 wet 5 - 40 dry, 60 dry, 75 wet 6 - 90 dry, 92 dry, 110 wet Given the numbers I'm getting, I would say there are some issues that need to be looked at. Any because everyone likes pictures...
-
Wow, I wasn't expecting these well thought out responses. Thanks everyone! I'm leaning towards doing a tear down of the engine as I like learning new things. I have both "How to Rebuild Your Nissan & Datsun OHC Engine", and Frank Honsowetz's "How to Modify Your Nissan & Datsun OHC Engine". I've flipped through them but at the time it was just theory as I wasn't working on an engine at the time. I'll dig these out when I'm home. The spare engine also has a 4 speed attached to it so I suppose I could pull the starter off my running car and do a compression test on this engine before I pull it apart. I'd do a leak down test but I don't have the tool.
-
I've got a spare engine which came with the Z that I purchased several years back. The spare was an engine that was used for "racing" but there were no details on the internals or what kind of racing. I'm looking for a project on the Z and an excuse to crack open an engine to get some hands on learning. Looking for opinions on what to do. (slow day at work) -swap it in and see how it runs -open it up to see if it's bone stock or not -tear it down for no reason besides putting it all back together for fun and learning Side note, currently have a running L28 in the car now and have never pulled an engine apart.
-
Thanks EuroDat!
-
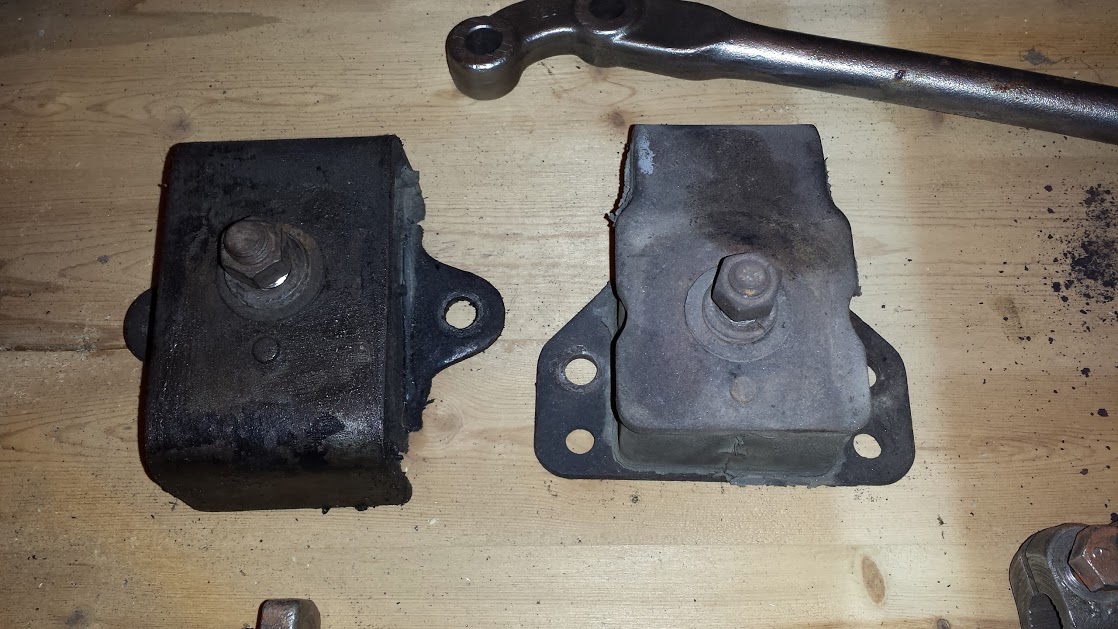
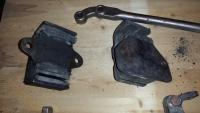
I dropped my front crossmember to find I had 2 different engine mounts. Is one wrong or from a different model? Or a no-name engine mount? The one on the left looks correct.

-
Got one with a chisel and hammer but the other was stubborn. I gave it to a local machine shop to remove. Most likely with heat which I don't have access to.
-
Beautiful wagon! Love those cars.
-
I'm redoing my compression rod bushings but the sleeve on the end seems to be seized onto the rod. Does anyone have any suggestions for removing it?
-
Test fit of some truck wheels that were laying around, .