


Derek
Free Member
-
Joined
-
Last visited
Everything posted by Derek
-
Shipping was almost as much as the bumper. Also the picture he has up is so cheesy you have to wonder about the quality. Derek
-
oops didn't see the post above
-
Mine sits out front in the driveway where 6 day's a week I flip a switch,push a button and have the best drive to work I've had in 10 years. Derek
-
I second Carl's recommendation for Fantasy Of Flight. That place is awesome. This was the first time I saw Bill running the Z and it was quite impressive I must say. I had a great time at Roar N Soar and highly recommend it. Derek
-
I saw a post by Carl about Roar N Soar and checked in to it. Looks like a blast. I entered my car in the "corral" http://www.fantasyofflight.com/roar-n-soar/applications/classic_vintage_car_show_app/ This is great deal as $35.00 gets you admission for 2 for both days as well as great parking for your ride! They're looking for more cars so if your thinking about it you should enter soon. Derek
-
The timing is perfect on this as I'm getting ready to upgrade my amp and add some front speakers. Right now I have 2 6x9s in the back in custom enclosures. I plan on adding 2 4" 2 way speakers in the front kick panels. I'm not running a head unit as I'm putting together a carputer with a 7" touch screen. I'm only going to have 2 channel output with a Griffin DAC. I was planning on running a 4 channel amp with some built in filtering. I'm thinking something along these lines http://www.crutchfield.com/p_489AP740/Profile-AP740.html?tp=115 I'm not going to buy from Crutchfield as they're kind of pricy. Any thoughts on this combo? Thanks Derek
-
I Had the same issue. I removed the wiper pivots from the car and disassembled them. Although they turned freely I was surprised at the amount of rust in them. I cleaned up the shafts on the wire brush and used a dremel with a wire brush on the bores. I reassembled with grease and the wipers worked like new. Not as good as retrofitting a modern motor but a whole lot easier. Derek
-
My understanding is the Compact will fit if you remove the dash for install and make some minor modifications. I was able to remove the original heater unit and install the Mini without removing the dash or making any mods to the car. The mini cools well but if you have the dash out anyway then the Compact may be the way to go. Derek
-
Hi Carl Yea it was really freaky. Ultimately it was my poor job of sealing when I put the rear body panel on but three of the seams were really tight but smoke still came pouring through. It's probably debatable whether these were leaking exhaust or not. The large seam along the bottom was probably the main culprit but as the many posts can attest no two cars are the same when it comes to exhaust leaks. I really went over the inside of the car with a fine toothed comb and never spotted these problems. You have to wonder about the condition of some of the seam sealer on these older cars though. I'm convinced that this is probably the only way you can truly solve the leak problem in a methodical way. One thing is that the lower seam is part of the rear bumper mounts so if there's been any kind of damage to this area there is the potential for exhaust leakage. I didn't bother trying to seal the seam. I shot some spray foam into the ends of the tubes and this sealed it right off. I removed the rear marker lights and this gave me a pretty straight shot into the tube. Things like spoilers and long tail pipes are just band aids that mask the problem. I've had this car since 1980 and I can't remember the last time I could drive it with the windows down and not get some sort of exhaust smell. I'm really psyched!! Derek
-
Man my car hasn't been that smokey inside for a lot of years! But that's another story. I bought one of the smoke machines and plan on keeping it. Your welcome to bring your Z over and we'll have a smoke out. The wife and I took the car out to dinner last night and drove home with the windows down. Not the slightest bit of exhaust fumes were in the car. She's more sensitive to the smell than I am and she didn't smell a thing. When I get a little more time I'm going to smoke the rest of the car and get the rest of it sealed up. The manifold is on hold right now as I'm really busy with paying pattern work. Although I'm carving an intake pattern right now for a Desoto Hemi. So I am working on an intake just not mine! Shoot me an email and let me know when you want to come over. Derek
-
For me that is. I've been battling with this problem for years. In Florida I mainly run with the windows up and the air on so it hasn't been too much of a problem. But with the windows down and during down shifts it was getting pretty bad. I had made all the usual repairs. New weatherstripping, sealed the tail ights, checked for holes with a flashlight, etcetera etcetera. All to no avail. I then came across this post by Zs-ondabrain http://www.classiczcars.com/forums/showthread.php?t=29708&highlight=exhaust+fumes “Here is one thing you can do. Get a smoke machine, a shop vacuum and some cardboard. Cut the card board to fit in the window opening with the window 1/4 of the way down. Cut a hole the size of the vacuum hose into the card board and slide the card board into the felt groove in the upper part of the window frame. Then tape the lower part of the cardboard to the upper part of the open window. Turn on the vacuum. Start the smoke machine and blow the smoke to the suspected areas and there ya go. Or have someone on the inside watching for the exact spot that the smoke comes in, while you're out side with the machine.†The only thing I changed was I was on the inside of the car and my buddy was on the outside working the smoke machine. As I laid in the back of of the car my thoughts quickly switched from wondering if I wasted $45.00 on the smoke machine to “ I hope I can get out of here alive†as I was immediately engulfed by smoke. Okay I know the smokes non toxic but it was a bit freaky! We aired out the car and decided to go for a more measured approach. This time I was able to spot the areas where the smoke was coming in. In my case it was the body seams between the rear body panel and the inner floor that were leaking. I had put a new rear body panel on the car years ago and didn't do a good enough job of sealing the seams. The biggest culprit was the very bottom seam. This is the one you see if you look under the car and follow the inside of the panel upward. This is also where the bumper brackets mount. Although this channel doesn't directly lead into the cabin, the ends are open and spill into the ¼ panels under the tail lights. It then became a game of sealing leaks and the re smoking the car. All told I found 3 minor and 1 major leaks that I probably never would have located without the smoke machine. Now's the time to buy one because of Halloween. The party stores all stock these things. This really works! Derek
-
Scary thing is I have the exact same tiller! Derek
-
Here you go. 12574-VCS #10 fittings - 72 â€long. 12561-VCD #8 fittings - 60 â€long 12548-VCL #6 fittings - 48 â€long. The #8 line runs from the condenser to the compressor. This is if you have the condenser ports on the right hand side . Derek
-
The aftermarket bracket looks very similar to mine. It'ss missing the rear adjuster bracket that bolts to the small tab. Mine also only has 4 mounting bolts not 5. Derek
-
There's room length wise as the mini just protrudes into the passengers area. height and with are close. I think Vintage Air has a loaner program with empty cases to use for a trial fit. Derek
-
You mean the 5 different layers of sound deadening and insulation:cheeky: Yes it absolutely has a lot to do with it. I figure since I'm running the unit on low most of the time that stock cars would still see a drastic improvement. Heck the air flow increase alone is worth it! I'm also noticing that switching it to vent and floor combined as the outlet is working really well. I just wish that it had an electronic thermostat as opposed to the old manual style. Derek
-
Great now everyone will see how ratty my engine compartment is!! I like this setup as it mounts the compressor nice and low These are the lines from the compressor leading into the core support. Running across the front with the custom clearance bend for the fan! Drier with high pressure cut off switch. Hard lines running into passengers compartment. I should probably put some insulation on the low side line. I'll say it again. This A/C upgrade has been the best thing I've done for my Z since I converted from the flat tops to the SU's and that was done in 82. I can comfortably drive the car in the Florida heat. Derek
-
#1 Yes it's a complete unit. #2 & #3 Yes it replaces the entire nissan heater and fan assembly. #4 & #5 Yes again! #6 The masking tape is covering the inlet for the fan motor. I had dropped a nut inside the unit earlier so I covered it up with tape for the install. I had bought the mount years ago from a Nissan dealership I worked at. It bolts on the left hand side of the motor on the 4 bosses near the bottom front of the block. I'm sure it was an aftermarket but I can't remember the brand. Derek
-
I had similar problems with my 73 and SUs. I tried everything I could think of including adding an electric pump. I ended up switching the fuel pickup to the drain plug on the tank and all my problems disappeared. This may not help you but I thought I would throw it out there. Derek
-
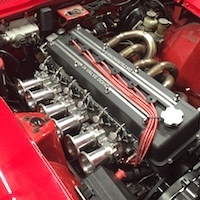
First off I know I could have picked a nicer head and valve cover but this is the best I could come up with. This is probably the last I'll be doing on the manifold for a month or so. I'm super busy right now and in this economy I better get while the gettings good. I will be doing the final design on the rear manifold in the meantime. Derek
-
Things are going well on it so at this point it's a definite maybe. It all depends if it runs or not. It won't be cheap though! I really didn't put a lot of research into this. That may sound strange but that's just how it went. I did some research on the best taper degree and where the injector placement should be for the best torque. After that it was a matter of fitting the longest runners I could in the given space and making it look cool. I've seen so many projects like this get bogged down with too much theory. Here are my levels of success on this project: It starts and idles. Amazing! It runs better than the 25 year old SU carbs. Really amazing It runs better than a MegaSquirted factory EFI manifold. Freeking Amazing. As you can see my expectations aren't too high! For me it's all about the look more than the performance. I wanted something unique that wasn't a mass produced piece. I really enjoy the challenge on a job like this and it makes me a better pattern maker and it's also a good way to show my clients what I can offer them. Derek
-
I think I have everything mocked up at this point. Here's a shot of the linkage with the throttle closed. And open This is just a practice butterfly. I need to make a jig for my lathe so I can make these as a turning operation. Milling them just isn't giving me the results I want. Say AHHH! And yes that is a giant step between the casting and the throttle tube. I have a fix for the next manifold. I just need to figure out what I'm doing on this one. This is the vacuum bleed for synchronizing the venturis. I need to lower the rear boss. Also the throttle shafts will be shorter. It looks a little shabby this way. At this point I think I have enough info to finalize the design for the rear manifold. Now all I need is time! Derek
-
It was my understanding that the Megasquirt has the map sensor built in. Derek edit ok I just went to the TWM site. there is a port on each runner for the map sensor. Derek
-
wow looks great. You might want to check out this glue http://www.glueplace.com/1081-spray-trim-adhe.html This is the best price I've found This stuff is really good. The spray pattern is very narrow and controllable. Derek
-
Anywhere you want! The wall thickness is enough that it can be drilled and tapped. I'm not sure where the TPS is going to mount. Probably on the pedal side of the linkage. The rear manifold will have a boss on the bottom of #6 for the air temperature sensor. A lot of this stuff I'm winging as I go. But that's what tig welders are for! I'll update the post here as this progresses since there seems to be more interest than I thought. Things go in spurts according to work load. Although the closer I get to having the front manifold done the more of a priority it's becoming!