Jump to content

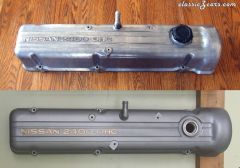
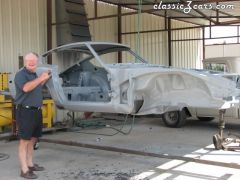
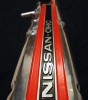
2400 OHC Cam Cover Before & After a Refresh


DeesZ

This is a - before and after - a refreshing image of a NISSAN 2400 OHC cam cover I recently did.

I enjoy doing these covers over quite a bit and just had to expand my cam cover storage rack to handle the growing crowd of them.


From the category:

Body Work and Paint

· 1,597 images
  • 1,597 images
  • 345 image comments


Recommended Comments

Thanks, kinfish!

Process in general:

degrease/remove all crud

seal up the inside thoroughly

media blast (used SiC on this one)

repair deteriorating sealer around the baffel

paint - VHT flat aluminum header paint

cure paint w/heat per instructions on can

detail letters with gold

coat lightly with VHT clear coat

cure final coat with heat

take pictures

mount on wall with others in the collection!

Link to comment

Did you worry about getting media blast material stuck inside the baffle? I worried about the deteriorating stuff around the baffle and elected to remove baffle and get rid of all the sealer, retap holes and replace those microscopic screws and secure with locktite.l

Link to comment

Hi, Ron....

Yes, media inside the cover is to be avoided at all costs!! I clean the inside of the cover with Simple Green (the new grease cutting formula is pretty good, too) and a stiff fiber brush. Then seal off the whole bottom, filler, and vent with several layers of tape to assure there is no available point of entry and keep everything out of the under side while media blasting. That stuff around the baffle does deteriorate, in some cases pretty badly, and sometimes not at all. They used at least two types of sealant, and the earlier one (lighter in color) really deteriorates badly. If it's questionable I take it all off, clean up and re-do with Permatex #2. (I have been cautioned by board members not to use something like RTV, and several recommended the #2 which is "non-hardening". I tried it and like it.) Those little screws are a pain in the rear, and I've noticed on about 20% of the covers I get that one has actually fallen out. That worries me, so I generally remove them, degrease, add a dab of Lock-Tite or JB, reinstall, then rebead the perimeter of the baffle with the Permatex #2 with an extra dollop on each screw head (as the factory did them).

An interesting thing on the old 2400 OHC cover is that they did not use screws, they used rivets. I made certain to re-bead the baffle on that one with a really good dab of Permatex on each rivet, too. It gives me some peace of mind that they won't fall out and eat up an engine.

I've been experimenting with cam cover finishes and accents. Check out my gallery to see a few.

Thanks for your interest. If you have any suggestions, I'm interested to hear them - on methods, technique, accenting designs, etc.

John

Link to comment

Create an account or sign in to comment

You need to be a member in order to leave a comment

Create an account

Sign up for a new account in our community. It's easy!

Register a new account

Sign in

Already have an account? Sign in here.

Sign In Now


×
×
  • Create New...

Important Information

By using this site, you agree to our Privacy Policy and Guidelines. We have placed cookies on your device to help make this website better. You can adjust your cookie settings, otherwise we'll assume you're okay to continue.