sideshowbob
Community Member
-
Joined
-
Last visited
Everything posted by sideshowbob
-
That's probably it then, thanks! Unfortunately I can't do it right now as the fuel rail is sitting on my desk (meeting with glares from my wife). I've gotten these things to stop leaking before but the problem is back again . I'll have to grab up some replacements after I've taken care of this ticket I picked up on monday unless I can get these to hold pressure for more than a couple of weeks at a time .
-
Victor, Due to some ugly problems I'm having I was attempting to get a baseline tune going on. The dizzy is from an '83 Maxima (or at least it uses the Cap for one, yep found out where it came from and if i'm not mistaken it uses the odd e12-93 unmarked TFI unit). Good point about checking the total mechanical advance, though. I assumed it would be the usual 8.5(STX?) or 9(ATX?) found in the ZX, but since it came from an entirely different car you're probably exactly right, thanks! If the vehicle it was pulled from had a different mechanical advance curve due to slower idle timing then the readings I'm getting would be around a couple hundred RPM's off! This can advance the timing very significantly in some cars and is no doubt why I'm getting such a high reading at my relatively high (800) rpm idle. Oh, and I have no clue as to the INITIAL advance on this thing.
-
I'm trying to determine if the crank spun one link or tooth without the cam following it aka "jumped a link". With such a loose chain on one side it doesn't seem too far-fetched. But then, you're right that that still wouldn't affect the dizzy timing unless the damn shaft that connects it to the oil pump did the exact same thing somehow. I've never been much good at diagnosing rough engines It can be rather frustrating. EX: the old coil caused a miss that could bee seen when the timing light was on, it hesitated for a fraction of a second sometimes. I replaced the coil once and it was just slightly better. Did some other fiddling and so forth for a while and came back to the coil, an accel coil was worse than stock so i was luckily able to trade it in for an MSD coil and the stutter dissapeared. Engine's still rough though, mostly due to the injectors but this strange timing behavior has me scratching my head a littl too much: I feel the bald spot forming already. At the moment I've tuned it by ear to just above that crappy stumble/pop crud to avoid the detonation that I can't hear even when the timing is maxed out (though it runs badly with a great amount of advance, of course). That, I suppose, is due to the large amount of underhood noise I get, some of which will be fixed as soon as I install the new manifold gasket tommorow or maybe this weekend. Excuse me, I tend to babble on about this car.
-
I'm so terribly embarassed. I have the same problem. I pulled the fuel rail a few minutes ago and (after moving it 5 parking slots) there was gas dripping from the fuel injectors when I pulled it and the raw fuel smell (well, maybe stale fuel) from the cylinders was terrible. Apparently my injectors have been leaking down while it sits and removing that 'oh-so-important' film of oil between the rings and cylinder walls causing some bad contact. With luck, it's salvageable enought to go untill I get a garage and a yard to stick the kids in while I work. Thank god this car is just an unneccesary frivolity (so the wife says) and not what I'm driving every day. Oh, and it looks like it was used badly in a major war somewhere with 6 colors and a big rust hole! Anyway, stay tuned while I use a tire air compressor and a 555 timer IC with a 9 volt to fire all six injectors simultaneously into a large, oval cookpot. The fireworks could be spectacular!! Maybe I'll do this outside this time.... So like the commercial said.. Starting Tony's Motor Is The Worst Thing He Can Do To It
-
No, wait. The rotor and the #1 wire line up at TDC, when both lobes are up and when the pressure from the plug hole pops my finger OUT, not sucks it in (this i use instead of a pen or wire that might concievably scratch my piston surface (the wire, the pen is safe )) Lovely nested comments, no? So... I'm at TDC two or three times (I forget) before the bright link and the sprocket line up with #1. You're going to tell me to pull the front cover, arent you? Seriously, thanks. I'm most likely making a very basic mistake here somewhere (see my rather lenghty post about rapid compression loss that I figured out 10 minutes ago!)
-
This I know, I replaced the balancer last month due to the seperation problem. In my case it was banging against the block! Good point abou the cam timing... the electrical shouldn't be affected because the spark is controlled by the rod and.... argh. Ok so it must be the rod, or the new pulley isn't as new as I wanted it to be. Well, at least it doesn't jump around. The mark is quite steady even under a good twist of the throttle. The cam lobes, however, isn't what I meant. I'm speaking of the bright links on the chain lining up with the number on the cam SPROCKET. If one has moved, the other might line up and I wouldn't know where the second bright link is. I'm saying the link seems to take an inordonate amount of turns to reach the position it should be in to check chain stretch with the little V mark anf the dash on the cam retainer plate (washer?). Though this may be due to my impatience and not that it's turning too often. I should probably have mentioned that this motor isn't exactly stock (f57_n42_n47) and I haven't a clue as to what's already been mangled within the deep, dark confines of the block and head. I think maybe someone tried to mate it with another motor to produce little l28's in an obscene and seriously damaging way. Anyway, what I'm sayin here is.... is... that I've been in the sun too long.
-
This car's going to drive me mad. In addition to the other wacky problems I'm having the timing just can't be adjusted lower than 10 degrees, at this setting it runs like hell and pops quite a bit (SUPER RETARD!). Ahem. Anyway, I have this odd feeling that this isn't caused by the oil pupm/dizzy shaft being out of whack, but instead maybe the chain has jumped a link (I STILLL really dread removing the front cover, due to my garage being a parking lot at the moment) and the damper mark has shifted as a Result or Consequence of this little occurence (damned infuriating, really). The chain itself is rather loose on the right hand side of the engine and tight (due to the tensioner, no doubt) on the left. In my previous experience with domestic vehicles, this is incorrect :dead: . The chain and sprockets show very little wear so i'm forced to question it's position and not the pysical shape it's in. Also, I can get by TDC several times before the timing mark on the cam sprocket aligns, is this also normal? I've never had to adjust this in-vehicle. In my previous and only rebuild (a 302) I had the luxury of an engine stand and set the adjustment from scratch, which is amazingly easier than diagnosing this with the cover on the I6. Thanks, again :classic:
-
Now that you mention it that nasty little gas smell is back. I had that problem fixed before and no I'm not sure how. Thing is, the car doesn't run rich. At least, not enough to carbon up the plugs much and the injectors don't leak under pressure, either. How did you get the new rings in/block honed? I've done this bit before but only on a fully dissasembled engine and that's not an option right now. Really, doing it in the engine bay would be seriously iffy right now too. Oh yeah.... maybe replacing the master cyl was a bad idea. It might be that I was getting good compression because the brake fluid was sealing up the rings. Unlikely, but something that strange wouldn't surprise me at this point.
-
The first (not really) in a series of valiant efforts to keep costs down in auto maintenance. The Cheap B@stard Presents: The window squeege One of the most irritating things about an old car is often the hardened, brittle rubber weather-strip. This stuff is absolutely neccessary if you ever drive in the rain and don't like colonies of insects making a home in your beloved old wreck. These pieces are almost always available from the OEM, but at a serious premium. If you add up all of the parts they sell for your car, a 10k 'disposable car' ends up costing six figures or so. Then there's the aftermarket suppliers who sell those foam strips and look alike rubber. The foam is crap, but some of the rubber appearing on the shelves is quite an acceptable substitute for original, especially for those rare old cars whose manufacturer hasn't made replacements for the past twenty years. Unfortunately, some parts aren't available at all or only at great expense. This was the case with the rubber window 'squeege' on the project 280Z. Yes, 40$ (It is 40$, right? I'm not substituting for some cheap stuff here, am I? ) is a great and unneccessary expense when the cost of the entire job is calculated. After much crinkling of the forehead and skull-scratching it was left to rot further. While searching the hardware store for some 'take over the world' type equiptment I stumbled across some odd rubber strips used for some sort of flooring. There were several types hanging on a rack with various cross-sections and among them was one with a flat, beveled plane that closely resembled the 'squeegee' on the door windows (the entire cross section resembled a lowercase 'd', with the c part open at the end). 'Eureaka!' I cried, causing some fellow shoppers to eye me with sidelong glances and edge towards the door. The strips weren't perfect, they would definitely require some cutting but they were only four dollars for ten feet! That kind of savings was irresistible. Even a failed attempt would leave some of the material for a future need. The first order of buisness was to cut the stuff lengthwise to remove the 'C' shaped channel that curled over the flat area. Lacking a long straightedge I used a footlong ruler with the predictable less-than-perfect results. No problem, the cut egde would be below the window trim and invisible to all but the most determined and inexpert of car thieves. Next came the more difficult part, attaching the rubber to the stainless steel trim. The first attempt, using contact cement, was a dismal failure. It separated easily leaving gooey strands everywhere. Though it may not have been left to dry long enough, this probably wouldn't be the best way to attach it. What can I say? You never know until you try it... Nissan used staples. Not really something possible here, as crimping the ends will probably prove too difficult without damaging the trim in some way. Screws might work if the tips could be trimmed in such a way as to not interfere with the window or prevent the trim from snapping back into place. So, in went the screws. First, a hole was drilled through the original metal strip, the new rubber and the rail using one of the old perforations from Nissan's super-staple-gun. The self tapping screws held wonderfully but were, of course, too long to allow the door rail to snap back on. Not a problem. Using a screw to tap out the threads and backing it out allowed a 'shortened' screw to be placed. The screws were shortened using a pair of large wire cutters. It took a few tries and seems to be something of a hassle but is a vast improvement over glues and epoxies. It gives you that SOLID feel, that's always so great when you've put together something. After the strip is back on the car it's time to trim it to match the original along the other stainless parts. It doesn't look exactly like the original but it's a far sight better than the crumbling crap that's been sitting on the car for the past thirty years. You may want, if paranoia strikes, to seal it with silicone or somesuch at the bottom to prevent water from dripping down but if you screwed it in properly without warping the metal excessively this shouldn't be a problem. I can't say what the strips I purchased were made of but they seem to be a flexible pvc type. They were hanging on a rack at the Home Depot right at the end of the flooring isle. I'm sure there's several types that would work at home improvement stores everywhere at a similar savings to the factory replacements. After performing this minor surgery and looking over the leftover section I cut from the liner I became curious and ran outside with a small section of it. Lo and behold, it was a perfect replacement for the rubber that surrounds the bottom of the rear window louvers, which had also become rotted through the years. I should check out the hardware store more often........ This piece can be found at your local Hobo Depot
-
In two months and 60 or so miles my compression in all cylinders has dropped drastically<sp?>. From 170-160 across all cylinders it's become 140 to 150. <whimper>. My driving isn't that insane. I've made a mistake somewhere along the way.... THIS IS MY BIGGEST WORRY Will my engine be junk in another 60 miles? Help? Please? Vacuum is still super low (it was when the compression was high, as well). It was at 14 steady when I bought it, now it's a twitchy 10. Hopefully the new intake gasket will fix that. Oh, and injector 3 is doing something strange again, pull the ign wire and it stumbles, pull the injector clip and it does NOTHING (but yes, the injector is firing while it's plugged in.) Probably clogged again, here goes the fuel rail for the third time. In the three months I've owned this car I've........ Rewired the Ignition Coil and replaced it Made a new coil bracket Adjust valves 3 times Removed EGR blockoff plate and put it back in disgust at the black brake fluid mess from the MC leak Sprayed Carb Cleaner into Intake while running (maybe bad? It stalled the motor.) Cleaned throttle body Replaced Harmonic Balancer Changed Spark Plugs/Wires Changed Dizzy cap and rotor Played with timing adjustments Moved the timing chain cam sprocket to the #2 position then back to #1 Removed the Cold start valve, tested, replaced pulled the injector rail and injectors cleaned the injectors using carb cleaner replaced the injector hoses replaced the injector connectors replaced the injector rubber seals (Large and small) replaces fusible link boxes with a Buick MAXIFuse unit re-wired the starter to fusible link wiring with a single heavy wire rewired alternator main wire and repaired bad splice Replaced Air filter Replaced fuel filter and fuel pump bracket Melted a plastic bag to the headers and exhaust pipe (oops) Screwed with the TVS, sometimes with good results, sometimes bad. Scraped rust Sprayed down the floorpans with rubberized spray Ditto for the trunk area Cleaned the injectors Replaced the fuel pump bracket Fuel filter Cleaned up the valve cover and made it shine wire brushed a good portion of the intake polished the afm repaired the dome light Rewired alternator to fusible link wiring (the old was corroded into dust) Shortened front bumper closer to the body Somewhat straghtened the front splash pan patched up the driver's fender made a rust hole in the dogleg much bigger and fabricated a replacement piece typed a lot of notes replaced the outer window 'squeege' with something from the hardware store Greased the driver's door locks fixed the lock on the tailgate played with the afm weight, killed the car twice, replaced the cover replaced the afm to TB boot with a ZX unit Removed countless leaves and insect carcasses sprayed primer on a two panels and spray painted one to protect it from the rain caught the kitchen on fire with the MIG welder (ok, the plastic shield I was using) considered buying another Z several times considered lighting the Z on fire several more times Two compression checks with wildly varying results Driven it more than 5 miles once gotten various toxic fluids in my face at least twice push started it three times developed an even more colorful vocabulary of swear words tried to figure out what the PO's were thinking a few dozen times gazed at the motor sport catalog wistfully in the evenings frowned at the clunking noise in the rear and shrugged smelled burning tire everytime I've driven it bought more odd and expensive tools that in the past five years combined, ok maybe not drilled through a bolt to connect a fuel injector to a small tire type air compressor wondered if, perhaps, I'd lost my mind decided that a po must have done the same gas-squirting-from-the-cs-valve-hose I did, due to the odd location and shape of the underhood rust spots watched the weather report with dread in my heart torn apart the interior and partially reassembled it ripped out the alpine tape player it came with glued together the dash bezel thrown away the AC compressor in a fit of rage replaces vacuum hose/fuel hose and some indescribably hose-like hose talked to a couple of hose been asked if it's for sale 4 times in a month while screwing with it in the parking lot dreamed of the V8 I'm going to be forced to put in when this 'rebuilt/rebored' engine falls apart contemplated getting a job at a body shop to get free work done inhaled far too many volatile compunds just knew I was missing some simple, basic and stupid tuning procedure gone through the EFI bible tests twice replaced a few dozen bolts/nuts and made a few of my own worn out a few wire brushes and a 3M 'paint-rust stripping wheel' turned the kids into 'gophers' lots of sanding (for just 3 panels) slapped some vinyl on the fubared dash cap slapped some vinyl on the rear deck painted the window louvers painted the hood louvers wondered what the various odd smells were re-attached various parts that were in the trunk when I bought it (headlights, clutch parts, ect) called parts stores all around town without ever really buying much desperately e-mailed salvage parts suppliers without getting replies tried, in vain, to figure out what kind of differential the car has cleaned lots of electrical connections, just to watch them corrode again within a month replaced lots of electrical connections used a pin from the spare wiper motor connector to replace one on a headlight that was only dust nearly worn out my multimeter zapped myself with the coil three times before finally changing out the wire to it gone to the junkyard four times, returning vaugely depressed hacked, slashed and burned put heatshrink tubing in the obvious and most unlikely places torn out all sorts of tar and fiberglass insulation superglued my fingers together lost all kinds of fasteners made my very first dent in the door spent far too much time searching and finding only answers to problems I didn't have yet discovered that Mr. Humble bought his Z here in this city and must have gotten parts elsewhere discovered that the true meaning of life the universe and everything=entropy
-
Oh... I don't know... how many times did you bleed the system? Just checking the obvious here. How about the clutch pedal free play adjustment? You do know that bleeding the clutch is not the same procedure normally used for brakes, yes? http://www.atlanticz.ca/zclub/techtips/clutchbleed/index.html http://www.atlanticz.ca/zclub/techtips/clutchfreeplay/index.html
-
I just read in the EFI book that a bad tach signal to the ECU can cause certain problems. My tach wire to the ECU is reading 8.4 volts during the test due, I think, to the resistor I've added to make my tach work. Has this caused anyone problems before? I'm going to try moving it so the ECU gets full voltage.
-
For as much as you can, of course.
-
I think this one has the 'mitsi' stamp on the body somewhere, if memory serves. The rotor definitely does, right on top. I do have misgivings about the IC unit, however. They stem from comments on Zgarage regarding the performance of the e12-92's, which are meant for EFI control (the extra prongs). If there's a particular marking you're looking for I can check tomorrow. EDIT: Didn't mitsubishi make just about every electronic dist. for nissan?
-
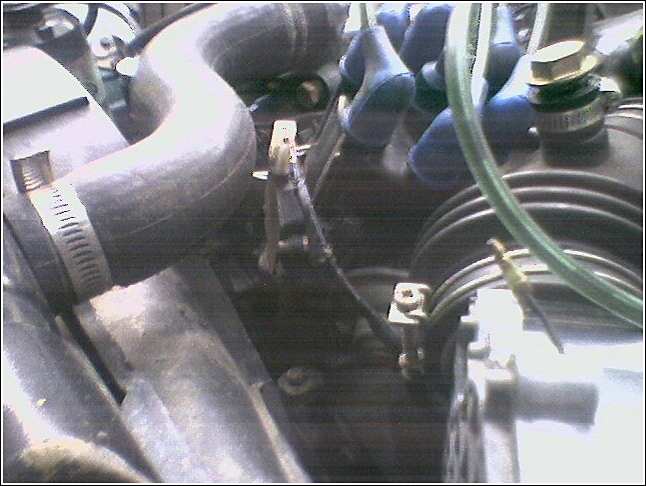
Ok, a bit late, but I have pics of this thing. Not that it looks much different from any of the other intergrated IC distributors . Oh, and it has the two extra lower prongs (can't seem them here) that I've seen on the e12-92 IC unit.

-
Unfortunately for them, I find their tape overpriced and buy some quite reliable rolls from harbor freight! Yes... I'm cheap. Care and feeding of an old Z requires mucho $$$. Especially one this beat on by PO's.
-
An hour of untaping later..... The green menace had lurked for years, slowly consuming the precious copper ore made accessible by the careless joining of ...... Oh, hell. The wire from the alternator splits into three about a foot down the line. One of those dreaded 'factory' splices crumbled at the touch into three lone wires (two remained connected by sheer luck and allowed the car to run, somewhat). Nice lesson. Next time I have a problem, untape the whole damn car. I'll be doing it sooner or later regardless and the new tape looks so much prettier
-
Ok. They don't disagree as much as I thought. :stupid: My problem lies between the battery/fusiblelinks and the fuse box somewhere. Apparently, the relay only ties into this line and doesn't control it. So, while the relay is working to power the rest of the vehicle there is probably just a break between the relay and the fusebox where they connect. I'm going to cross my fingers now.
-
My 77 wiring diagram and the haynes manuals disagree (apparently) on the connection of certain items. They both bear little resemblance to what's in the vehicle (as far as the fusebox bus strips go) . My problem appears to be a (partially) bad ign relay, since shorting to the + on the battery from the back of the fuse box causes some features to work (engine room lamp and voltmeter, for example). But then.... the engine room lamp never NEEDED the damn relay to begin with. Hmmm.. I'm confusing myself here. Let's clarify. The voltmeter, Dome lamp, brake lights, tail lights (or ANY running lights), dash lights and engine lamp don't work. The headlights, warning buzzer, brake warning light, turn signals and remainder of the car still work fine. It's left me in the dark so far. Now, I HAVE traced some wiring and dismantled brackets, ect. (All grounds are good), the blue/white wire that connects (power??) to most of this junk reads continuity to ground (?!?Short!?!?!) on both sides of the black connector located in the white connector bracket on the passenger side. Judging by the evidence the PO had this same problem. Has anyone had this problem? If so, what was your fix? And no, no one else is going to touch the car so a shop is out of the question
-
I believe unshoruding the valves is the best porting procedure you can do on these engines, since that's where the flow is restricted (don't quote me on this). Try looking in here : http://www.atlanticz.ca/zclub/techtips/
-
For those of you who haven't found it yet, you local Wally-World probably carries something called Liquid Electrical Tape. In a store near me it's carried by the Bondo-Spray Paint-Auto repair section of the store. This liquid dries to a nice rubber coating and can be used to seal electrical connections against air and moisture. I think we can all think of fifty thousand places on a Z (especially the EFI models) that can use this sort of protection. Waterlogging TVS springs to mind immediately. Heck, maybe it can repair crusty weatherstrip, who knows?
-
Ok. Today I purchased an Accell super Stock coil and installed it in my car. Instant rev problems at anything above idle, the car stumbled and spat in an irritating way. I replaced the Accel (nice chrome BTW) with the stock coil and it was back to it's lumpy unstable idle but I could rev quite smoothly again. Back to the parts store it went (supposedly, electrical parts can't be returned once installed but the guy took it back for a MSD coil anyway). I have yet to install the blaster-2 but I have already noticed an important difference here. Perhaps I had the internal resistor type from accel (it did say FULL 12VOLTS on the box, however). The Accell coil's resistance reads at ~2.5 ohms on the primary!!!! A far cry from the .7 the blaster-2, I now hold in my hand, is reading (#8202). Regardless of the source of this problem, I'm fairly irate. What would happen had the counter rep not agreed to exchange it? I would be stuck with a worse-than-useless chunk of chrome. I do hope the MSD doesn't perform as miserably. This Z has enough problems.
-
Still, I want one. :devious:
-
My rear left tire, left to it's own, tends to flaten by itself. I just keep a compressor handy (12v) since I've been to lazy to get it patched. Sounds like my Z came up with it's own theft deterence system....
-
Ok, Thanks. I'll be getting one shortly (the Blaster and stock are about the same price, I think I'll try the blaster first