


Zs-ondabrain
Free Member
-
Joined
-
Last visited
Everything posted by Zs-ondabrain
-
 If you convert the whole system to L.E.D. you'll want to swap the thermal for an electronic blinker because of the lack of proper resistance in the now new system. And there is also plenty of zenon headlights on e-bay I'll find the link and post it for you guys.
 -
as for mine, they keyed it to the primer and the cut is up to 1/8" wide a certain points. I used to work in a hi-end body and detail shop, so I know there is no quick fix, unfortainately.
-
and the side of the box w/ optional decals hope this helps. Dave.
-
here's a pic or two of the box
-
This is for owenk, I found it at the local craft store, right under the 240Z I found their (and bought a.s.a.p.) The maker is Revell, the model # is 85-2377 1:25 scale and I believe it to be a 1970 PL/510 Dave revell-monogram
-
I'll post a few pics as I go, thanks for the tips guys. you never know what your getting into till ya build it. And yes, I already noticed the exhaust problem and have plans for it. I just find it difficult to built, knowing the Z like I do, and seeing that Its so far from being accuret? as far as duplicating goes. but I guess I'm just being picky. pictures tomorrow. Dave.
-
It'll take me a few weeks to paint and assemble. I'm gonna do it up the same way that my real Z will look like when done. Best $10 I ever spent.
-
Good morning Carl..
-
they also had a 1970? pl/510 right under the Z box. should I have grabbed it for 13 bucks??
-
and here's the Matchbox car I got from Mom, Bad pic Sorry.
-
and one more...
-
Ain't she pretty? One of my boys got a nascar model for X-Mas and no glue. So I go to the craft store to get some glue for him and just for the hell of it I look over at the model cars, to see what they have in stock. And I'll be damned if my red 1970 240Z is'nt staring me in the face. So I grab it off the shelf and look for a price tag, $10.00, Can you believe it???? I always here of the fairlady models ( w/ the mirrors on the fender and RHD) but I'd never seen a plain ol' 70' 240Z on ANY shelf, And I look, alot. So today I feel Lucky, and I also got a Muscle Machines (1/64)th scale matchbox 240Z from my mom of all people. Gee, DO YA THINK THEY kNOW ME OR WHAT??? Heres the box....
-
and one more
-
All excellent idea's and advice, and heres my 2cents....... I usually start with a can of GUNK (degreaser), both inside and out, usually using a plastic (non-scratching) stiff bristled brush for the tuff stuff and in between the lettering, then dry the hell out of it. Then start the initial cleaning with a SCOTCHBRITE PAD and some flowing water to keep any debris from clogging the pad, and there's a lot of it on your usual valve cover. By now, there should be the slightest shine coming through, and any apparent flaws can be sanded out w/ 250 Grit for the tough stuff and 400 Grit for the rest of the slight blemishes. After all the sanding and cleaning is done, I start w/ a tight knit spiral sewn buffing wheel for the general cut-in, and there's a lot of it. Tripoli buffing compound is great for this chore and you'll need a couple of sticks. Use a minimum of 1HP motor. And if your serious about doing alot of polishing both now and in the future, a 2HP motor w/ extended arms and a buffing pedestool, and dont forget the assortment of compounds. Now that you've cut most of the crap off the surface and your face looks 23 shades darker and your shirt is ruined. you have a great shine on the surface. BUT..... you're not done. Switch to a loose soft buffing pad and some white rouge, high luster compound. and do the same thing all over again. remember to move in a straight line from side to side whenever possible to keep swirls to a minimum. Using very hot water and dish detergent with a stiff toothbrush, you can remove the build-up of compound in the cracks and around the letteing. Use a soft cotton towel to wipe it down and dry it with. using another soft cotton towel you can start to buff out the remaining compound all over the surface and bring it to a final brilliant shine. Obviously I left out getting into the cracks and small areas with a smaller felt cone and smaller wheels made for such a thing but that will all become obvious when you start your first buffing project. Time and patience are the other items you won't find at the store but you'll learn em soon enough. I probably left out a few things but you get the general idea. Good luck, Dave.
-
It has never falsed on me. When I had a shock sensor, I had it turned down so it was affective, but not offensive. Soon after a big rain storm, It kept falsing. So I removed it, then put in a motion sensor ( if the car is lifted or swayed, it gives a warn away chirp the first time, them full siren the next.) I've only had one problem in the whole time its been in the car, the drivers side actuator stripped a gear and had to be replaced. But thats it. If someone reaches under the car and pulls the power wire near the starter the alarm still operates just fine. its hard wired from the battery. the power wire for the alarm goes behind the battery, in through the firewall, then over to the drivers side and the whole thing is tucked up into the dash. L.E.D.s are where the door lock knobs used to be, actuators in the doors and a custom actuator plate in the rear hatch, A hatch pin, hood pin and door pins, two sirens under the hood and one piezo siren inside the car, and a switch to lock/unlock the doors and a button for the hatch.
-
And thow you can barely see it without me taking off the vent cover completely, the actuator for the hatch is in there pretty snug. you can see the rubber boot in the middle of the picture and the hatch lock on the right if I show you the whole thing, I'll void my patend and lose some bucks
-
as you can see from the previous pic, the door lock stem was no longer needed, so I removed the top half and the actuator is connected to the remaining half down 2 inches into the door. And since the knob is out of the way, I put one L.E.D. in each door where the knob use to be. the advantage is... 1) I can still use my key if the battery dies or the actuator stops working. 2) the L.E.D is in an area that makes it Very easy to see from outside the car. (great theft deterant) 3) if some idiot rips into the lock and actually manages to open the door ( w/ the red flashing light in his face) duh. the alarm goes off in his face. there are (2) sirens under the hood there is an imobiliZer peizo siren inside the car the sounds off at 130 decibels. which in turn can make you very dizzy, naushes, and give you one hell of a headache and a possible bleeding ear. Here is the center console switch in a stock location as to not cut any additional holes in the car.
-
my 70' 240Z has a full alarm w/ actuators on both doors and an actuator on a custom built plate ( to work sideways) in the rear hatch. on the center console is a 3-way momentary switch for lock-resting-unlock the doors unlock when the alarm is disarmed the doors lock when the alarm is armed the lights flash in accordance w/ arm/disarm the hatch is opened by holding down the channel 2 button for 3 seconds whether the alarm is on or not. I've been putting alarms and every 12Volt goody in Zs for 17 years. If you got a question on the subject, ask away. I'd be happy to help to the extent of my experience. Dave.
-
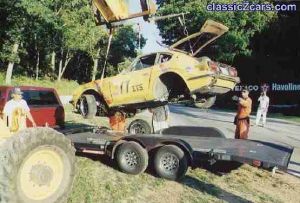 ahhh..... grasshopper, must see good in bad. PARTS CAR!!!!!
 -
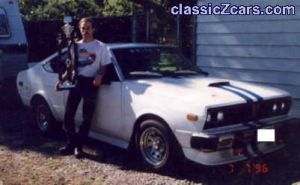 this was my first Datsun, 1978 (A10) 510. got it for $500. had it for 5 yrs worked on it every other day, then sold it for $2000. The trophy is for 1rst place Ameture class slolum racing at Seattle International raceway in 96'
 -
Hope you didn't take that the wrong way, I've actually seen people do something similer to make it look like they had no stereo. I realize that may be a race car and the radio is extra weight. No harm intended, Dave.
-
I haven't put any up close pictures of the (keying) on any forums for the fact that I like to see my baby w/o those wound of someones stupidity, I'd better never find them bastards:dead:
-
You have my deepest condolences, trust me!!! The same little bastards got my baby last fall, no rhime or reason for it other that the fact that they were jealous or something. look at the circle and you might see a thin light line in the middle w/ a small arrow pointing to where it started, it goes up the hood, over the roof, across the hatch and across the passenger side door and fender:cry: I feel for ya, I really do Dave.
-
Sweet camoflage, you buy that on E-bayLOL I can't help it, ( the sub that is) I am a car stereo installer, both for CAR-TOYS INC. and self-employed as a stereo installer / customizer / mechanic. And Its my daily driver. Dave.
-
With my gas milage I could use 5 more gallons on a trip. so what did ya think of the sub?? It makes a great rear end weight in the snow (more traction)