Dave WM
Free Member
-
Joined
-
Last visited
Everything posted by Dave WM
-
 Depending on the environment the interior of the car saw (heavy smoker as an example) the evap may be clogged up with tar/dust reducing the ability for the heat transfer to take place. The other issue is if the expansion valve is ok or not. if its bad its NLA. the upside is you can buy brand new evap and it uses a common expansion valve, the bad news is its expensive like over 300$ The only way to know for sure is visual exam of the fins on the back of the evap. Not an easy thing to do. If its plugged up, the sys will not work right and you will have odd pressure readings. If the expansion valve is ok, you can clean the evap but again its a pita. would be hard to do with the dash in place, I would pull the dash rather than trying to fish all that stuff out, if possible at all.
 -
the cheap approach would be t hook it all back up tighten all the fittings and do the checkout procedure I outlined above with pressurized air and then the vacuum. My system had a slow leak, replacing the condenser with a NOS one fixed that, a new drier and recharge with R12 , its been 4 yrs at least, still works great.
-
As far as checking the SWP123, you can hand spin it, see if pushes out air. other than that hard to say. If it has been open to the air its likely to have some corrosion inside, not good, unless it had some pressure to keep out the humidity or if it was in a very dry climate.
-
too late now, but generally speaking best thing to do is in an unknown would be to see if the compressor is locked up, if not connect up some gauges and see if there is any pressure, if not then pressurize the system with nitrogen and get out the spray bottle with water and soap and see if you can find leaks. If no leaks and it holds the pressure, then try pulling a vacuum and see if it holds. if it does then recharge with R12 (supply it directly to the AC tech for find a shop that will do it, they are around). As now with it apart I would tend to go with all new parts and plan for a 134a. the thing about that kit is you still need the condenser for the R134a, I would not trust a 43 year old condenser. It will take some fabrication. there are direct fit condensers but they are the tube/fin style and not PF, I am not sure that would be best with R134a. replacing everything up front will get you up to about 800-1000 depending on how you go. AC is not cheap.
-
I forgot to ask what is the current working status of the stock system?
-
I would try harder to find someone that will work on R12 OR just do a conversion to 134a. I don't know much about those R-12a products, but pretty sure most AC shops do not use them either. If you convert to 134a, you would want to replace everything in the engine bay and flush the EVAP well. I would think a universal fit PF condenser would be better than a flushed OE one. The PF condensers are supposedly more efficient that the tube/fin type that is stock, and from what I have read R134a will need that to operate correctly. The main problem area IMHO is the condenser it sits out there in harms way taking rock strikes etc... Also you need to consider what about the compressor? are you replacing it? there is oil in there as well that needs to be considered in a swap. I have the old SWP123 style, its huge and heavy but very durable. Most folks opt for the modern SD style either real Sanden or clones. Pretty sure if you get one new it will come preloaded with pag (non compatible oil with R12, for use with R134a).
-
there has been a lot of discussion on fuel sending lights. when everything electrically checks out I would suggest you pull the sending unit and look to see if its all crudded up with deposits. the theory of operation is the gasoline cools the thermistor inside the thermistor housing. IF that housing is plugged the fuel will not get to it to cool off and the light goes on. A simple test would be to remove the sender, immerse the housing in a cup of gasoline (not water use real gas for this test) and look to see bubble come out, then remove it and look for a good amount of fuel to pour out of the holes in the housing (not just drip off the sides but actually dribble out of the housing holes. The housing has a filter element that is a fine mesh. this can be clogged. IF its clogged try immersing in a cup of vinegar overnight. swirl around now and then to see if you can dislodge the particles clogging, blow out the crud thru the various hole in the can. Try the gas cup test again. If its still clogged you may need to disassemble the housing. This is some delicate work that requires some soldering and is likely to destroy the existing thermistor. However if its not working you don't have a lot to lose. A possible replacement thermistor has been identified. I would suggest you rebuild the existing housing with that replacement thermistor. That housing was better designed that the replacement housings out there. Oh and make sure the light in the indicator is NOT an LED. The car was not designed for LED lights, so things like the sending unit and the dimmer will not work with them. The instrument lights were always dim, that is what folks were used to back in the 1970's. Bright instrument lights also are not good for night vison when driving in darkness.
-
I liked the title object of the movie, search for the holy grail, not too far off topic. btw, what's your favorite color? (from the bridge keeper)
-
what is interesting to note is the thermistor did exactly what Dr Dave had when I used water (just in case that got lost in all my post). I attribute this to poor fluid flow perhaps due to surface tension. If Dr. Dave wants to try it I will be happy to send him this one, I would like to test a bit more, but at this point the best test would be to install in a car that has a top loader (mine is a side loader). If it does not work in Dr Daves car would assume he is driving around with 1/2 tank of water. If she weighs the same as a duck then she is a witch (a man of science) .
-
in a nut shell.. :) Tomorrows test will involve using the light bulb that is installed in the Z, which I presume is nothing special, same as all the other OE dash bulbs.
-
Just finished testing. Results are in. works the same with one or two lights (in series). That is it stays off in gas (warmed to about 118f) but will come on within seconds of removal of the sensor from the gasoline. I had to cut the on time short for the single bulb as I did not want to overload the filament. Based on my test I can definitively say that it works with either one or two GE47 bulbs. Are they the same as the stock unit, no, but I feel the cover a broad enough range that its safe to say the circuit should work with a low amp 12v bulb. the GE47 is approx. 1 watt at 6v from what I can find. The only other test I can think of is to try the setup in the car (I will set it up on the floor board and directly connect to the factory light). I will set that up later today and report back I have a video coming on the test I just reported on. below is a few hours later. What I am not clear on is I tested it for well over 1 hr with 2 bulbs and then well over 1hr with a single bulb. The overall current was pretty much the same, I suppose due to the ratio of the bulb resistance to the thermistor resistance. The only diff was if I had allowed it to go on much longer on the single 6v bulb I suspect it would have burned out. Another observation, when testing with water vs gasoline, the thermistor can dumped MUCH faster with gas vs water. I suspect a surface tension issue. Las thing, I forgot the thermistor was in warm gas when I checked the resistance, about 1k I took it out sprayed out the warm gas cooled with the solvent it was over 2k, I suspect when it settles down to room temp (aprox 78f inside the house AC) it will return to the 1.7kish resistance.
-
after about 1.5 hours (and no lite, about 30mA) I have shorted out one of the GE47's now my current is about 40mA, fuel temp about 118f, will monitor to see if things remain stable (lite off).
-
What I am also wondering is the thermistors use in a circuit. Was the later model stuff (like the 91 Toyota) really just the same deal a simple bulb/battery/thermistor setup like the Datsun OR was it more complicated perhaps a latching relay or some transistor bias adjustment or such... anyway testing will continue. I kinda like the idea of a latching relay, trigged on just like the bulb, but once on break the current flow to the thermistor, leave the light on until the ign key is turned off to reset the latch. This take the thermistor out of the high heat for an extended time as well after the latch is set. for more reliable that the relay perhaps and SCR could be triggered by the thermistor. I like it since once triggered like the latching relay, it would stay on until the ign key was turned off.
-
not really. but I will test the system to see just how sensitive the setup is. IF it turns out that a wide range of bulbs works then perhaps we can assume that maybe its not as critical as it may seem. in which case a simple resistance/physical size may be enough. I may end up just buying the specific thermisor referenced by some of the motorcycle guys to test as well. that will give us an exact part number to use. At this point I just want to see if I can replicate the prob Dr. Dave is having.
-
I will be addressing this specifically. IF my long term test are successful with the current testing using the 2 GE47 6.3v series bulbs, I will remove on bulb from the series (that's a drastic change) and see how the system works. I will be posting an interim video in a few mins to set the stage.
-
more results, yes the bulbs are GE47 (standard 6.3 volt used in most vintage electronics, series connection results in approx. same resistance as the bulb in the fuel indicator light. late Saturday night experiment was disappointing. While the setup worked perfectly at 1st (out of water light comes on quickly 30s or so, in water light goes out within 1 second), continued testing showed that if left in the water for an extended period (in my case 45 min) the light was on. It was somewhere between 15 min and 45min when the light came on (I was not watching constantly). while monitoring it I noticed the mA slowly going up, I incorrectly assumed it would stop at some point as it entered a steady state of water temp. Wrong. I left it at 15 min at about 60mA up from starting at 30ma. Came back at 45min and I was up to 190ma an bulbs lit. Oddly I could not get the lights to go off even after blasting it with contact cleaner (very cold), Thinking I had destroyed the thermistor I considered an autopsy but decided to bag it for the night just in case I was missing something obvious. oh and the resistance was fixed think about 200 ohms but cant recall. Next day everything is back to normal, hmmm, same working comes on out of water goes out in water. Thinking maybe I should test in fuel rather than water JIC it makes a diff (surface tension, cooling effect, etc...) so this time I use some fuel, works as expected, on out of gas, off in gas. left it go for at least 45 min, still off in gas, lift it up, goes on quickly, back in gas off again. I also had this gas rigged up with a heat source to elevate the gas temp to upwards of 130f. Thinking it would not be uncommon for the gas in the tank to be warm. No effect works fine. Right now I am testing again with the intent to operate for hours with warm gas and see if it stays off. I will post up the videos I on the testing later today after the long term test is complete. I think I will also try the test with just one light (the 6.3v) just to see how sensitive the choice of the bulb is (big change from 2 bulbs in series to a single bulb), after I complete the long term test that is.
-
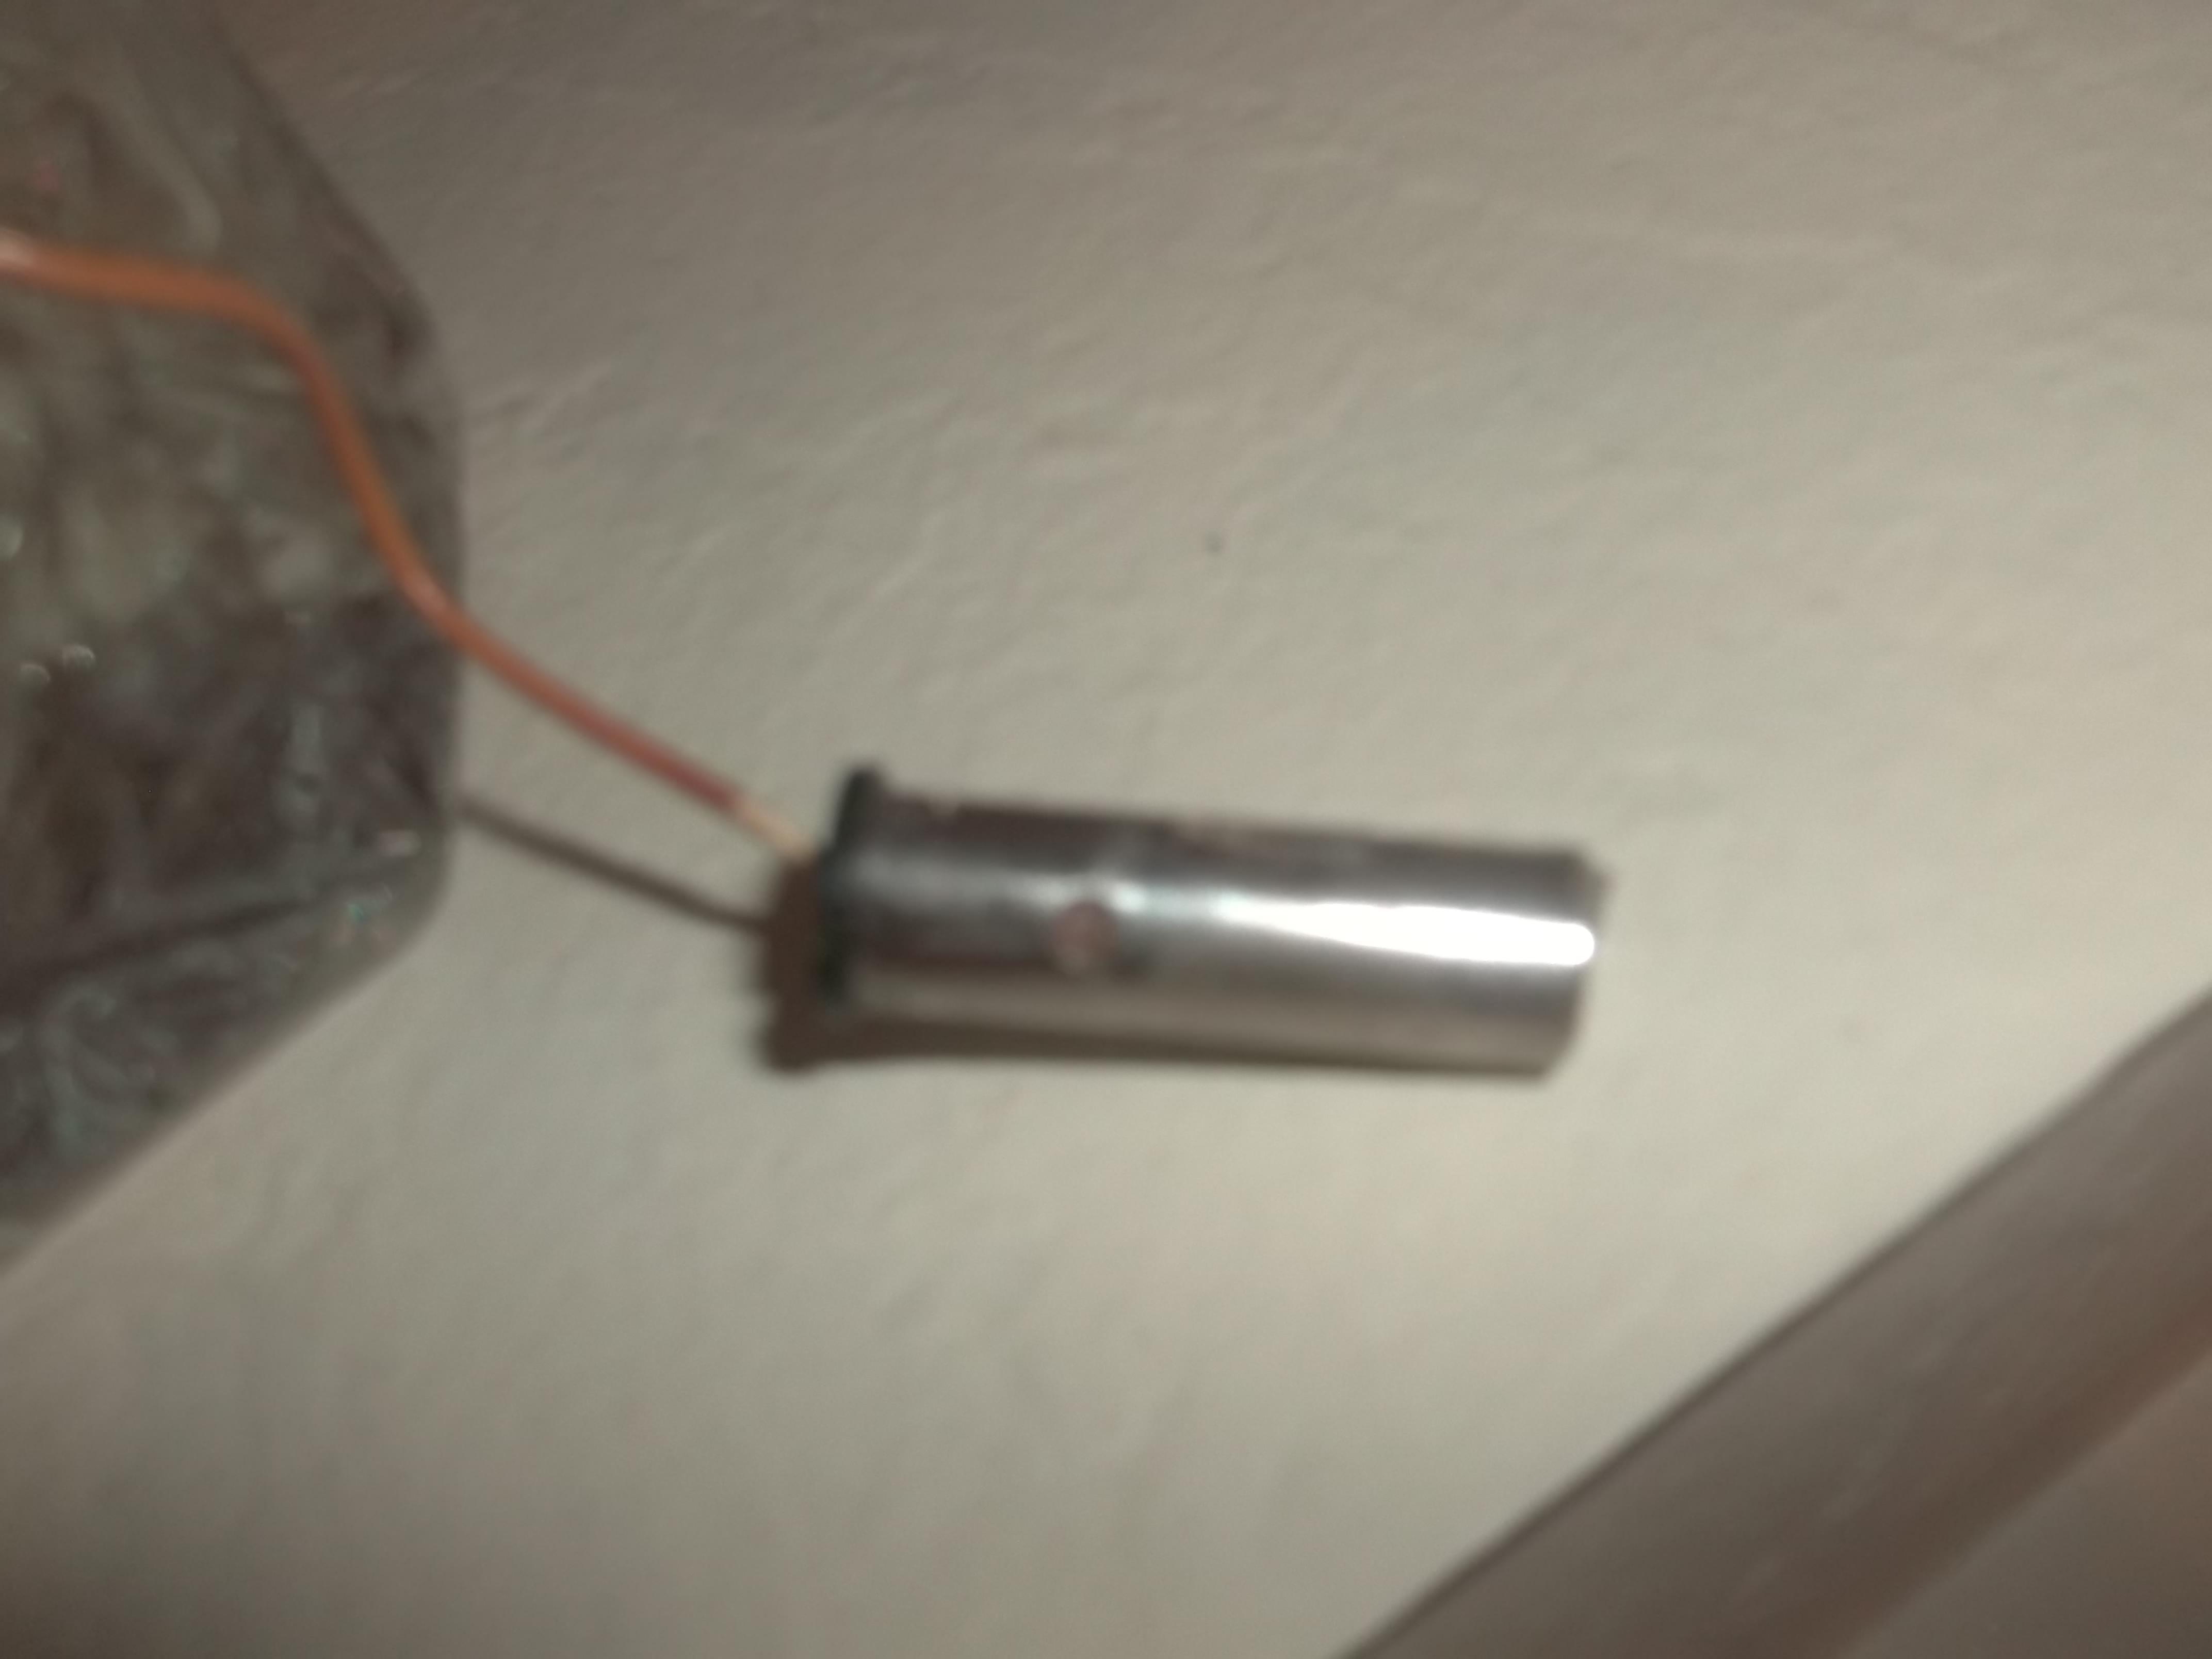
very well so far I will post up a video tomorrow demo of it working. Right now I am testing by letting is set in water for an extended period of time, monitoring the current (it seems to idle at about 30ma when submerged). One thing that is different is the fact that the donor had a rather elaborate plastic container (the before mentioned 2oz plastic container) This container was mounted on a wire just like the stock Datsun ( a stiff wire to the mount flange). I can only assume the OE Datsun was designed to operate with out said container, perhaps that has something to do with the hole size etc... I did not notice any filter media on the plastic container, but then again I did not look at it too closely. The OE Datsun unit drained VERY quickly.
-
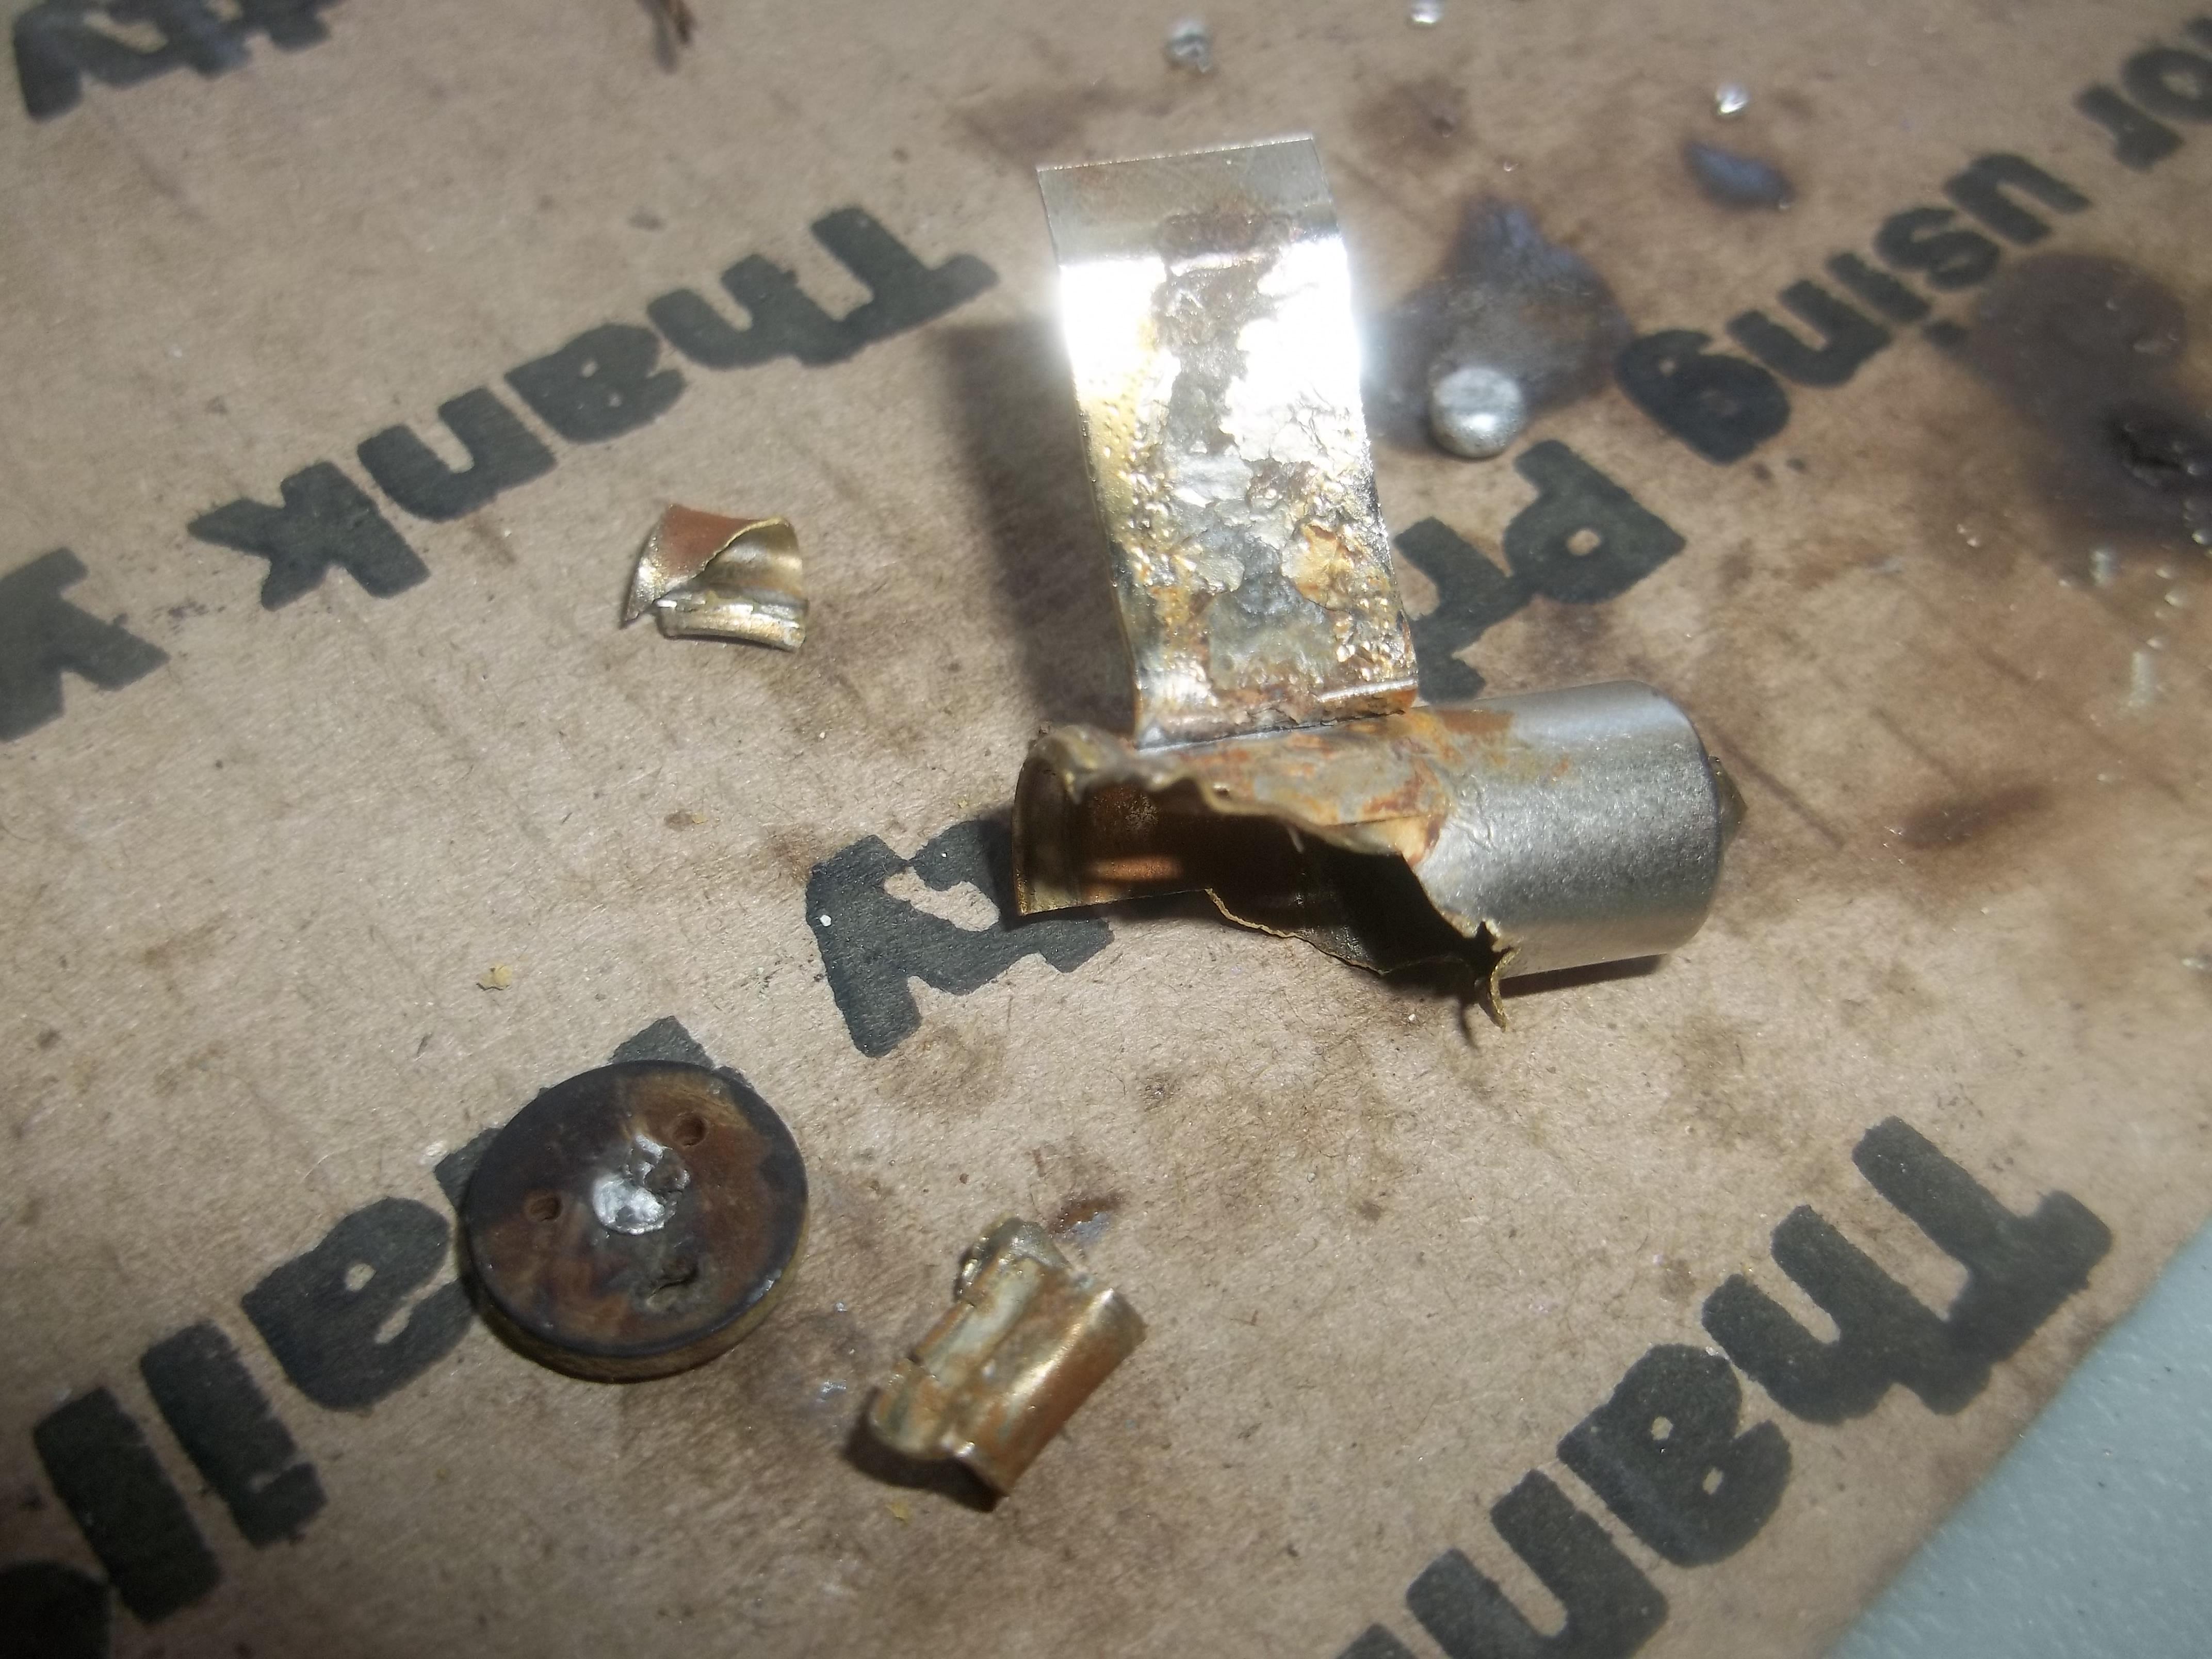
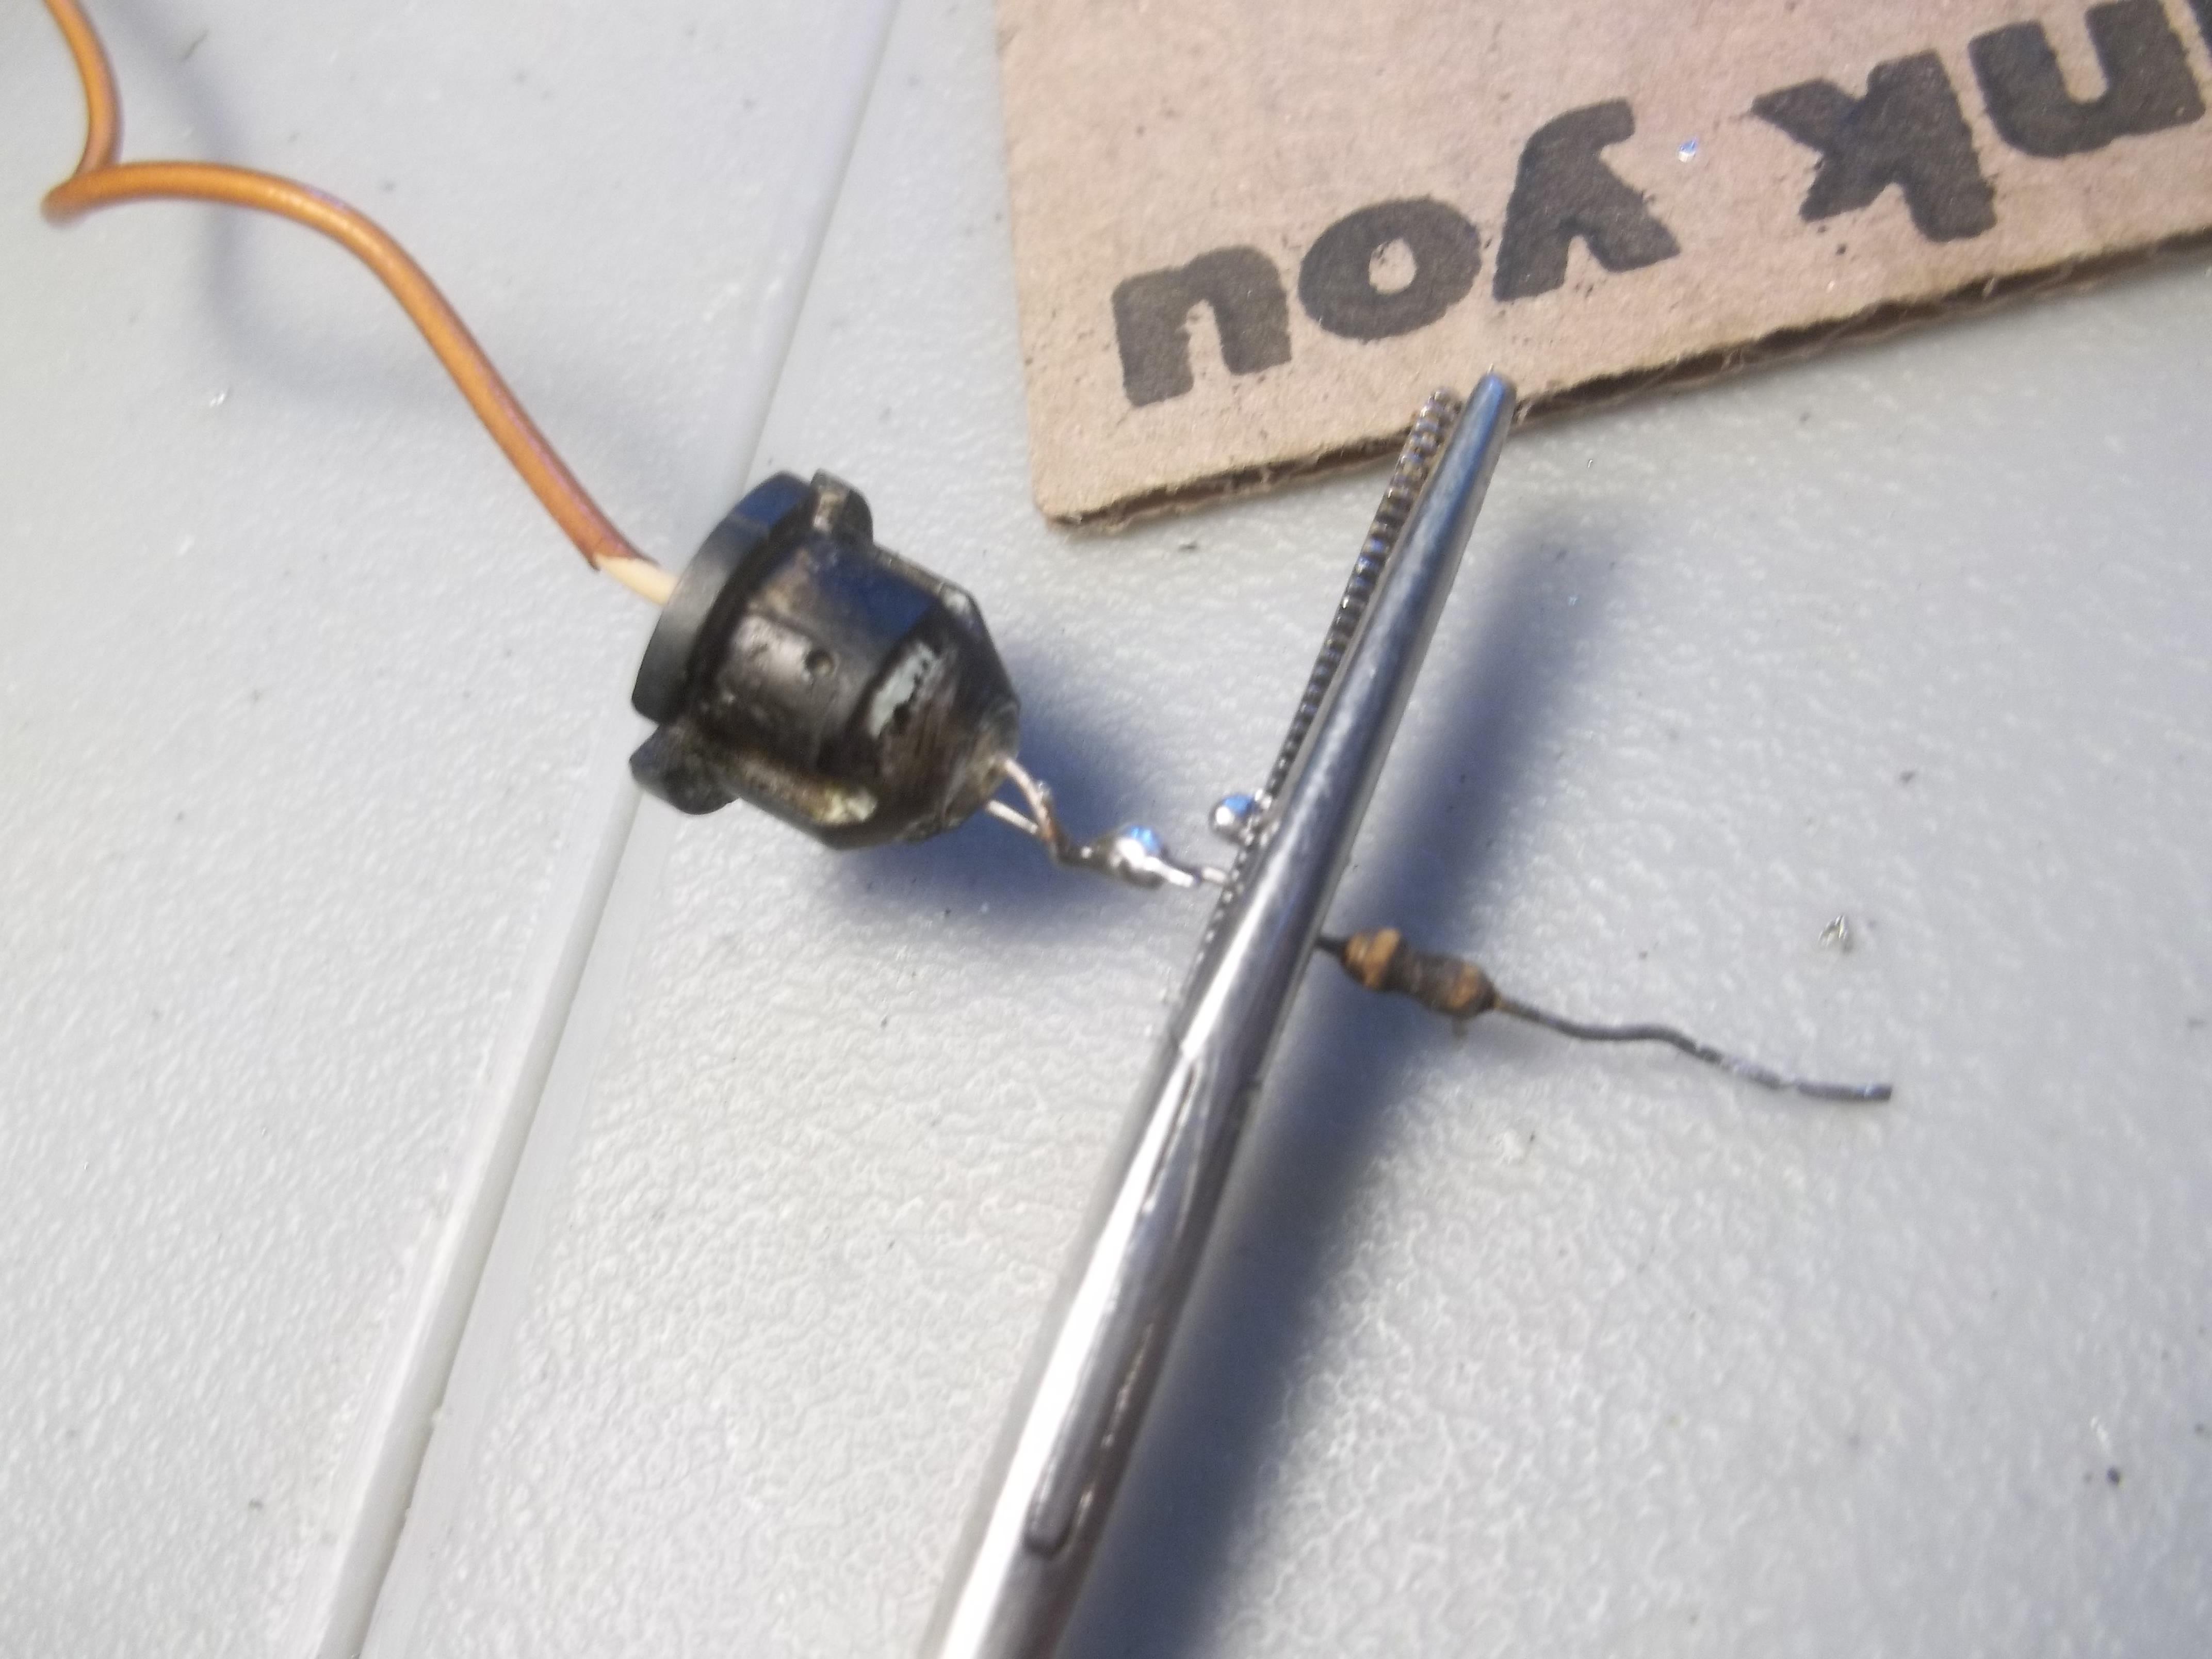
some of the harvesting and transplanting operation. I pigtailed the remnants from the hot side of the can inserted one lead of the thermistor, crushed and then soldered. Removed the old filter material (copper weave I think) soaked in vinegar to remove the scale, then reassembled soldered up the other lead to the can. The OE can works much better as far as getting the fluid in and out of the can. I am going to clean and touch up that solder on the bottom. I thought I had the lead cleaned and tinned but it looks like it could be better.


-
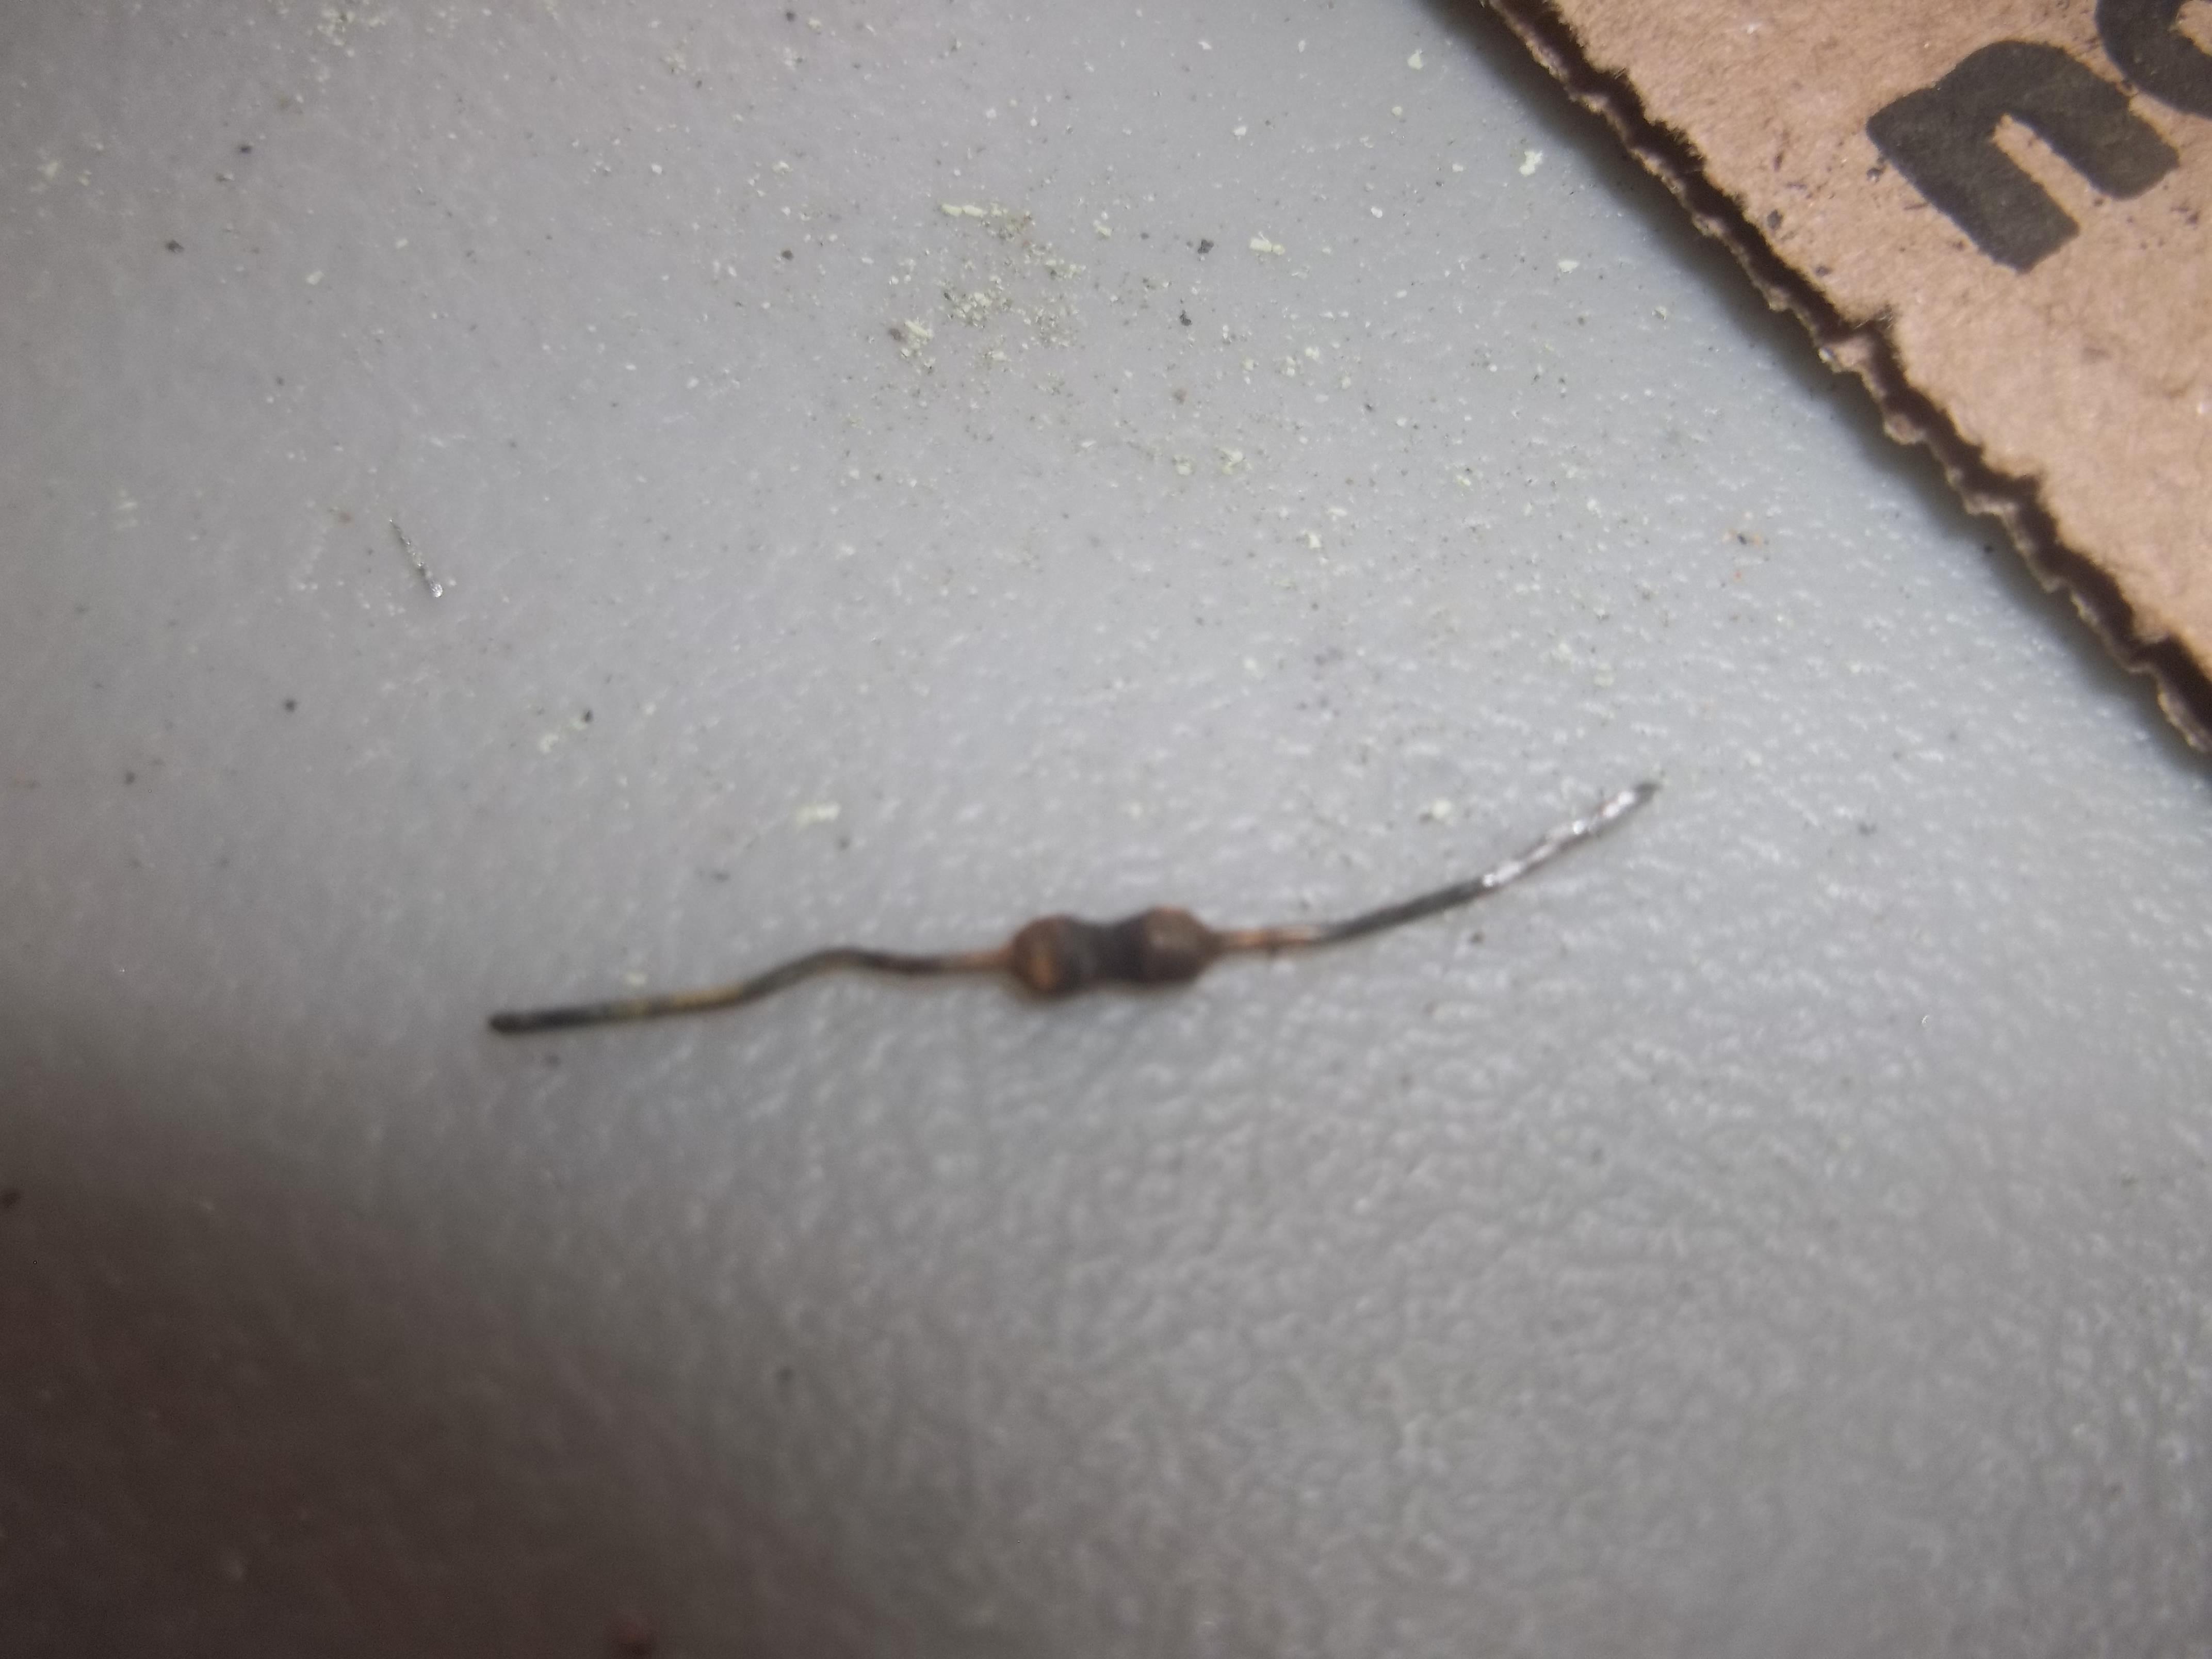
I was able to peel down a strip of the can to get a better look, while I was not able to focus the IR gun on the tiny thermistor (looks like the size of a 1/8 watt resistor) I was able to hear it hiss as I dunked it in the water. From what I can see it seemed to have a dark burned looking band in the middle. Further test show its resistance to be polarity sensitive at least with the DVM. It would range from 1.6k to 2k just by swapping leads. the VOM did not seem to notice it but being analog and the scale pretty small it may have moved a bit. the VOM showed something like 1.7k as did the VTVM. I suspect the solid state nature of the device may be a factor in this. I am not sure if I can salvage the thermistor with out destroying it, at this point the can is toast so I would have to if I wanted it in a uncompromised can. Not a big deal but would be fun to try. another interesting observation was at 1st I was unable to get any resistance reading with the DVM, it would just toggle between moHms and koHms, not settling on a scale (auto ranging DVM) I did not have this issue with either of the fix range VOM or VTVM. After a few min (maybe when it had cooled down as I tested right after using it in the light circuit) I was able to get the 1.6-2k readings (depending on polarity) with the auto ranging DVM.
-
went to the JY today (yea no cover charge!) and found a 1991 Toyota, 4 door sedan, the tank sending unit was easy to get at so I pulled it and found the same style thermistor but it was inside a plastic holding tank (like 2 oz size). removed it and ran some test. It was pretty grody so I sprayed some electronics cleaner in it but could not get the light to go out unless I sprayed the cleaner direction into the tiny holes. I used some fine wire to open them up but I think there is still junk inside that is causing issues with getting the fluid in and out. I ended up opening two holes (top and bottom) to about 1/16" with a drill, now it works reliably. will post up the video in a few. I wanted to see if warm fluid (in my case water since I don't want to smell up the house with gas) would keep it from coming on so I used hot tap water, about 110f.
-
another area to watch out for is the hazard flasher vs turn signal flasher. IIRC they have the same plug and the units are located in the same area (under dash driver side), Think it may be that one cable is too short to allow incorrect plugin but not sure about that. The actual flash units are much different is size (same pin out), I don't know if they are interchangeable.
-
typical resistance losses, but you should check in under load. For test like this I like a test lamp.
-
No engineer here, bean counter, but I did room with one at FTU (now UCF) I think I was accepted into the engineer club when I was able to quote star trek during summer reruns (and I knew the resistor color code, that was unexpected). We had 4 engineers and one accountant in the dorm suite.
-
yea its really just preference, pump needs to work properly so I like to focus on that 1st.
-
I always find it best to fix the problem rather than work around it just to see it run. You know it works based on the starter fluid, so mechanically its sound and the spark is working. You need to dig in with the multimeter and resolve the problem.