


Dave WM
Free Member
-
Joined
-
Last visited
Everything posted by Dave WM
-
 normally I go oe, but for this looks like the local autozone has a dorman plug.
 -
huh core plugs are a bit of a problem, not sure but are the kits short the correct number of small plugs? I have 9 on the sides what i see are 7 in the kit. thought this would be a no brainer.. https://www.oreillyauto.com/detail/c/melling/hardware---fasteners/expansion-freeze-plug/expansion-freeze-plug-kit/f7a4da40e238/melling-expansion-plug-kit/mel0/mpe132r/v/a/6638/automotive-car-1979-nissan-280zx?q=expansion%2Ffreeze+plug%2Fkit&pos=8
-
yes, my line of reasoning is the only issue was it seemed to be running hot but with all the crud that figures, and the exhaust gas in the rad. I had no odd bottom end noises and oil pressure seemed fine, so no real reason to tear down. One thing i was reading up on cleaning out the oil passages, the ones in the top of the block for the head have tiny holes (restrictor plugs) wonder how do you clean that? Not going to bother unless i do a full tear down. 1st thing is start the engine on the test stand, its the one with the MN47 head, I want to do a test again on it with the chem test kit, to act as a control subject and make sure the chem test is working ok.
-
all cleaned up, had between .002 and .0025 gaps on the head and block, have to check the fsm but IIRC thats fine. Posting up a video now. Next up will be do I just bolt it all back together now and try it again, OR do more tear down. With the nice looking surfaces and how well it did on the original compression leak down test I am leaning toward the former. I could get it all back together in 1 day easy, and then swap back to the test stand in just a few hours. I will have to sleep on it.
-
the super scraper is GREAT! as is the ARP cleaning tap. Its a joy to use good tools.
-
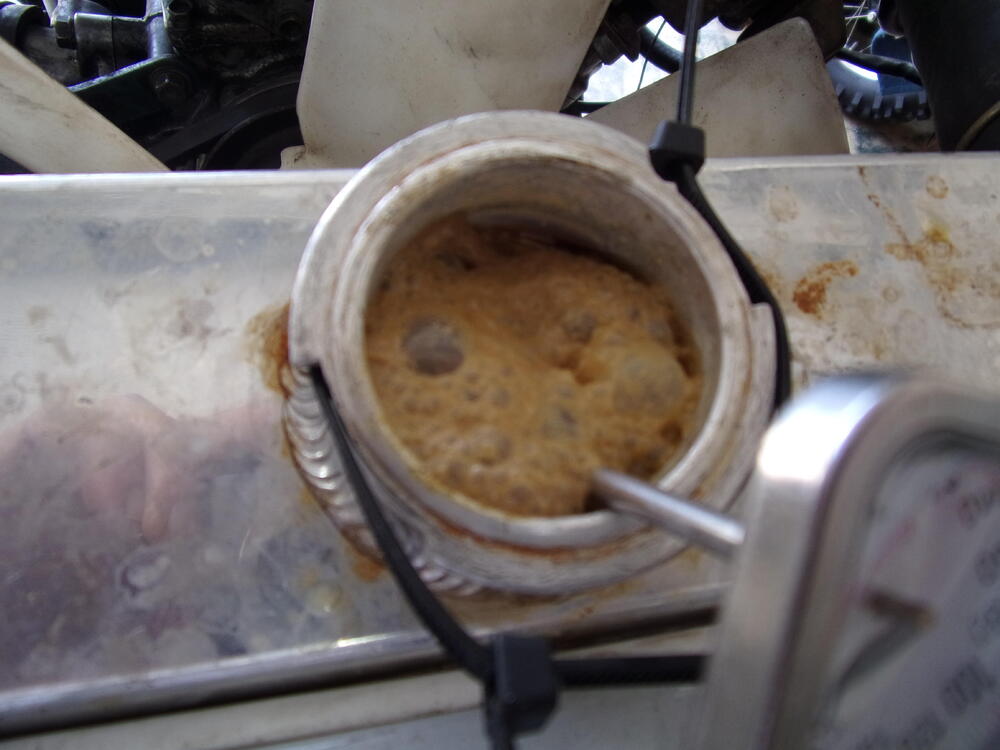
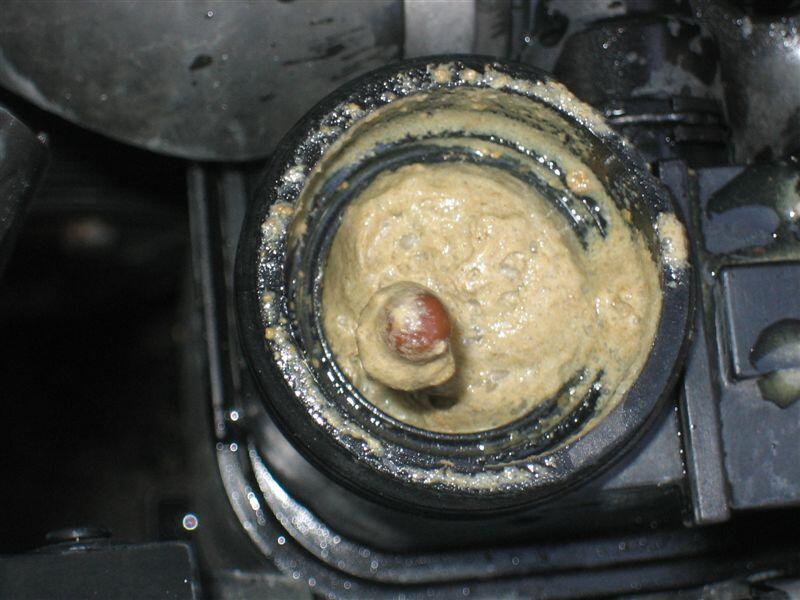
whew LOTS of cleaning today. removed the side core plugs (left the front and back, they look perfect and I dont think I gain a lot of cleaning action there). start wit digging my fingers into the ports and dragging out the mud. After that I used a bent up small dia tube and dig deeper digging. Once i got most of the big chunks out and the remaining stuff turned into a slurry, out comes the garden hose for more flushing. repeat the steps a few times until I must have gotten out 90% of the junk. I know that does not mean a lot since the total amount of the junk was unknown so perhap 10% is way too much, but its not. I would say it has a typical amount of residue that any engine would have now. I implore any owners of spare engines, go out and knock out the core plugs and do this as a minimum, let the dry out and spray in some oil or WD or what ever float your anti rust boat, then tuck them away until you are ready to use the engine. I think its reasonable to assume that just draining the block via the plug is not good enough for long term storage. So what's next... well I am back to perhaps trying scraping the head and block and installing the fel pro for another try. I will save the good gasket for later. the cylinder walls look great, and the leak down test tells me the bottom end it fine. I keep vacillating on doing a complete tear down. I think to help make the decision I will remove the pan and pull at least on con rod and one main to inspect for wear. I guess I could check for end play in the crank as well. I guess the smart thing to do would be to let a shop do a magnaflux on the block since I had some exhaust gas leak into cooling passages issues based on the chem test. For some reason I resist the idea of a shop getting its hands on my block, prob since I have NO experience with using a machine shop...
-
Parts for Nissans.com says it was shipped today so standing by..
-
Part Number 11044-P9600 is the one I went with, on the way along with an ARP cleaning tap and some new dowel (one got chewed up in the removal process). I just finished draining the oil from the block. Coming soon I will cover the oil passages and flip over for some prelim rust removal. just want to get the mud out for now, then will move on to full disassembly for more through clean out and possible electrolysis rust removal (still need to find a shop that I trust, if i can will let them use the method they suggest for cleaning out water passages.
-
sounds good to me CO. Well I decided to just remove the engine from the test stand, will drain the oil and water (with head off), move on to the freeze plugs, and then decide on hot tank or DIY block clean/de rust. There is still about 1" of rust mud (poke s stick down the back water hole in the top of the block). Seems pointless to pursue continued work on the test stand, even if it passed the coolant test I would just tear it down afterward due to the rust issue. I will get the factory gasket, have that ready to go.
-
wow, there is a LOT of discussion in there. Tony D states more holes open the better , think that was the gist of it. I maybe getting ahead of myself here, will post up some videos of what I have and have found out. later. Good news is the bores look great, and the head has less than .003 and that is only at the very end, not the middle. I still have to clean up the head surface, so that may even be false as I may have some residue left on that side. I did a diag check full length was about .002. Using gasket remover and plastic razors for the head, coming out well. other issues, the rust accumulation is horrific, I mean like mud like and a lot of it. the block also had one head bolt on the manifold side that fought me all the way out, the rest had nice break away feel. the one that was trouble as the rear dowel hole bolt. Lots of rust. I am pretty sure its a blind hole, so not sure how water could have gotten in there. There was evidence of a brown rust water stain on the side of the block right by this same bolt. Also the fire ring did not have the nice clean space between it and this same area. My guess is the exhaust gases were pushing past the ring and opening up a path from the water jacket, bolt hole, and side of head along the bottom of the gasket. that is what I think i was seeing. I bought a thread chaser to try and fix the bolt hole, have a super scraper on the way for the block. I am going to have to pull the engine of the test run stand and either get a shop to hot tank it, if they still do that, or I will pull the freeze plugs and see how much mud I can dig out.
-
thanks ZH, think I will just go with the factory gasket then.
-
In the process of chasing the exhaust gas in radiator, I pulled the head, gasket looked ok, found a couple areas that may have been a an issue. Anyway while looking over the gasket i noticed several of the head cooling ports on the manifold side were completely covered by the gasket. I pulled out my felpro, it had holes for those but was missing on hole on the spark plug side. Also had holes in the gasket on that same side where there were no ports. So what I think is the OE had missing holes in the gasket, the felpro had holes that did not match up with all the water passages either. Am I missing something? I have found a OE nissan gasket for the P90a head that looks like the old one, again missing all the holes on the manifold side. I figure I should go that way, even though it seems illogical.
-
somewhere I recall soaking pistons in antifreeze (great stuff) in a crock pot for a day would get them super clean.
-
flushed it with a lot of reg water, themostat out. will try running it that way later today with rad reconnected.
-
Engine running on test stand, focused on rad issue.
-
here are some pics of the foam, video of the run coming soon

-
nice job, great write up! thanks for sharing!!
-
this is not the pic of mine but what it looked like
-
ok got it started on the test stand today. Bad news I get a lot of oily brown foam coming out of the rad (I left the cap off so I could monitor the coolant level). Pretty sure the oil level in the crankcase dropped as well. had some but not a lot of exhaust gas in the rad as well after testing with the blue turn yellow test kit (it was just a slight green actually). I retested the compression all were right at 150 psi, and did well on the leak down test (most were 90% one was about 85%). temps went up not crazy high but def higher than should be, on the other test engine it was rock solid at middle of th e gauge this one was more like 2/3 towards high. Oil pressure seemed lower on this engine as well. I was thinking it was just the higher temps thinning out the oil. so based on the brown oily foam, apparent loss of oil in crankcase, and elevated temps I am HOPING its a blown head gasket. the Compression test don't really show that, but i would much rather have a head gasket problem over a block or head problem. I will get some video of it tomorrow to share, perhaps someone else will recognize if I show vid I am pretty sure my next course of action will be to pull the head. Oh and I love the hyd rocker pivots. NO valve clatter at all.
-
re installed the cam shaft. I wrapped the lobes with some electrical tape making sure to cover the edges. I found it MUCH less stressful doing the install since I did not have to worry so much about the sharp edges of the lobe contacting the bearing surfaces.
-
I know, kinda slow walking this one 🙂
-
progress so far.. removed the cam shaft, took it to a shop where they polished it. It had some pretty bad scoring on #10 and #9 cam base circle. for some reason the damage seemed limited to just the base and not the lobe itself. But since it had hyd pivots the base stays in contact so I did not want to run it and do more damage. the rockers themselves looked ok. The shop said it really should be re ground to clean it up, but agreed to try a polish. He said it came out better than he expected. I will take that as a partial win. The cam bearing surfaces looked good both on the camshaft and the towers. there was some burnt oil on one side of the tower bearing I cleaned it up with some carb cleaner. Again the engine looks to have had too few oil changes, hence the cleaning of parts as I go. the pivots are tedious but strangely satisfying. I to the tear down, drain the old oil, soak in gas, remove the internals, spray off with brake clean, allow to dry, then dunk in the gallon sized carb cleaner (the one with the basket inside), let it soak for about 30 min, comes out pretty clean, use some Q tips and simple green on it. If its still dirty it gets dunked again. I am not sure if you can damage anything by leaving it too long, prob should do some research on that. Anyway when clean I reassemble in a oil bath to keep air out, then clean out the head well of oil where they screw in, and tighten to about 62 ft lbs.
-
this looks a lot better as far as the oil supply line. L28 Turbo Stainless Steel Braided Oil Supply Hose — Godzilla Raceworks
-
thought I would start a fresh thread to document my journey on getting a turbo engine to run and perhaps install in my 1975. I say perhaps since at this point my main interest is to learn about turbos, and if I like what I learn I may install but will make sure its reversible since my car is an excellent example of a survivor. So now that all the qualifiers have been stated... as titled its a 1983 i assume based on the P90a head with the hyd lifters. So far all I have done is mount the engine on a test run stand that and I have attached manifolds and EFI for NA testing. I will be swapping out the dizzy drive to use the standard dizzy since that is what i have used on the last NA engine that I had on the stand. The plan is to eventually run the stock turbo and turbo EFI, but for now I just want to get some NA base line runs. The engine is extremely dirty with carbon both all over the valve train and in the pan. I cleaned out the pan and picked out the large carbon chunks from the top of the head under the cam. I have started to clean the lifters, found an excellent video on youtube as guide. Its very satisfying so I will finish up that before test firing the engine. I have a new oil filter and oil (15-40 rotella T4) for the initial test. I spun the engine on my test stand to confirm oil, At 1st there was no pressure so I pulled the pump and filled it, after that the oil pressure came up fine. I had one cam oil hole not producing any dribble so I poked it with a fine wire, and cleared. Based on the overall dirtiness I can see I will at the very least need to pull the cam, and flush with brake clean and prob use a gun bore brush to clean it, or else risk re fouling the oil feed holes in the cam. The head had an excellent leak down test, the compression test on the stand was 2-6 all about 150 psi, 1 was 125. I am not sure if my starter was just getting weak at that point so I will test again after running. I have seen this before with engines that were left sitting for long times in storage, so not too worried about it at this time. during the NA test run phase I plan to check for exhaust gases in the coolant and coolant in the oil, standard stuff to see if the block/head are ok. If all those test check out the next step will be to remove the engine for a complete tear down and assessment of things like bore condition, bearing wear, rings etc... Based on the condition of the oil I would expect to find some pretty dirty rings. I have had the stock turbo rebuilt by a local shop. It looks GREAT will post up some pics later. The turbo was really trashed, and the oil supply as the culprit. The oil line is really filthy so before any turbo runs I will need to get the engine block hot tanked, the oil gallery plugs removed and clean out any junk in the galleries. The turbo is just too nice to even consider bolting on until I am sure it will have a clean supply of oil. I have some early video on my channel of just mounting up the engine to the stand if you would like to see. they are on my youtube channel stay tuned as I progress. I will need some help on ideas about getting a clean oil supply line as the old one is I think beyond cleaning. Its on the back burner since so much else has to happen before the turbo as mentioned above but I would like to start planning.


