


Dave WM
Free Member
-
Joined
-
Last visited
Everything posted by Dave WM
-
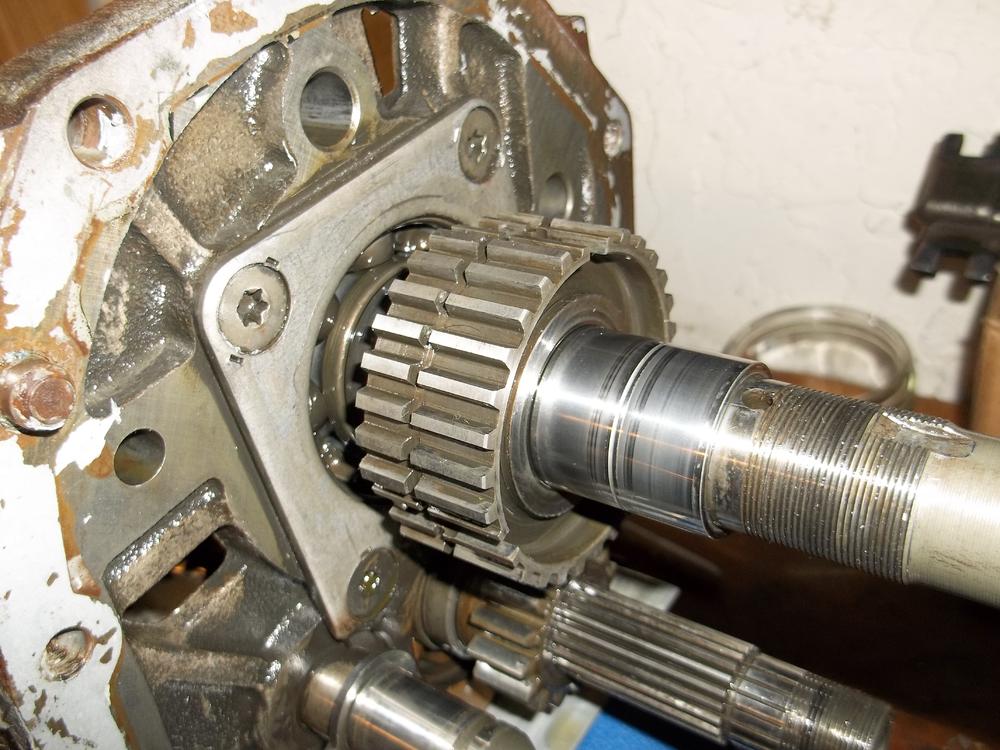
 its the sleeve that is directly behind the schro hub for the 5th/reverse. Mine is a bit more worn than I would like. NLA from the various vendors of course.
 -
looking to replace the 5th gear NLA inner race of the needle bearing. think its 27x32X30 can't find anything like that, but did find this https://www.123bearing.com/accessory-bearing-inner-race-IR28-32-30.php Was wondering if I could use some shim stock .5mm and wrap the main shaft with that where the bearing IR goes. the whole setup is a light press fit to start with, I was planning to heat expand the bush and cool the shaft anyway as to not impart it with any force to fit.
-
I almost get depressed every time I look at this thread and wonder why I can't make my car look this good, then I think maybe I can! what an inspiration to see such nice work.
-
I may have found the smoking gun. the input shaft main bearing. I thought I checked this when it was out, prob did not clean it up enough, or test it long enough. all the bearings are out most seem pretty good, I will have to compare side by side to the new ones, but the input will catch and hang up when turned slowly after I have thoroughly cleaned and dried it.
-
yea! back cluster is completely off, only casualty was I seem to have lost one of the 3 little springs in the hub assy, I don't know how as I was very careful and thought I had accounted for them all. No big deal, seems like an easy cheap spring to get OE. taking a break now to get re organized removing the main shaft looks like it may be fiddly.
-
More progress, heeding ZH advise I went back and took another crack at the bearing splitter puller. I had to remove the loosen the bearing retainer plate to free up the reverse idler, with that out of the way I have a clean shot with the split puller, thank to ZH for getting me back on track Not all was smooth sailing, I near nearly ruined one of the torx screws by trying to remove it with a hand held torx set that I had. sort of like a Swiss army knife of torx. well it started to deform the torx head so I went out to the local hardware store and picked up a torx bit with a 3/8 sqr drive. not trusting doing more damage I used my hand held impact driver, gave it a few solid whacks with a 4 lb BFH, and volia all is good again. I am going to have to go back and get some washers now, (forgot them) as I want to take up the space between the split puller to get it really tight together before I start in on the removal, but at this point things are looking up.
-
the problem is the reverses idler shaft is in the way preventing me from positioning the 3" splitter (and I assume the larger one in your post as well). It looks like the bearing retainer plate is part of what holds the reverse idler shaft in place. I maybe able to unbolt that plate and move it aside so that shaft would not be trapped, If I can get it out of there the larger bearing puller I have may work. The next problem it the counter shaft gets in the way of the bearing splitters. I will plat with that some later, see if I can get that plate out of the way (not off, as I need the gear off to completely remove it. what I would like to do is make sure I can get the clamping bolts on the split puller very tight without any contract with the shaft of the retainer I am trying to pull. That way the flat part of the puller will be what come into contact (the puller has a slope and then a flat, that's what I want to come into contact with the back side of that grooved syncro hub). I may need some spacer washers to allow for that. Tighten the splitter together yet no contact with the shaft it circles.
-
roger that. I have the HF set that came with to, a large and small neither worked (to fat or due to slope put a lot of stress right on the edge of the syncro teeth. I would like to put it on backwards so the flat of the puller would be against the flat of the syncro, I will take my calipers out there and see if any of them would work. If I could file the small one I have thinner it would prob work backwards. scratch that cant file it down, already just fat enough for the clamp bolts. so has to be installed the right direction.
-
another idea on the puller, maybe I can just get some 1/2 plate (checked it will fit) and borrow a buddies cutting torch to fashion the opening U. No need for the accuracy of a plasm cutter. I can just clean up the edges, drill and tap the rod holes. Just thinking about my options.
-
well if my OTC puller is no joy, I will take a trip to the surplus store and see what I can devise. If that goes nowhere I will throw in the towel and try a transmission shop. If I can find a U shaped plate about 3/8" thick I would drill and tap it and use some all rod and a regular puller. Not sure how the pipe method you described would work.
-
got an OTC 1044 puller on the way, says 18" reach (16" from back of hub to end of shaft), just hope the hooks can get behind the hub.
-
think I got it combined into one longer video
-
here is the beginning of the series. YT has stopped the free use of the video editor, so I can't combine videos, resulting in a lot of short clips. the 1st one is pretty long, the rest are very short since I am holding the camera and working, not a very fast way to work, I end up getting starting and ending shots.
-
so is this a show stopper, OD bush look too damaged? NLA of course but if its just a bush I would a machine shop could fab one.
-
decided to start a clean thread. easy stuff remove bell housing and rear tail shaft housing removed shift forks, detent balls and springs snap rings and speedo drive gear and ball that retains it. reverse idler gear. rear counter shaft nut/gear OD gear, needle bearings balk ring. what is giving me problems is the OD sync hub, OD gear bushing. the bushing is not going anywhere. the manual says use a "suitable plate" behind the retainer and press out the main shaft. I am going to have to try and some steel that has a u shape cut out to clear the retainer, I can tap it and us some all rod to attach to the puller on the end of the tail shaft. I may try some brass or alum as I don't want to have steel bear on the syncro slots. they would be the 1st thing the plate sees unless I could fab up a spacer that fits INSIDE The synro hub and the plate could bear on that. maybe even just some washers placed around the hub would work. anyway at a stopping point until I can figure this out. maybe time to buy a plasma cutter and welder to star making jigs.
-
that is the one I got, this one is out there too https://sales.omegamachine.com/Nissan_FS5W71C_Extension_Housing_Bushing_p/71411.htm crazy shipping 25$ plus the 20$. I got the NISSAN-62 shipped for 9$ total. The omega looks more like what is in there though, has a spiral from front to back, the one I got has more of a X shaped deal, and look like its a rolled sheet (you can see the joint) while the omega looks like a machined from billet.
-
Thanks EuroDat. curious, since I already have the NIS-62 bush (mine looked a bit scored up) I noticed a red DONT USE on your sheet. what's up?
-
when I get ready to actually start the video process, I will make sure I capture that rocking I am getting just for information, may help to show others what to look out for.
-
I can wiggle all three (1,2,3) about the same amount. grab the gear and push one side perpendicular main shaft while pulling the other side. if there is supposed to be NO play there I am screwed.
-
decided to check clearance on all gears, all looking good there (in tolerance with SDS sheet of transmission manual). waiting on my helper to do video work. Also will use wood dowel to help keep everything in order. Could not see any defects with gear teeth, as far as chips or odd wear patterns (they all look the same to me).
-
I will hold of an any more parts buying until I get it torn down and hopefully find the problem part.
-
The bearing on the back of the mainshaft closest to the speedo drive was somewhat rough. I have used my stethoscope on the two front bearings, they did not seem bad, but I have no point of reference since I am a newb to what they should sound like. At this point its a learning experience, hopefully when I get it apart and can really clean all the oil out of the bearings, I will be able to compare to the new ones. I can not see any obvious problems anywhere else but again my inexperience is a problem.
-
a couple questions I assume new roll pins are a must, Nissan part? or generic. There is a lot of talk about different thickness snap rings, I assume this has to do with manufacturing variances? or is some kind of wear issue on the shafts in the grooves for the snap rings? Do I really need new woodruff keys? I did not realize these would wear enough to be an issue. I will use new shaft nuts. Lastly the kit I got came with a no name needle bearing for the input shaft, "china" on the bag it was shipped in. I am thinking I should get a Nissan one just to be sure. the other bearings had japan printed on the bearing and seemed to be from a big supplier. I am worried about the needle with no branding. funny thing I noticed on the tear down, the magnet on the drain plug was missing a chunk, about 1/4 just broken off. I am sure it was not like that when I got it but I can't recall any thing I did that would cause it to break. Guess I will be getting another one of those as well. I don't know why the orig broke but don't want to take any chances of more breakage there.
-
thanks EuroDat. I hope to get some video soon of the fork removal. Hope it will be helpful for others, but also so I have a reference to go back to. Can you give me any tips on re assembly? I see the use of a press and special adaptor tool to hold the plate for vertical pressing. I am hoping I can use the heat and cold method to get away from having to use pressing. I will heat up the plate and freeze the bearings hope they will just drop in. then use the same approach heating up the plate/bearings and freezing the counter and main shaft to install them. The village land guy just uses the main nut to draw the main shaft in but using spacers instead of the rev/5th gear. tighten the nut to pull the shaft into the inner race.
-
a little follow up on this. I removed the counter shaft nut, normal right hand (CW to tighten) so I could get a better view of the threads. when I spin the main shaft of course the countershaft spins the opposite direction. I can just see enough of the main shaft to see the threads moving the same direction, that is moving inwards at the same time as the counter shaft is moving inwards. This tells me the main shaft must be left hand to have the same inward spiral as the opposite turning counter shaft. Got me a 38mm box wrench so next post will be about getting the shift forks and rods out of the way so I can remove the rear main shaft nut.

