One Way
Free Member
-
Joined
-
Last visited
Everything posted by One Way
-
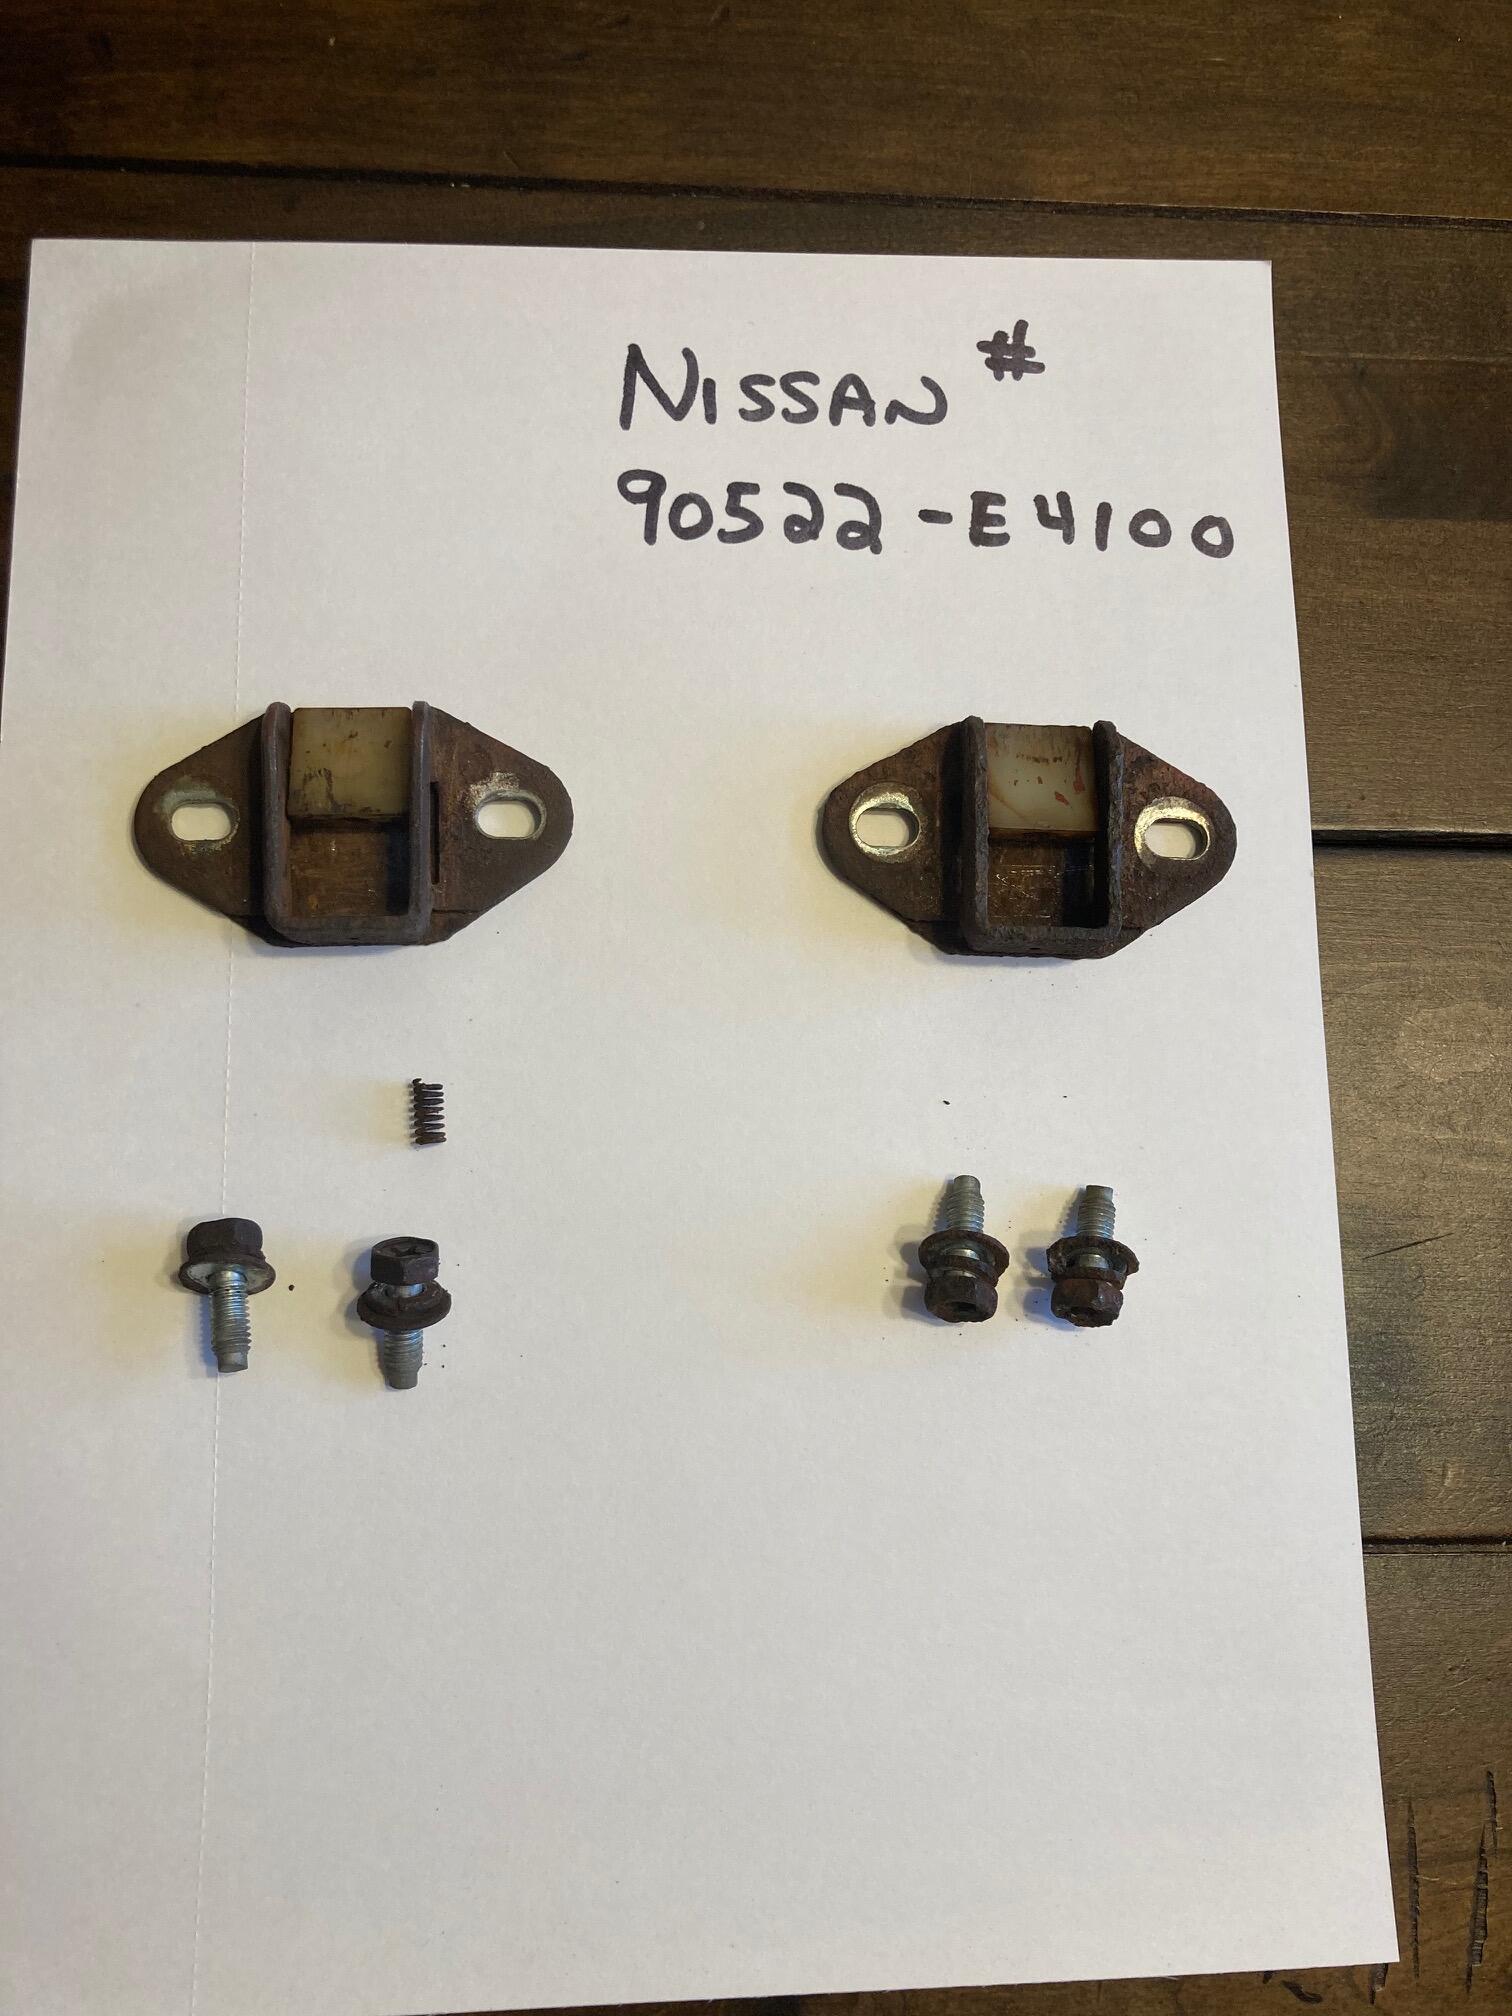
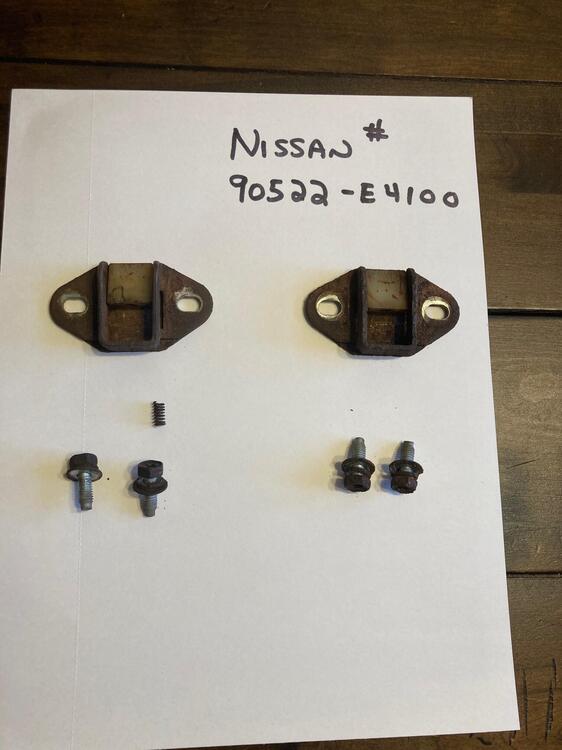
I was quite surprised that this part is still available through Nissan and other suppliers. All told it would be around $50 to get a new pair. Just trying to budget where possible. There are many more important places to put $50 into this resurrection project and the rear hatch actually functions quite well as is but just want to clean up and at least paint these parts. The nylon slider is in good shape. I would need 2 small compression springs and not sure of what was originally placed to cover over the springs. That part is long gone. It really interests me how this part was originally assembled to have the nylon slider captured in the bracket. Trying to send along a picture with my wonderful wife's help. Thanks, John-Lugoff, SC.
-
The resurrection project is moving towards the rear hatch area. Looks like I may be purchasing the new replacement repair panel if I can not fabricate a decent looking piece. A quick project on that portion of the car is the guide brackets with the nylon slides and small compression springs. One spring was completely gone, the other mostly intact. Is there a way to safely remove those nylon guides so I can media blast, clean and paint those brackets and later reinsert the nylon guides. I really do not want to bend the bracket to remove them. Not sure how they were assembled at the factory since the bracket is spot welded. Any tips will be appreciated. Thanks, John-Lugoff, SC.
-
I also am not quite sure about the details either. The cable may just be corrosion seized into the slotted portion. If you are wanting to install a new cable, a die grinder or Dremel too with a cut off wheel will quickly slice through the cable. I did that up near the horseshoe shaped cable guide just to get the cable detached and out of the way so that I could remove, clean, and paint the bracket, control rod, and related pieces. Good luck with a tough project. There are are a lot of parts and pieces in that whole handbrake mechanism that need to work properly. Thanks, John-Lugoff, SC
-
Hopefully I got the PM to go through. Not much of a computer communicator. Parts catalog says 4 and do vaguely remember pulling those same clips off the drum end quite some time ago. Thanks, John. Hope to hear back from you on the PM. I have a day off today so I will check it in between odds and ends errands and projects today.
-
Thanks for the response. I will be needing 4 of the clips. Do you do your own plating at home or is it done through your workplace? We can make arrangements for payment and shipping. Would $25 be adequate? That is about what it would cost if I ordered them from ZCAR. Thanks again, John-Lugoff, SC. Not sure how to securely share our addresses with each other so I can get a check in the mail and you can put the clips in an envelope.
-
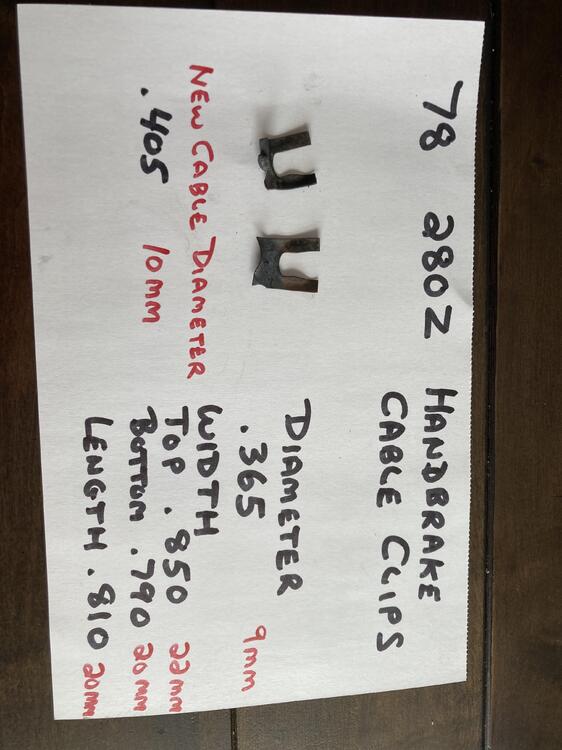
Thanks for the possible offer. My wife got the picture loaded for me. It gets frustrating with parts not having any dimensions or specs in so many of the descriptions. I send a few comments to O'Reilly corporate every week for adding pertinent info on their parts description page. Last week was a classic with a power steering pump pulley on a Cadillac that used 2 different sized shafts from OEM. The only info under description heading was "BLACK"-no dimensions whatsoever. Their e-mail response was that info will be added into their next update. Dealing with this every day at work makes you wonder who is actually creating these computer catalogs. I was hoping to find a generic part number for these clips but am not coming up with any dimension info. ZCARDEPOT does show these clips but again no dimensions shown. Thanks for listening, John, Lugoff, SC.
-
Success with the clip removal. Twisting and prying just was not working except for bending up the clip flange , so I heated up the clips with the torch and pulled them right out with very little effort. Obviously can not do that if you are planning on reusing your cable-the rubber sheathing melted off real quickly. I will be needing new clips to go along with the new cable. I will do some research and see if we can come up with a good part number. I have the Raybestos cable which appears to be of good quality and crimps similar to the original cable. I will try to keep you updated. All the other handbrake parts are either in the EVAP-O-RUST jug, or have been cleaned , primed, and painted with new cotter pins and flange bolts already in my parts bag with the new cable. Someday I will actually start putting all the new or refurbished parts back on to the resurrection project. Thanks, John-Lugoff, SC.
-
Thanks for the helpful tips. Hopefully I can get back at the project next week on my day off from work. All of the pictures and diagrams I have seen show those two extension springs holding up the cables. Mine has two rubber straps. The cable runs through a larger hole in the strap and the top end has a small hole for a bolt and washer mount. The new cable came in yesterday. Cable looks correct and it came with just 1 odd shaped hook all in a sealed bag. There was one hair pln clip floating around in the box the sealed bag was in. Not sure what those are for or if I was supposed to get 2 odd shaped hooks to replace those extension springs or in my situation the 2 rubber straps. The picture and detailed description of the ordered cable does not show or mention any clips, hangers, etc. I will have to figure out what my best options are when I get back under the car. I am leaning toward the rubber straps. They survived 40 plus years but their age is definitely showing. Thanks again, John-Lugoff, SC.
-
Just a helpful tip for installing the ROCKFORD U joints. Slightly chamfer the ends of the clips. This makes it much easier to rotate the clips around the caps so that the majority of the clip is flush with the flat portions of the yokes. The process is a bit tedious cleaning off the stakes on the yokes and then getting the clips to rotate around the caps, but it has been an enjoyable project. I would definitely recommend the ROCKFORD u joints as a repair option on these "NON-SERVICABLE" propeller shafts-using the DATSUN terminology there-I still find myself calling it a driveshaft. Thanks, John-Lugoff, SC.
-
I am having the same exact issue on my 78 280z. The new cable is on the way and worked on the hand brake assembly a bit today. Sprayed everything with Blaster. Removed the 4 bolts holding the plate to the tunnel and ended up cutting the old cable to remove the equalizer shoe and components. Those are going to be cleaned, blasted, primed and painted with all new hardware and waterproof grease. My driveshaft is already out and repaired with new u joints. I tried the pry bar routine but only got the clips to angle off and they did not want to angle back to a straight up position. Thanks for the great picture. I originally thought the clips should be facing out in the other direction but I guess that is the way it was assembled at the factory. While on the brake cable topic all of the parts diagrams I am finding show 2 springs to hold the cables up to the frame but mine has 2 thick rubber hangers the cable slides through and the other end of the rubber hanger is bolted to the frame. The rubber hangers are not in the best of shape and was thinking about using the rubber tail pipe hangers to secure the cable rather than some extension springs showing in the parts diagrams. Any help will be appreciated. The resurrection project continues to move forward but very slowly. Extremely busy at work and very shorthanded with team members so progress has been limited due to lack of available time. Thanks, John-Lugoff, SC.
-
I am a bit unsure about the replacement floor pans available for the 2+2 version which we are working on resurrecting. I have made my own repairs on the rear floor sections with some 18 ga sheet metal and they came out OK but lots of work for such a small area. The preformed front floor repair panels would be a much better looking and easier option. Will the standard 280Z panels work? Which brand option works the best. Not afraid to have to do some modifications, additional fabrication to make them fit and work. Thanks in advance for any helpful info, John-Lugoff, SC.
-
Thanks for the reply. The parts are on the way. I do have a tubing bender tool and flaring kit. A quick look at my filter/drier appears to have AN style fittings. I will look closer at the lines. As mentioned before, I am not too familiar dealing with A/C systems since I was born and raised in the Northeast and we really never needed AC in the vehicles we owned. Down here in SC it is almost a necessity. I am much more familiar with working on the heating systems-a necessity when it is 15-20 below zero up in the mountains during the winter. Thanks again, John-Lugoff-SC.
-
Taking a chance and ordered from FOUR SEASONS- filter/drier #33416 pressure switch #35758 connecter-pigtail #37219 valve core kit #26777 Hopefully these parts will fit and function properly. The mounting bracket removal should not be very difficult. Just uncertain about the switch and the correct pressures. Any helpful experience and info welcome, thanks, John-Lugoff, SC.
-
The original replacement for the 78 is either not available or extremely high priced. Mine has the 2 hose fittings and 1 switch fitting at slightly odd angles. A filter/drier for a 79 280ZX is very inexpensive, hose fittings appear to be the same size but angled differently, a switch port is capped off also at a slightly different angle than the original. Will that part #33416-FOUR SEASONS-work in my 78 280Z with some plumbing modifications ( it will be needing all new hoses and lines anyway) and some bracket modification. I think I remember seeing a YOU TUBE video of that bracket being cut off and using the original mount bracket. I am not very knowledgeable on A/C systems. Just trying to line up new parts or refurbish the old ones for the A/C system. It is quite strange why a similar functioning part can be priced so drastically different from one model year to the next. Thanks for any input or advice, John-Lugoff, SC.
-
U-joint #2 installed smoothly and seems to pivot very nicely in the differential end yoke. Next project is to install the 2 end yokes to the driveshaft tube yokes. I may have to build some type of jig to hold the tube while I press in the other caps with my small arbor press or find a very patient helper to securely hold on to the tube. I will keep you all updated and will try to have my wife post some pictures of the finished driveshaft. Thanks, John-Lugoff, SC.
-
Very successful u-joint install on the transmission yoke with the ROCKFORD #430-10 kit. Pressed in beautifully with my small hand arbor press. The only tricky part is rotating the clips so that you have the maximum contact between the yoke and the clip. Some patience and very gentle persuasion seemed to work well with that process. I will now proceed with removing the differential end u-joint from the shaft, clean the yoke cap surfaces, then finish cleaning, priming, and finish coating the driveshaft, before installing both joints. I did not want to waste the time removing the other end until I was confident the new joints would work on the " NON-SERVICEABLE" driveshaft. I will keep you updated as the slow progress continues. Thanks, John-Lugoff, SC,
-
The Rockford Driveline #430-10 staked in u joint replacements have been ordered. Very pleasant and helpful on our phone call this morning. The online order process kept locking up here on our computer and the phone call order actually put the pricing a couple of dollars less than the online price. Will keep you posted on the progress. Also looking for suggestions on the best paint and color for the driveshaft. The axle shafts came out real nice with the chassis epoxy satin black VHT #SP671. I was thinking more towards an aluminum color for the driveshaft but have not located any epoxy paints that color. The engine ceramic aluminum paint I have been using on other parts and brackets also sprays on nicely but it probably is not as durable as the epoxy spray. Thanks again, John-Lugoff, SC.
-
Thank the LORD my wife is home and semi functional from the spinal fusion surgery. I was able to wander out to the shop and got the front staked in u joint removed. Used the Dremel tool to grind off the stakes the best I could followed with some heat and some pretty aggressive pounding with a proper sized socket. I was not able to remove either cap but got one side as far out as possible and then carefully cut the exposed cross with the die grinder. Followed the same cutting procedure to remove the cross from the slip yoke. The caps easily pressed inward with minimal pressure. Touched up the stake points with the Dremel and polished the yoke surfaces with sanding barrel. I may run the brake cylinder hone through them later. I will be ordering the joints from Rockford Drive Lines very soon. Thanks, John-Lugoff, SC.
-
Some research found that Rockford Drive Lines 815-962-1411-has developed a whole series of u joints for the many vehicles that have staked in, "non serviceable" driveshafts. They have a very informative website, but the installation instructions are a bit generic in nature. According to the specifications as well as the vehicle application chart found on their site, the staked in Z models can be replaced with #430-10 which includes the inner retainer clips and the grease zerk that is installed in one of the caps. The specs are listed in standard sizes. .867 cap size which is 22mm and the lock up dimension of 1.4. Measuring my joints and yokes reveals an exact match. I will keep you posted on the progress which will be slow. My wife is having major surgery-spinal fusion-next week, and that obviously will be my top priority along with my job in the coming weeks. We are just trusting the LORD for the whole outcome and recovery. Hope this info may be a help to some others with an actual part number and reputable supplier. Thanks, John-Lugoff, SC.
-
The axle shafts came out beautifully with media blasting, epoxy paint, and new Spicer U joints. The u joint removal was a bit tough but after everything was cleaned. polished and painted the assembly went very well with my small hand arbor press and correct size socket to press the caps into the yokes. I was hoping to do the same with the driveshaft. The cost of 2 u joints and some labor time is way more in line with the limited budget resurrection than a whole new shaft I will try to do some more research for correct size u joints. Internal clips at the correct width would be ideal or possibly having some grooves cut in the yokes to accommodate external clips. I am not aware of any driveshaft specialty shops in our area but may have to do some research into that as well. Thanks again, John-Lugoff, SC.
-
Progress slowly continues on our resurrection project. The driveshaft is now removed and I would like to replace the u-joints. 40+ year old car that has not been on the road for over 20 years. The joints are staked in and the repair manual says entire propeller shaft must be changed. I have found 2 different catalog listings for u joints with different cap diameters, one of which comes with no hardware, clips-the other comes with clips. I have not yet accurately measured the existing u joints for size yet but looking for some input from the more experienced Z experts here. The Spicer brand u joints for the drive axles installed perfectly, just hoping to be able to do the same for the driveshaft. I have also seen a listing for a center support bearing on the driveshaft but it does not appear there was ever one on this car, but there does appear to be a place to mount one at the front. Thanks in advance for the help. Just hate the idea of having 40 year old, I am sure deteriorated grease and u joints , in an otherwise good, undented driveshaft. Thanks, John-Lugoff, SC.
-
Removing those plugs was a bit of a chore. My head and camshaft was quite rusty and I wnted a thorough cylinder head cleaning, The thread sealant on those plugs was badly deteriorated, portions of it hanging out, so I removed them and soaked them in some EVAP-O-RUST for a few days. I will be using some good high temp thread sealant on those plugs when I get to reassembling my cylinder head on this resurrection project. I believe they are somehow used in the casting project for the water jackets? The threaded plugs are certainly more substantial than freeze plugs that also seal off water jackets in the engine casting. Merry CHRISTmas-John, Lugoff, SC.
-
Just wondering about some input on the valve cover gasket material. I am seeing cork/rubber and composite material listed with very little additional info. Which seems to work better on this long valve cover? Also wondering about the valve stem seals Are the VITON material seals the best choice or should we spend the extra money on the polyacrylic seals. Looking at the MAHLE brand for the seals. Thanks for all the help on this resurrection project. Just trying to line up all the parts needed for the cylinder head rebuild. Thanks, John-Lugoff, SC.
-
Any recommendations on the valve stem seals? I have been checking on the MAHLE seals. VITON or POLYACRYLATE? A bit of a price difference. I am more familiar with the VITON material but not sure if the POLYACRYLATE is worth the few extra dollars. Thanks again for all the help and encouragement, John-Lugoff, SC.
-
This resurrection project was supposedly "RAN WHEN PARKED". The problem was the park. The paperwork trail looks like it was badly parked for about 15 years. Almost 100% complete original, no parts missing except for a center cap on one of the wheel covers. The head gasket looked good, no signs of leakage or blown areas; All of the valve train was intact but rusty from poor storage. I am going to assume it did run until parked and the valve train components all look functional. If and when we get this project running it will not be driven hard so reusing the OEM valve train parts I think will be safe. The valves are currently in the soak tank to clean off the carbon deposits. The valve seats have been cut at our local machine shop and I am going to lap in the valves and see what the valve faces look like after a coarse and fine lapping compound procedure. Our machine shop said the guides measured up fine and looking at the valves, the stems look very clean. All of the valves came out easily when I disassembled the head. The camshaft was seized on bearings # 1 & #2 but some BLASTER soaking and gentle persuasion got those freed up. I will try the budget cylinder head route and do the lapping and assembly myself and continue the cleaning of the camshaft which will take some time. Who knows what the specified limit may be. Lots of repair manuals leave you guessing on some specs. Hopefully they are not super critical limits. Thanks again for all the helpful input, John-Lugoff, SC.