


inline6
 Subscriber
-
Joined
-
Last visited
Everything posted by inline6
-
 Hmmm. I didn't know that Motorsport Auto had an all aluminum one. They don't give much info on the website... Here is the one I am looking at: http://store.summitracing.com/partdetail.asp?part=GRI%2D1%2D25241%2DX It is all aluminum and crossflow. It's 189 + shipping. I guess they are tempting because of the price, but unless someone else has had luck making one fit, I'm in no hurry to fabricate everything. G
 -
My 3 core radiator has developed a slow leak (where it was repaired once before), so it is time for an upgrade. Has anyone bought an all aluminum crossflow like Griffin that was an "easy" fit? I have some fabrication ability, but don't want to reinvent the wheel. Looks like Griffin has one that is 26 X 19 that might work. Garrett
-
I was just reading your original post and noticed this -- "And prior to me tuning the carbs the sudden drop off didn't exist." This is really confusing as all you did was change float height and needle height. What are the chances that something else has gotten off track during the tuning process? "At this time I have both carbs turned out 3 turns, although I can't sense any difference from 2 1/2. But with this issue I figured I'd go a little extra. Much more out and the idle becomes erratic." Not that this will fix it either, but I think you are running them unnecessarily rich by this description. I run mine leaner and leaner until I can feel the hesitation, (usually during part throttle). When I get that hesitation, I turn them and 1/8th to 1/4 turn richer and the hesitation goes away. It's too bad you are not near by. I'd love to get my hands on your car for a few minutes and see if I could find out what is wrong. Any idea what is causing the vibration? Obviously where I was headed was if you have different amounts of air going into the front vs. rear carb, then that will cause engine vibration at higher rpm and could cause the problem of running into wall at 5k rpm. Is the problem load dependent? In nuetral, sitting in the driveway will it climb to 6k and beyond quickly? What does running without the air cleaner cover and filter, but keeping the backing plate (with air horns) do for it? Do you have a timing light? Can you observe the timing marks by operating the throttle by hand from idle? What do the timing marks do as you rev? Full advance is about what? at about what rpm? Garrett
-
Persistance will find the problem Daniel. Keep with it. What about the synchronization of the carbs? Are you familiar with that process? Your latest note with the new bit of info about lots of vibration makes me think further about that being the possible problem. Couple of additional questions: Where you have the mixture screws set for each of the carbs: are they set the same amount of turns in relation to each other? In other words are they both set at exactly the same thing, whatever number of turns that is? And where are they: 1.5 turns out each for example... Incidently, the best way to set the needle heights (which isn't going to fix your problem) is to pull the pistons, set the needles so that they are visibly out a little bit too far, then tighted the set screw just enough to snug the needles to keep them from falling out. Next, screw the mixture screws all the in until they stop (full lean). Finally, put the pistons in the carb bodies and set them down gently. Put pressure to make sure the piston bottoms out on the carb body-- at this point the shoulder of the needle will bottom out on the nozzle, and the nozzle will push the needle into the piston, so that you have an ZERO clearence between the top of the nozzle and the shoulder of the needle. Remove the piston gently and then tighten the screw that holds the needle. Reassemble as usual-- remembering to reset the mixture screws by following the regular procedure. I had a brand new set of 4 screw SU's (never used) and I set the needle heights with the straight edge (as the factory manual instructs) and when I opened the throttle plates and provide backlighting so that I could examine the needle relationship to the nozzle, I could actually see a gap difference between the shoulder of the needle and the base of the nozzle from the front carb compared to the back carb. It is this factory machining tolerance that is the reason why the best mixture setting can be different when comparing your front and rear carbs. If you set the needles as I described above, you should be able to use the exact same setting (number of turns) on both carbs. It certainly makes it easier to remember your settings! Garrett
-
"The two main changes I made with the carbs apart were to reset the floats (both were a bit more than the .55" recommended in the video) and to set the needles with the shoulder flush with the piston (They weren't even close). " Is there a slot shallow slot on the bottom of your SU pistons that goes all the way across? Did you set the needle flush with the bottom of the slot or with the bottom surface of the piston? There is an even better way to set it than either of these two, but if you did it the first way I described above, please do it the second way. The second way is how the factory manual sets the height. Use a good straight edge, and set the needle shoulder flush with the bottom of the piston (not the groove, or slot). After doing this, you will need to adjust you mixture screws. Have you synched the carbs with a Uni-syn or other sychronizer tool? Reverberation: I think you can rule that out; not the problem. Set your throttle to open 102%. By that I mean, visually check that while pushing and holding the pedal to the floor, you can't operate the linkage at the motor by hand to get any additional movement. Set the pedal stop at 1 turn lower than where full throttle occurs. This will make sure that the slop in the linkage won't cause a problem. When you say you ran without the air cleaner assembly and the problem was resolved, what does resolved mean exactly? Did it weeze its way to 6 grand? or did it pull hard to 6 grand in 1st and 2nd? or did it pull past 6K? You should be able to pull past 6 grand easily. There is definitely still a problem. What brand air filter are you running? Garrett
-
"On the way back I experimented with turning the mixtures a full turn richer and a full turn leaner. Neither helped..." Neither helped? Was there a noticable difference in engine behavior? When I put mine a full turn leaner from where they run, about all my car will do is idle. Hitting the throttle just makes it hesitate and backfire through the intakes? A full turn richer just makes my car start fouling plugs and it loses a little bit of power-- by the way. What needles are you running? The original N-27's? Garrett
-
It's been my experience that the timing and mixture adjustment are inextricably linked. What are you setting the timing at? Try advancing your timing about 7 degrees for kicks and see if it changes anything. Also, you say that you adjusted the float level. Su's are very sensitive to this level. Are you positive that you set in exactly how he described it in the video? The reference point is unusual in my opinion. I set the level by cutting a small nail to the specified length. I usually miss it a bit on the long side and then grind the end to the exact measurement. The Nissan factory manual for 1972 states 14-15mm or .5512 to.5906 inches from the recessed, flat area inside the float cap to the top of the flat, metal part of the float. I modify the nail to be at 14.5mm Next, use needle nose pliers to hold the nail in place and then lift the float up to pinch the nail vertically in place, then blow through the fuel inlet tube. It is correctly adjusted when I have to put some effort into blowing through the tube, and can just barely hear the air squeeking past. Garrett
-
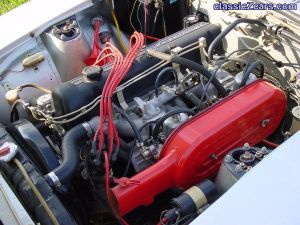
 I just added a picture of the engine with some notes. Not much to brag about... yet! I got the L28/N47 motor with 77k on it in 94. Pulled the head, rebuilt an E88 with competition, stainless valves. Oversize intake valves, std. exhausts. Some porting (mainly exhaust). Everything else is stock. Didn't even mill the head... I think I'm lucky if I have 8:5 to 1 CR.
 -
 L-28, E-88, Manley Oversize intake valves, stock cam, Clifford Research header, rebuilt SU's, Euro distributor-- yeah with points!
 -
Yes they are. 16X8 up front and 16X9 in the rear. I spent a long time measuring the car to make sure I was ordering the right offset to fill the flares.
-
10 years of working and still working!
-
Another option: If you have rubber pieces that have mild surface dry rotting, you can actually use sandpaper to "restore" them. The sandpaper removes the "dead" rubber. I'd recommend starting with 240 grit, and then go to finer grades until you have the texture you want. I usually finish by rubbing with a rag soaked in acetone or lacquer thinner-- then 303 or other protectorant. Can be a lot of work, so keep that in mind vs. the option of new ones. Also, I don't know if these are the ones you need, but I just put a pair on eBay. http://cgi.ebay.com/ebaymotors/ws/eBayISAPI.dll?ViewItem&item=2433006582 Of course, any rubber part you need is not available any longer, this may be a good option. Garrett
-
Hey Gav, I just read the whole post for the first time. If you trust the compression guage, and those numbers, I'd rule out anything major. Head gasket is fine. Water coming from the exhaust is normal during warm up-- plus your not losing coolant and the oil looks fine. Car seems to run fine too you said, right? I'd also rule out clutch as well. What type of electrical system do you have on the motor? Also, what are you running for an air filter? I'm thinking it's electrical. Have you checked timing with a light yet to see if it is different than usual? Garrett
-
Thanks all, so far... I'm glad I'm getting all of these responses. I floated this topic by once before as a reply to a post and it didn't resonate I find it interesting that we Z car owners seem to fall into two groups with these very different exhaust systems. Wouldn't it be really cool to have recordings of both types of systems on the web for us all to listen too? I think the article on by http://www.sportzmagazine.com with the supplemental downloads on http://www.zfilms.org/SportZMag are helpful to people who are about to spend big $ on an exhaust. I wonder how many of us have taken the plunge and not been happy with the results like blitzkraig and myself? I haven't been able to listen to yours yet Gav. Downloading the Divx deal hasn't worked and haven't timed it right on the GeoCities page. I'd like to see a page that has multiple downloads of different systems for our Z's. Maybe that would be of help to other Z owners looking to replace their exhausts. I'm going to put this project on the "to do" list for my web page, but at the present rate, it is going to be 2008 before it gets done. inline6
-
Thanks for the info guys. What diameter pipes are you guys with the dual pipes running? Gav, your exhaust goes straight back after the resonators? Did you go under the fuel tank? Your system doesn't run out the stock location in the rear panel? Also, I'd like to hear from some others about what they have! Garrett
-
Ok Zedguy, Gav and Victor, Don't keep me in suspense. You've got great sounding systems... Now tell me what you have. 2.4, 2.8? header, stock manifold? single or dual pipes? from header or manifold down to one then back to two or two all the way? diameter of pipes? glasspacks? mufflers? what brand? Thanks! Garrett
-
I know this has been talked about ad nausium but: Having had a couple of different exhausts (spent a good chunk of money on the last one) and heard a few other Z's I can say that the range in sound is quite amazing. I could really use some guidance because it will save me a lot of money-- you see, if I don't get it right, I'm just going to keep trying til I do. Anyone think theirs couldn't sound better? If so, what do you have? I'm looking at a bunch of stuff. I'm keeping my Clifford Research header (dual 3 into 2) but thinking about: merging to a single 2.25 or 2.5 all the way back with Round: Magnaflow Injen 5zigen Supertrap etc. Car is NA with 2.8 and SU's-- mild port work and big valves. Also thinking about adding back a small center resonator as necessary. Anyone got some mp3's of your car like they did with the 350z exhaust in the SportZMagazine test this month?
-
Not enough body shots for me... Car is in MI. Yeah it was garaged but, the one photo of the rocker shows the rear quarter dog leg that attaches to the rocker is puffed out. Fresh paint??? I'm thinking a fair amount of fresh bondo too. But, just guesses as it is hard to tell from pictures, and there aren't many of them of the exterior here. Garrett
-
Thanks to both of you for the info. I just played with the timing for a couple of hours. Although seat of the paints is not scientific, there is enough of a difference between 17 BTDC and 32 BTDC to feel a difference. 32 BTDC or as best as I can currently read it, is where the pinging goes away in 4th with full throttle at 30 MPH. At this setting 6000 RPM comes a bit quicker in 1st, 2nd, and most noticeably, 3rd. Also at this setting, when I operate the throttle by hand with the timing light on it, I show something in the neighborhood of 45 degrees of total advance. Seems to be fully advanced around 3000. Also, I am not having any cold start problems. That just seems bizarre to me. I checked TDC with a screwdriver in the number one spark plug hole and the marks on the pully are correct. I have the euro pully with just one groove. The mark furthest left when facing the car from the front is TDC. Each of the other marks (I'm assuming) is 5 degrees. I wonder how many Z car owners are setting their timing by the book and missing out on a couple of HP? Garrett
-
I read this in an old post: "Much better to set your timing using total advance of 32 Degrees BTDC with the vacuum advance off and plugged @ 2,500 RPM. So, no matter what the initial mechanical advance is setup for, you'll know you've got it right." How is everyone setting their timing? I have a "Euro" distributor with single points D609-52 I think is the number on the side. When I set the timing at 17 BTDC (at 650 RPM as the workshop manual states), it runs fine but not as well as when I set it closer to something like 27 BTDC at the same RPM. Yeah, I know, that's a lot. And when I rev it while checking with a light it definitely is going past 36 degrees BTDC although at that angle, it is hard to read with the flat scale that is on the block. Details: 77 L-28 shortblock - no mods E88 head -not shaved with stock cam, stock Su's with SM needles I run 89 octane gas. Seems like setting it so that it just pings ever so faintly with full throttle in 4th gear from 30 to 40 mph works best for power. Also, how are you reading 32 BTDC on 240's if you just have a pointer on the timing cover and 5 lines on the pulley? That only gives you 25 degrees, right? Garrett
-
When welding on the exterior surface, try to use a mig welder and just tack weld it one tack at a time. Tack about every inch, then go back and keep tacking in between-- waiting for the panel to cool in between tacks. Don't run any beads. Takes a long time but you won't get panel warp. Also the length you are dealing with here is not long-- so won't be too bad a job. At all other areas, drill holes in the repair panel and then rosette (sp?) weld. Essentially, these are like spot welds. Been there and done that. Sheet metal work is very time intensive. Also the repair panels in the aftermarket don't fit well. Test fit and modify as necessary to get the original contours and wheel well opening curve. Good luck! See my website -- essentially an article right now-- for some of the work I did on mine. Garrett
-
Sorry. Looks like the spaces were removed. I'll try one more thing. Visualize the below image with the x's replace by spaces. xxxxxxxx-------------- xxxxxxxx{xxxxxxxxOx} xxxxxxxxx----------------------- xxxxxxxxxxxxxxx{xOxxxxxxxxx} xxxxxxxxxxxxxxxx--------------- G
-
I've got two oval Magnaflow mufflers stacked in the back of my 240z. Magnaflow number on them is 11124. They are 2" inlet and 2" outlet. One side is centered and the other is offset. It was a little tricky, but if you use the centered as the inlets and the offset as the outlets, you can stack them so that the outlets are straight up and down coming out of the valence. This offsets the mufflers like this: -------------- { O } ------------------------ { O } ---------------- This fits nicely where the rear quarter panel tucks in at the bottom. I'm sure Magnaflow makes this canister size with smaller inlet's and outlet's. Could be a good option for you. I also had to curve the upper outlet down and out to get the mufflers located so that they were tucked up where they look good-- just a slight S bend though. Garrrett
-
Actually, I still have a little time. If anyone has a 70-71 dash in VA, please contact me. I am thinking $45-50 bucks (cracks fine). Let me know. Garrett
-
I know this is a long shot, but I need to know if anyone can help me put my hands on a series 1 dash in VA tomorrow. I am in the Charlottesville area. Condition doesn't matter because I am going to get it restored. If you have a Z friend near here, please shoot them an email and see if they can help me out. My car was made in 12/70. gman@firstva.com day phn 434-817-1000 Garrett