EuroDat
Free Member
-
Joined
-
Last visited
Everything posted by EuroDat
-
 Looks neat and clean. Imo the front looks more involved, but its the rear bumper with the spot welded bumper guard that needs a lot of work to look good. You need to repaint as well. You got yours off nice and clean. I have seen photos where its been removed with a chissel and the back is all dinted in. Not pretty. Thanks for posting pics of the front. Chas
 -
I used a piecs of 1cm thick armaflex insulation material. It was compressable and made the panel feel a lot firmer when I finished. Armacell - Armaflex You could probably pick up an off cut from some industrial air condioning company in our area. Here it costabout €30 per sq.mtr of 10mm thick sheet. I might have a photo of it when I did it. If I find it Ill post the photos later. Chas
-
I did mine with a jack under the sump. Here are the steps I took: 1. Disconnect the battery 2. Loosened the afm and its hoses. 3. Remove fan shroud, let it hang on the fan. Check your top radiator hose has enough slack. Mine did so I left it attached. 4. Support the engine under the sump. Your car jack with a block of wood will work. 5. Remove the bolts holding the engine insulator bracket to the engine. These are the bolts the go into the block. Note: The top bolt on the passenger side bracket and the bottom bolt on the drivers side bracket are a pita to get back in. If you don't want to remove these brackets you will need to jack up the engine a lot more. Mybellhousing hit the tunnel before I had enough room. 6. Remove the top bolts from the insulator and remove the bracket. That will give you room to get the insulator out. The new insulators will be hard to fit because they are new and firm, where the old ones are saggy and softer. They just don't seem to want to work with you. You will need to be able to get under the car to get at the bottem bolt on the insulator and the bottom bolts on the block bracket. Do one side at a time, otherwise the engine can move around and damage thing. Chas
-
Your car looks neat de-bumpered. Im planning to do this when winter come back. Weather is to good now to have the Zed of the road atm. Im curios how the bumper will fit the rear qarters. The 240Z rear quarters are recessed so in theory the mounting bracket will need to be shortened a little to stop the bumper from sticking out to far. Jeez, I hope that makes sense. Can you post some photos of your progress? I would like to see what you did for the front bumper change. I ended up using a 240Z Xeon air dam to close the gap under the bumper and fitted the 240Z turn indicators. Still looking for a 240 grill. Goodluck with your swapping. Chas
-
By far the easiest way to remove tar sound deadening material is the dry ice method. Its easy to do. Heap it on a small section to start with to get use to the technique. About 1 to 2" thick and wait a couple of minutes. You will hear the tar cracking and then its ready to remove. Pick the pieces of tar out of the dry ice and move it the the next section, add more dry ice when needed. Use a good pair of leather gloves when handling dry ice. Its very cold and can cause nasty cold burns. Welding gloves work fine. Keep the doors and hatch open and well ventilated.
-
Just to add to Jims post. You will also need the flywheel to do this swap. It has a 240mm contact surface instead of the 225mm in the coupes. The 2+2 version also use the 240mm flywheel. If you go with the coupe clutch remember to use that throwout bearing collar. Im with Jim on the T5 versus the 71C. Specially if you get the 240SX (S14) with the reverse synchro. Yea there is a number of different versions of the 71C out there. Seeing you don't have the bell housing, the 71C might be your best option. If you are technically minded, the swap looks more complicated than it is. Using a series 1 driveshaft or shortening yours is a lot easier then getting the turbo one to fit. The turbo driveshaft is not easy to shorten because is diameter reduces just before the yokes. Tamo3 is swapping a 71C into his 280Z now. You might want to check out his thread. Goodluck Chas
-
I been a little silent the last week. we lost two collegues at work and it shock us up a bit. Reading your last post, I had a similar problem with the air temperature sensor in the AFM. I ended up replaceing the sensor. Its NLA so you will need to find a work around. Here is my thread on how I solved it. http://www.classiczcars.com/forums/fuel-injection-s30/51993-faulty-air-temperature-sensor.html Zed Head came across a possibility, by accident, when he was removing his water temp sensor. You could experiment with the old one and if you can get it apart ok, by two new ones. They cost around $25 from Nissan P/N: 22630-N4200 SENSOR WAT :: Nissan Parts, NISMO and Nissan Accessories - Courtesyparts.com Your 2 second idle run was probably caused by fuel still in the inlet manifold. The ignition works independant from the ECU. After it burnt that fuel it went back to your not starting/running problem. Chas
-
Check the side of the head between 1 and 2 spark plugs. It should read P90A. These heads with hydraulic lifters came out in Feb 1983 on the turbo zx's. Parts for the lifters are very hard to find these days. If they are working good, they are very quiet and very little valve train noise. I have heard of (never seen it) an adapter for them to convert then to normal adjustable lifters. Chas Here is another thread dealing with a P90A. He had trouble and his conclusion to change tomechanical lifters is purly based on his set up and different to your situation. http://www.classiczcars.com/forums/engine-drivetrain-s30/20617-p90a-hydraulic-cam-problems-still.html
-
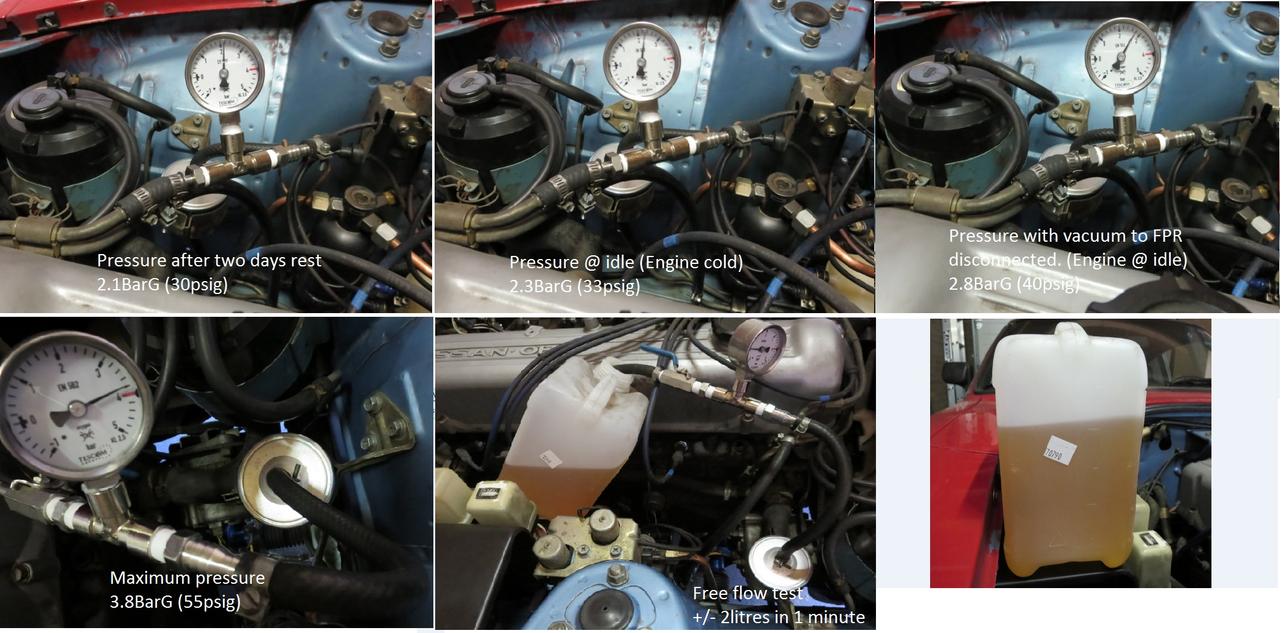
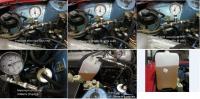
Your right. Thanks Zed. Ill correct it. Something else worth mentioning. I checked my gauge (in the photos) at work and its was reading about 2-3psi high. So 40psi is really about 37-38psi. Its now calibrated (as best a gauge can be) Chas
-
+1 for above advice and a couple of pointers on testing the pump. You know it running, but there are some other test to tell the true condition of the pump and FPR. You will need a guage installed somewhere after the fuel filter and before the FPR. 1. Remove the solenoid wire from the starter. That way you can use your key in "Start" to test. 2. Hold key on start for 10 - 15 seconds. Pressure should read around 36psi. Thats the FPR pressure with no manifold vacuum. 3. Block the return line. I fitted a valve in the line so I could control it if the pressure went too high. Check maximum pressure. A good functioning OEM pump will reach about 55psi. Be carefull if you have a aftermarket. They can develop a lot more pressure and even damage something or blow off a fuel hose and spray fuel all over the place. 4. Check maximum flow from the return line after the FPR. You should get about 1/2 gallon (1.5 to 2ltr). That is with the fuel pump running under 36psi pressure. 5. Engine running: Pressure at idle should be around 28psi. If you give the throttle a quick rev. The pressure should briefly increase as the vacuum dips. Good indication that the FPR is functioning properly. Note: The flow valve is from my testing on my pump. its not from a factory spec. Here is some photos of my test. Goodluck hunting.

-
I didn't know you had a problem with it not starting. You could give some more details. What have you done so far other than replace injectors. What is it doing exactly? Does it crank over? Does it want to start or nothing but turn over or backfiring? Have you tryed using starter fluid to confirm it is a fuel problem? Have you checked the efi harness fusable link? A lot of simple checks that also give a lot of information.
-
Hi Bunny, Welcome to the club. Would be nice to hear how you ended up with a 280Z. There are a threw things that can cause your problem. The thingS that springs to mind is the Cold Start Valve, Thermotime switch and Auxilery air valve (Air regulator). Do you have a copy of the FSM (Factory Service Manual) and the Supplement aka EFI Bible. Plenty of test you can do to troubleshhot the EFI. Follow link to downloads XenonS30 As for the warm temperature. The guage is not that accurate. Better to use a thermometer in the radiator the check the guage position and note the temperature. Goodluck Chas
-
Did you clean the throttle already? It doesn't look that dirty inside from your photo. Still wouldn't hurt to clean it while you have access to it. Just follow Siteunseen advice in post 31. Video: You can not upload videos it the forum. You will need to upload to something like YouTube and post the link in the forum. It will work that way. Strange mix up of parts in your cooling system. Didn't know a Tacoma radiator would fit a Zed. Where is this "Bad seal" that blowing hot air? Can you take a photo of it. I can't imagine what it could be because there is little that can provide air pressure in the engine. Other than steam from to cooling system, which is not a good sign. As for the popping and bogging down. It might be time to get to know your multimeter and start testing your EFI system. These old systems are touchy when it comes to bad connections and that can lead to all sorts of problems. Not saying it will solve everything, but it could influence the engines behavior a lot. Here is a tutorial on how to do some simple checks. That and the checks in the EFI bible will help you a lot in finding problems in the EFI. He mentions adjusting the AFM spring. Don't mess with it. Its better to get it running right first before adjusting that stuff. L-jetronic Fuel Injection Technical Troubleshooting Article Goodluck Chas
-
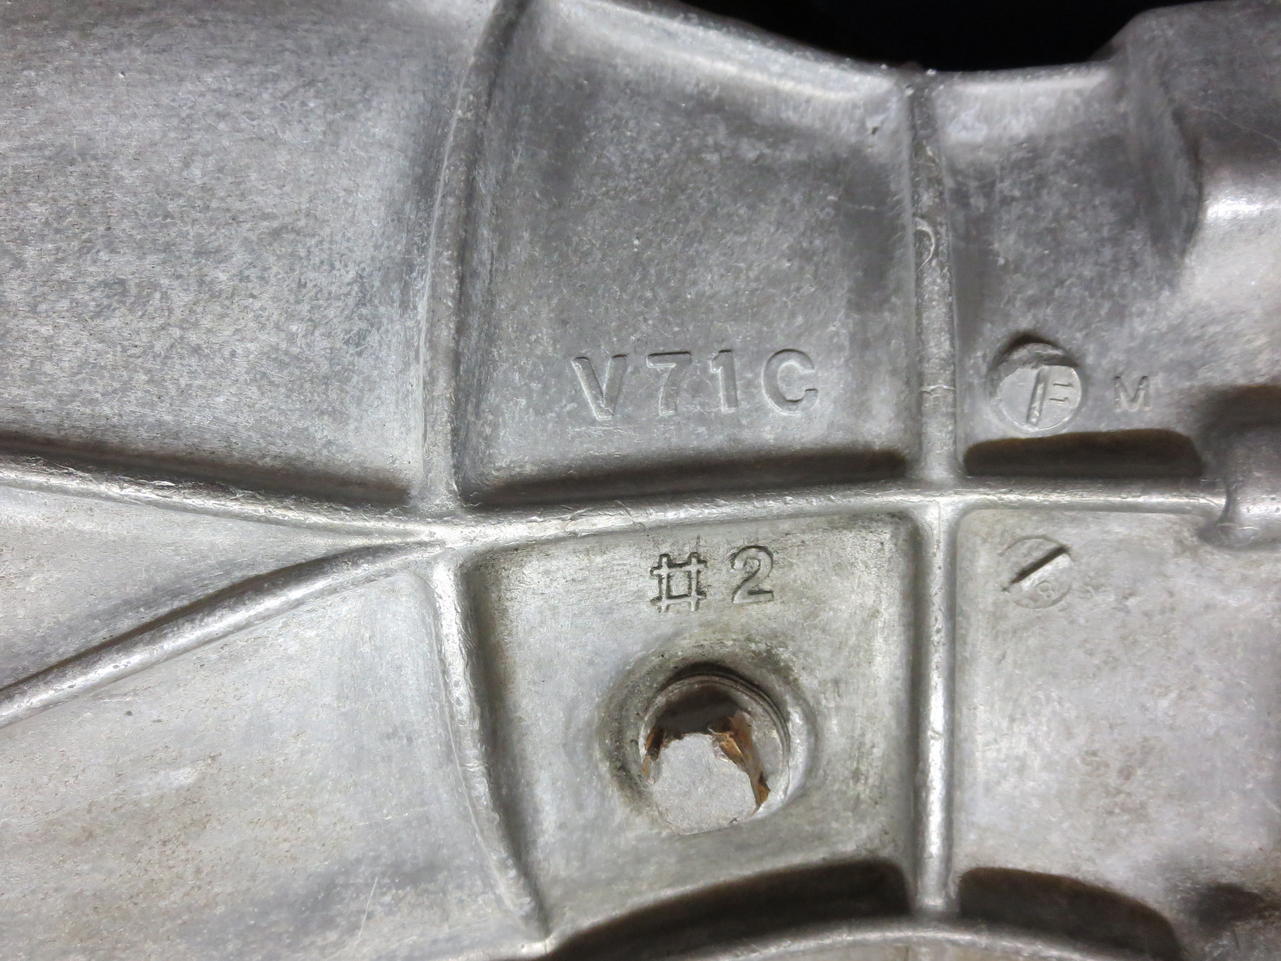
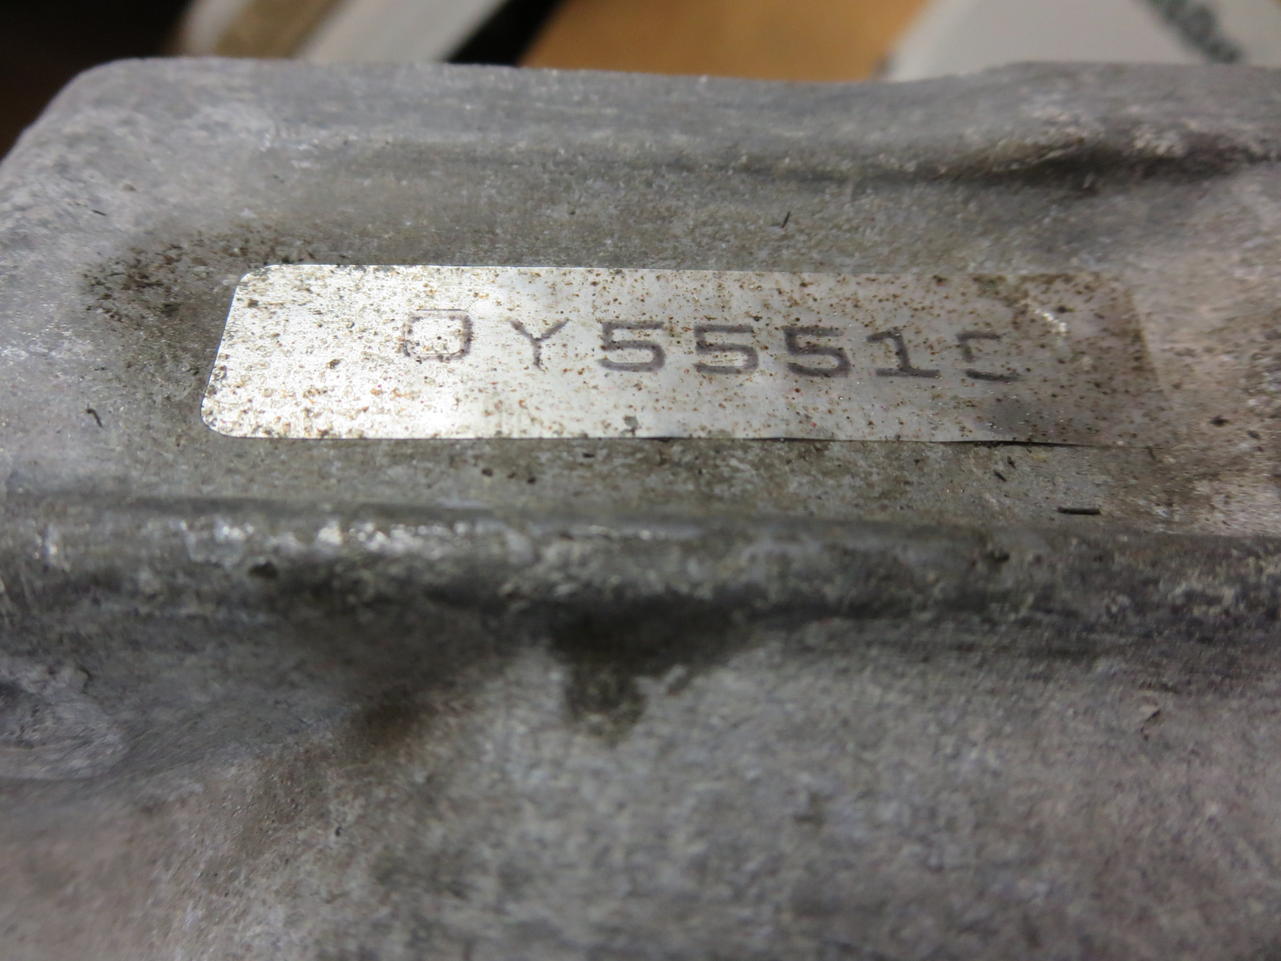
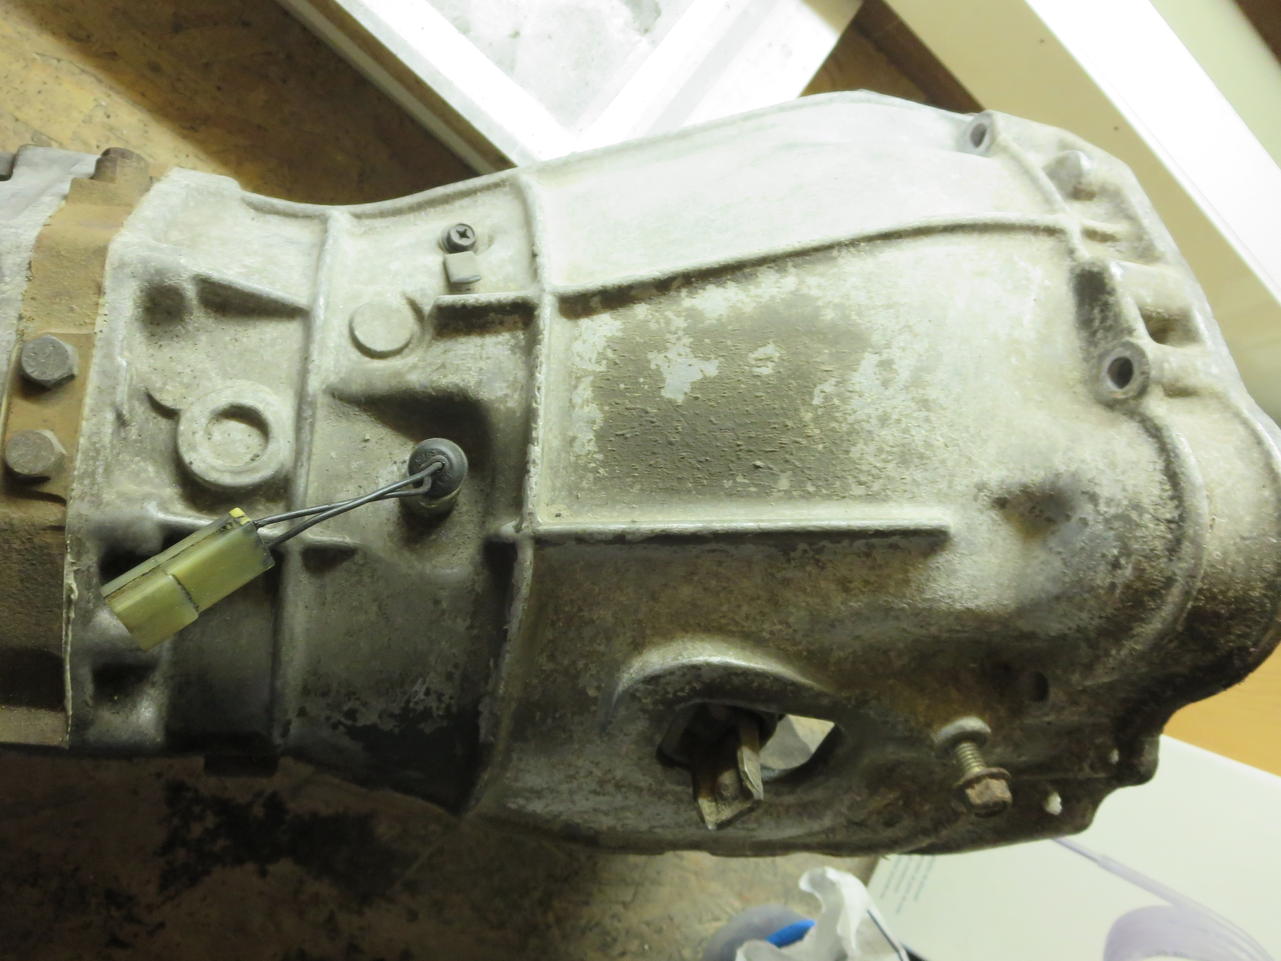
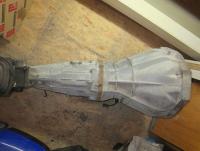
I dug my 71C out from behind all the other junk I have been hoarding and took these photo's. Its out of a 84/85 model 300ZX with 83000km. Im not sure what the sticker means on the bellhousing. It also had a paper sticker on the side with "OK" in black text, but its now fallen off. Ill have to search for it. The V71C transmission has the 17mm wide gears and no reverse synchro. The RB71C transmission has the 20mm wide gears and reverse is synchro. If you hear the term "full synchro gearbox" that is what they mean. My tranny looks similar to Zed Heads tranny. Chas


-
That doesn't seem right. You would think the Bolt head - Washer - Lever - Washer would be the correct combination. That way the lever is in between the two plastic washers. No metal to metal contact and less friction/wear on the parts. Sounds like the lever maybe bent or way out of alignment. Maybe a PO bent it to compensate for an incorrect install? I have a European 260Z manual (hard copy) but it doesn't show any detail of the choke mechanism. Im just rambling a bit, having a 280z with efi myself doesn't help much either. Can you see were it is binding? Is the cable aligned. If the cable has to make a sharp bend, it will bind. Chas
-
Strange that the 240SX tranny has 71B stamped on it? Yer, whats with the animal? Its on both. Looks like a kangaroe. Ill have to take closer look at mine. Its from a 300ZX so it a lotdifferent to the 71C out of the 240SX. Chas
-
You can also try reverse flushing by using your garden hose and a compressed air pistol to reverse flush it. Lay the radiator flat on the ground or a little tilted towards the top with the outlets facing upwards. Fit the garden hose and the air pistol into the bottom outlet and seal it as best you can with a rag or something like that. Fill it with water until it flow out the top and give it bursts of air. That can dislodge a far bit of crape out the core. Oh prepare to get nice and wet. A good weekeind to do it;) The core can get blocked when poeple used stop leak to fix a leak somewhere in the system. I can remember a product called Bars Stop Leak. It had little pellets in it that could cause partial blokkages in the core. Chas
-
Hi Michael, Is the engine still playing up or are you trying to find what could have caused your problems? I can understand the bad feeling about a problem that cued itself, but could come back anytime and WHEN??? Your pressure is reading about right for idle. Consider these gauges are not all that accurate, give or take 5%. Do a full pressure test by disconnecting the vacuum hose to the FPR. The pressure should increase to 36psi. Here is the tests I did on mine a couple of months back when I had bad fuel and a dodgy TIU. Chas
-
Hi Dan, Awsome result. The car looks great. What is the exhaust system you are using. Tale pipes look neat. Chas
-
Hi Tamo, The driveshaft you have is from a 280Z. They used different uni-joints with the smaller diameter. Don't ask how I found that out. You need a driveshaft from a 240Z or a 260Z. Be carefull with the last months the 260Z also strted with the non servicable driveshaft like the 280Z. Like Zed mentioned, if you get a series I driveshaft, you wont need to shorten it. It is already the correct length. Note: Siper cap diameter: 240Z to 260Z nov 74 are 25mm. 280Z 22mm and non servicable. PS: Thats a nice gearbox you are planning to install:cool:. The 1990 240SX had the heavy duty version of the 71C. There is a lot of different models of the 71C out there. Chas
-
Hi Bart, A simple test to check if its a blocked radiator is to drive it and when it gets hot again open the heater fully and fan at maximum. You should see the temperature drop suddenly and remain a little lower. Thats the extra cooling capacity in the heater. Other checks would be to lossen the belt and check the pump turns freely. Check belt tension. Another check is to drain some fluid from the radiator enough to expose the tubes. Check how many appear blocked. If more than a third appear blocked, you're not going to have enough capacity in the weather conditons we are now having here lately. Some old shops will pressure test your radiator and if it appears ok, they can remove the bottom tank and clean the core. I have done it with a friend on his 1971 ford capri radiator. He used it for 6 years without problems and that was in 40degC summers. Good luck Chas
-
The one we had trouble with came loose after tapping it with the handle of a screwdriver. You could hear it when it sprung back. It did it twice an then bled ok. We decided to order a new one, but we could bleed it for the time being. The new one came just in time. After two weeks the cups started getting so bad you could hold your foot on the peddle and it would slowly go to the floor. When we changed it, we pulled it apart to see what was wrong. There was a lot of corrosion and pitting in the unused section of the bore and white aluminium oxide crud around the cups. The gug at the parts store could remember someone going througb the same problem, but he had to remove the mc and tap it on a block of wood to get the pistons out. For as little as $50 you can get a new after market unit from rockauto. That is what I did and swapped my resivoirs the keep the original caps. I think this is most likely your problem too. Maybe you can loosen the mc from the booster to look at the rear piston or even gently remove it from the booster and see if you can push them in with a screwdriver. Chas
-
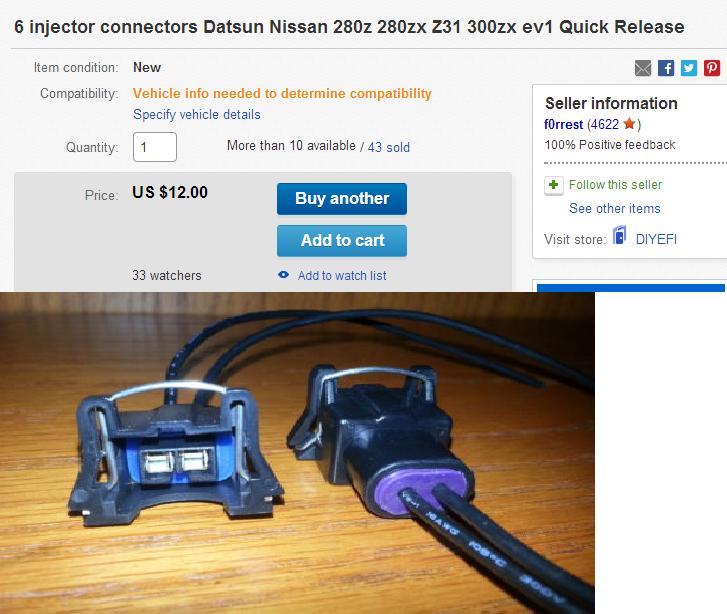
I ended up buying this connector kit for my 280Z. Quick release is handy for testing. He also has a complete kit available Injector Connector 6pc Kit Quick Release EV1 Datsun Nissan 280z 280ZX 300zx Z31 | eBay for $19.00 Chas
-
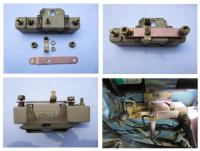
I played around with the resistor today. If you look at the photo's in post #1 you can see I fitted all the positives to one terminal bypassing the resistor altogether so I could use the 12V coil. This was ok for testing, but I wanted to keep the stock look as much as possible. Toyed with the idea of pulling the resistor apart and bridging it internally, but then it would not be reversable and maybe in the future I would want to go back. The easiest way seemed to be fitting a plate over all three terminals. I used a copper strip to fit under the termials. The strip is covered with a double layer of heat shrink to prevent arcing if it gets pushed down onto the resistor bracket. Now its not quite original, but looks a lot better than with all cables on one terminal. Now if it would only stop bucketing down I can take if out for another spin. Chas
-
Not sure what you mean by upgrade. If its the looks of a big caliper front brake setup then most go over to the Toyota 4 piston units. Im not saying its the way to go. Remember, you are playing with a setup that was designed by an engineering team with a lot of knolledge and R&D behind them. Fitting bigger brakes to the front is going to throw it out of balance with the rear brakes. There is a guy by the name Eric, that comes highly recommended. A "restored" set will cost you $279 + cores, but is well worth it. Datsun/Nissan 240Z Front Calipers