


Captain Obvious
Free Member
-
Joined
-
Last visited
Everything posted by Captain Obvious
-
 Well I'm not sure I have an explanation for which hoses hold vacuum and which ones don't, but it sounds like your EVAP should be in better shape now than it was before. So, looking at that carbon canister cap valve thing... Notice how the spring pushes the valve into the open (purge) position. Also notice how the control vacuum line (smaller upper) pulls the valve into the open (purge) position. The question I can't easily answer is "The control line pulls the valve from above to open it. But the valve is already being pushed open by the spring from below. So what is it that ever CLOSES that valve?" And that's where the theory of the high manifold vacuum helping to pull that valve closed comes into play. So when do we get the next round of A/F readings now that you've fixed the cold start injector and (hopefully) the EVAP stuff?
 -
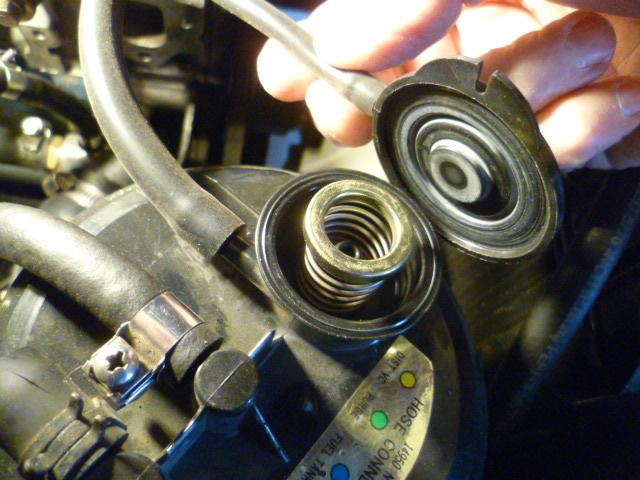
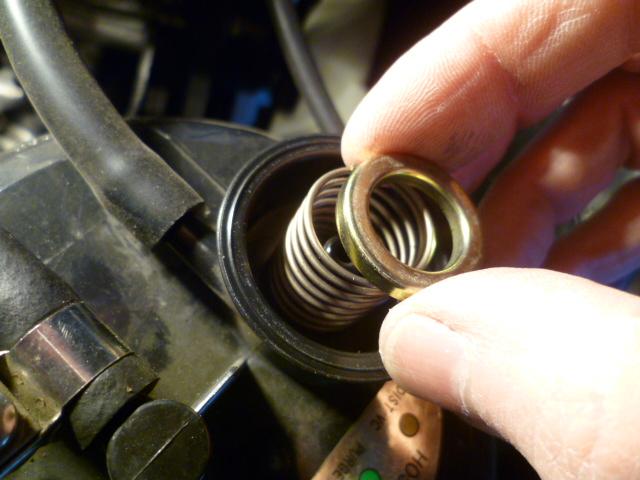
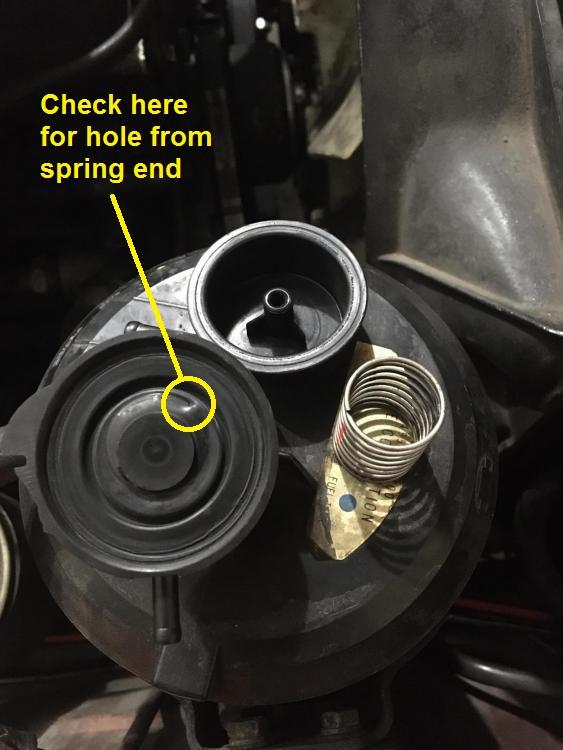
What a coincidence... I didn't have any pics of my evap system to refer to aid the discussion, so I popped the cap off mine and took some pics too. Haha!! So, I bet I know what's going on with yours... I had mentioned earlier that there's not much to it. A diaphragm, a spring, and a metal ring seat for the spring. Well, you're missing the metal ring seat for the spring. I believe it's purpose is to keep the end of the spring a metal surface to press against to even out the pressure and keep the sharp pointy metal end of the spring from poking through the soft rubber diaphragm. Well you don't have the seat, and my guess would be that your spring has poked a small hole through the diaphragm. Inspect carefully at the dent where you can see where the spring was pushing: In any event, it's supposed to look like this: And I also verified that my small control line does hold vacuum. About attaching the large line directly onto the post down inside the cap where the spring lives? I think your assessment is correct. It'll be continuously purging at all times. Probably just fine at everything but idle. At idle, you might find it runs it lean again. I don't know if you have enough compliance travel in the mixture screw to compensate, but if you're just looking for an option to try until you can find a new can (or at least diaphragm and spring seat) it's worth a try. If you find you can compensate with the idle mixture screw, you should be fine.
-
Haha!!! That'll do it! Wiring looks great. It's going to be a whole lot better with those new connectors!
-
So in the pic, there are rubber bellows and bump stops, but in the completed pic, neither of those were used. Why not? Didn't fit well? Just didn't like the look?
-
The small canister hose should hold vacuum at all times. If it doesn't you might want to pop the cap off the carbon canister and have a look around. The big canister hose will not hold vacuum with the engine off. And that's my little bit of confusion about the system. The FSM talks about the large line as being sealed until the control lines opens it, but in my experience, that is not the case. My theory (that I talked about a little earlier) is that the high vacuum source pulled directly from the intake manifold actually helps pull that large line into a closed position. As for the other question about not changing the idle... It's probably because that small line (and the distributor advance) is pulled from a ported vacuum source. And at idle, there's no vacuum so nothing gets pulled into the intake tract. In other words, it's not a vacuum leak on that throttle body nipple unless the throttle blade is in a specific position. At idle, there's no vacuum, and at WOT there's no vacuum. The only time there is vacuum there is at a light cruise position.
-
Your old seal did have metal in there. If you didn't see the metal, it's because It had a rubber coating over the metal. But there was metal inside. They usually make those seals in a couple different varieties like that. The general concept is that the ones with the rubber coating on the outside are better sealing when used in an application where there sealing surface has some imperfections or the hole that it is being pressed into has a split in it (like the rear main seal). Might beg the question then of "so then why don't all of them come with rubber on the outside?" and my answer is "I don't know. Maybe cost." Here's a page from McMaster that talks some about the differences: https://www.mcmaster.com/oil-seals/
-
Dome light looks good. Hope you like the LED when it comes in. So I have no experience with Keihlin, but I'm assuming the basic concept is the same for all of them. Just pay attention to the details and make sure everything is clean, clean, clean. And I can do without the carbon fiber goodness. Haha!!
-
Forgot about the valve on the CARB can... There's not much to it. A diaphragm, a spring, and a metal ring seat for the spring. I looked through my pics for something that might show the guts, but I got nothing. If the diaphragm doesn't have any holes in it and is installed correctly (not folded over), then I don't know what else to do there. Does the control line (smaller line shared with the distributor advance) hold vacuum? I do remember someone doing some testing on the valve... @Dave WM maybe?
-
Well that gasket in your pic is (the technical term) "trashed". Even if you weren't going to use any RTV, there's absolutely no way you should reuse that gasket. Not only does it create an uneven mating surface under the bolts (potentially bowing the flange as you mentioned), but it's also permanently compressed. So in your shoes, if you really don't want to use RTV, you could always try a new gasket first (without RTV) and check it with you A/F meter. If you don't get satisfactory results, you could take it apart again and goop it up. I'd never been a fan of any sort of gasket compound either, but now I put it on just about everything. I hate seeing big gobs of sealant squeezed out of the gap and I always thought of it as a crutch for people who didn't know how to do things right. Then I started working on lawn and garden carbs where I just couldn't get stuff to seal. So I started putting a little on with a syringe. Just a tiny bit. Now I put a tiny bit on most everything. And yes... you should give the RTV some cure time before you stress it. Heat helps, so if you put it on your motor while it's still warm from running, it should be good to go the next morning.
-
Hang in there Bud. Things should start getting better soon. And you know how to reach me too if you need.
-
About the casting process, I was referring to small stuff like the lens for your dome light. Not big layup stuff like a carbon fiber hood. I was thinking that you might be able to copy your dome light lens before you break it. I've done a little bit of small stuff, but don't think I would ever attempt something like a hood. The original switch button contacts the lens at all times which helps squelch rattles. It sounds like your new switch's push button (even with the rubber seal installed) is shorter than the original button. Maybe you could put a small rubber button in between the two to take up the gap. And about the soldering... I'm sure it's not aluminum. Not sure what it IS, but it's NOT aluminum. Either nickel plated brass (which should accept solder easily), or steel (either chrome plated or stainless). Are the metal parts magnetic? I think I've got a dome lamp around here that was damaged. I don't remember what "damaged" means though. I'll have to see if I can find that thing. And good luck with the bike. What carbs do they run on that? I assume it's either Mikuni or Hitachi.
-
I guess I was thinking that a compression test now would highlight catastrophic issues, but based on the conclusions drawn from the fact that it's running good, I think we can forgo that. So no biggie. I was just thinking it could be a benchmark of "now" and then you could compare that to "before I started this, and also against "after break-in". In any event, I'm glad it's running well and the whole oversized ring thing seems to have worked out!
-
And I know you don't want to, but this is what I did:

-
Oh, and in case I wasn't clear... I would use both the silicone AND the paper gasket. I would put RTV on both sides of the paper.
-
Yes, I mean RTV. I'm particular to "Permatex Ultra-Grey" because I've found it to be the firmest (highest durometer) once cured. And in this application where you're trying to seal that flimsy, probably already bent flange using a thin paper gasket, I think the high firmness is especially valuable. It's not really gasoline rated, but in this application, I would still use it. If everything is working as intended, that gasket should be a seal for air, not gas. I don't think a dry paper gasket is going to get you where you need to be.
-
And to answer some of the other questions... The idle mixture screw is just a rounded nose fine pitch screw that bottoms out on a seat inside the AFM body. So I guess it could be possible for there to be crud built up down inside there that might prevent that screw from bottoming out completely? I do consider it a little unlikely though, because any crud inside there would probably be a soft carbon sticky mess of crankcase PCV blowby and would probably be smooshed by the screw tip and seal pretty well. I would consider it to be more likely that it would be to crud SHUT than crud open. And about the carbon canister, to be honest, I'm not completely positive I understand the valve in that cap completely. I mean, the description in the FSM is pretty simple, and I understand how it is SUPPOSED to work, but after messing with that diaphragm and valve in the cap for the CARB can, I'm a little unsure. I do know that the way it's SUPPOSED to work goes like this: 1) When the throttle is any position other than light cruise, everything is supposed to be shut-off and hold vacuum. 2) When the throttle is in light cruise, you should be able to draw a small amount of air through the larger vacuum line straight into the intake manifold. This is the purge cycle of the carbon canister. 3) The small control line is always vacuum sealed. You should be able to draw a small amount of air out of it with vacuum, but then it should always hold that vacuum. The part I'm a little unclear on is the purge line... Looking at and playing with the valve in the CARB can cap, it seems like it's "normally open". But then the control line also pulls it open when you apply vacuum to the control?? So I'm thinking the manifold vacuum actually pulls the valve closed to seal it. And then the control line overcomes that vacuum and opens it again? Does that make any sense or am I just making things worse?
-
Well that sounds promising! In my experience, I've never really liked that cold start seal in the first place. It's on the high vacuum side. It's a relatively thin, flimsy flange that is almost always bent from the force of the bolts that hold it down. It's a high surface area to the number of bolts that hold it down, and those bolts are far from the center on those flimsy wings. So if I had to have a cold start valve (which I'm not sure you do), I would slather that gasket up on both sides with silicone sealer. There's no way I would ever trust it put in completely dry. But that aside... Being in Dallas, when do you ever, ever, ever get weather cold enough to even really need a cold start valve? It's not like you guys ever get temps below freezing, let alone into the 20's*. I've removed my cold start valve and capped off the hole and haven't looked back. I think you could do the same. But (and I'm not judging) if you do want to keep it, for whatever reason, I would absolutely use some gasket sealer on that thing. If you got 13 with it blocked off, it's clear that if it's not leaking air, you're readings should be just about perfect. And don't worry about the egg at all! * Except for a week ago, right?
-
Sorry. Gotcha. I thought it was pebkac. Didn't know there was editing issues. I'm gonna go back in my hole now.
-
Hmmm... So you have the AFM gear adjusted such that cruise looks good (at 14.6), and WOT looks good (at low 13's), but idle is too lean at 16.5. And that's with the idle mixture screw turned all the way in. Well first thought is vacuum leak, but you said you're good there. Second thought is throttle position switch, and you said you're good there too. OK, so humor me since you got an A/F gauge... First thing, at idle, spray some starter fluid or carb cleaner in and around the intake tract while watching the A/F numbers. Make sure to hit the boot between the AFM and the throttle body, the throttle body butterfly shaft (both ends), and the BCDD area. Something else to try... Unplug the TPS while watching the A/F. If the switch is being interpreted correctly, it should run even leaner with that switch disconnected. You can either disconnect it, or pop the black cover off and manually open the idle contacts. Gently. And you can do the same sort of test for WOT... Drive the car around with the TPS disconnected and you should see your WOT numbers run leaner. And you're sure you've got the altitude switch in the "richer" position, right? Just tossing out ideas.
-
Excellent. Sounds like that will get your car to you without the moving guys killing your battery or burning out your starter. You could also still unplug the oil pressure sender in addition. Maybe give that a try tomorrow morning to see if it makes things even a little better. I mean, I think you're good enough already, but just in case you're looking for that extra push over the cliff (as Nigel Tufnel suggests), you could try that too.
-
@Racer X, I keep meaning to mention this... You don't always have to quote an entire post every time. You can clip it down to a smaller size, or not include any quoted material at all if it still makes sense without it. Just a suggestion.
-
Jayhawk, That's a great pic. I love it how everyone ended up in a Z!
-
Great! Last I heard, you were gapping rings. I didn't know you had the motor back together! So far, so good, huh? Excellent! So did you do a compression test as soon as you put the rings in at zero miles? Just to see?
-
Haha! Use the Zcon beverage budget please. I'm hoping to be able to make some withdrawals from that acct in the not too distant future!
-
I know just enough about the casting process to be dangerous. My understanding goes something like this... To do it "acceptably", you can watch some U-tube videos and read some websites. To do it "really well", you need to know what you're really doing. From my limited experience, I would predict two stumbling block areas: 1) Getting the large flat surface to cast properly without wavy-ness. Might be able to make a support "box" that surrounds the mold for additional support. 2) Getting the translucence and color of the casting resin right. I don't think this would be too difficult, but it would take some experimentation. As for your carbs... I've been known to put the smoke back into cycle carbs from time to time. Since I worked my carbs, my bike starts, idles, and runs perfect. Is there something specific causing problems?


