Captain Obvious
Free Member
-
Joined
-
Last visited
Everything posted by Captain Obvious
-
 I haven't studied or used the stuff, but it sets off my snake oil alarm. Pour it into the gas tank. Draw it directly into the intake tract. You can even rub it on sore muscles. Puts tread back on worn tires. Cures whatever ails ya! More power to the people who believe they've gotten good results, but I just don't like the sound of it.
 -
Let's hope it's that simple. Wouldn't be the first time someone had to go back for another rebuild.
-
Yeah, I have a 20T, and if you've got the room for it, that's what I would recommend. I was just thinking that a little 6T would be good to hide in an apartment closet. Hey, is that a hydraulic press in your closet, or are you just happy to see me?
-
@siteunseen, Stevie and I both missed you at this event.

-
I get more use out of mine than I ever thought I would. I'm really glad I have one. Maybe try a little 6-ton HF A frame design? Light enough to store in a closet and pull it out when you need it? Not sure 6T is enough to do bushings though.
-
Cars don't talk back they're just four wheeled friends now.
-
There should be enough fuel in the bowls to run the car for about a minute with no fuel pump at all, so... I'm thinking it might not be a fuel pump issue at all? By any chance, is the ignition coil power on the same circuit as the fuel pump? If so, I suspect lack of spark, not lack of fuel, may be causing the issue? If that's not the case, and your bowls are actually drying out between starts... I'd be interested as to why that is happening.
-
Q - How much current could you get from a metal star-wheel whizzing by an inductive coil? A - Infinite if the resistance in the loop is zero. Zero if the resistance in the loop is infinite. It's the Law.
-
Good luck with the project. My results for my car were dramatic once I had redone the whole suspension.
-
When you say that the needle is going stop to stop as far as the needle can move, are you saying that it is slamming back and forth from like +40A to -40A? If that's the case, then I doubt the problem is simply a loose belt. I'm thinking a loose electrical connection (shunt, fusible link, battery cable, something like that), or a faulty rebuilt alternator.
-
Zup, I'm glad to have been able to help you out with the tire~ Zedy, Just wanted to let you know that it was great to meet you, and I'm sorry that you had to take off before the banquet. If you would have been there, we would have had FOUR trophy winners sitting at the same banquet table. Glad you got a handle on whatever was going on with the allergy. I'm glad I had the chance to spend some time with you before you had to take off.

-
It wasn't ALL fun and games.

-
Any hints? Yeah... Buy a hydraulic press. Even if you don't need it for the spindle pins, it makes easy work of removing the old bushings and installing the new ones. You know you've wanted one for a long time anyway.
-
I haven't measured it, but I suspect the current drawn by the ignition module is in the milliamp range. I suspect they used the gauge wire they did (for the red and green) simply because that's the smallest they used anywhere in any harness. I would be happy to defer to someone who has actually taken measurements, but my instincts tell me that you can use any relay you want without worry. I also believe an SPST relay to disable the circuit would be fine as well. Since those two wires don't go anywhere else other than the ignition module, you don't have to break both legs. In other words... It's a loop. And a loop with one break is just as broken as a loop with two breaks.
-
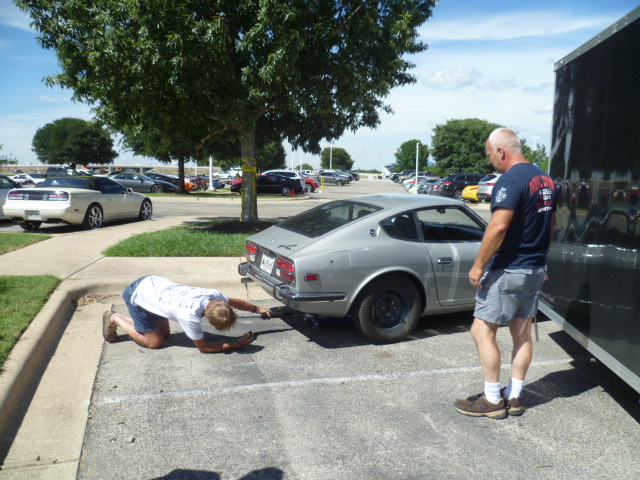
I wanted to say thanks for all of you for putting up with my calamities. I felt like death warmed over the first day I got there, and surely wasn't a lot of fun to be around. (For those of you who weren't there or heard any of the story, I blew out my back a mere 12 hours before I was supposed to get on the plane for ZCON, and almost pulled the plug on the trip due to the pain. Thankfully, I did not.) What really helped was when I hobbled to the show at the Oasis and saw the smiling gang of familiar and new friends. Friends that were clearly surprised that I made the trip. I tried my best to put on a good front that day. but I've heard from many of you that you could tell I was suffering. Just wanted to let everyone know that most of that is behind me now. I'm home, safe, and feeling much better. Not at 100% yet, but well on my way. I want to give a special shout out to my travelling partner Gary @GGRIII for pulling me along and picking up my slack. He took care of all my lifting the entire time I was there, pulled my bag through the airport for me, and even chauffeured me around the first two days as I laid back in the passenger seat of the rental car. I would not have been able to make the trip without him, and he deserves the credit for making this trip happen. I've got a number of pics that I will eventually post, but at this point I'm exhausted. Here's one that can't wait though:

-
It doesn't spell it out, but they offer two systems... 1) What they call their "complete" system, and 2) what they call their "underhood" system. My belief is that the underhood system includes everything you need except the evaporator (and expansion valve), and the controls. I think it's got everything else, including the interconnecting lines.
-
I've got a parts ZX here that I could scavenge parts from, but wouldn't that have the same parts availability and old technology issues as a stock Z system? I was thinking (hoping?) that something from a Sentra or something ubiquitous like that would be cheaper, more reliable, more efficient, and easier to find if I need another one. As a matter of fact, I've already got a stock 260Z mounting bracket and compressor. I was just thinking that I could do better?
-
Thanks all. Jbond, I think I found the system you installed: http://autoacsolutions.com/store/products/1976-1977-1978-datsun-nissan-280z-ac-underhood-package/ So why is it that the Sanden 508 compressor is so popular? Is that a good one? I did some digging at rockauto, and clearly one of the stumbling blocks for slapping a different compressor on there is the belt configuration. Everything new runs the multi-groove belts instead of the old school V that we use. If the system was still under pressure, I would trust a compressor from a junkyard. I don't think I want to put in a used compressor though. That's something that I want new. So, if I can get a cheap compressor from a yard, I wonder how much I would spend on getting custom lines made up. Question is... If I use a cheap junkyard yard compressor, but spend real money for an evaporator and getting custom lines made up, would it have just about the same cost as buying one of the pre-packaged kits?
-
Do we have any A/C experts in the house? My 77 280 came without A/C and I'm working on adding a system. I've got the interior stuff done and have turned my attention to the stuff in the engine compartment. Has anyone got any experience with using parts from a different vehicle and adapting them to the Z? I'm assuming the technology and compressor designs for the newer stuff (designed for R134) is better than the stuff from forty years ago. Newer, lighter, more efficient, cheaper? I could "relatively easily" fab up a mounting bracket to mount a different compressor where the stock one goes. Use a ubiquitous compressor from a Maxima, Civic, or Corolla instead of the stock one? How "matched" do the components need to be? Compressor, evaporator, condenser? Would it even work right to use a compressor that wasn't designed to be used with the stock evaporator and expansion valve? So what I'm asking here is.... Has anyone done anything like this, or am I on my own breaking new ground?
-
My original diaphragm was OK, so I've got a spare one of those. What I would really like to have is a new valve assy. I found that my original one looked better than the crappy looking one that came in the "rebuilt" booster, but it didn't work right. So I'm running the crappy looking (but functional) one that I harvested from the rebuild. I'm positive they used the same valve in many other cars, but I just don't have any source to confirm. I can't rip a bunch of boosters apart in the junkyard just to check.
-
Man, he's got Z-itis bad. Really bad. Multiple generations bad! Hope the two of you find good homes for the thinned herd. I would be skinned alive if I brought something else home, but... Have you got any pics of the GTO stuff? I just like looking at them.
-
I'm positive you wouldn't have sold more than a couple. I assume you never turned up a source for the internal rubber parts or the end seals? Speaking of such things... I'm positive the Z isn't the only car that used those internal parts. Anyone have any theories of other cars that may have used the same internal conponents? Something easy to find like an old Maxima or Sentra perhaps? Anyone know if Honda or Toyota used Hitachi brake components?
-
That's fantastic!! You must be so happy!!
-
Haha!! I'm not sure it's worth a rung of the cool ladder, but I've only ever bought two brand new vehicles in my life off the dealer lot, and this is one of them. She's an antique at this point! I'm not sure how much longer I'm going to retain ownership though. Riding around seeing everyone in their SUV's driving with one hand on the wheel and the other hand on the smartphone... It's out of control. I'm the one that's the most vulnerable. I used to ride more, but phones and inattentive drivers have taken most of the joy out of it.
-
Now there's some good documentation for ya!! Way better than what I could turn up! Kudos!! Phil, So the connector in your original pic goes to the speed control switch, right? Not the resistors on the blower housing. If that's the case, then I suspect that B/W is for the A/C system.