Patcon
 Subscriber
-
Joined
-
Last visited
Everything posted by Patcon
-
 European balance tubes are available. I believe Z therapy has them or something very similar if you want a cleaner look Charles
 -
It depends how cold it gets where you are and whether the car is cold natured and if it will see cold weather at all. Plenty of people don't run heated manifolds. Also according to the Z therapy video you need to run some kind of air horn or you will lose a lot of power. The stock air cleaner evidently works as well as almost any other air horn or you could order after market air horns and filter them somehow. By the way that is a fabulous looking car, British car, British Green i believe, driving lights. Very nice... Charles
-
I have used Fedhill before too and it is very nice line. Because it is so soft sometimes it is hard to make your lines nice and straight, but that also seems to make it flair easier. I would have preferred to use the fedhill flairing tool. It is not cheap to buy but they have a rental plan... http://store.fedhillusa.com/flaringtools.aspx Thay were very helpfull and easy to deal with. Charles
-
Does anyone have any ideas on what gauge metal or does it need to be a certain type? Charles
-
One other option is to take Arnes advice but convert the head to solid lifter there are a number of threads at hybrid z about this because the hydraulic lifters are NLA and sometimes collapse when dirty or pushed too hard. The guys on HybridZ sometimes push the limits on these engines. If you do decide to convert the head the old lifters can probably be Ebayed. The P90 and P90a heads are good heads and flow pretty well. So that would be another way to get where you want to go. Charles
-
That sounds like it would work, but I was looking for a restoration type solution... Thanks, Charles
-
I don't know the proper name for the rubber coated strips of metal welded to the inner fenders that fold around the electrical harness and hold it in place. I had always thought they were some special metal, but I am beginning to believe they are light gauge steel coated with rubber. Well the problem is they like to break right at the bottom. Has anyone made any replacements or are they available any where? If not does anyone have any ideas for fabbing some up? On a side note they appear to be differnet in my 73' 240z versus the earlier cars. Thanks, Charles
-
Agreed, timing is everything. I will have to look around the big box stores. I have never seen swaging tools in our Depot or Lowe's. That's interesting. I am a contractor and know the stores pretty well... I might have gone that route if I knew they had them in stock, but didn't want to have to order a tool online and wait and shipping, etc. Charles
-
I found some that were similarly priced. Then buy some swages, but if you are going to do only one cable, then you only need two and you only need the swager twice. For $3.60 of cable and $.98 of tee nuts I replaced the cable with the tools I had at hand. Both ways should work fine, but if I wanted a cable that matched the factory exactly I would just buy a new reproduction. The point was to get a satisfactory result as economically as possible. Charles
-
Most of the swaging tools I have seen are expensive and you would have to find the right size swage. As well as buy a box of swages. I considered that but opted for a technique that fit the tools I already had or that many people would have access to. Thanks, Charles
-
Did anyone ever figure out how to install the upgrade into the 73 240z or 260z w/ intermittant wipers and retain the delay feature on the stalk? Either reworking the factory delay box or reworking the harness to retain the delay wiper control from the stalk. Thanks, Charles
-
Thanks, Arne I was hopeing to put enough key words into the title so a reasonable search would pick it up. There is a tremendous amount of good info on these forums, but finding it can be hard sometimes. I hope it helps... Charles
-
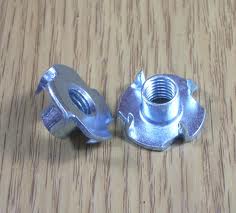
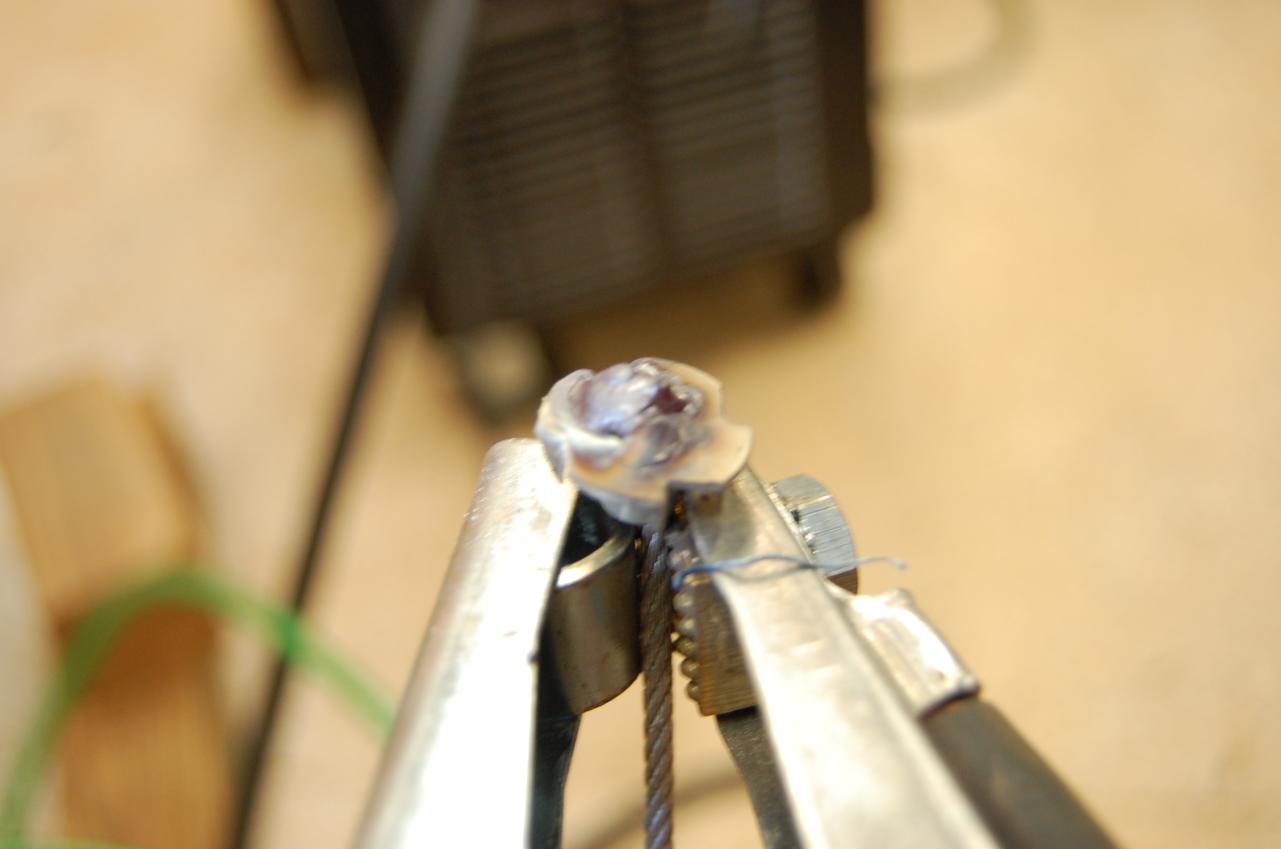
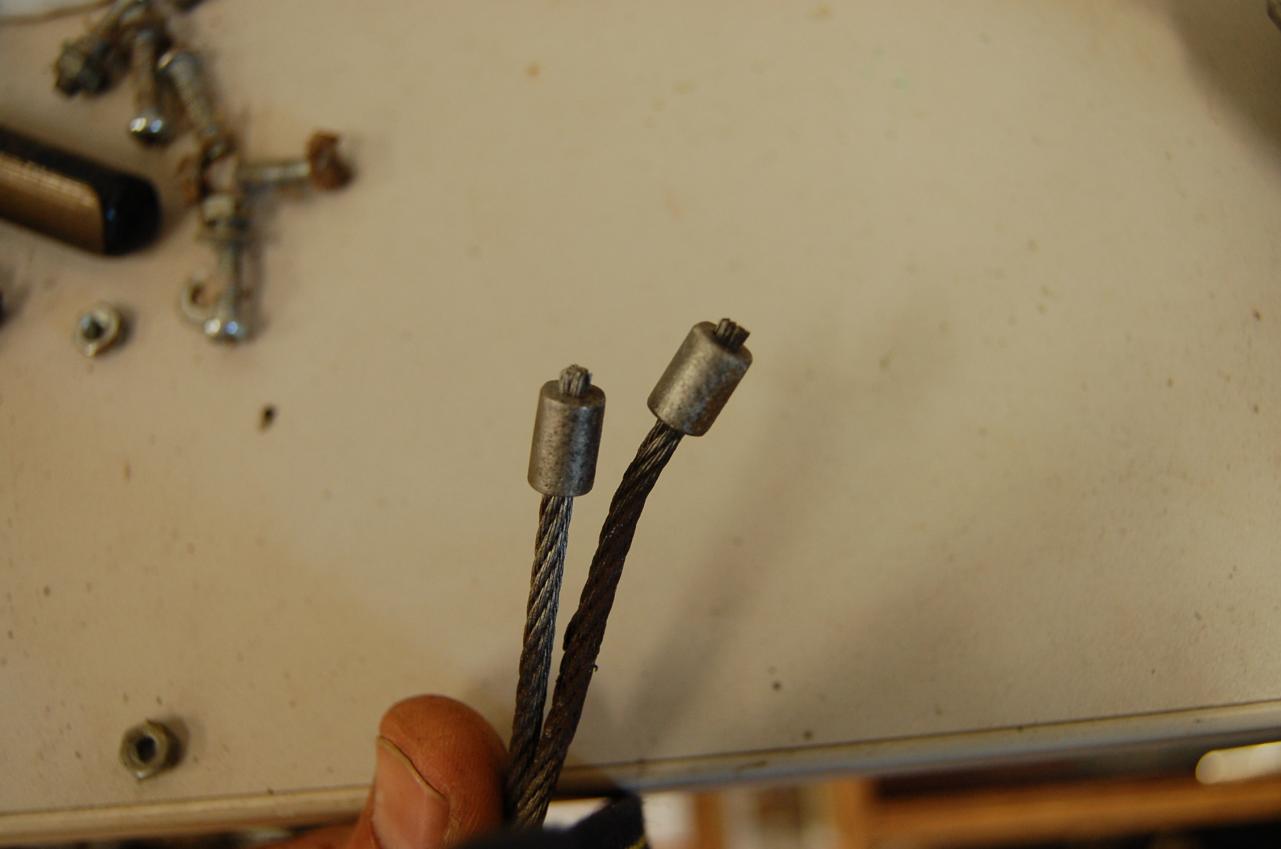
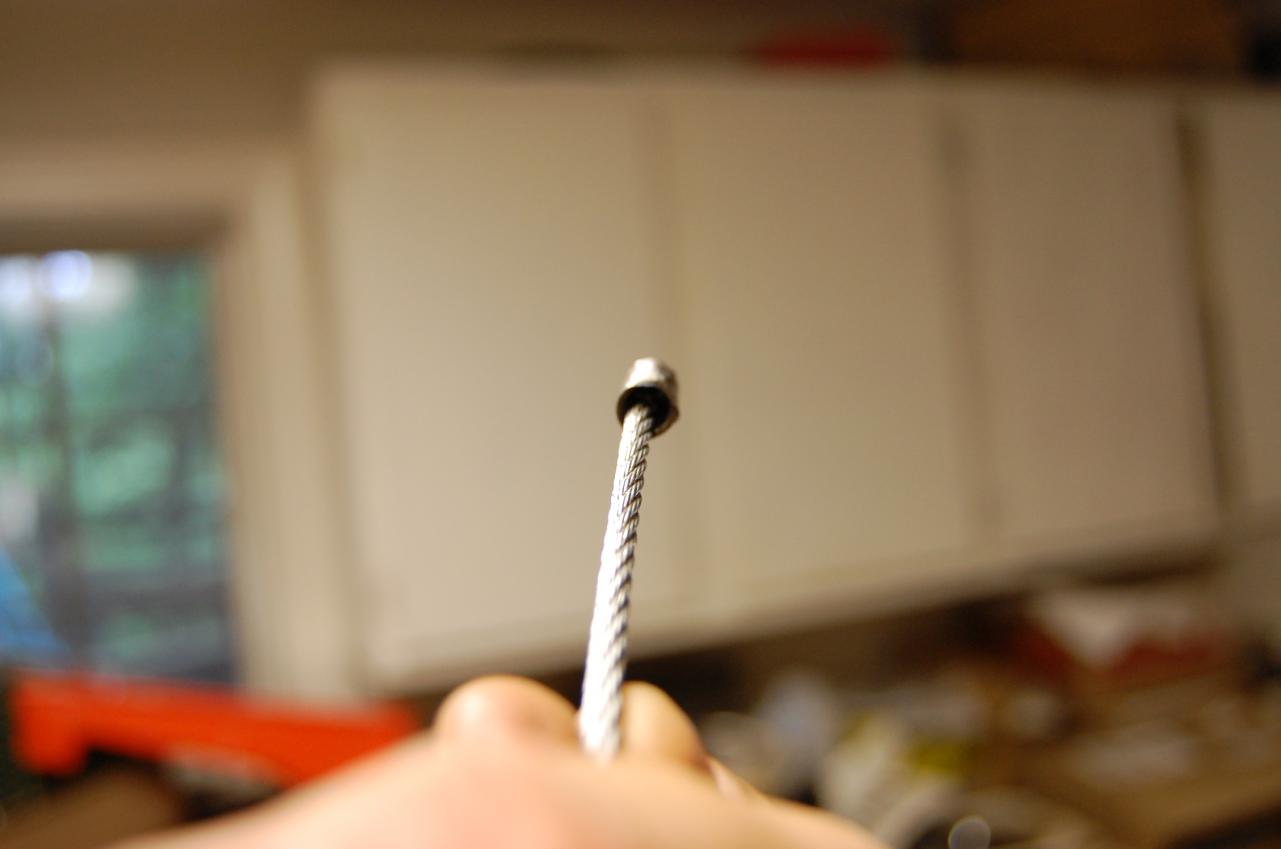
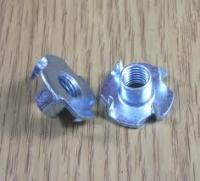
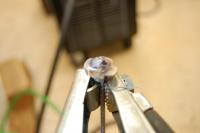
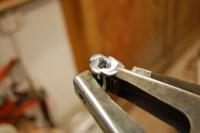
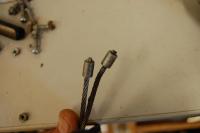
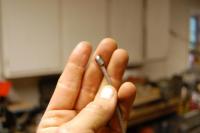
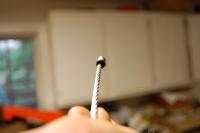
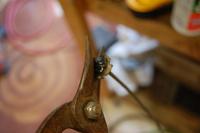
I had done some searching for emergency brake repairs and where to go from here. I had a broken parking brake on a 240z. I took the idea that Beandip had and went with that. I went to Home Depot and bought about 8' of 1/8" unjacketed and 3/32 jacketed cable. I also bought some 1/" tee nuts like these The problem I saw was not replacing the cable but was how to swage the end with the little cylindrical shape and make it hold. I removed the old cable and rethreaded with new cable. I chose to use the unjacketed cable because it was thicker and the exisitng cable was unjacketed. I then placed a tee nut over the end of the cable with the spiked flange at the very end (the end towards the wheel). I took my mig welder and welded around the end of the cable on the flange side. I didn't weld from the inboard side because I was worried about buring the cable in two and that would make it too short. I then clipped the flange off as close as possible and finished shaping on my bench grinder. The inboard end of the remaing tee nut did not fit very close to the cable so for some extra insurance I used JB Weld to fill the cylinder on the inboard side. I assembled the cable all up and installed all of the springs and brackets etc. I then ran the excess through the other tee nut and welded the other end where I marked it for length. I made the new cable 1/2" to 3/4" shorter than the original to account for the stretching of the original cable. When I welded the second tee nut I accidently burned the cable off, which is OK but substanitiated my fear of not welding from the inside. I epoxied the second end and lubed everything up real well and installed. Seams to work real well and has a very factory look. Sorry I don't have any other pictures. If you don't have access to a welder, epoxy might hold the ends if you get them degreased properly. The tee nuts have threads inside them so they will bond very easily. Or as an alternative you might be able to solder the ends on the cable. If the cable is clean and fluxed the silver should bond to it OK. I thought I would post this up since the cables are hard to find in good used condition and putting a new $300 cable on a car I have $1000 in didn't make sense at the moment. Hope this helps and have a good Mother's Day Charles I didn't have any pictures when I made the cable so I went back and made an end so I could make pictures, since everyone likes pictures Original cable ends Ready to weld Welded up Snip the excess, then grind down I filled this area with epoxy Finished end
-
I believe they are similar. They are mentioned in the Z therapy video. I believe they are Stromberg's and have a diaphragm in them. That looks like an XKE... Charles
-
Emailed J C Whitney the other day... "Trying to find current part numbers for these older part numbers so I can order these door weatherstrip 13SB2561U comes in 25' lengths 18B4877X 8' lengths fuzzy strip 19SB3480P for 6' Thanks, Charles" Here is the response Thank you for contacting us. The first item is sold out and discontinued. But the below links are the other 2 numbers: http://www.jcwhitney.com/all-rubber-window-channels/p2009944.jcwx?skuId=170761&filterid=j1&_requestid=2287141 http://www.jcwhitney.com/inner-and-outer-belt-weatherstripping-universal/p2008570.jcwx?skuId=172892&filterid=j1&_requestid=2288170 Please feel free to contact us if you have any additional questions. Sincerely, Holly Does anyone know if they still have a weatherstrip profile that will work for the door seals? Their online catalog is pretty useless... Charles
-
Looking at your picture the vent line from the top rear of the tank in the highest section of the tank. Take it loose from the vapor tank and see if you tank will take fuel then, provided that line is clear. That one line is responsible for allowing the use of the upper portion of the tank. If that line is crimped over or pinched the tank won't take fuel. I believe when you drive around the tank is belching air back into the filler neck and then it will take more fuel. If the tank isn't collapsed I believe your problem is between that vent port and the vent line at the top of the filler neck. I believe there is a drain off the vent tank that connects to the filler neck just below the cap. That allows the air to escape the tank after fuel fills above the neck of the tank. Charles
-
Can the Precision products be bought directly or only through a third party? Thanks, Charles
-
The 280z I parted out had holes like that across the rear directly behind the larger style bumper. I believe they were an attempt to prevent the pressure zone behind the car that cause exhaust fumes to enter the cabin... Charles
-
Well the best I can tell the wheel cylinders have already been swapped out. The brake line enters the wheel cylinder on one end but the surface is turned out about 20 - 25 degrees. Any thoughts on the wheel cylinders from autozone? I figured the rebuild kits from black dragon or rock auto would hold up better, but it may not matter. The price for complete cylinders is not bad if they are still available for that, and definitely easier than rebuilding and not much more. Most of the wheel cylinder units I have seen are in the high $60's to $90's each. That is more than I want to put into this car right now. Thanks for the info, Charles
-
I was working on one of my z's it is a 1970 240z that I am trying to get back on the road. I replaced the master cylinder, but can't bleed the rear wheel cylinders. I can bleed them at the hose in the wheel well but not out the bleed nipple. The nipple is clear. So I figured I would just rebuild them because the car may end up as a parts car, but there is no rebuild kit offered for the 70-71 wheel cylinder. I have plenty of 72-76 wheel cylinders laying around but didn't know if they would work in the 70-71 backing plate. Thanks, Charles
-
Thanks, Walter That was the answer I needed. I knew some people didn't use the vacuum advance Thanks, Charles
-
I have a 70 240 with a 71 240 motor that I rebuilt 20 years ago. It has very few miles on it. I couldn't get it running recently after sitting for a number of years. Worked on coil finally figured the problem was in the distributor. Went to the junk yard and pulled a coil and distributor from a 1982 280ZX. I installed using a number of resources, some of the info you posted Blue. As well as some other forums, even a 510 forum. Was a very easy swap; set the timing close, fired right up. Now I need to figure out where the correct timing is from some of the other people that have done this swap. I was think 10d, with no vacuum advance, but wasn't sure. Thanks, Charles
-
I know several members have done the 280ZX distributor upgrade to get rid of the points style ignition. I have been looking in several of my manuals and trying to figure out where to set the timing. I was leaning toward 10d before TDC without the vacuum advance hooked up. What are some of you running? How do you know if the vacuum advance is going to add too much timing? Thanks, Charles
-
Try this link... http://www.rbracing-rsr.com/compstaticcalc.html Googled calculating static compression ratio... Bear in mind that aluminum headed engines will tolerate a little more CR than cast iron heads. I run 10:1 on my aluminum headed 350, but I have the advantage of a knock sensor and I run it on regular pump gas unless it is very hot outside. Post up your info so others can follow along. Charles
-
I wondered about the gold z becuase it pulled away so quickly. I also saw the Cadillac... I totaly understand about the reality factors involved on how far to push. No slight intended, just curious. It is sometimes very hard to tell these things from video. Looks like fun...