Everything posted by Zed Head
-
 siteunseen makes a good point. The AAR's tend to get gummed up. I can't find a specific reference to the heating block but I did find a picture. I added red lines to indicate the inlet and outlet coolant lines. Check your coolant temperature sensor resistance at the ECU connector and compare it to the chart in the FSM. You might have dirty connections somewhere, raising resistance.
-
If the idle speed changes when you remove the hose odds are it's working right. If you measure pressure with the hose on and off it will tell you a lot. Numbers are always good, "right on" just means that you feel good about it (no offense). The AAR came from the factory with a heating block under it, with coolant lines attached. If yours is gone, the AAR will not get as warm as designed and stay open. Could be part of your problem. You didn't mention the power line to the AAR. You can check power with a voltmeter, it should have power when the engine is running. It's on the fuel pump circuit.
-
The high idle sounds like your AAR is not getting hot and staying hot. Do you still have the coolant line running to the mounting block for the AAR? That's what keeps it warm. And the power line to the AAR warms it up when the coolant is cold. On the rich running - have you confirmed that the fuel pressure drops with intake vacuum? You can have spot-on pressure, not running, but be rich running if the FRP is not adjusting pressure.
-
A design that spins the pin while pulling might have some benefits. When the pin is pulled straight out the rust particles can wedge in the small spaces, and the high spots can gall the points that they can't get past. Spinning allows things to find their happy place, along with doing a little grinding on the high spots, and lubing up every surface. I had good luck threading old mag wheel lug nuts on to each end of my pin and spinning the pin while beating it back and forth. It got looser and looser until it could be punched out with a long bolt.
-
Just realized that my other post was incorrect. The FSM describes reaming the head to to the proper size to fit the seat. And the interference fit spec. is at the end of the chapter in the specs. section. Recommended temperature for inserting the seats is in the chapter also. Too many numbers to piece-meal them out. Good luck. Index of /FSM/240z
-
The replacement procedure is described in the Service Manual. It doesn't look too complex. They recommend boring them out, heating the head and pressing in the new ones. No tolerances given but maybe there's only one size and the hole is assumed to be untouched. After they're installed though they need to be ground to fit the valve. That's the part that takes the skill and is most important. If you're not going to grind them too you might as well have a shop do the whole job. You said you're a machinist so may know that but just in case...
-
These are clues. Your friend is not really a mechanic, a real mechanic would use a meter to test, not foil. Here's another site for FSM's, a little easier to use since the files aren't zipped. Open Electrical System. Edit - never mind the link, something is screwed up on it. The page (godaddy)doesn't match the instructions. Maybe they'll fix it later. http://www.nicoclub.com/FSM/
-
Considering his post in grannyknot's thread, I think he is looking for a supplier of new rings. Apparently some later 5 speeds used a different 5th gear synchro material, "carbon fiber" or something like that (or there's bad info out there) but my impression is that the 280Z and ZX 5 speeds used the same synchro ring for 1-5. I know that the one 80-83 5 speed I took apart had 5 brass rings. You would know better though.
-
Here it is. You have to read the whole thing, a lot of learning happened along the way. High RPM shifting dynamics - Drivetrain - HybridZ
-
Did you find any reason for the noise? And where did you get your parts? There is a very good thread over on Hybridz from a guy who wanted to build his transmission for high RPM shifts, racing style. He really knew what he was doing and discovered some interesting things about synchro gear options, and how to modify the the synchros so that they work perfectly. If you're in to perfecting your parts I can dig it up and post the link. On the synchros topic - they're designed to work with specific gear oil qualities. Oil film strength and viscosity are key. I wouldn't want any foreign materials in there at all.
-
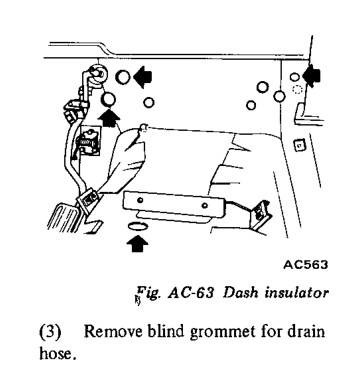
The picture is what it is. I wonder if Australian or British FSM's have the same drawings, or if they get their own.
-
Here's a picture from 1976 AC-60. Throttle pedal on the lower left for reference.

-
I notice also, although it's hard to tell, that your Timesert doesn't seem to be the copper color of the "flat washer" Timesert. It looks like the silver color of the "taper seat" model. Might be part of the problem. +++ TIME-SERT® SPARK PLUG THREAD REPAIR KITS +++ spark plug stripped thread repair kits repair damaged threads in spark plug hole stripped out approved
-
-
It may not be "oil" per se, but combustion residue mixed with water and a little unburned fuel. I thought somebody mentioned it, but leakage around the timesert threads, not the sparkplug threads is the likely cause. It looks like the sparkplug gasket is seating on the timesert but nothing is sealing the interface between the timesert and the head. It's easy to overlook the fact that there is actually a channel created along the threads when the screw, bolt or sparkplug is tightened. Tight on one side, loose on the other. That channel will probably "coke" up and clog itself in short order. But you might also study how the timesert is set in place. If it backs out because it's not set right, that could be a problem. Looks like they seal at the bottom but yours might not have a good surface down there. Or it just needs a good torquing. Maybe they can be retorqued. ++ TIME-SERT Threaded inserts for stripped threads, threaded inserts, thread repair stripped sparkplug's, Ford sparkplug blowouts, threaded inserts threaded, repair stripped threads, stripped threads, inserts threaded inserts, Ford spark plug repair, ++ TIME-SERT Frequently Asked Questions ++ Time-Sert thread repair questions and answers for + TIME-SERT® SPARK PLUG THREAD REPAIR KITS + spark plug stripped thread repair kits for spark plug problems, thread stripped spark plug repairs in damaged threads in spark plug hole stripped out approved thread repair, aluminum head spark plug repair
-
It's the wire with the white plastic connector, connected to the same post as the battery cable. It's an in-line fusible link.
-
Connect one lead to ground, either the battery negative or the alternator case, and the other to the yellow wire. Measure resistance, in ohms.
-
You probably have a short on the yellow wire. The white wire is connected to the battery and the alternator charging post. There should not be much current through that wire. Disconnect the T plug at the alternator and check the yellow wire for continuity to ground. Reconnect and check resistance through the alternator. You should have no continuity and high resistance, respectively.
-
The factory-style steel shims that fit behind the pad will do the job. I had a set of pads that would not stop squealing until the shims were installed. Grease, the spray-on goo, chamfering the pad edges, none of it worked. Only the shims. You can get them at RockAuto for $1-4. "Brake Pad Shim Kit". I feel like a Debbie Downer..
-
Nice setup, thanks for sharing. My header theory is that the mass of the bulky stock exhaust manifold casting retains enough heat energy from running to overheat the injectors after the engine is shut off. The manifold gets much hotter than the head and the coolant can't pull all of the heat out before the engine is shut down. Headers don't have that mass so don't transfer as much heat energy. But, as is typical for problem-solving, adding in the vented hood, we have three variables changed. So no clear answer. Good to know there might be a solution out there though. I'm leaning to headers as a solution.
-
Well, there's one data point for purging the fuel rail, maybe. What brand of injector are you using? And, do you have the stock exhaust manifold or headers? I have another theory about where the heat comes from. A good poll would probably shed some light on the heat soak problem.
-
That would be for a dedicated ground wire for the distributor body. The 280Z's have a wire that attaches to one of the distributor mounting screws for the same purpose. It just guarantees good grounding in the case of gaskets and sealing materials isolating the distributor body from ground at the mounting surface. The ZX FSM shows the screw being used for ground for test procedures. If you still have the black ground wire to the mounting screw for your 280Z setup then you don't need it. I check my grounds with an ohm-meter myself, to be sure I have minimum resistance, even if they're connected correctly.
-
I don't think that the USB port needs a protective cap. I can see inside my computer's USB ports right now. The world is full of open USB ports. Sounds like you have some options though. Good luck.
-
I've tried the same fix. Results were temporary.
-
You could easily modify the cigarette lighter unit. The two electrodes, one on the side and one in the center, just connect directly to the battery, there's no resistors or other electronic gizmos. Either cut the electrodes out or just connect directly to them, hidden behind a face plate. You could even tap off of the lighter circuit for power.