Zed Head
Free Member
-
Joined
-
Last visited
Everything posted by Zed Head
-
 We just finished a mini-heatwave here, broke some records, temps in the 90's and high 80's, and I've been driving all over the place, parking, shopping, doing stuff, and no sign of heat soak. Still unclear if it's the injector change (Bosch 280 150 901 or Standard FJ707T), the aluminum straight-shot rail, or a combination of both, but there is hope. Just a follow-up as summer arrives, for those heat-soak sufferers.
 -
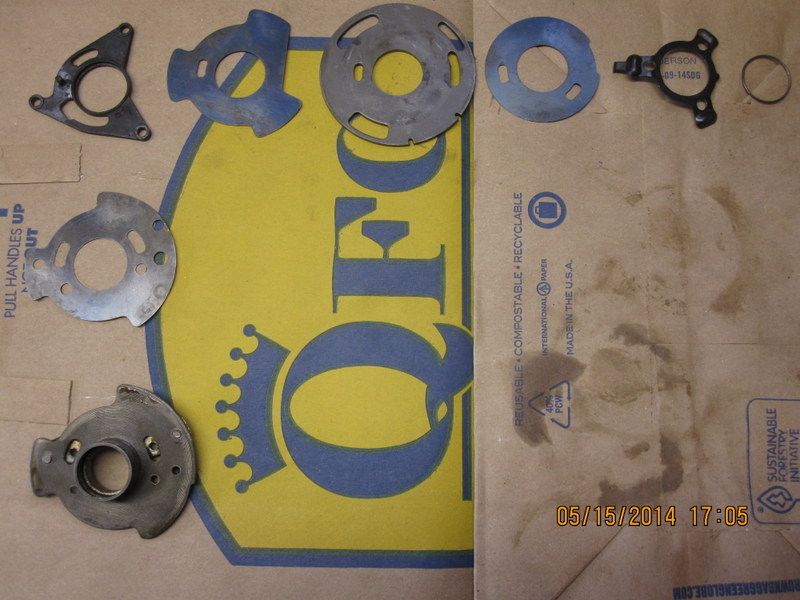
I just refurbished an old breaker plate and took a picture of all of the pieces laid out in the order I took them off, in proper orientation, except for the bottom spring plate bearing holder, which is upside down and opposite the way it would go back on. But it's obvious how it fits when re-assembling unlike some of the other parts. I spent more time trying to get the circlip back in place than anything else. I'll devise some sort of jig before I try to put another one back together. Just posting for the record for those who get disoriented while taking it apart. I always do.
-
I'm almost positive that the Fel-Pro gasket is all organic. People call them paper gaskets. You could probably go to your local parts store and eyeball one, they are the common gasket. They do seem to require freshly machined flat surfaces to seal well though, whereas the MSA and Victor Reinz gaskets are thicker. I've used a Dremel tool on both the Reinz and MSA to fit to a stock manifold and head. They didn't fit the ports quite right on even the stock parts.
-
Probably just the insulation.
-
Get a piece of stiff mylar film and make a cone around the face of the tach. It will act as a ramp to get over the edge of the dash cap. It will probably take some real pushing from behind. I had trouble just getting mine started moving when I recently removed it, the original dash had molded itself around it. Even though I had it out a couple of years ago. This is without a dash cap.
-
Whoever did us all a huge favor and copied all of the FSM's, for whatever reason, did not break 1977 in to chapters. I'm definitely not complaining,there would be many fewer Z's on the road without these documents available on the internet. So you have to download the complete 1977 FSM in one shot. The first link below will download and open the file on your computer if you have a PDF reader, like Adobe, in one shot. Very slow download. The second link will download a zipped file, that will need to be unzipped. A faster download but you need an unzipping program Index of /FSM/280z/1977 XenonS30
-
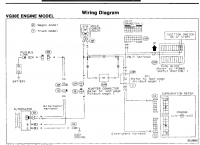
Considering the speed of electricity the only thing that should really matter is that there is no voltage drop (resistance) between the S wire and the feed to the loads. The main problem with the positive post connection, opinion, is that it is typically somewhat dirty and corroded, and has an extra interface between the wire end and the other loads. That's why I moved all of my stuff off of the battery, and just a ran smaller wire to the battery to charge it. I also ran my negative wire to a modified connection (a metal strap/plate from the starter bolt) though so that I could disconnect the battery without touching the posts. Battery posts are a pain in general. Edit - as of 1995, Nissan was running the S wire almost to the battery post, or at least one connection point away from the alternator. Notice which side of the fusible link the junction is on, it's not actually at the battery, but it's still almost connected directly to the charge wire at the alternator. Edit 2 - Forgot to say that one thing that I always consider when looking at how the manufacturers put their cars together is that the cars are designed for efficient assembly. So what you see may not be the best way to do things, just the best compromise.
-
]Word is that the valves might nick the edge of the cylinders, if the cylinder edges are not relieved where the valves pass by. Also, there are, apparently, several different versions of the E88 head. You would want similar combustion chamber sizes to get a similar CR. Why do you want to swap heads?
-
Weird that I saw that same exact S wire connection in a wring diagram the other day and wondered myself, again. There are discussions and recommendations around the internet about where to put it. The one I like, that seems to make "sense" is to attach it in some central location to all of the various loads. Consider the battery to be a load, not a supply, since it is a load on the alternator once the engine starts. I ended up attaching mine to the starter lug for while, which is where the charge wire ends up after feeding the fusible links, and recently moved all of my loads, from the starter lug and the positive battery post, to a central one post attachment point under the relay bracket, and attached the S wire there too. I did have the S wire attached to the battery post for a while but it seemed to make my voltmeter jumpy for some reason. This on a 76 with the alt swap so I had the dilemma you're describing.
-
-
Download the Service Manual for your car and check the Body Electrical chapter. Google the term "280z fusible link". Get a multimeter and start using it. It's the best way. Don't assume anything unless you've confirmed it with the meter, many parts get replaced for the wrong reason. Datsun Service Manuals - NICOclub
-
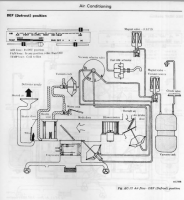
On the 76 those two heater doors are mechanical. The 78 diagram seems to show the same. You can see if they're open or closed by eye, and manipulate them with the engine off, just move the lever from Defrost (closed) to any other setting (open). Do you have the little knobs in the center of the vents pushed in to open them? And are your hoses still connected. Mine are old and inflexible, fit poorly, and get knocked off easily if I dink around under the dash. I've had my carpet get stuck in the doors and keep them open. It's cramped down there. Edit - used the Snip tool (a pretty cool gadget) to add a picture.
-
Thanks for the addition. The pressure leak-down could be a factor. Is your FPR lower than the rail or higher? Siteunseen's look higher in his pictures, which would just blow vapor past the FPR, leaving liquid behind. If the FPR is low, then the liquid gets pushed out, leaving the rail dry. Just working on the heat pipe/heat pump/"cooling coil" theory. The other difference might be the injectors. I did a little internet work and find that the four hole injectors that I have are called "multi-hole" type and the stock and the Bosch are "pintle". The Standard FJ series appear to be their own design, a variation on the Bosch design, according to their web site. Maybe the internals of the injector are a factor. Posted a couple of links below. The SDS description does not match the Bosch diagram for the multi-hole. Not positive what's inside my 280 150 901 injectors. I removed my cooling fan completely the other day. No more reaching under the dash to turn the timer on. My obsession with heat soak is diminishing... Nice metal work. I assume the new rail is of similar shine and detail. Tech Page Injector Spray Styles - Tech Corner Standard - Fuel Injectors
-
Sometime the tiny details matter most. If you rock the drum side to side the brake shoes will move and you won't make much real progress. If you rock/beat/pound/tap them top and bottom then the shoe pivots will hold the shoes and you get more for your effort.
-
johnc knows more but is probably working... Ideally, the circlip would be the only resistance to the shaft fitting in its splined hole. If youhad to use a press then you have no idea if it was inserted to the correct depth (circlip in both grooves) or too far (rubbing on the dust seal and housing) or not far enough (binding the half-shaft). If it was mine, I would pull the axle back out, remove the circlip, and make sure the axle slides in and out without the need for large force. I have a stock J30 VLSD diff that has a tight axle but it can be removed and inserted with just heavy tapping, and you can tell when the clips engage. You might have some burrs on the axles or may have crushed the clip. Where did you get the axles, are they recently made or an old set? Maybe, no offense to Wolf Creek, the attention to detail has dropped a bit and the new ones are on the plus size side. You should have test-fit with no clips, then inserted the clips for final installation.
-
Is this with the engine running, with the key On, or with the key off?
-
If the engine runs fine and it's just the tachometer that's weird then a condenser/capacitor might help. But if the engine runs weird also, that is a sign of a bad ignition module. Mine would run fine until I too it over ~3000 RPM, then it would behave (the ignition module) like you describe. The tachometer read too high, and the engine ran rough and would barely idle. If I turned the engine off, it would fix itself, until I took it over 3000 RPM again.
-
Are you in Vancouver BC or Vancouver WA? Read through some of your old posts and don't get a general picture of what's going on. In general, if things don't start working the way they should, getting all of the basics right is a great place to restart. Do all of the tune-up procedures and you won't have to wonder about them.
-
Those numbers vary with model, but are all shown in the FSM's, Engine Electrical chapter, Distributor section. Here's an easy link also, where they've been compiled. You'll need Excel or an Excel viewer. http://www.classiczcars.com/forums/electrical-s30/34192-280zx-distributor-advance-curve-reference.html
-
Is there a problem with the way the engine runs? Didn't see any described. The first thing described in the Tune Up chapter is valve adjustment. It seems like it might be the most difficult, changing plugs is easy and external, but I would guess it's #1 for a reason. Probably because it has the most effect if it's wrong. I'm just like most people and did not adjust my valves until well after I had messed with everything else, when I first got my car.
-
You can really get your head spinning on these modifications...
-
I realized over the last few days that the person suggesting the heat pipe theory, FastWoman, has her fuel rail wrapped with insulation, and little sign of the heat soak problem. But she does have FJ3 injectors. One more reason to wonder. It's hard to get a grasp on a single solution for the problem. Still haven't heard from the two other guys with barbed aluminum rails. Probably out enjoying the spring weather.
-
The material comes from rossmachine drilled lengthwise but otherwise there are no other holes. Here's a member who just received a pre-made rail, Post #138. http://www.classiczcars.com/forums/open-s30-z-discussions/50066-280z-full-restore-5-months-hopefully-2.html#post455933 If you're not handy with tools, like drills and taps, and don't want to run around looking for fittings, the pre-made rails aren't really a big premium over replacing stock parts, or trying to make your own, once you add up the drill bit and taps and fittings and rail.
-
Those look the FJ3 or FJ707 injectors. They have a different nozzle shape but they all shoot a very narrow stream, I think. They're not a problem for the others that use them. The intake vacuum sealing area is that the bottom of the metal body, where you'll be putting the small o-shaped gaskets, and it's the same distance from the metal clamp the screws go through. Is that a pallnet rail?
-
Looks like siteunseen and I followed the same path on the regulators. I went the budget route though and modified one for vacuum level adjustment. Links attached,plus an Amazon option for the one already done. You don't need the cross-drilled hole, the sharp end of the needle does not sit in a seat,it just floats in space. Edit - forgot to say that if you do your own modification practice drilling a long straight hole on a few cheap bolts first. I practiced and I still came close to messing it up. Although, you can build a new bolt, its purpose is just to move the spring seat up and down. Edit 2 - I think that Eurodat is right and siteunseen is running the no-vacuum source regulator. So, site, you're running a little rich during part throttle operation. Might have a little gassy exhaust smell? Since it works for you, you might not want to mess with it, but if you're handy with a drill and have a small piece of metal tube and some JBWeld you could add the vacuum port. Edit 3 - "boost" really just refers to any pressure change from ambient. Above ambient is typically called boost, below is called vacuum. But the diaphragm and spring in the regulator in the regulator don't really care, they just move accordingly. Dune-Buggy.com - Plumbing the Fuel System New Bosch 0280160001 Fuel Pressure Regulator Made in Germany | eBay Or ready-made: Amazon.com: MSD Ignition 2222 Boost/Fuel Press.Regulatr: Automotive