Zed Head
Free Member
-
Joined
-
Last visited
Everything posted by Zed Head
-
 Just had a similar conversation on a different forum, about a 4 barrel carb. The carb manufacturers suggest the power brake port as dual purpose with a T. So it would be the port on the right. But this would run all of the blow-by through two cylinders. I think that people run vacuum logs for situations like this. Two problems really - one is what to do with the blow-by, the other is why is there so much.
 -
There's always a way. If you don't want to use the intake vacuum you can use the Bernoulli principle - http://datsunzgarage.com/weber/ If you're using an air filter you can plumb both vents to it. If you're using three air filters you could run a three-way T to each. You could probably place the tube ends in front of the air horns and suck the fumes in that way also if you're running individual filters. You could run a long hose out to the back of the car by the exhaust pipe. I'd find a way to burn them myself.
-
Isn't the bigger hole just for inspecting the core plug area? They probably closed it to keep things cleaner. Look at the all of the clutch dust that would make it past the old one. I'd use the newer one.
-
Run the hose to the intake manifold like the factory did. You'll need to seal the system so you don't suck too much air through the crankcase and screw up your air-fuel ratio. It's not "P"CV until it has vacuum pulling gases through. You might also confirm the "rebuilt by Datsun Spirit" story and get some details. Wouldn't be surprised if they keep records on their work. You could call them with the engine serial number. Nighty-night.
-
You don't really need that second pickup. Although it does take you through engine warmup more smoothly. There is a short time during warmup where the extra timing advance keeps idle speed up. If it's not there the ignition module will just run off of the other one. I had the same problem with the bolt broken off in the housing. You might be able to drill it out. The drill will probably walk off the bolt or through it and in to the aluminum. Mine did but I reused it anyway. Some sealant and a good gasket and no problems. Those are the same. Coolant temperature sensor. For the ECU. The temperature sender (for the gauge) in your top picture just has a bullet connector. That might be the normal mode. Not sure and not by my car. Heat the housing with an air gun or torch. Aluminum expands a lot more than steel. Those sensors will probably come out. Do it while it's on the engine for leverage. But the holes in the housings might or might not match what you need.
-
Hey Mike. The Service Manuals (repair) are there, but not the Owners Manuals. He asked for Owners, specifically. Where's Blue?!
-
I think that's a switch. For the second magnetic pickup in the distributor and circuit in the ignition module. The sensor, for the gauge, has one wire, yellow, I think. It grounds to the housing.
-
Here's an interesting site showing a water pump modification. Just to give an idea of the variation people see. A good understanding of how the pump works and an inspection of what you get is probably worth doing. http://www.wallaceracing.com/water-pump-mods.php Here's the link it came from - http://forums.maxperformanceinc.com/forums/showthread.php?t=411256 I love talking about stuff like this... Edit - just noticed that the thread I linked went on for 1324 posts, over a year and a half. I've only made it through page one, post #20.
-
I used heat shrink also to spread the load at the junction. I think that other switch is the top gear switch. It's for the vacuum advance solenoid switch that lets vacuum through to the distributor. One of those odd emissions things they were doing back then. Pretty sure it's shown in the FSM. Edit - it looks like it's a neutral switch. Not sure what cars had them. Mine didn't.
-
No, I meant the heat sinks used for soldering. It's a metal clip placed between what you're soldering and heat sensitive parts. It soaks up heat that would otherwise pass to the sensitive part. You can use alligator clips but they do make specific clips for the job. http://www.instructables.com/id/Save-your-components-with-a-heat-sink/
-
In general, the automotive manufacturers put much time and money in to designing and testing parts, for performance and durability. Aftermarket suppliers generally put their time and money in to producing a similar appearing product that works long enough to get past the warranty period. The cynical view. I thought that cavitation was a problem with the L6 system. The cast versus stamped discussion covers almost every car brand out there. You can search the Google and find all kinds of reading. I tend towards the factory design generally unless there's evidence shown for a change. Nobody has ever advertised improved performance from the flat stamped steel blades, from what I've seen. Hard to imagine going away from flat and square, if it works, to an intricately curved cast blade, but not totally implausible. Side note - if you misspell performance very badly, "necromancer" is suggested as the word you meant.
-
I was actually going to suggest using the savings on cooling system improvements. Consider the size of the two radiators to see which does more work (or releases it as heat for those physics people out there). You might also consider the potential downsides - more places for oil to leak, and a more brittle oil pan, One missed speed bump or curb and you can be out $500 and have the car down for a while.
-
No polarity. The ground is after the reverse light so the body of the switch is insulated, not grounded. To zKars's point - use a heat sink on the base of the terminal, to save the insulation. Pretty sure I just crimped my new wires on, but soldering would work. Page BE-16 shows the whole circuit but here's the short one.

-
It's just a switch. You might consider new, flexible, wires, I've found that the old wires are all stiff from years of heat and getting washed by dirty road water. Probably why they break, any wire movement puts all of the stress on the connection point.
-
Your oil passages and bearing clearances will be the same though. Sounding like you don't really need the pan or the cooler.
-
If you remove the belt then just put one loop over the pulley that you're working on, you can squeeze the two sides of the belt tight with one hand and work the wrench with the other. Or, you might be able to just push on the belt with one hand to tighten things up while working the wrench. The first method works well though. Same principle as those rubber belt (strap) oil filter wrenches. You could use one of those too if you have one. http://www.harborfreight.com/2-pc-rubber-strap-wrench-set-69373.html
-
Measure voltage at the T plug with the key on. Your L wire might not be providing power. That would be the blue to W/B. The yellow wire is the S(ense) wire. Could be that the lack of power at the L wire was your original problem. The bulb in the voltmeter can burn out and cause this problem. Or if you don't have the gauge installed. You can work around by using one of the other wires at the plug. But you won't have a Charge lamp.
-
Recheck your wiring. Looks like you cut the plug off of the old external regulator and used it for the connecting, but I can't see the wire colors on the harness side. Use the write-up here, It's for a 77. Not having a diode won't stop charging from happening. It's the power missing from one of your wires that is the problem. You should have power on both with the key on. http://atlanticz.ca/zclub/techtips/alternatorswap/index.html
-
Stick these words in the search box and some good threads will show up - "proportioning valve rebuild".
-
There's a paragraph in the FSM about how to test operation. Replace if bad. But how to take them apart and clean them, and what's been found inside, has been described here before.
-
Good news. Now you can start thinking about modifying. 85 mph is just a start. I'm positive that my engine is smoother and has more power after I wash the car. The transmission also shifts better and the radio is clearer. Strange but true. Not sure how it works.
-
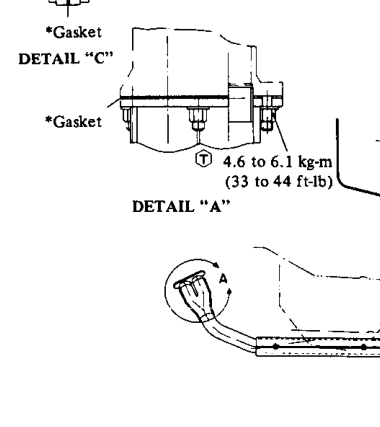
I got the fragment of picture I posted from the 1972 Brake System chapter. They call the "T" a 3-way connector. Page BR-5. Shows all of the stuff that's missing.
-
This popped in to my head the other day - I used to work with vacuum pumps and we would modify the exhaust ports with a piece of large water pipe filled with steel wool. The wool gave the vapors a place to condense and drain back in to the pump but let the gases flow through. Without the modification when you turned the pump on and it was evacuating it would often blow oil vapor out of the exhaust port. Used the same concept on the breather valve for my diff. Filled it with a piece of Scotchbrite. It stays clean now.
-
My 76 has what looks like two broken plastic mounts by the brake and clutch MC, as site suggested. Might go there if you're talking about your 76. If they came with the 78/79 motor, they might bolt on to the bottom shield, like the small one on the 76 bottom horizontal shield. There are drawings in the Engine Mechanical chapter, disassembly section. Looks like a vertical shield, not horizontal. Those hoses would go to the "magnet valves" (solenoids) for the AC.heating system. The vacuum bottle supplies the valves, which then control the system. IF the hoses still have their little tags on them, with letters, leave them on. They tell you what's what. In the 1976 AC chapter. With the motor out and in front of you stud extraction shouldn't be too hard. Just work slowly and be careful. Start a drill in the center of the stud and get a good hole drilled. If I was working on one, based on my last experience, I'd fabricate a drilling jig to guarantee the hole was square to the head. My eyeballing just isn't that good. People have had good luck with reverse direction drills. Worst case you just drill bigger and bigger until you end up peeling threads from the hole. That's how one of mine went, in the car, working sideways. If you loosen all of the bolts on left and right you can get enough wiggle room to get everything in its hole. Then tighten and torque. The rear cylinders are spendy for the early cars.
-
Shouldn't take much. Hopefully it's been off recently so he doesn't break any studs. You are talking about Detail A, right?