Zed Head
Free Member
-
Joined
-
Last visited
Everything posted by Zed Head
-
 Just measured my old 300Zx bell and the relevant parts on the swapped unit, and got 33 3/8 total, also. So looks like you're on the standard swap path. Any of the three writeups should get you there. If you can find a very early short 240Z propeller shaft you'll be one fabrication step ahead.
 -
-
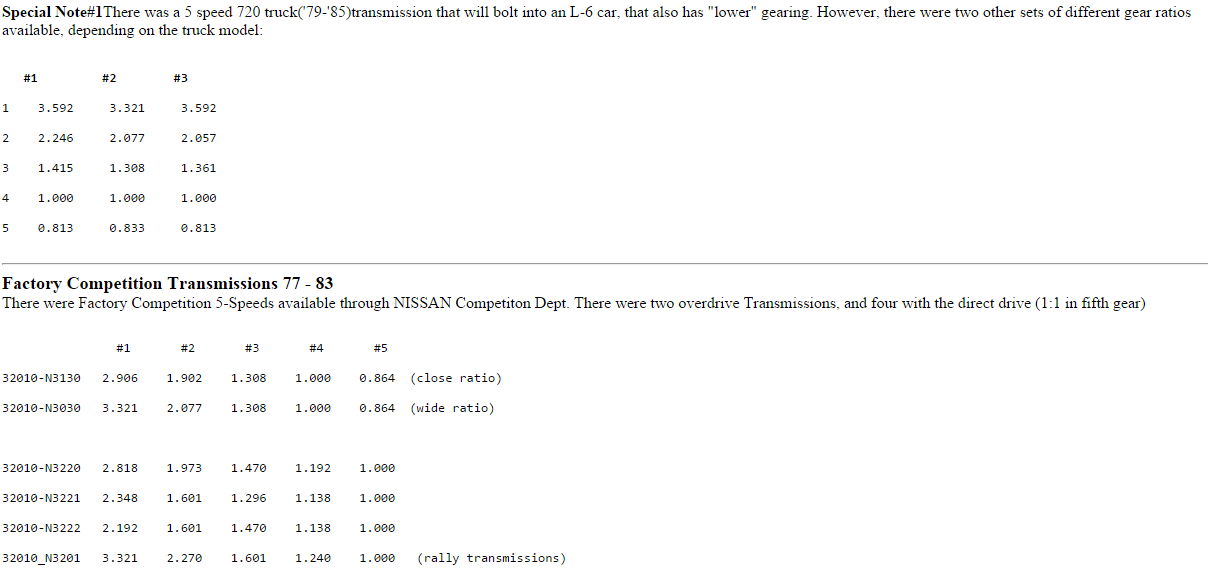
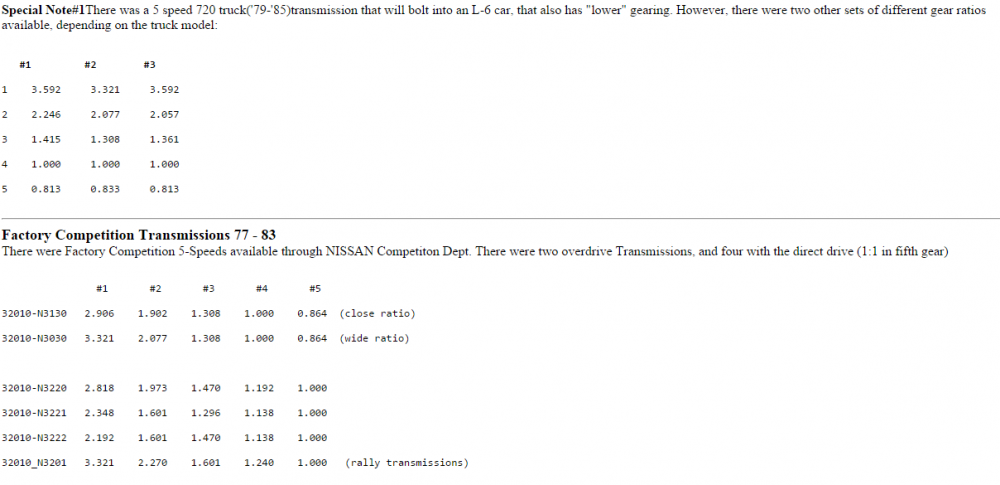
One option. That would be the short tail-shaft transmission then, I believe. Maybe. Requiring a longer propeller shaft. Wouldn't be a giant surprise. People were modifying the cars soon after they were introduced. 20+ years is only about mid-1990's. All the Z's were old by then. zhome shows that my competition trans comments might be off. But also shows the 720 with a 3.6 first. Could be truncating instead of rounding though. Maybe 3.592 = 3.5. http://www.zhome.com/ZCMnL/tech/GearRatios.html
-
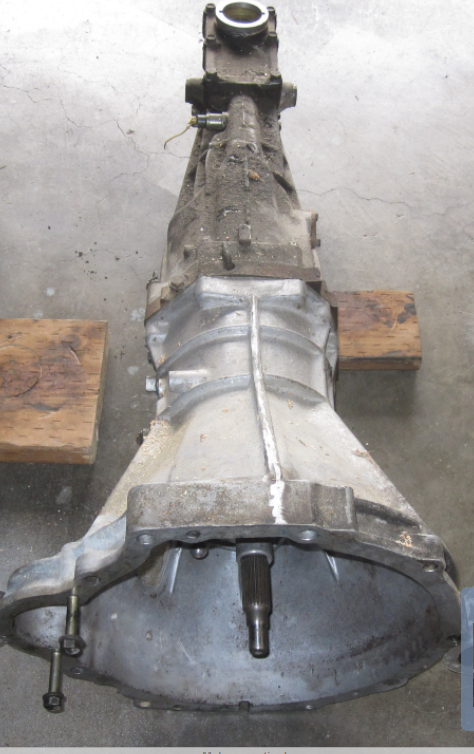
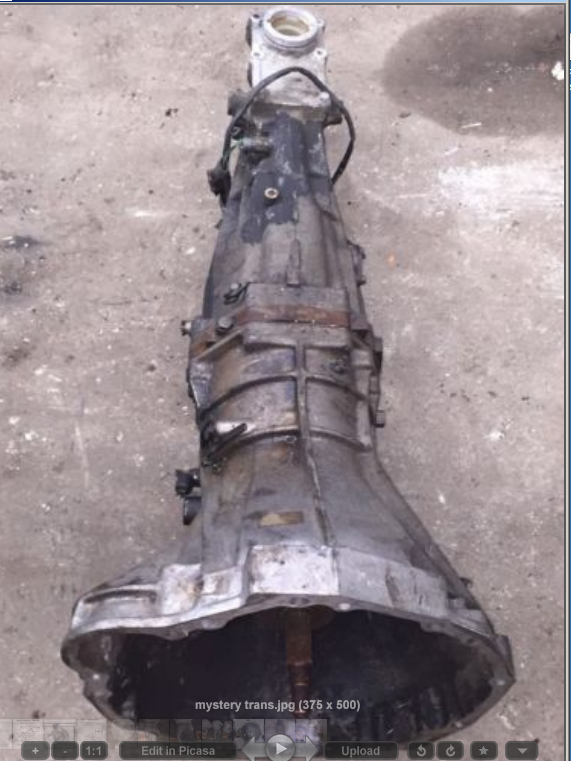
Worth is subjective. You haven't given enough information for anyone out here to make an offer. That's what I would do. Post some pictures, get as much information as you can and ask what someone out here might pay for it, if you bought it and decided to resell. Then you'll now where you stand. If you change your mind, you'll know how much profit or loss you might get.
-
-
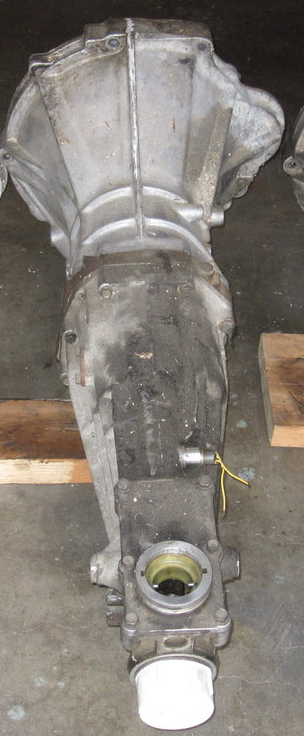
Might be an old competition transmission. They came with a variety of ratio choices, apparently. There was recent discussion about it. Good news that a simple bearing change will fix it. Although, I've wondered how much bending and twisting it takes to get a bearing cage to pop out like that. Really, it's just there to keep the balls apart. How does it get loose?
-
I'm jumping between threads here. How could you have those ratios on an L6 engine unless somebody swapped bellhousings? Or swapped gear sets? Just asking. Maybe George knows.
-
The back half will bolt on to a new front half so you can make a swap work. The questions are about gear ratios and back half length. People either use a very early 240Z drive shaft or have theirs cut to length. If the ratios are right, it might be what you want. I mentioned your other thread in this thread. The guy has truck ratios. We haven't even got in to how this could be unless it's a bellhousing swap.
-
Can't even venture a guess without knowing what you want it to be when it's done. But it sounds interesting. Is it a race engine? Race transmission? Race diff (limited slip)? If you trust your neighbor why not negotiate a number that he'll be happy with. He'll probably end up at your place helping you put it back together anyway. Tyres, not tires? Are you from the U.K.?
-
Too bad you and Mr. Abate are on opposite coasts. He's looking for those ratios.
-
Could the original wiring still have been running through the 240Z ballast resistor? Maybe you just had too much resistance. Continuity would still be there.
-
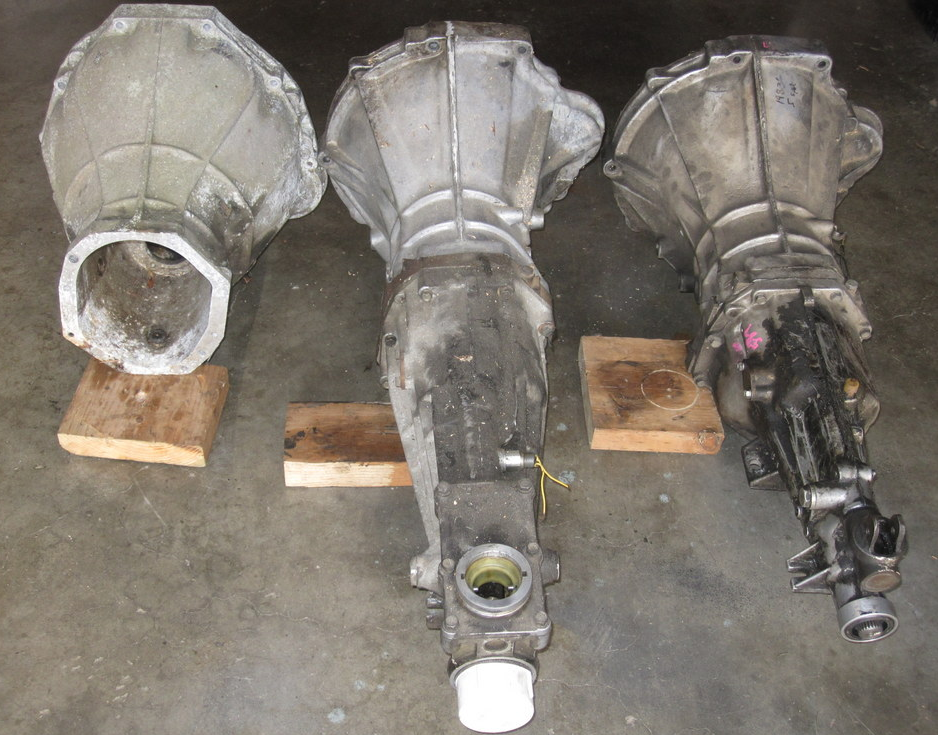
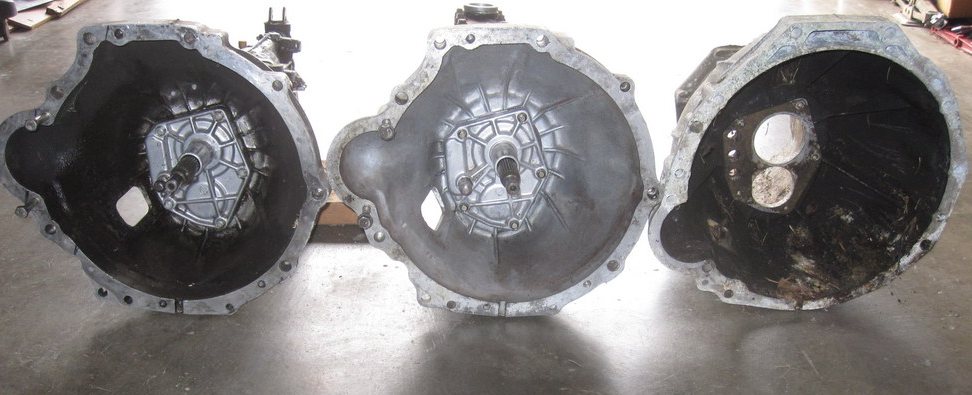
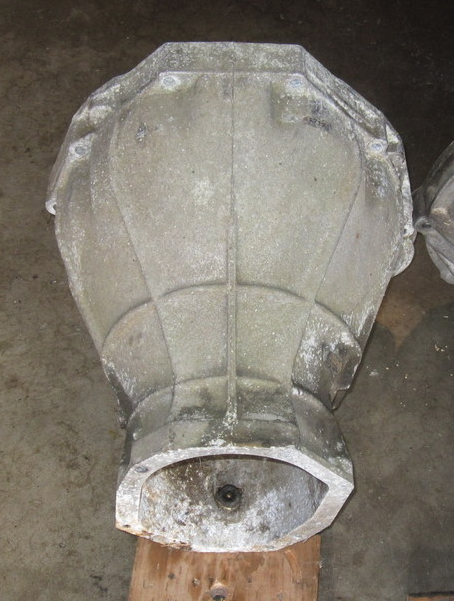
I'll stop now. You can see the differences in this picture. Your transmission seems to have a thrid orientation. So it's probably L series, VG, and CA. And there's a KA out there also, but I think that it's like VG. EuroDat's "Z" maybe.

-
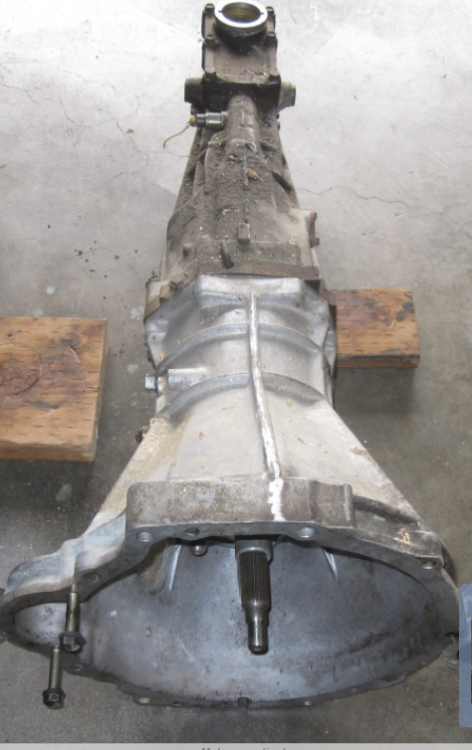
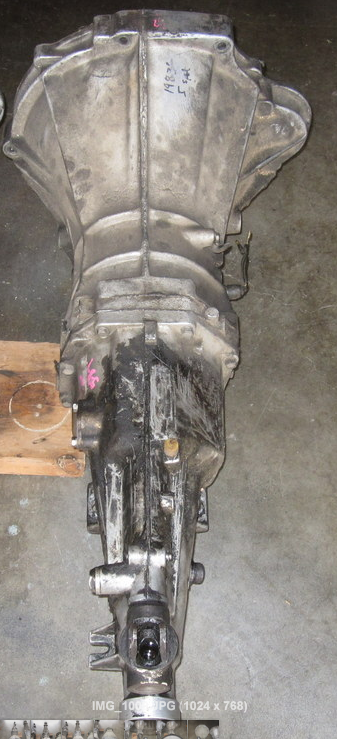
Couldn't find the usual comparison shots so made my own, just for fun. The free bellhousing is what's left from the swap. 1985 300ZX. I miswrote earlier, the starter actually is lower if you use the flat spot on the housing for reference. The insides are clean. I tend to leave things dirty until they get used.
-
But the rear case looks like a 71C, with the different shifter mount. And the front case is different from the early 71B's. Look at the orientation of the flat spot to the shifter. Edited after taking my pictures. My head is spinning. I can't get the right views to compare. I'll try to take this perspective on my swapped unit.
-
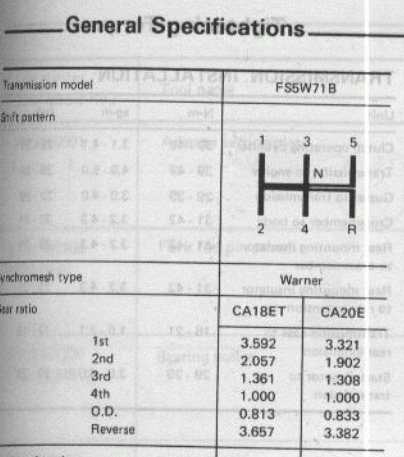
Posting a picture from the 1986 200SX FSM. Maybe the FSM is wrong. But if it's wrong there, gear ratios might be wrong also. I still don't know what the C and the B signify. Maybe just the change in countershaft bearing size. Nissan used the 71C designation all the way up to 1994 in the 240SX, maybe beyond. I did find something in the MT chapter. Two transmissions. Could be they left out the CA18ET variations. Looks like a good puzzle. You could have the guy check the 1st gear ratio. 3.592 is over 3 1/2 turns, 3.321 is less.

-
I think that he meant NAPS-Z. Maybe. The tell on the bellhousing is the position of the starter mounting area relative to the bolt holes and flat top section. It will look higher on the VG30 and the other engines. Can't you post a picture? Use the Snipping Tool in Windows.
-
I said Nismo, but I meant nicoclub. And they only have 1986 on their site. It shows not much different from a 280Z trans, except the gear ratios. Still uses the old shifter style too so it might not even need the shift rod hole drilled. Who knows, it might not need any work done, just a straight front case swap. http://www.nicoclub.com/FSM/200sx/1986/1986-s12_manual.pdf The truck transmissions have a shorter tail shaft and rear case, apparently, which might be another fly in the ointment (has anyone ever actually had a fly in their ointment?). Although some say it actually gives a final unit that's the same length as a 71B. If it were me, I might get it just to know some more stuff and have a project. It might be a straight bolt-off, bolt-on swap. There are so few of those cars around though that the 200SX info might be of little general use (probably why you can't find much on it). In the long run though, this swap will probably get more and more popular as the Z car transmissions fall apart. If the drifters don't blow up all of the 240SX's.
-
I agree with EuroDat from your other post (too many posts spread around on the same subject!) that unless you get the right "71C' tranmssion, there's not much benefit to the work. The guys that did this swap originally did it for wider stronger gears, more better synchros (reverse synchro for example and a double cone 2nd and 3rd), and the stronger bearing. Plus, apparently, the shifting mechanism is better. Along with just general newerness and maybe some small fixes that come with most redesigns. I mentioned in one of your other threads that I did this with a 1985 300ZX transmission. But I got the transmission for $20 from a young guy on Craigslist whose mother told him it had to go (he listed it for $100, but when I paused on the phone he dropped to $20 - it had to go now! I almost felt bad.). And the bellhousing for $50 (blown up mystery ZX 5 speed). So now I have a part that can be swapped to a 1994 240SX unit, but the 85 300ZX trans itself just offers the new shifting mechanism. Gear widths are the same, I swapped the bearing, not much true benefit, except a good condition $70 transmission. Plus it was a good reason to buy a drill press. The hole for the shift rod only needs slight enlargement. Almost like a reaming operation. The right tool will self-center itself, it's almost impossible to mess up. Get on to the Nismo site and find the car your transmission came from. The MT chapter will have an exploded diagram showing the synchros, and will have the gear ratios (to be sure).
-
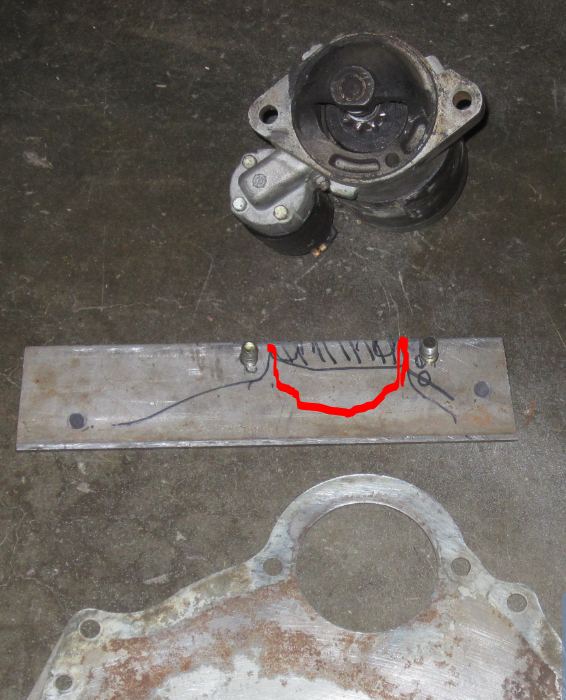
That was the only reasonable piece of steel I had laying around. Plus, I think that the fact that it's clamped on to the back of the engine block makes it stiffer. If it went around the outside it might bend. And thin is easier to cut and drill. Really though, it just started out as an "I wonder..." then a "maybe I have something that will work" on to "do I have the right drill bit for the hole size"...etc. Usually these things get stopped before they're done. I have lots of things lying around that look like they were on their way to something. My first test on this one was without the thin plate on the back of the engine. I thought I might to do some grinding to get it to fit when I realized how tight it actually was with the plate. I bought that engine from a wrecking yard with a 30 day guarantee. I rigged up my extra EFI system and bolted on a transmission and got it running to be sure I had something worth keeping. But if I was going out to look at a Craigslist engine it would be nice to get it spinning at starter speed and check things out. Truthfully though, I just had too much free time and the garage was warm. Glad you guys like it, maybe it will save someone some trouble in the future.
-
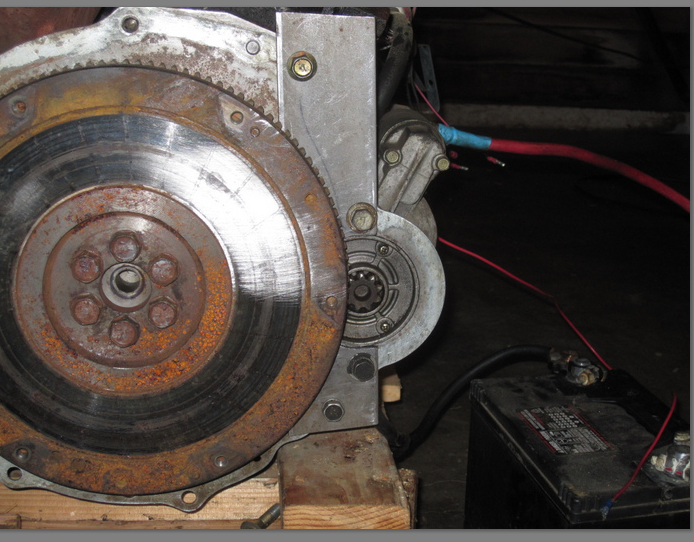
I've dinked around with several engines in the garage and have always wished I didn't have to mount a transmission to spin the motor. I thought of a possibility and had some scrap steel and time so worked up a quick mount, that actually works. I had started out using a spare starter and the back of an engine for measurements then realized that the backing plate on the engine has all of the necessary holes, a ready-made template. If you have a drill press, and a jig saw, it's not too difficult. A battery, starter, and the plate and I can spin a free-standing engine as long has it has a flywheel. The steel is 3/16" x 2 1/2" mild steel, hot-rolled I believe. I showed the starter bolted to the plate but in use the plate has to go on first and the starter through the backing plate hole. I also bolted the plate to the engine backing plate when I drilled the engine mounting holes. Less error using the engine plate as a guide. Just another thought I wanted to get out there. Might be handy for someone. Forgot to say, 3/16" is the limit on thickness. There's a sliver of space between the plate and the flywheel. No running, but no room either.

-
That's interesting. I don't claim to know exactly what the tach's use, I just tried to give them what they're probably getting, with either points, or electronic ignition. I actually mentioned the possible need for a resistor, thanks for the second opinion. I've read of people burning up their HEI modules by using a later model ~0 ohm coil that the computer controlled HEI systems used. They look the same but they're not. But that was just one guy. If I try it I'll start with a resistor or potentiometer and work down. Stop when it works. I went too liberal on the use of the word schematic. It's a word schematic. Anyway, if I ever find one of these old ignition boxes for cheap I'll probably try it out. I just wanted to throw the idea out there while it was still in my head.
-
I've done it, and I think that EuroDat has, and Blue has a writeup on the atlanticz web site. If you're handy with a drill and some grinding tools, it's really not too difficult home garage work, if you swap to the smaller countershaft bearing. The most accuracy is required for enlarging the hole for the larger countershaft bearing that Nissan started using in the 71C units. That requires some machinist level skill. Without that, it's fairly common wrenching, some drilling, and some grinding. Then there's finding a shorter driveshaft, and modifying the transmission mount. I cut slots in my stock mount, but some people prefer to cut and weld. Overall, there's some ingenuity required. Several different ways to get it done, but nothing super-difficult. Full disclosure - I have not mounted mine in the car yet. I have everything, just not in yet. I did spin it through the gears on the back of a spare engine that I have in the garage though. No issues. Mine was from a 1985 300ZX.
-
What do you mean by "full advance"? You twisted the distributor as far as it would twist? After you checked it, where did you set it? Sounds like you're close. And it does sound like a fuel supply problem, since starting fluid works. I would set the timing to 10 degrees and focus on the carbs. I'm not an SU guy for sure, and barely a typical USA style carb guy. But I think that if the pistons in the SU's get stuck, you get no fuel. Since you rebuilt them yourself, might be there's a error. Site has posted some tricks for unjamming a piston, I believe, and I'm sure there are some other good tricks out there.
-
Just curious - what do the rod caps look like? I've seen pictures of some that turn blue from overheating. Sometimes it's the remains of the ones that blew a hole in the side of the block.
-
Any should work if the parts are oriented right. You moved the mount with the distributor so it should be fine. Once you get things oriented correctly. You have spark, just maybe at the wrong time.