Zed Head
Free Member
-
Joined
-
Last visited
Everything posted by Zed Head
-
 Aren't they weld on anyway? So you could set your own height. Seems like spring rate would be the only difference, and instructions. You could call jpn garage to be sure.
 -
They'd probably bolt in but the spring rate might be too low, and the ride height, depending on where you wanted it and tires used, etc. You'd be starting at a lower spot if you used these in a 280Z. I was under the impression that the transverse link (aka control arm) did get beefed up for the later cars but the dimensions were the same. The spinlde pin itself appears to have gone unchanged. http://www.carpartsmanual.com/datsun/Z-1969-1978/axle/rear-suspension

-
Not uncommon. If I was having this problem I would remove the lines from the MC that supply the front and rear systems and block them (using old lines and fittings or sticking a piece of rubber under the fitting). Then use the MC bleeders to bleed the MC. That should give the firmest pedal you'll ever get. IF the MC seals are bad you'll never get a firm pedal. Then attach the rears and bleed them, then the fronts. Break the system down in to its three elements and test each. You have to remove those lines anyway to replace the MC. Might as well test it on the way out.
-
This sentence isn't super clear. Maybe you're saying that because fluid squirted during the bleeding process, there must have been pressure? But then after squirting a bunch of fluid and air bubbles, the bleeders were closed, but no pedal pressure could be built. So that could be a weak seal in the MC, or there's still air in the system. You can build low pressure to squirt fluid but then still have an air bubble that will compress when the bleeders are closed.
-
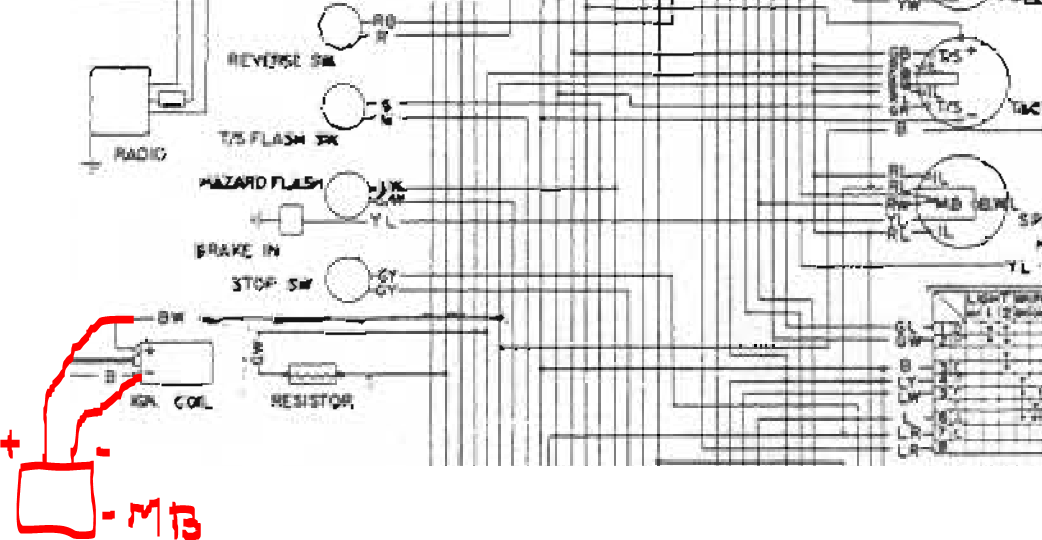
Seems like you're working with more wires than you need to. The "match box" is just taking the place of the points, so you really only need to deal with the distributor. The negative side of the coil needs to be attached to one terminal of the match box (not sure how they're labeled), and the positive side needs to stay attached to the black-white wire, but with an extra branch going to the other terminal of the matchbox (the extra power wire to the match box is because the module needs its own power, unlike the points). And the distributor body itself needs a good ground. You really shouldn't need to mess with the other wires to get the ZX distributor to work right. Then, if you want to remove the ballast resistor, you would need to connect other wires together, that also attach to the positive side of the coil.

-
How much time passed between the firm pedal and the no pressure pedal? Something's missing. If the reservoirs are still full of fluid then the pedal should push the pistons and the pistons should move fluid, like they did when you were bleeding them and everything worked right. If the reservoirs leaked fluid then you could see air getting back in to the system. Maybe you just have bad seals in the master cylinder. They may have been shrunken before but all of your pedal pressing opened them up. Maybe they took their natural smaller diameter set while sitting. The sitting allowed them to collapse and stop working. If so, a hard fast pedal push should open them up again. Just guessing. Odd situation.
-
That's the propeller shaft, not half-shaft. Did he mean the u-joints, or the differential mount? The u-joints look kind of dry. If you have a pre-74 shaft they're replaceable.
-
There are eight points of rubber contact holding the engine, transmission, and differential in place. The two motor mounts, the central transmission mount (called rear engine mount by Nissan), the two ends of the transmission mount crossmember (not readily noticed), the front differential mount, and the two mustache bar ends. They can all add some looseness to the whole system. The tail of the transmission is really not very tightly held. That's a spot for rotational vibration that might be hard to diagnose. Lots more mass also, small movement = big effect.
-
Just a note for anyone deciding to try this. I don't know what the gas bubbles are that released during the chemical reaction, but they should probably be avoided and/or dispersed. I don't think that it's boiling water. More likely either hydrogen, oxygen, or sulfur dioxide. Two somewhat flammable/explosive, one is toxic. The levels must be very low and dilute but still should be considered. The rotten egg smell leans toward sulfur dioxide. Aluminum oxide, iron sulphate (or sulphite? I don't know), and sulfur dioxide could be the end products. Maybe. I don't want to tax my brain with chemistry. Any chemists out there feel free to set me straight. The volume of gas from tiny watch screws is probably much less than from the large objects we're messing with. We might be in dangerous territory. Don't get poisoned or burned. I did boil up one of the rusty studs last night and the red rust turned to black, along with lots of fizzing. The stud and nut stayed black after the rust was gone, not shiny metal, and eventually I was able to remove the nut. I have some pictures. I'll post up later.
-
I see now. I think it's a universe of wide open spaces thing. Those disappear as populations grow. Sounds like you're talking yourself out of this one. If you're planning to get one eventually, keep all of the good parts. You'll appreciate them later.
-
You won't know if it's worth saving until you have a plan for what you want. The one picture of the body doesn't look too bad. What is an "approach"? Must be an ND word?
-
Didn't mean to jump Namerow's thread but I had too much free time, and I've spent a few hours leaned over the fender working on a broken thermostat housing bolt in a head. We can compare notes. Mrs. Wages vs. all comers. We should at least be able to come up with a simple procedure and things it should work on.
-
Most of the alum that was in the hot solution crystallized back out after it cooled down. It's looking like heat is a big part of having a realistic method, time-wise. Probably why it's popular in watch world, but not well-known in the world of big parts. Heating a cylinder head and holding it there would be difficult. I'll leave one in the cold and boil the second one tomorrow to see what happens.
-
The Spice alum doesn't contain the potassium ion, according to their description, in your link. Mrs. Wages does, apparently. In solution there should be little difference, I believe. Probably why they call them all "alum". Mrs. Wages would be a lower purity form of aluminum sulfate maybe, or just offer easier purification by crystallization. I found another old stud so made up a another solution, but heated it to get more alum in to solution. Heat helped. I'll see if it stays in solution or comes back out.
-
I picked up some Mrs. Wages Alum from the local Coastal store. Seems like the right stuff, although apparently there are various ratios of elements all called "alum". The ingredients say "aluminum potassium sulfate", no indication of a blend. Found two old studs from past disassemblies, both with nuts corroded/jammed on to them. I try to save all of my odds and ends just in case, and I couldn't get the nuts off of these. So they represent locked threads. Added some water to the alum and it didn't all dissolve so it's a saturated solution. Dropped the studs in to jars containing both the alum solution and another with apple cider vinegar, plus a drop of dish detergent in each to help break through any oil film. Lets' see what happens. No heat to start, just like a typical garage scenario. I've derusted things before with the vinegar and it works surprisingly well. Took some starting pictures, but it's just two salad dressing jars with rusty studs and unclear liquids in the bottom. They have time stamps. It's about 40 degrees F in the garage.
-
There's probably some thermostat housings out there that this would work for. Bolts break off in them often. A plastic plumbing elbow with a rubber gasket might be a better vessel than an old pop can for a cylinder head stud also. I'm tempted to go jam an old rusty stud in my spare engine and see how it works in the real world.
-
Seems like one of those theory/practice things. In theory it should work great. In practice maybe it isn't so easy. Or, in a commercial setting the dissolved iron in alum solution is chemical waste, requiring expensive material handling costs. I could see that as an issue. Or maybe it's just hard to figure out how much to charge for letting a broken stud sit in a solution of alum. "Where's the stud you removed?" It's gone. Where? It dissolved. How much will it cost me? $50. $50 for soaking something until it disappears?! Rip-off!
-
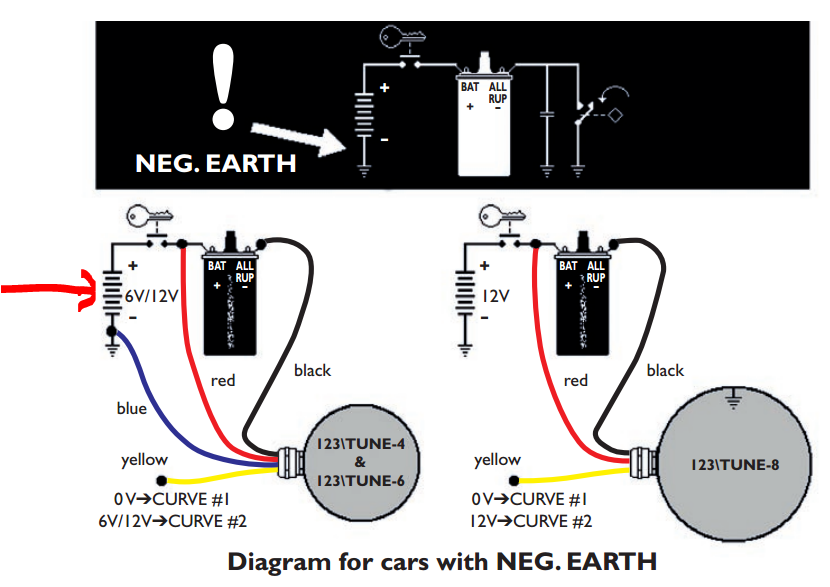
I think that it makes sense when you realize that the thing with the short and long lines is the battery. They're showing the switch supplying power from the positive post of the battery and the blue wire connected to ground to the negative post. It's just an unusual symbol for the battery.
-
Sounds like the relay is stuck or no good. It's a common normally open 4 pin relay. Any old auto store or junk yard relay could take its place. I lean towards the Bosch units from BMW's. They seem to be of high quality.
-
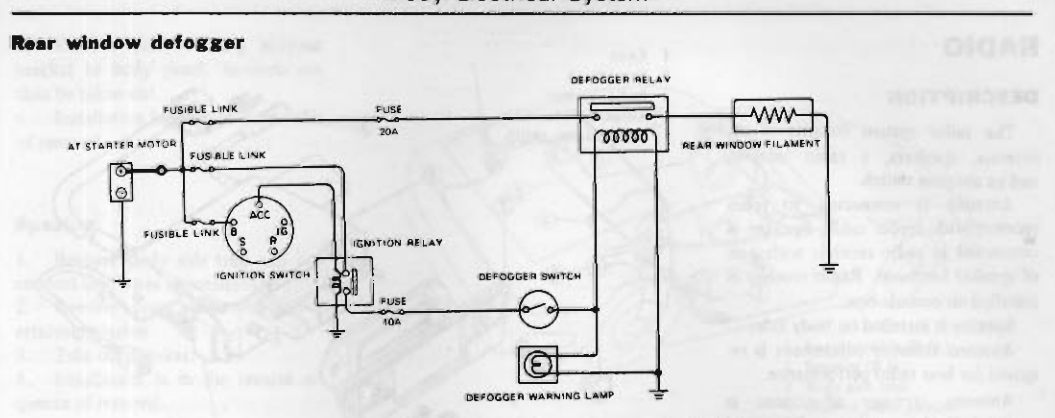
Here's the circuit diagram. Looks like the blue light just shows that the relay got power, but doesn't show that the relay did its job. Notice that of the two wire ends over the window, one is just a ground. Only one has power, you have to pick the correct one. You can just use your meter and test directly to a body ground. If there's no power at either wire, but there is power at the fuse, that would indicate that the relay is not closing the circuit, or it's been disconnected.

-
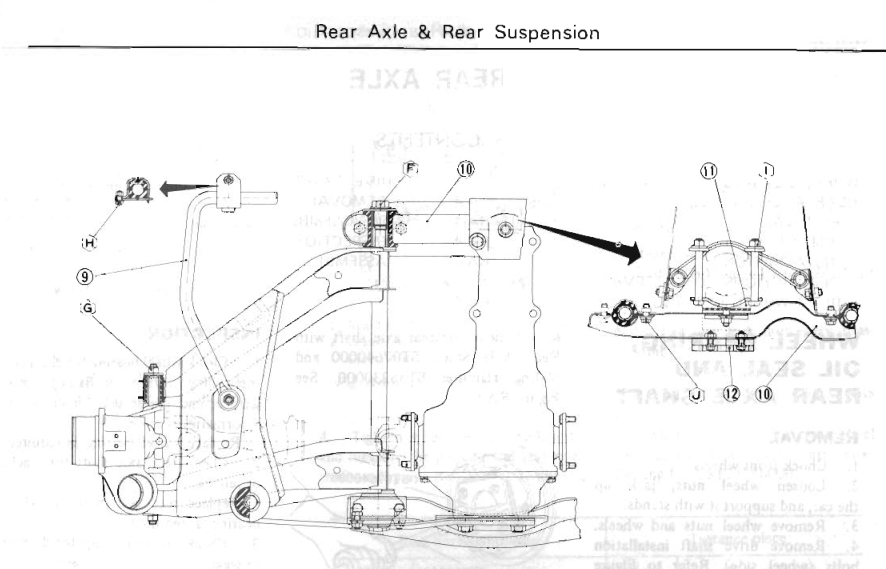
Are you sure that picture came from 1975? I opened up my 1975 file and it shows the typical R200 setup. Regardless, you can see that "1" in your picture is an R180 (the bolts around the input flange). That's the simple direct answer. R180 goes one way, R200 the other. Not sure about different bars. Carpartsmanual shows the same bar, after July 1973. Maybe that's where the beefier bar appeared, since they still used R180's after then, but don't distinguish a different bar (Just realized the from-to on their page is a bit weird). http://www.carpartsmanual.com/datsun/Z-1969-1978/axle/rear-suspension

-
I've kind of developed the opinion that Pertronix is just milking everything they can from the old Pertronix ignitors. They've apparently changed manufacturers (comments from old posts) to save money and the quality of the product seems poor. Lots of failures and problems. They don't even really support it on their own web site. Where is the #1761? - http://pertronix.com/support/instructions/ You could probably use the Pertronicx ignitor to run a GM HEI module. The coil current would be handled by the HEI and the trigger signal supplied by the Pertronix unit. Pertronix actually suggests similar, using the Ignitor to run an MSD. I think it's the high current from the coil control that fries the units. http://pertronix.com/prod/ig/ignitor/ Works great in stock point-type distributors as a trigger for multi-spark CD ignitions, eliminating the need for expensive aftermarket distributors.
-
Here is a sign that the internet is taking over the internet. I don't know if this is circular logic, circular illogic, or circular something else. I do feel like I went around in a big circle thought. https://en.wikipedia.org/wiki/Alum From the wiki: Industrial uses " Alum solution has the property of dissolving steels while not affecting aluminium or base metals, and can be used to recover workpieces made in these metals with broken toolbits[5] lodged inside them.[6] As considerable expense and/or effort may have gone into machining a specialist part, this can be a worthwhile exercise. " Reference [5] - https://www.youtube.com/watch?v=fqZYgReuywM AvE demonstrates usage of Alum to remove a broken stud from an aluminium engine head Reference 5 is the Spice video.^^^^^ that BGM posted. The link is messed up.
-
I browsed around the internet a bit. Seems like drills and taps are the most common items removed using alum solution. I wonder if the stainless steels are affected the same way? The aluminum is unaffected because it has a protective layer of oxidized aluminum. I think that stainless steel works in a similar fashion, forming a protective layer. Might have problems with the stud materials used. Still, worth a shot on studs in aluminum heads. Studs in exhaust manifolds or engine blocks, out of luck. I wonder also what the bubbles are. Could be oxygen or hydrogen, depending on the chemistry. I'm not even thinking about doing a chemistry equation but someone out there might.
-
The question would seem to be about time. Did he wait three minutes or three weeks. And there's no need to corrode the whole stud, just reduce the diameter slightly. Something's wrong here folks. Lots of show, with the drug inferences and the weird Canadian curse words. Then magic happens and the stud is gone.