Richard McDonel
Free Member
-
Joined
-
Last visited
Everything posted by Richard McDonel
-
Thank you CanTech! Richard
-
I'm restoring (assembling) a 1971 240. Too many parts from too many cars can cause confusion. I have one choke cable assembly, and pulled tight, the cables barely reach the choke levers, in fact full open choke is not achievable. I notice in various catalogues that there is a different part number from 1970/71 vs. 1972. Is the difference between the two cable lengths? Or does the difference lie in the mounting position of the lever on the console? Thanks
-
SteveJ, You're partly right. It says "Oh Sorry" in both official languages.
-
Hi Dan, Glad to see you and your car getting some recognition. Looks good on you! BTW; Fired up the engine in my 240 resto for the first time today. Music to my ears, after all these years. Many thanks for all your help and advice along the way. Cheers, d***
-
Just got my September Road & Track in the mail today. They have a three-page feature on the original 240Zs. Nothing really new for most of us, but great to see our car back in the news.
-
Namerow, Here is the reverse side view of the two seals. Don't know if it will solve anything for you. There is a market opportunity out there that someone is missing out on. Certainly the need is there; a part that the fsm says cannot be repaired, with the only option being to buy a new one, but the factory doesn't make new ones. Someone must have the tools and the knowledge to rebuild these these things. For myself, I'm just grateful that Grannyknot was able to come through for me with a workable used unit. I'm one step closer to putting my many-year project on the road.

-
grannyknot, Mea culpa! I forgot the great price (free) that you offered. Again, my thanks. Best regards, Richard McDonell
-
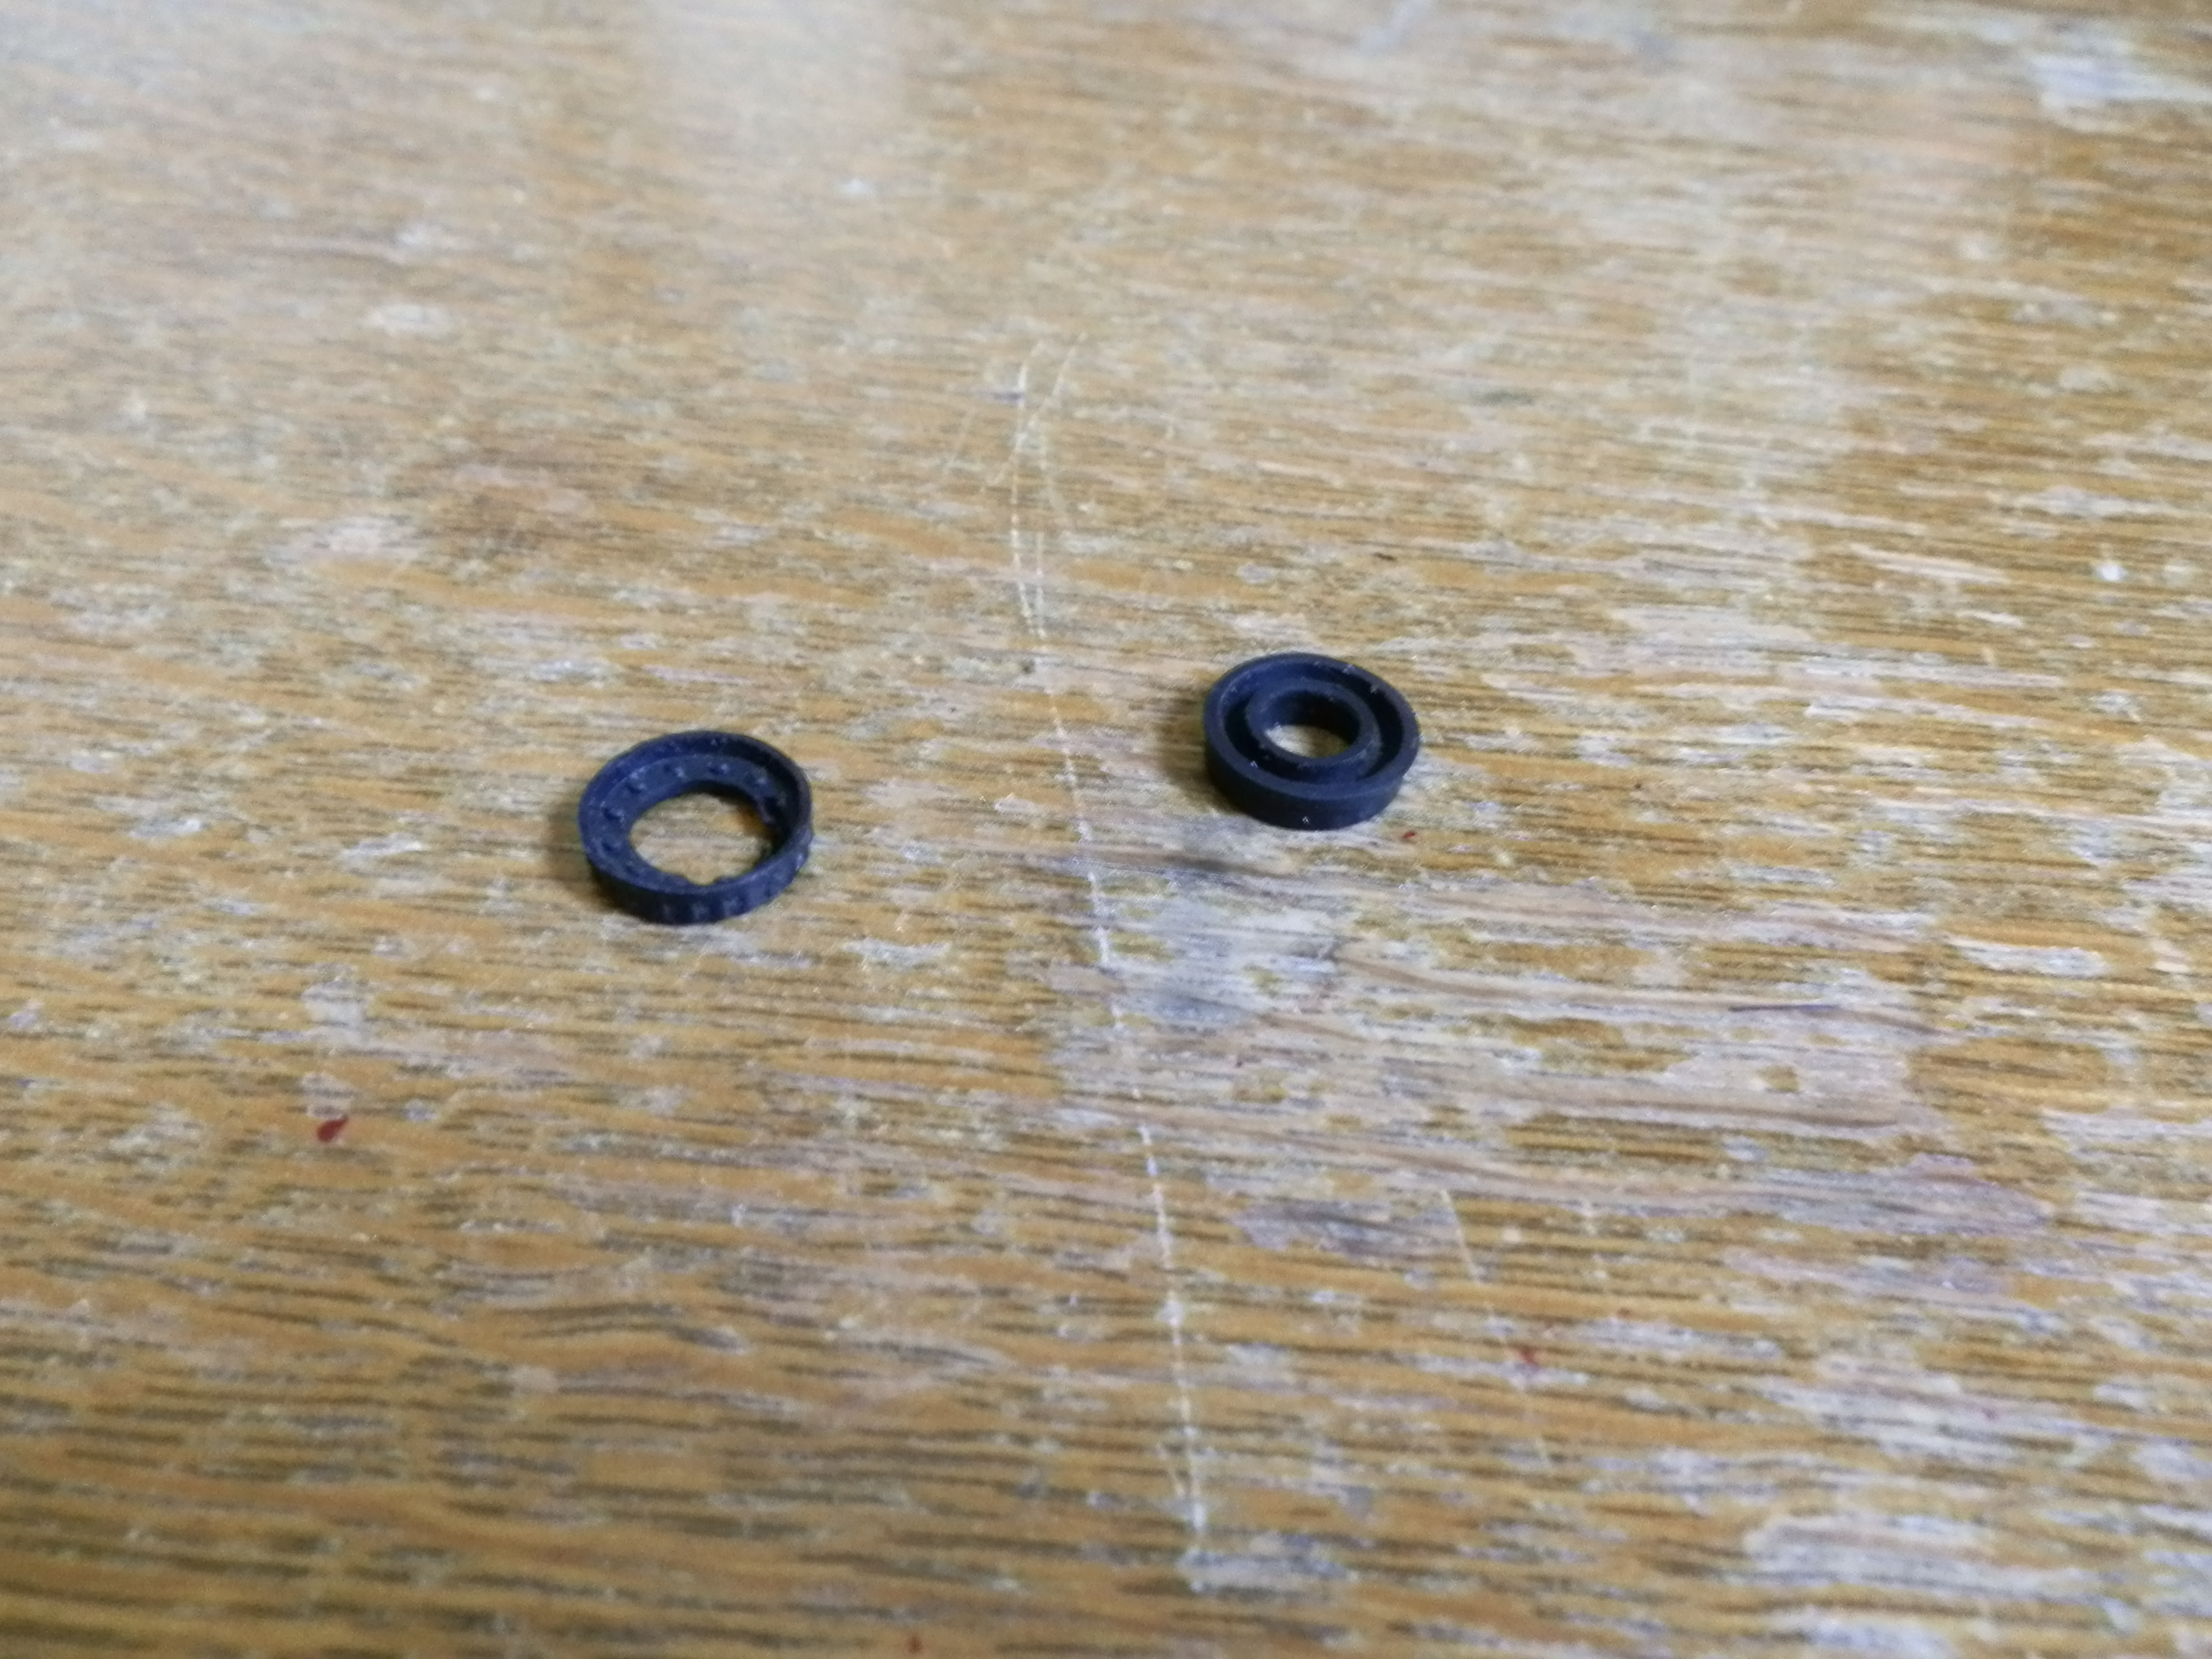
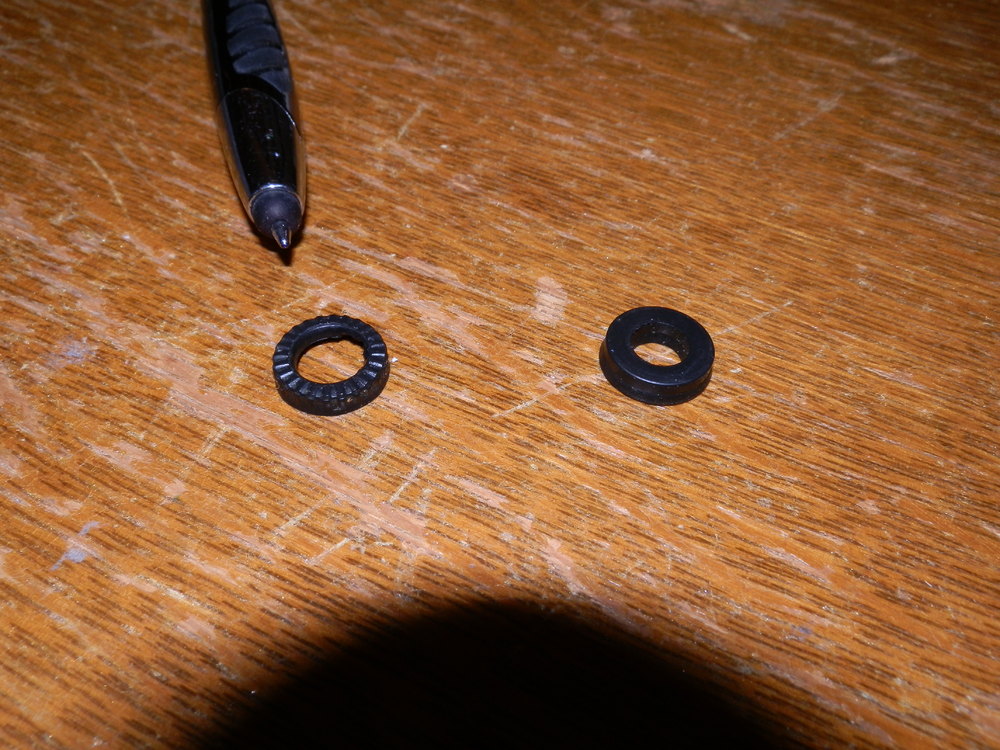
Namerow, You and I have been sold different kits. The O-ring is fine, but the other seals in my kit differ from yours. I hope the attached photo is clear in showing the the seal that I - rightly or wrongly - mounted at the bottom (inner) end of the stem has notches around the perimeter. Neither of yours appears to have these. Their purpose? While it is always a source of great satisfaction to solve a difficult problem such as presented by the brake proportioning valve, I am grateful to Grannyknot for selling me a workable used unit. I am now able to get on to the thousand and one other little items that have my restoration project many moons behind what I originally envisioned. Perhaps a plea to the overall membership of this forum for a good, used unit? Best wishes,
-
I've often heard that a typical car manufactured in North America will cross an international boundary five times during the course of manufacture. Last week I found out why. Last week I was replacing front wheel bearings and seals on my 240. The local Nissan dealer, bless 'em, had what I needed, specifically an inner bearing, an outer bearing and a seal. So I'm buying parts in Canada for a Japanese car. I get three packages, all marked SKF - a Swedish bearing manufacturer. The seal is made in Taiwan, the inner bearing Brazil, and the outer bearing China. Nothing made in Sweden, Japan, or North America. Must be a good time to be in the shipping business.
-
Zed, Thanks for the tip. Actually I have a shed full of all sorts of misc. parts. I've promised myself not to sell any of them until the car is on the road, because I just know that the first part I sell will two weeks later be needed to complete the job.
-
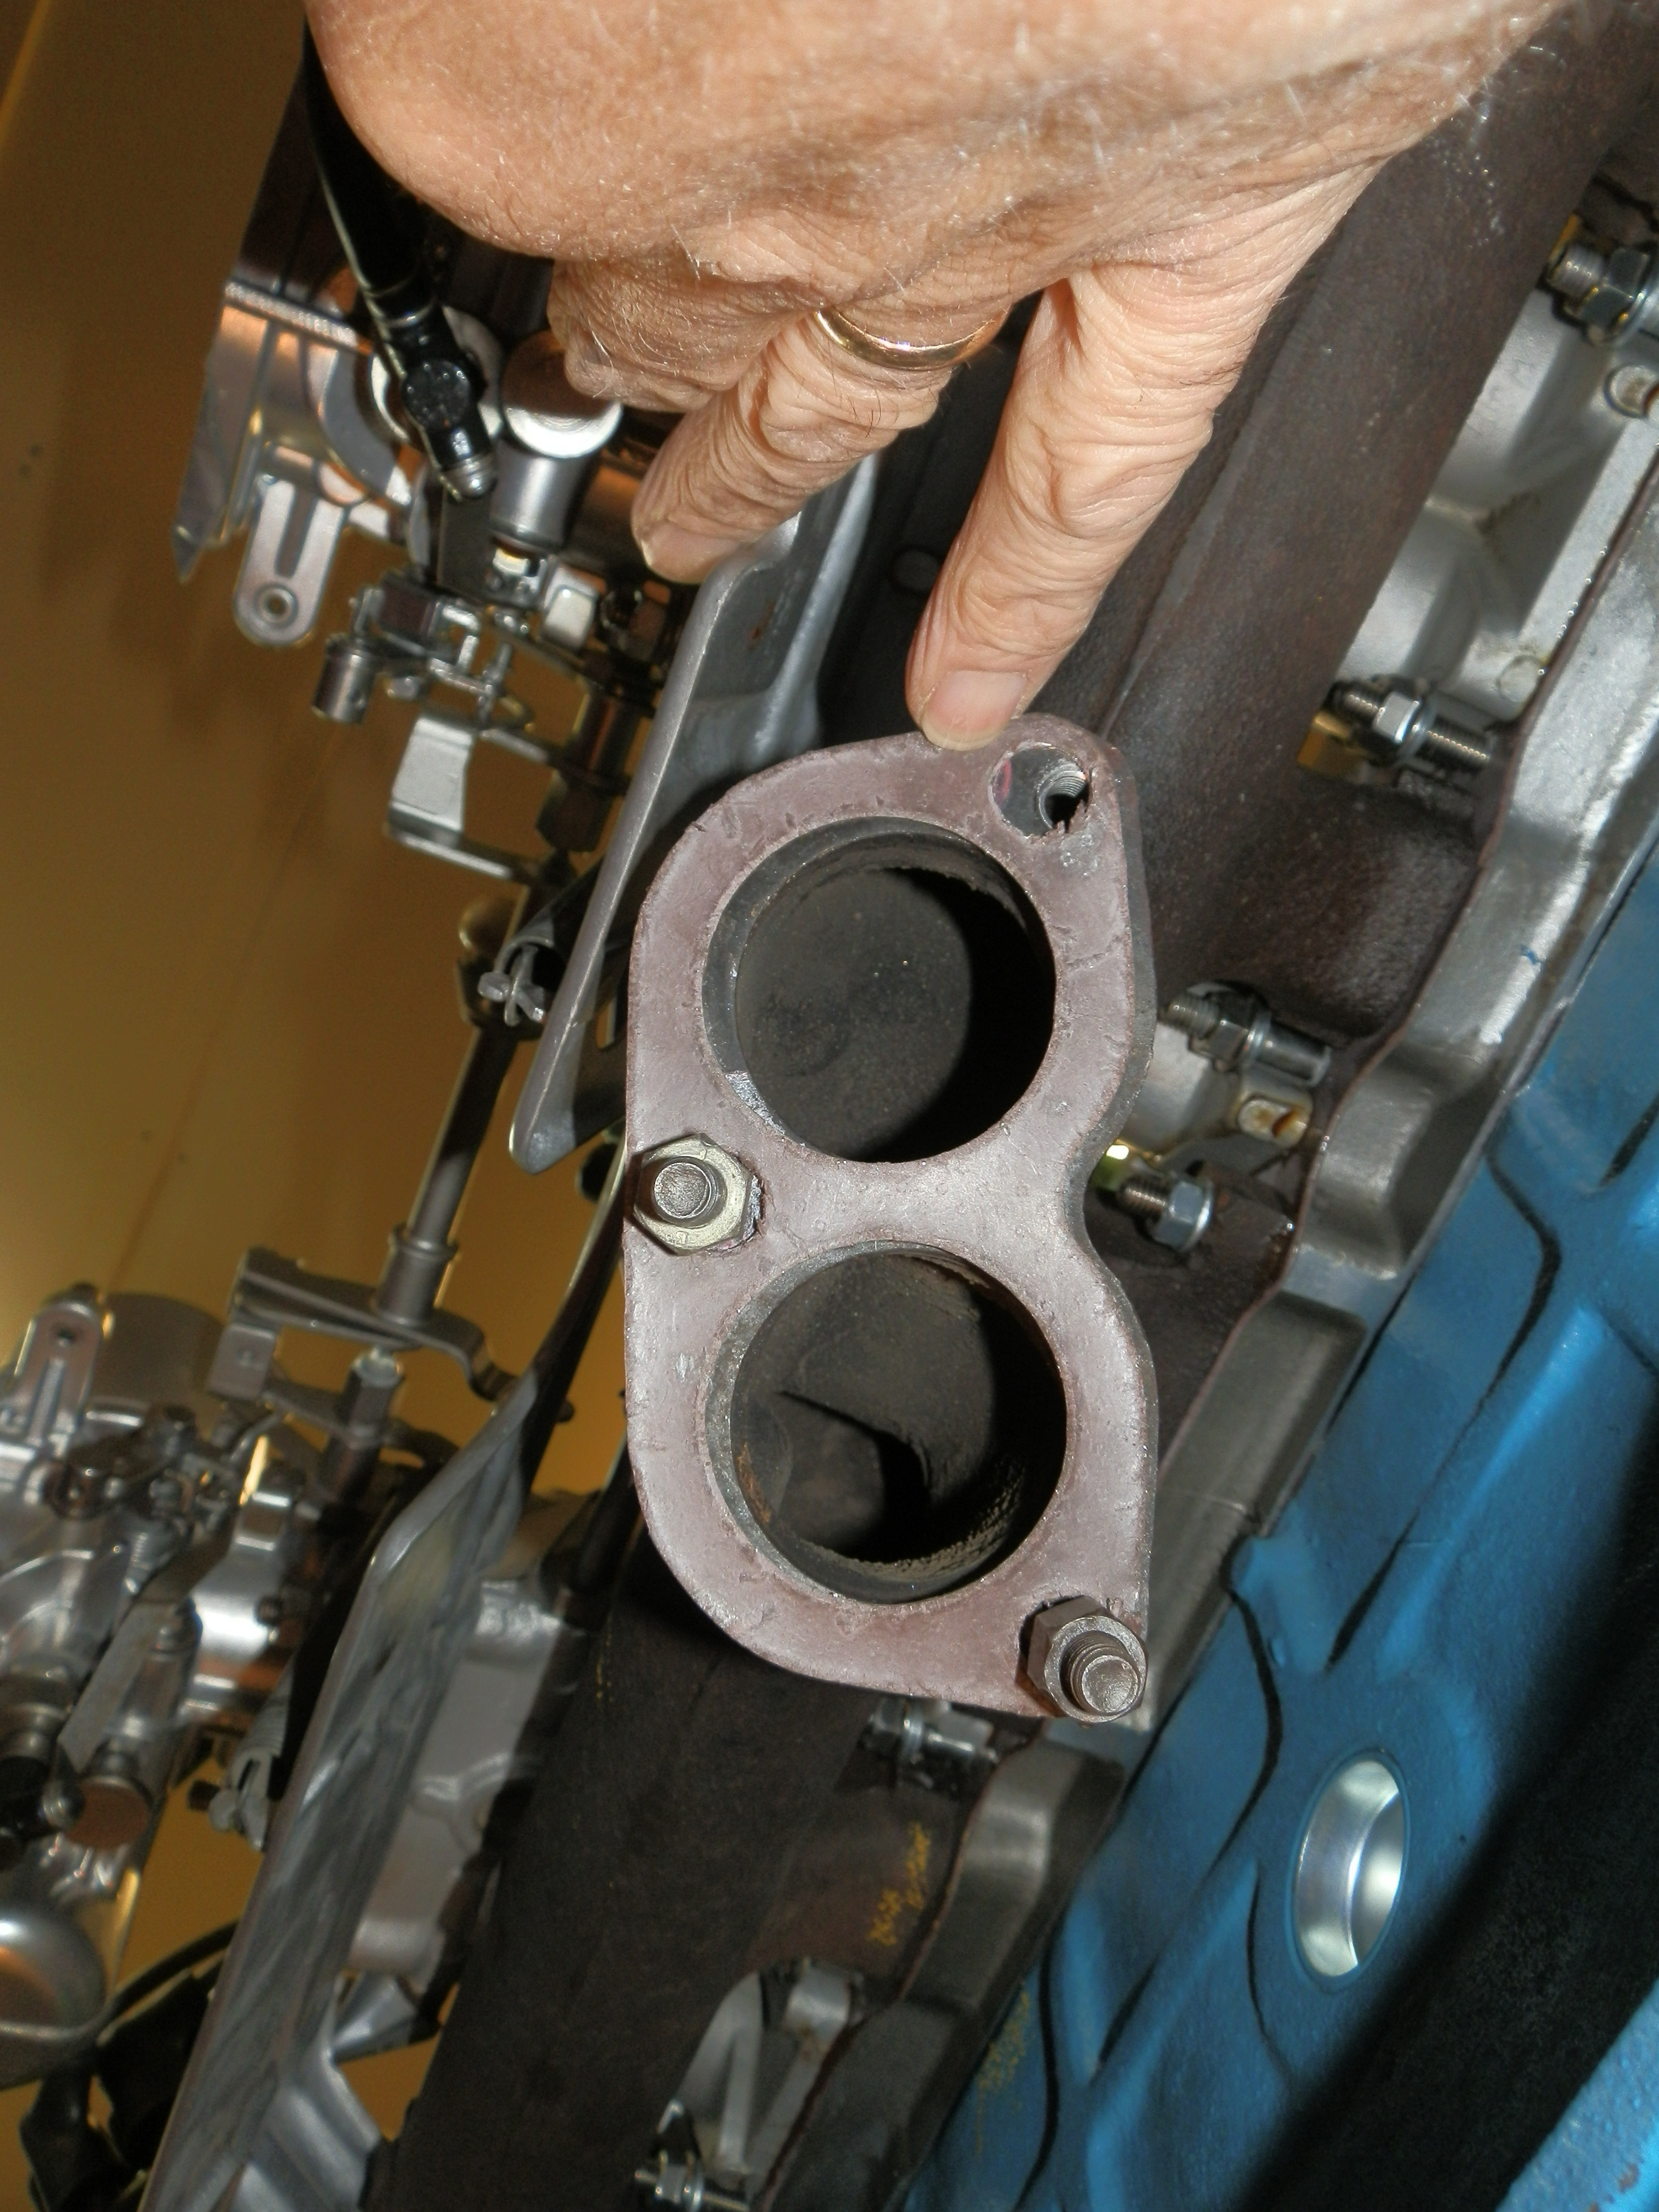
Final chapter, My machinist friend decided that weld-filling the existing hole in cast iron, then re-drilling would be very time consuming, and was not the best answer to the problem. Instead, he filled and re-drilled the exhaust pipe flange. In doing that, he made sure that the pipe stubs still fit snuggly in the manifold. Result; manifold, gasket and pipe all fit like the proverbial glove. Thanks for all your thoughts and advice.
-
Thanks guys, If the 280Z hat measures less than 1.5", then it would appear that the larger ones are for the 240. Bolt pattern - hub to disc - is the same on both. I appreciate the advice.
-
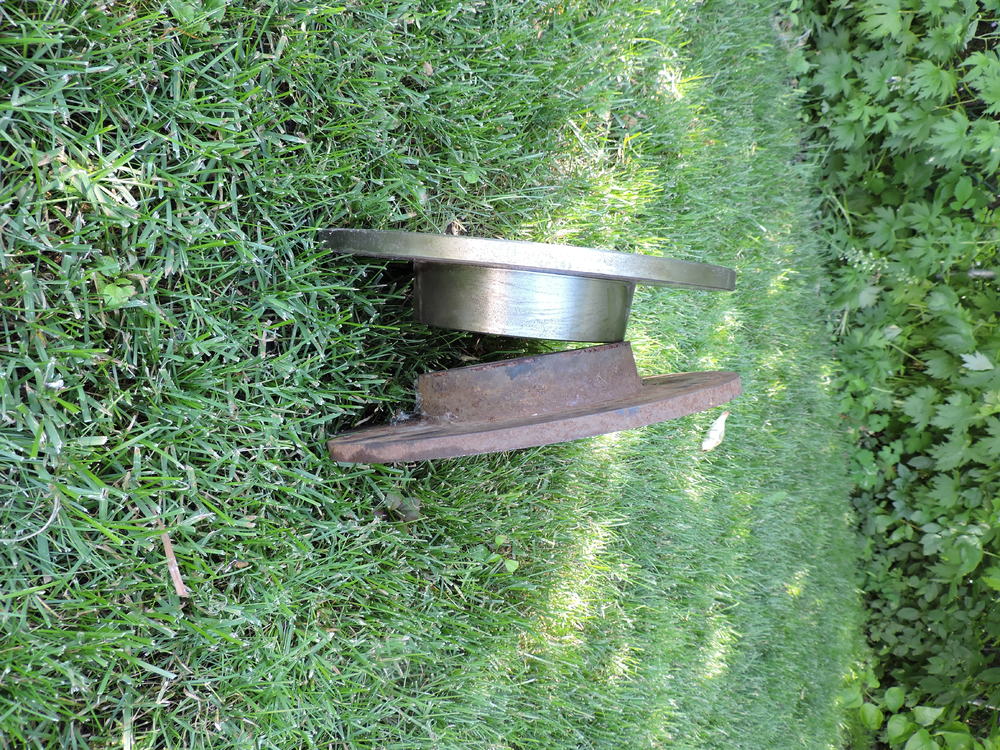
I'm back again. Having the remains of three 240s available to build one really nice one (that's the plan) has its benefits, but is not without its challenges. A brand new, and apparently stock pair of front discs came with one of the cars / wrecks. I installed them, but then found I couldn't fit the aftermarket mag wheels on. I started poking around the other parts on hand and found that I had two different "hat" sizes available (see photo). On both types of discs, the diameter is 27 cm (10 5/8"). The hats however are different, with the new ones being 4 cm ( 1 9/16") deep, while the others (off which car?) are just 3 cm (1 1/4"). Does anyone know which discs should be on a 1971 Series 2 (sr. # 28726)? Thanks, ps I chose the backdrop for the photo to ease the guilty conscience of others on this forum who may be feeling that they are the only garagehounds who neglect to regularly mow their lawns.
-
"Blue is now 240260280" You are referring to our country's largest parts supplier, Chinese Tire?
-
There have been several posts on how to - and how not to - install the headliner in 240s etc (tricky job). In comments there seemed to be some confusion over which adhesive was most effective. 3M Super 77 was suggested by some, and denigrated by others. I called the 3M factory, and they replied by e-mail, and flat-out said that Super 77 is "not strong enough," and further that it will deteriorate anything with foam. They recommend 3M part number 08088 "Spray Trim Adhesive." This is considered an industrial rather than an automotive product, so your local auto supply shop will likely not have it - you have to go to an industrial supplier. Looking forward to getting my fingers sticky.
-
Namerow, Please let us know how you make out. Good luck.
-
240DKW Dan & Namerow, Thanks guys. I believe that between your two suggestions, you may have identified the problem. While I' pretty sure we installed the upper seal the only way it could logically fit, that particular area is apparently where the problem originates. The two seals in the kit (the third piece is just an o-ring that fits on the screw-on cap) appear identical, whereas in the FSM drawing, they are not. Hence the blockage. I'm sure I can't be the only one who has had this issue - 47 year old rubber on any car will fail at some point. Motorsport and others have a rebuild-exchange opportunity available to them. Again, many thanks All
-
I have brakes! Thanks to "Grannyknot" (Chris) who replied to my May 24 post and offered me a clean, used proportioning valve, I now have brakes. With neither my original valve nor the one I rebuilt passing fluid to the back brakes I was stuck. I installed Granny's and it works. Never before been so happy to see $$$DOT 5 brake fluid coming out of a bleeder. Many thanks Chris.
-
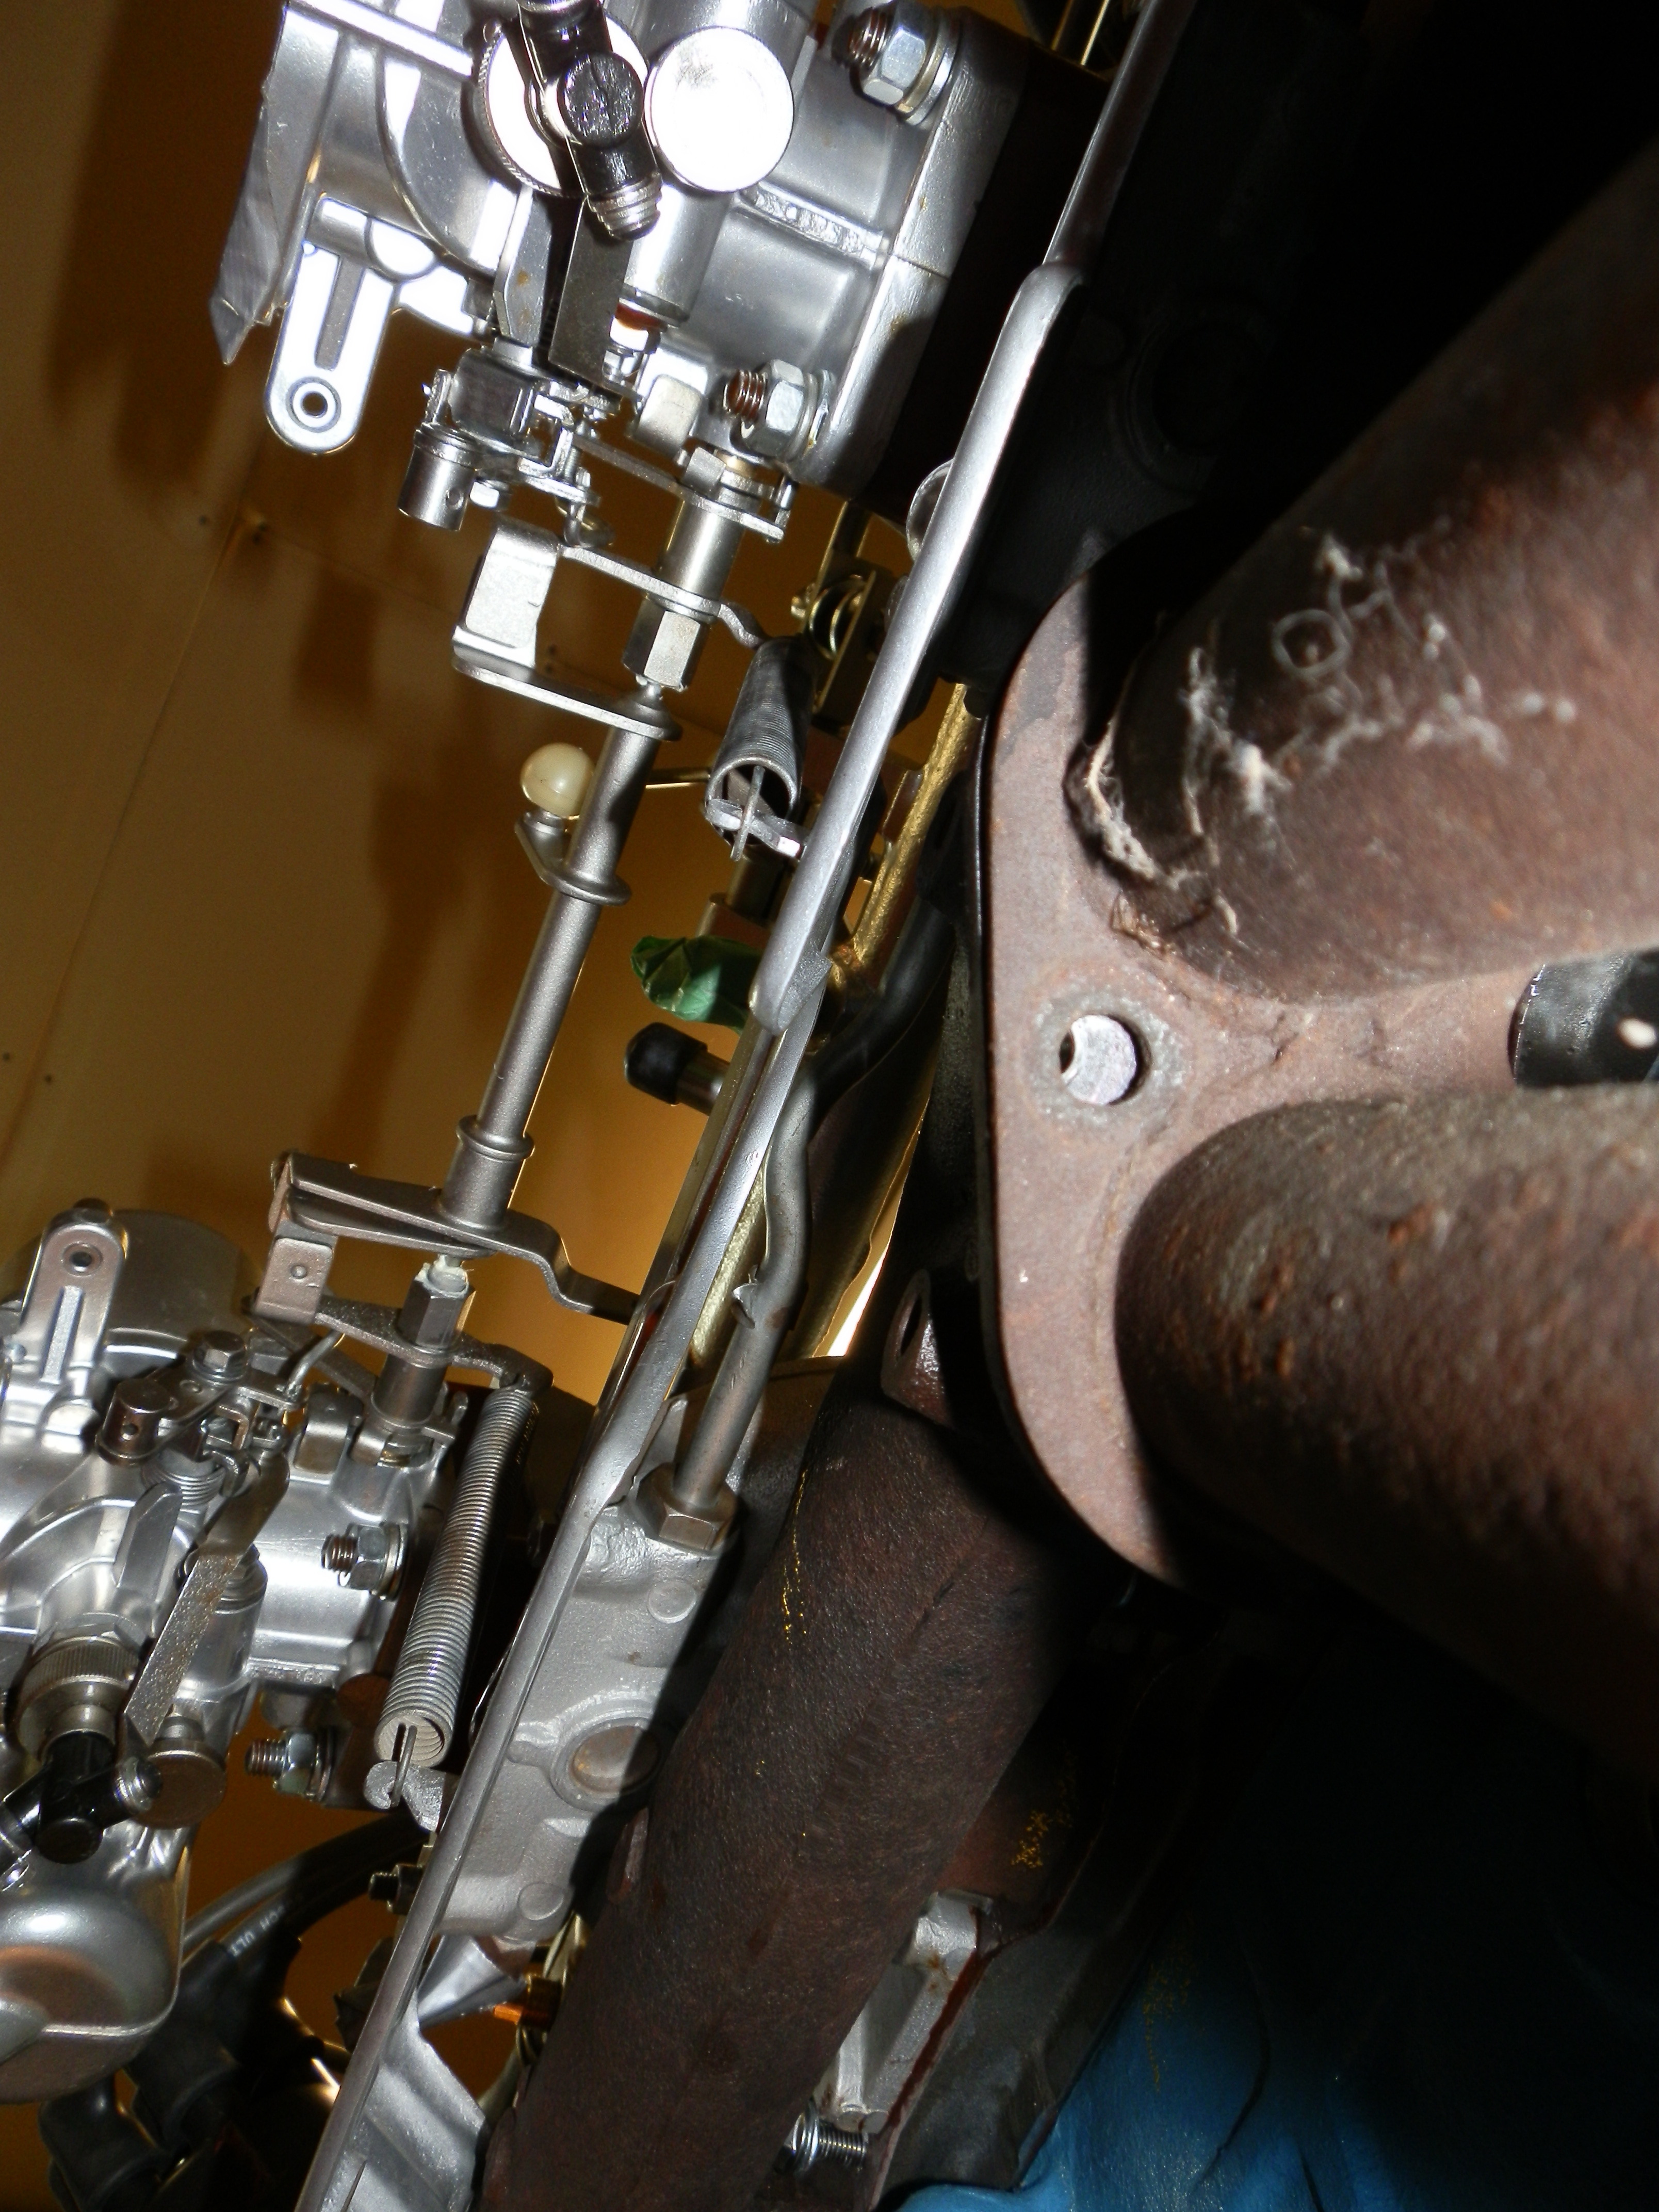
240dkw Dan, Thanks for this. I've already taken the manifold into a machine shop to have the third stud hole re-drilled. I decided to do that based in part on the fact that I already have a lot of time invested in it. I plugged off the six air-injection holes from the outside, had them welded over on the inside, then carefully filed / ground down the welds. The end result is a smoother port than I started with. Having said that, I'm open to suggestion, and when I get the manifold back I'll do some detail comparing before deciding which to install. Are you still in town?
-
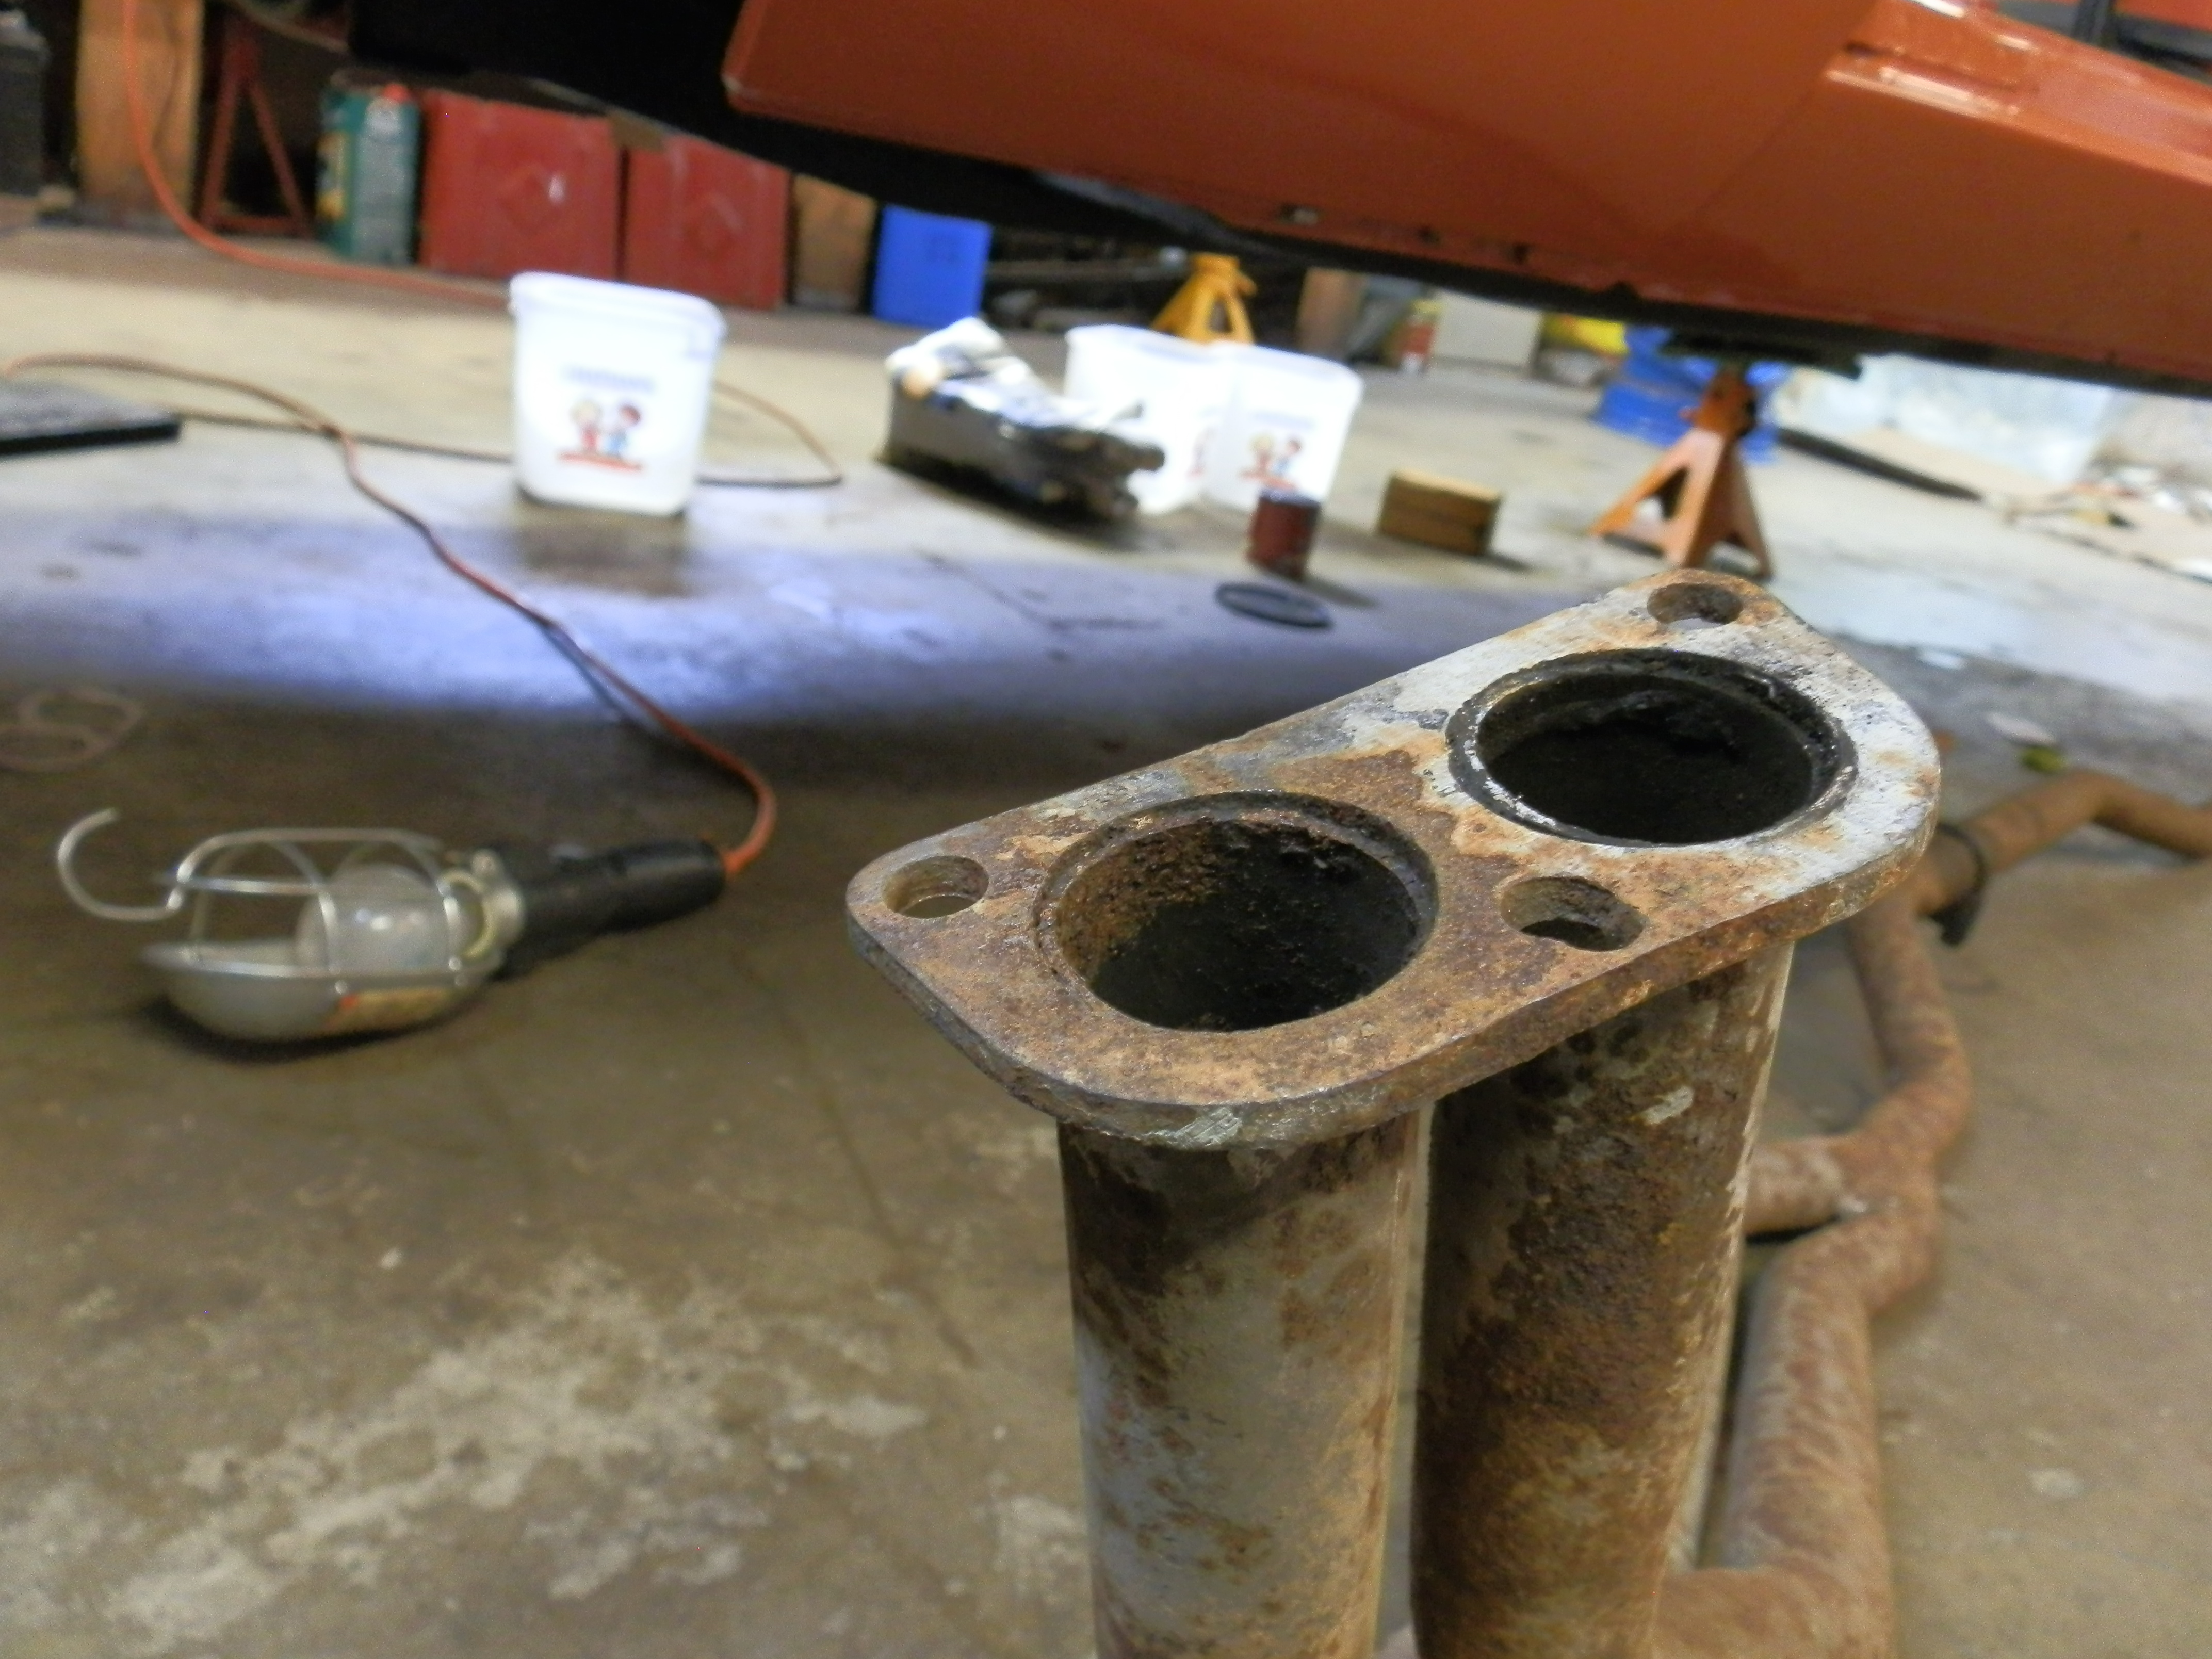
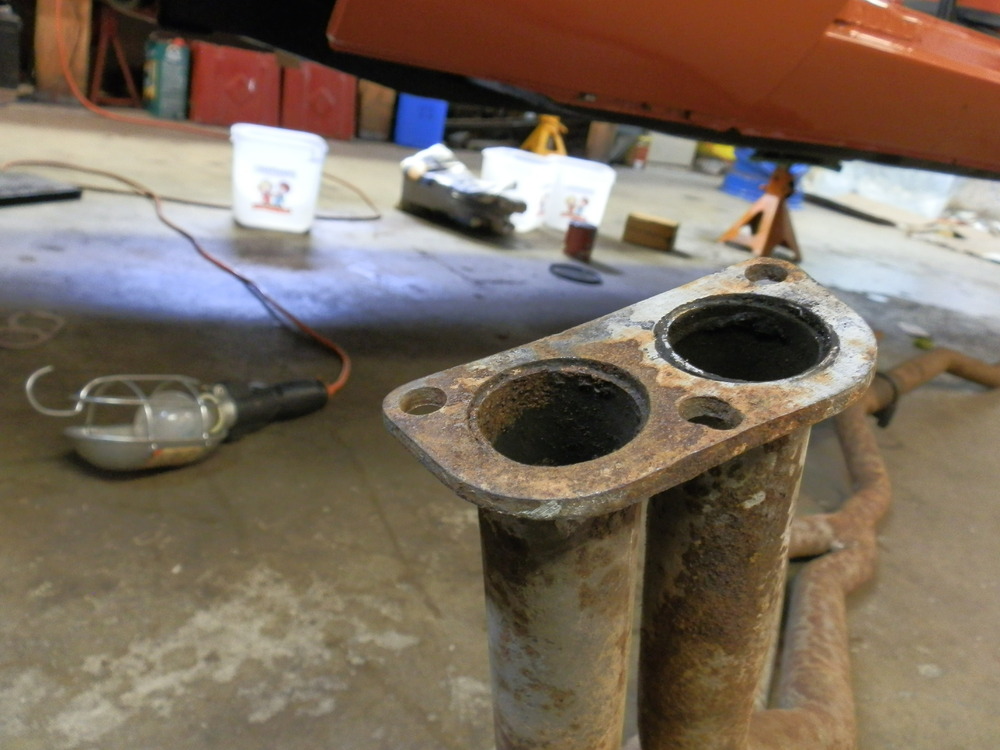
Zed, Thanks for your reply. My original photo did use as a model the cheapest looking of the three gaskets I had - I didn't want to try reaming out the stud holes in the good stuff. I have two pipe assemblies. With the good one, the pipes do fit nicely into the manifold as you suggest, but as you can see from this photo taken from below (1010012), the stud holes don't work. The second pipe assembly (1010011) is likely the one that came with this manifold. As you can see, the pipes have been cut off flush with the flange, and some stud-hole widening has been done. Curiously, both manifolds have the same casting mark, "E30." If anyone has any idea how all this came about, I'd love to hear about it. In the meantime, it looks like I'm going to have to remove the carbs, manifolds etc. (nasty fit some of those studs and nuts) and get the mis-fit stud hole filled and drilled.

-
I have parts from three 240Zs; a Series 1, and later '71, and a '73. From these I am building one - hopefully - very nice one. I picked the cleanest looking of three exhaust manifolds and installed. Now that I'm ready to hook up the exhaust piping, I find that the manifold-to-pipe gasket does not fit. I have new gaskets from three different kits, and they all perfectly match the holes on the "pipe" side, but not the manifold (see photo). Comparing the manifold on the car to one of the others I have, the centre-to-centre measurements are 7.1 cm from centre hole to corner hole on the manifold, while the other is 6.7 cm. Corner hole to corner hole on the one in the car is 10.6 cm, while the other is 10.7 cm. Does anyone have any idea of what the manifold is supposed to fit? Or what it's from? The photo makes it look actually closer to a fit than it really is; I did drill out a couple of the stud holes a few /64s. Installing all the studs and nuts on the intake and exhaust manifolds is a royal pain, but with regrettable practice, I'm getting better at it. many thanks,

-
Chickenman, Thanks for the information. Interesting to learn that there is more back-brake power available than is stock. I would hazard to guess that the factory designed it that way to be absolutely sure that there was no inadvertent rear-wheel lock up. I'm not clear on gutting the prop. valve. With only two connections ( M and R), I don't see how we would achieve a "T." Would it not make more sense to simply remove the factory valve and install the Wilwwod in its place? In any case, I'm hoping it is all academic. "Grannyknot" is mailing me a cleaned up old unit, and we'll hope that takes care of the problem. I really do appreciate all the replies I've had on this one. With respect to my reply to Namerow a week or so ago, I believe I misunderstood his post. The question he posed was not whether I had the guts of the valve installed bass-ackwards, but whether I had the lines connected to the wrong openings. The answer to that is no; I've checked and double checked that "M" goes to the Master, and "R" goes to the rear T. My apologies for the confusion. Best regards All
-
The saga continues. Z-car veteran DKW and I worked on the rear brakes for a couple of hours yesterday. Work included dismantling and re-assembling the back-brake proportioning valve. Same thing. Brake fluid to the valve, but only the occasional drip gets through to the T and the wheel cylinders. Someone advised me of a used valve for sale on E-bay. Price was right, but somehow the seller couldn't figure out how to get it from the U.S. into Canada. Questions: Is this much trouble endemic to the early Zs, or is mine a rare case? If it is rare, I'm open to hear from anyone who might have one to sell. If it is common, I'd like to know of peoples' experience with the Willwood adjustable prop valve. I notice that it is recommended for use with disc brake conversion, which is not the case here. My only previous experience with Willwood stuff is in-cockpit adjusters on oval-track racers. Thanks All
-
Namerow, Thanks for the suggestion, but I don't believe so. I put it back together as per the blow-up photo I attached earlier, and with the FSM at hand. I'll give it a few days, then remove and have another run at it once my head clears. In the meantime I still have a hundred little things on the car to keep me busy ps Are you, or are you related to Canadian Motorsport Hall of Fame member Norm Namerow?
-
Further to my self-congratulatory post of May 8, I must advise that I'm back again to Square 1. I installed the rebuilt valve, and now brake fluid is getting to it, but not beyond it. Anyone have an operable one to sell? I appreciate your interest and support.