zKars
 Subscriber
-
Joined
-
Last visited
Everything posted by zKars
-
 There is a spring washer and cotter pin in that connection. The end of the J hook should be a nice fit through the holes in the U shaped hole too to remove as much chance for motion. Also evaluate all the ball joints from pedal to that J hook too.
 -
This threaed has some help for you I hope that shows the changes in the slave cylinders. http://www.classiczcars.com/forums/wheels-tires-brakes-s30/32084-rear-wheel-cylinder-question-difference-between-left-right.html You are faced with bending your current lines or creating new ones.
-
Its the dizzy point gap feeler gauge. I know that's pretty old technology, but come on gang! I knew I was destined to be a Datsun mechanic when I discovered by thumbnail was 0.35 mm thick about a 100 years ago...

-
Oh my... I might have a new best friend!

-
If you choose to go with a sealant, be very very careful to use JUST enough to create the gasket, with NO squeeze out. You cannot afford to plug any oil holes....
-
Brilliant! didn't catch that. Thanks! Only one way to find out if they fit. I have a pair ordered.
-
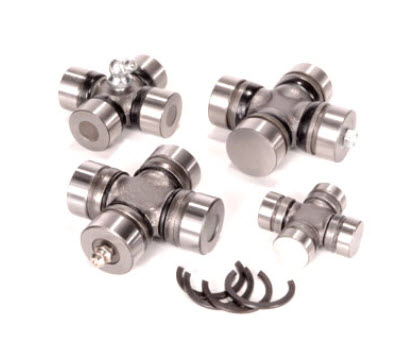
Nice bind CanTech! Now who would have thought there would be a u-joint store? Surprised there isn't a smallujoints.com.... Steering Ujoints oh oh... The part description shows both 15x40 AND 16x40.... Wonder which one is right.... I see they stock the infamous ATV700 as well, though the price is NOT the best in town....
-
No carbide bits in the house. I believe this is an excuse to go buy some however! Yes, schrapnel from the hole may be an issue, must drill "just' through. On the 16mm caps, I tend to agree on the likelyhood of the ends being hardened too, but the 15mm caps looks decidely less "robust". They are quite a different construction type. They almost appear to be a shell wrapped around a core (the actual race), so maybe the ends of the cap are soft. Could be me just being optomistic, but until I lay bit to cap, I'll reserve judgement.
-
Today I did a bit more hunting for u-joints that might fit the smaller staked style 15mm size. I'm afraid I have bad news. I looked at Motor Master's web site, as they seem to be a huge supplier of ujoints for all ATV-like machinery, and found the specs for the ATV700 MotorMaster I then called them and asked if they had a catalogue with specs for all their u-joints that I could peruse at my leisure to find one that fits, but the nice lady said "tell me the specs and I'll tell you if we have it" so I said, "Same as the ATV700 but with a 15mm bearing OD instead of 16mm". She had a look and announced the ATV700 has the smallest bearing of all the u-joints they have...... I did find a couple of useful things on their site though: This about staked ujoints and how to upgrade them to clip style. http://motormasterpowersports.com/UserFiles/File/What%20is_Staked-In.pdf and one picture I found very interesting. Who says you have to have the zerk in the cross? Hell, just drill a cap!! I think my bits can handle that.. Maybe there's hope of reviving those little u-joints after all if we can't replace 'em!
-
The pass side guard isthere specifically to shield the gas tank fill tube not as a generic splash guard. I'll admit this is a guess, but it makes sense from a safety perspective I think. The muffler hangers and exhaust on the other side would generally be in the way of splash guard on that side but feel free to fab up what plate fits your fancy.
-
This is an excerpt from the SKF "Vintage Bearings and Seals" catalogue that includes only the Nissan pages. SKF_VintageBearingsSeals_Nissan.pdf It lists every bearing and seal part numbers on every Nissan made up to 1995. I mean all. engine, axles, and yes, rack and pinions... The whole catalog is here on SKF's website, all 881 pages of it. I thought you'd appreciate an abridged version. Don't ask me how I extracted pages from a locked pdf either... Media Library
-
Its best to remove the engine and remove all external equipment. Place the engine on an engine stand where you have nice and consistent foot and arm placement to ensure perfectly even torquing on all bolts. Or stop worrying and just go tighten the bolts.... You can do it, I know you can.
-
Try cleaning then oiling the door side mechanism on the outside that touches the striker, so that it flips from position 1 to 2 more easily. You may also have to re-align the position of the striker as it has likely moved a bit. Wear on the striker is also a possibility. None of the doors I've worked on had that rubber bit and they all close just fine.
-
I've had two local people with this same leak. Both were fixed by re-torquing the head bolts. If you do need to change the head gasket, then you have nothing to lose by giving this a try. Now just torquing them from their current tight position won't help, unless they are 1) loose, and 2) the threads are in excellent condition, neither of which are very likely. Whatever torque you apply is very unlikely to actually reach the threads and stretch the bolt properly. Take them out one at a time, same pattern as the torque method in the FSM (center to each end), clean the threads thoroughly, oil them, and put it back in, torquing in two steps. There are two bolts, the center ones I believe, that are prone to being quite corroded and may not come loose very easily. Take it easy on those two. Of course they are the ones closest to the leak....
-
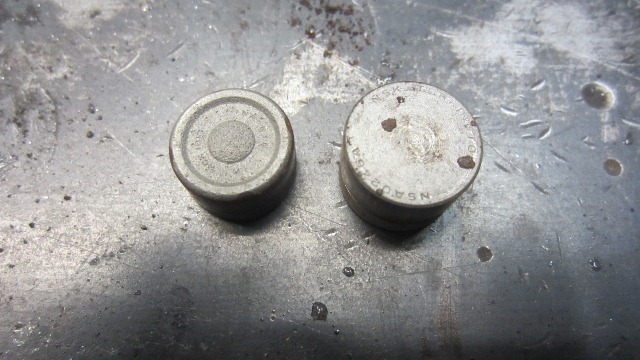
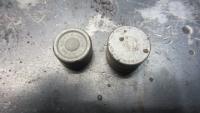
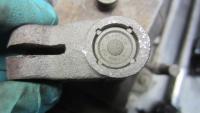
To add to my post about fitment of the ATV700 u-joint. There are at least two quite different styles of steering shaft u-joints. The kind with retaining "C" clips an those that are staked in place. I believe this has been discussed previously. It appears the early cars got the c clip retained ones, then they moved to the staked style. The staked style are easy to get apart. Well, not if you want to save the old u-joint, but you don't right? That's not the issue. The problem is the staked ujoints have a 15mm cap, the C clip style caps are 16mm.. The other dimensions appear the same. The ATV700 u-joints cannot work with those yokes. There is even no provision for the C-clip is you could get them in place. I pulled all my steering shafts and found that most are the staked later style, no surprise there. So back to the search for a u-joint that is the smaller size. Or get the yoke holes bored to 16mm... Cap difference on the left, staked u-joint picture on the right. I also tried to drill through one of the u-joint yokes to get a grease injection port. Don't know what that stuff if made of, but none of my excellent quality drill bits would do more then scatch it..... Somehow a plazma torch didn't seem right.... Anyone have some early steering shaft assemblies they don't want?

-
I remember a very old thread about some character near Boise that had a rather large stash of Z's and parts, but never did pin him or the exact location down. I think 'mystery solved" is appropriate. He should make himself known and get some action on that pile of apparently un-loved and un-wanted Z-bits. Now on topic, I believe you have a slight mix up on the drive shaft verses the half shafts to each wheel. The issue revolves around the early and late diff location, which would change the required drive shaft length. Half shafts are all the same on all S30's.
-
I have some spares. Drop me a line to z240@shaw.ca and we'll take it from there.
-
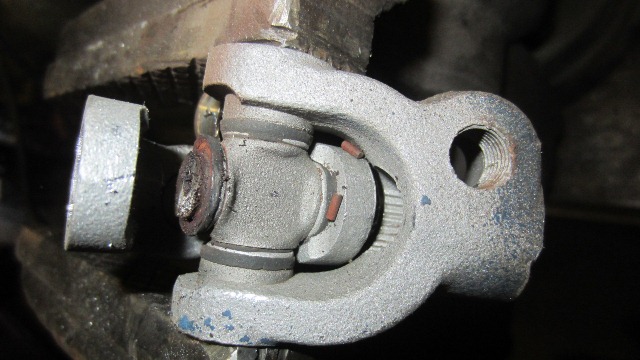
To add the overall usefulness of this thread, I can report on the installation and fitment of the Kawasaki/Motor Master ATV700 u-joints. I am happy to report they are a PERFECT fit compared to the stock u-joints. No slop, no problem with lock clips, just a perfect press fit and clip fitment. Un-detectibly different from the stockers, except for the rust of course. Some of the easiest u-joint replacements I've had the displeasure of doing. Paid $20.47 each via Amazon. Actually came from Powersport Superstore... Wait, one more thing to report. One this set that I just did, the small amount of "slope" in the old joints was due exclusively from a lack of lube in the roller pins in the caps. Just dry little pins flopping around in there. If I could have pumped some goop in there, it would have firmed right up. I say just drill a hole, in the center of the cross, use your pin tip your grease gun tip and pump 'em up! The centers of the cross are hollow and extend to each cup cavity. No room for a zerk of course. That's why they never had them to start with.
-
Nothing wrong with duct tape version of bushings, as long as they are temporarily put into use and checked at each stop light. Really wish you would have gotten pictures.
-
Very funny. Driving with socks in the snow is a treat indeed.... Stupid snow, broke thousands of trees in town, real mess.
-
Just wanted to clarify. The splines with possible play I'm talking about are inside the steering column between the steering wheel and the firewall. Tough to check, just a last resort to get that last bit of play out. I agree the splined connections in the engine bay are always very tight or rusted solid, no chance of play of there. BTW, Go Flames!
-
Rad shops often do gas tank work as well. If the holes are isolated to one area, they'd likely weld a patch over the entire area. If you have holes over a larger area, time for a new (to you) tank. I don't believe anyone has found a source for "new" tanks at this point. Also be aware that 77-78 tanks do not fit the 75-76 cars.
-
I almost hate to bring up another source of steering play but here goes. The column itself has a splined connection internally that allows for the column crush action in a crash. There can be play there between the splines after all these years as well. A good friend while tracking down his steering play found that if you change the engagement point of the splines, ie telescope the lower end that sticks out of the column in the engine bay up about a 1/4", the play went away since you have changed to spline mesh contact points. The way to move the shaft deeper/uphill into the end of the column is to add a spacer next to the rubber/poly isolator puck inside the coupler. This also means four longer bolts and the creation of a spacer with holes. Anybody know a trick to tightening a spline fit? A bit of hammer "work" to deform then slightly??? I know what you're thinking, there are two splined joints on the steering shaft, one at the rack, and one just below the rubber coupler, why not just slide them each apart 1/8" and re-tighten that lock bolt? Well, that lock bolt fits through a very tight fitting cross groove in the splines so you don't have any up or down movement or you can't put the bolt back in. Well you could "enlarge" that groove on the side toward the firewall I guess, but not so easy to do. I'm waiting for a set of those ATV ujoints to come as well. Every one of the spare steering shafts I have has some play in those u-joints. You have to clamp one side of the yoke in a vice, then slap a vice grip on the shaft on the other side and wiggle it to actually feel the paly, but there is play in both the upper and lower ujoint in every one I have. And now for my amusing observation of the day. I believe the person who designed the steering isolator rubber thing was Canadian. How do I know? Well I found an official NHL hockey puck in the last parts car. I had heard that some people had used a puck to make an isolator so I couldn't resist comparing the stock donut to an official puck that I just happen to have in my hand. Well, I could not believe how PRECISE the thickness of the puck matches the stock donut. Within a couple of thou!!! The OD of the puck is a bit larger, but there is no way the near perfect thickness match is just a co-incidence. There the designer is therefore Canadian since we invented the game. Obvious, eh?
-
Dang it. There is a good chance you can find a bearing from a generic source. Take it with you to a big drivetrain or bearing shop. Measure it and check on line to see if find one. Read the fine print on the bearing itself for an SKF or similar part number.
-
See, never trust an on-line data base. Call and ask. Now the nail biter is, will one actually make it to your doorstep...