zKars
 Subscriber
-
Joined
-
Last visited
Everything posted by zKars
-
 the key code is also located stamped into the passenger door lock cylinder (assuming it hasn't been changed...). Not the easiest to get to, but good to remember!
 -
I'll dig them out tomorrow and take a look.
-
They are totally different, no fitty. I have a couple of used ones in decent shape if you get desperate. Catch me at z240@shaw.ca
-
-
To clarify psdenno's statement, the drivers side (Left) rear is the farthest distance from the master due to the location of the T in the brake line back there (right side). It pretty doesn't matter which rear side you start with, I've never had trouble either way. Keg, go ahead and bleed the others, and keep your fingers crossed. Its Christmas after all!
-
Please tell us what distributor/coil system you're using (240 points, 280 reluctor, 280zx E12-80/92 or aftermarket) and if you have the stock 240 tach. If you have a stock 71 tach then the power to the coil runs through the tach, making it pretty tricky to just have the car run with the tach disconnected. So, as a first and easy test, disconnect EVERYTHING from the + side of the coil, and connect a temp jumper wire from that post to the + side of your battery thus eliminating the tach and regular power supply to the coil. Do this JUST before you start the car, and go for a drive. Note that turning your ignition off will NOT cause the car to quit, you'll have to remove that jumper to get it to stop. Let us know what happens.
-
Can't imagine anyone here recommending you drive your Z in the winter. Its a garanteed way to have it rust to nothing in record time destroying you dream machine. That said, they are quite capable handling winter cars when wearing good winter tires, so if this is your only choice of a car to drive, then get some good Michelin X-ice or similiar and have fun! Just remember the heat and defrost power of the HVAC system is not up to modern standards. Come to think of it, I somehow I made it through several Saskatchewan winters with my 510/610 back in the day, so I'm sure you can too.. Just be prepared to throw it away come spring. Something, none of us want to see happen.....
-
Due to extreme boredom last evening sitting in an airport waiting for a late flight I took the time to look at every FSM I had handy to understand the "facts" about this fill nonsense. -72 barely mentions more then "put the transmission back in when your done working on it" -73 at last mentions you should fill it after re-assembly. -by 74 it actually says "fill to the level of the fill plug". -This continues until 78 where they revert to saying little more than "don't forget to fill it." -The next FSM I have is 82, and it again has gone back to saying "fill to the level of the fill plug". - Most of the above statements are accompanied by a note about the capacity to use, some say to refer to the tables. The pages and sections where these points are made vary from FSM to FSM, though always in the "transmission" (be it TM, early, or MT, later) section. It did find it once on MT-5, but that varied as well. So guess what, each of you are all "right" in the scope of your personal experience, what you've read in your personal FSM study, heard on line here or elsewhere. I came from the "find the specs & capacity table and put in that much" school. How could following that logic ever be 'wrong' after all? (this is my "right" in my realm of how things work). Never noticed any mention of approximate, and I've never seen the statement in (some of) the FSM's about "fill to the plug level" until I read more carefully and widely. Every tranny I've ever filled NEVER overflowed or even dribbled when I put in the official" amount, so the concept of "fill to the plug level" was "wrong" to me. Being level is never simple to achieve or measure, so I'de never use the "fill until you begin to make an environmental disaster" approach. Again, all from my perspective of how things work. Seems even Nissan is not a perfect guide on the subject either. Frankly it is not possible to tell which approach is correct. If your transmission stays working, you have the correct method for you! So from now on, when someone makes a point that appears in-accurate from your perspective, please consider that there may be an opportunity for learning opening before you, rather than a chance to criticize. JMTC
-
Mechanically its a direct fit. Electrically, no. Just take the dash structure from your 260, take all gauges and wiring from your current dash. That said, the gauges themselves are all interchangable with the exception of the amp/volt miss match.
-
The wing nut mounting requires them both to be from a 240 dash.
-
The pins can be removed from the connector blocks for cleaning and inspection. There is a tiny slot in the connector cavity at the back of each female connector where you push a very thin "something" into, to depress the sticking-out tang on the connector to free it. I use dental tools or a very small flat blade eye glass screwdriver. Once you get one out, the rest are a breeze once you see how it works. Do them one at a time or make a careful drawing and label wires or you risk mixing things up. I have a couple of spare FI relays too if the problem turns out to the relay. Let me know
-
Leon there are clearly short cuts to dianosing his timing problems, but given the history, I felt it best to really get back to basics and to do a full "from square one" process to maximize his chance of finding the core issue. Fast Woman, good catch on the valve lash settings being a possible contributing factor. The settings are 0.008 inch and 0.010 inch just to be clear, in case there is a metric/english conversion confusing you Ronaldo. It must also be done with each lobe pointing nearly straight up to ensure you are measusing between the base circle of the cam and the top of the rocker. And I'm ZKars not K-Cars. I'm a Gemini, not an Aries
-
You have to check out his aluminum 2000GT. This guy is a mad genius! My favorite part of his website. "This website has a lot of broken English. If you do not like,please do not see my website. This website show how enjoy car life or special tech for your car and not teaching perfect English"
-
I knew you couldn't resist Bruce....
-
Its a timing problem almost for sure. You have convinced yourself some aspect of the time system must be ok, but it is not. Do not be afraid to challenge every detail of your assumptions. I suggest you start from absolute square one with the timing. Really. Remove the valve cover, remove the oil pump, remove the oil/distributor drive shaft. Put the engine at compression TDC, confirm with both #1 cam lobes "up" and look in spark plug hole for piston at top dead center. Then re-assemble the oil pump/drive shaft lining up the marks on both. Notch on the side of the oil pump just below where the drive shaft enters, and a punch dot on the drive shaft. Put the pump back on the motor, straight in. It likes to go in a tooth off, might take a couple of tries. Wish I could find a post that shows the correct position looking into the dist. mounting hole from above that shows the correct narrow/wide side of the drive tang relative to the the engine, I think its tang aligned to 11/5 Now put the distributor back in. Put the rotor back on (not the cap yet). Where is the rotor pointing? Better be forward toward the rad. The advance diaphram is pointing the same way. Look at the cap. The #1 tower is marked with a line cast into the cap. Put the cap on. That tower better line up EXACTLY with the rotor inside. Now put the plug wires on, one at a time, remove them all from the cap, starting with #1. Go counter clockwise, 1-5-3-6-2-4 (not 153426!! Anyone who knows me knows that story....) There are many many posts here describing this proceedure in excruiating detail, do a little searching, you will find very descriptive pictures. Report back what you have found. You will overcome this problem.
-
Is the clutch friction point very close to the floor? if so, the problem may be with the clutch hydraulics, ie that clutch is not or just barely releasing.
-
Ok, I thought I was the only one who would spend an afternoon trying to refresh or re-build a $1.79 part for the sake of originality.... Guess I'm not the only crazy person on the board with too much time on my hands after all..... Now if you're doing it for the sake of learning how one works, that's a whole 'nother thing.
-
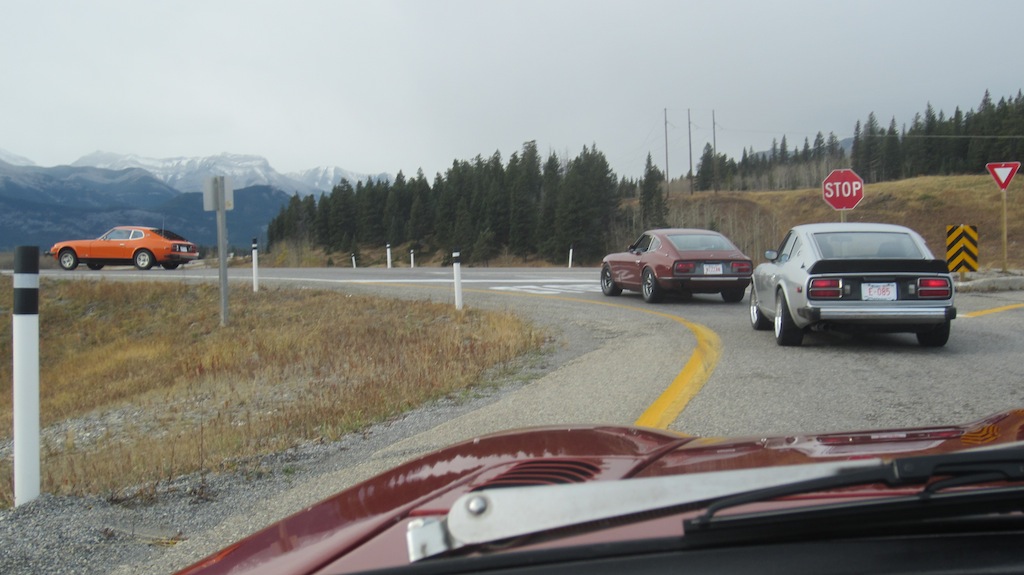
Well the gang just couldn't resist one more drive before the white stuff comes, and the forecast for Saturday was looking mighty fine. So off we went. For those of you who don't know the area, Calgary is just 30 or so miles East of the Rocky mountains, so this is always a great destination. We took off for Kananaskis country. Google it, you'll love it. In proper Canuck fashion, we ran across a small snow storm at the highest pass (Highwood pass, 7200 ft). Road was just wet. Temp around 2C, (35F). 15 minutes later it was +14C and sunny. Typical stuff here. Anyway, enjoy a few pictures of the fun!


-
Well I'll be horn swaggled.. Ok, I'm now an official believer that there are in fact two kinds of raised 77-78 rear hatch areas, one flat with a regular tail light trim panel, and one sloped with hidden tail light access area with no trim panel. While I have personally only seen the sloped type, and did not believe in the existence of the other or thought that those who claimed to have seen a flat one also believe that the earth is flat, my eyes have been opened as I have now seen an un-retouched photo graphic evidence of the flat type. There is a lovely 78 for sale, just placed in the classified, with a nice picture of his hatch area (the very last one), with the hinged portion of the raised floor open for all to see. And there it is in all its beautiful flat-ness, with even the tail light trim panel in plain view. Halleluia! Jim
-
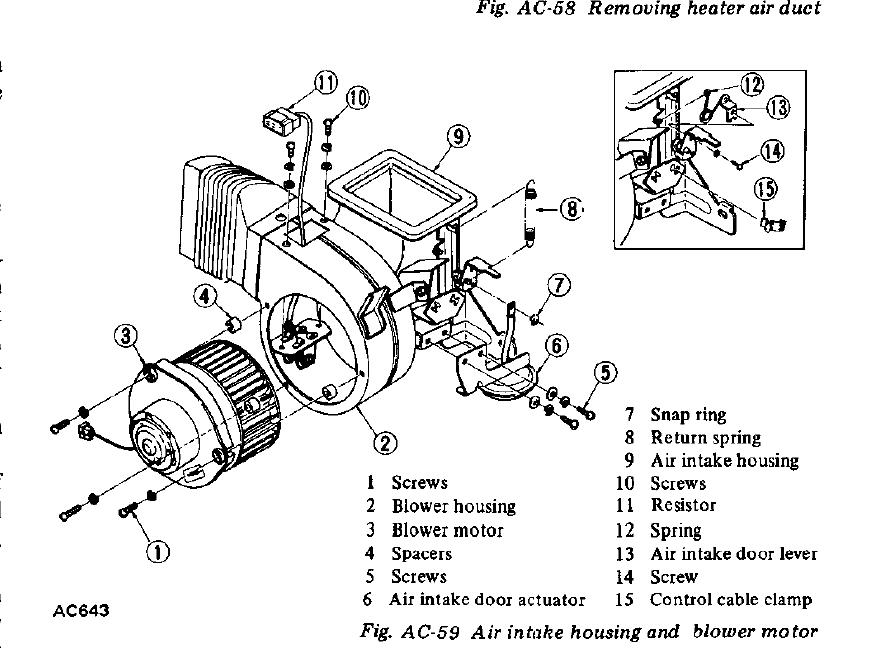
The 75-76 FSM (I know you have a 73) has diagrams that are acutually useful and descriptive for things like this. The fan case/vent flapper part of the system are nearly identical in form and function to the 240's. Look at www.xenons30.com for the FSM download. THis picture is from the AC section of the 76 FSM, page AC 58 Yours won't have the vacumm pot (part #6) that actuates the lever, yours is a cable.
-
I've had this problem too. The noise is due to not being able to flow enough volume, its sitting there pumping through its internal bypass. No return line I bet. Its get hot and locks up and eventually fails. I ended up going back to a stock mechanical pump with a small electric for backup/ boost when needed. I feed my 44 mikuni stroker with a stock pump... Compare the flow rate of that pump to what you engine needs at full throttle. 50 gal/hr drains your tank in 15 min ay WOT? uh uh... take the pump out and hook up a test system pumping water from a pail back into the pail and listen to how quiet it is and much flow that thing can move.
-
Other than the ECU on the left and the fuse block and relay bracket up on the right, neither of which are particularily important as grantF suggests , these lovely panels will slip right in. You can sit in your driveway and listen to great tunes... If you wire the stereo directly to the battery cause the fuse block is well, gone.... Sorry for the sarcasm. Don't think these are useful in a 280 at all unless you have a megasquirt in your glovebox and a new fuse panel on the firewall somwhere.
-
Either way works. What seems to sway people to doing it altogether is the problem of putting the trans back onto the engine and getting it to line up and back on, if you have to do it with the car on jack stands, by putting the trans on your chest then up and into place. uggg. No fun. I always do them in and out together now. I don't even take off the drive shaft. Slips right off on the way out, and just takes a second pair of hands to guide it back into the tail on the way back in. Remember what will come pouring out when the driveshaft exits the tail too.... Drain it first.
-
Andrew, Grant is asking about the 77-78 280 raised rear hatch floor and its components. The back 1/4 or so is sloped up from the raised floor to the hatch sill on a hinge, held down with two plastic knobs at the edge to allow access to the tail light bulbs behind. The micro fiche of the Body section for L26& L28E has very detailed pictures of the four hardboard pieces and raising support brackets and assorted bits and pieces that make up this "improved" rear floor area for the August 76 and later (77-78) 280's starting at section 135A-1, about page 50 in the PDF. The FSM on the other hand, has almost nothing about it. Fiche and FSM at xenons30.com as usual.... Hopefully someone here with a 77-78 may be able to give you pictures of their hatch area.
-
I must have one some where, let me look. Bug me at z240@shaw.ca