


By Mikes Z car
· 831 views
This mod has been in my car for 5 years, works great.
Before/After modification (click for animation):
I noticed low gas gauge readings. When I looked at the sending unit in my 240Z gas tank I saw that it has a worn curved track across the coil of resistance wire where the copper float arm connector slides across the coil. The sending unit I have must be original gauging from the large amount of wear on the wire. Since the rest of the unit looked good I figured I could significantly increase the life of the sending unit by shortening the copper arm just enough so that the arm contact point slides over the wire on a different part of the wire where the wire is not worn at all. The steps I used for this were:
1. With the unit out of the tank and disconnected from the car, I measured the resistance at the two connectors that go to the car at max/min travel of the float arm. Mine was close to 8 and 90 ohms. I used this info when completed to verify proper operation.
2. I remove the protective flat cover over the coil that is held in place by three tabs. I straightened the one tab that is twisted after it goes through a small slot. Once it releases the other two will slide out.
3. I marked a small dot on the coil using a marks a lot or similar in line with the very end of the copper arm as it swung in both extremes of direction.
4. I loosened the set screw allowing the copper arm to swing over a wider range of motion than before.
5. I shortened the effective length of the copper arm by bending it up and then down so that it is shorter. It wound up looking like this:
________/\________
It was sticking up in the air at this point, this is how I fixed that.
6. I adjusted the pressure on the arm so it contacts the coil at a gentle but slightly firm pressure. The pressure can be adjusted by swinging the arm over the end of the assembly and pushing down to over extend it. I noted that the arm approached the coil at the same angle as before and that the new position of the contact point is now on new wire that had not been worn.
7. Using fine sandpaper I sanded the wire where the contactor will be contacting the wire to assure a good connection. Sanding with the wire is probably better as sanding across it like the arm swings might work the wires loose.
8. Proper pressure can be verified by using an ohmmeter on the two connector posts as the arm is slid by hand over the coil. I wanted to see a fairly smooth transition from about 8 to 90 ohms, readings outside of that can be fixed by what i did in step 9.
9. I swung the copper arm and the float so both are at the end of travel they would see at the full tank position. Full tank position for the float will have it at its extreme end of travel in the direction towards the end of the resistance wire that has a wire going to the car connector. Holding the float in that position I moved the copper arm that contacts the resistance wire so that it lined up with the dot at the end of the resitance wire nearest the float that I marked earlier. I retightened the setscrew firmly. I verified proper setscrew setting with an ohmmeter to verify I saw close to the same readings at max/min float positions I saw in step 1.
Note that there are a couple of other mods to fix the sending unit, the links to those other two ideas are here:
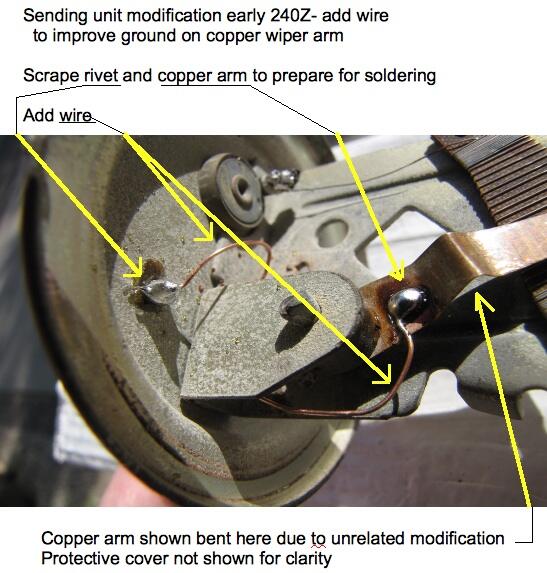
1. I added a wire to improve grounding of copper arm. See:
http://www.classiczcars.com/forums/showthread.php?t=35258&p=318623&viewfull=1#post318623
This is how I added the wire (loop the wire a bit to reduce mechanical stress on soldered connections so the wire doesn't break off):

2. Use crazy glue to hold down wires and prevent them from moving when the sliding contact rubs on them:
Http://www.classiczcars.com/forums/showthread.php?t=35258&p=318628&viewfull=1#post318628
Recommended Comments