Jump to content

  • entries
    24
  • comments
    15
  • views
    8,513

240Z frame drawing sketchup


Mikes Z car

2,250 views

Updated 30 Mar 2014:

Screenshots:

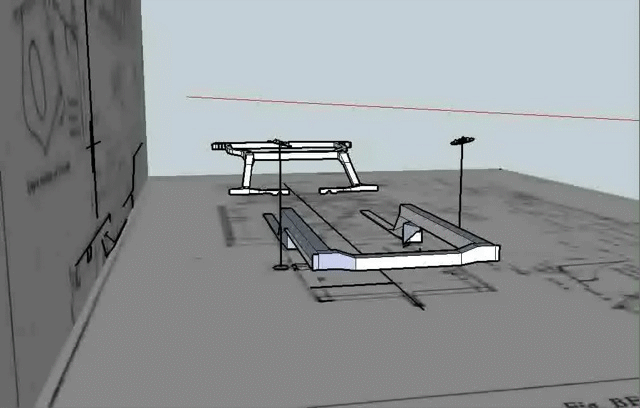
Rotating view (click to zoom in):

blogentry-18366-14217593912606_thumb.gif

Front frame rails:

blogentry-18366-14217593910552_thumb.jpg

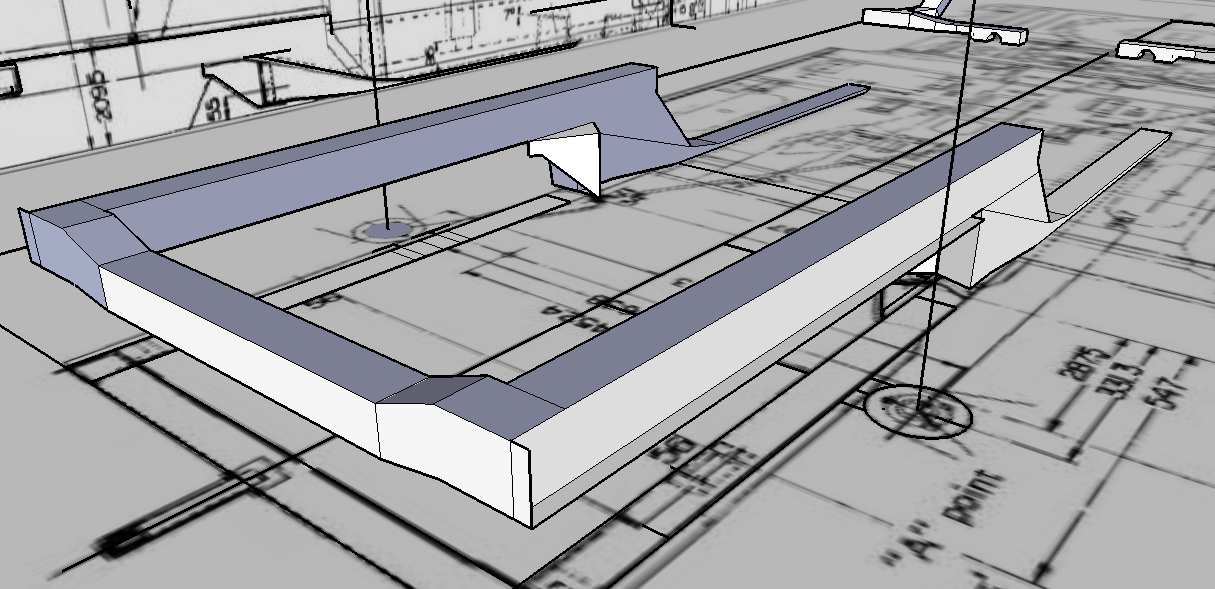
Rear frame rails looking towards front of car:

blogentry-18366-14217593909996_thumb.jpg

Sketchup drawing for download:

240Z frame rails whole car 20 Mar 2014.skp.zip

Sketchup drawing viewer can be downloaded here:

Download | SketchUp

Revision history:

2013 Dec- Updated drawing includes holes I noticed in the frame behind the seats. (Holes are now in correct location if you happened to have viewed this drawing the first couple of weeks in November)

blogentry-18366-14217593889205_thumb.jpg

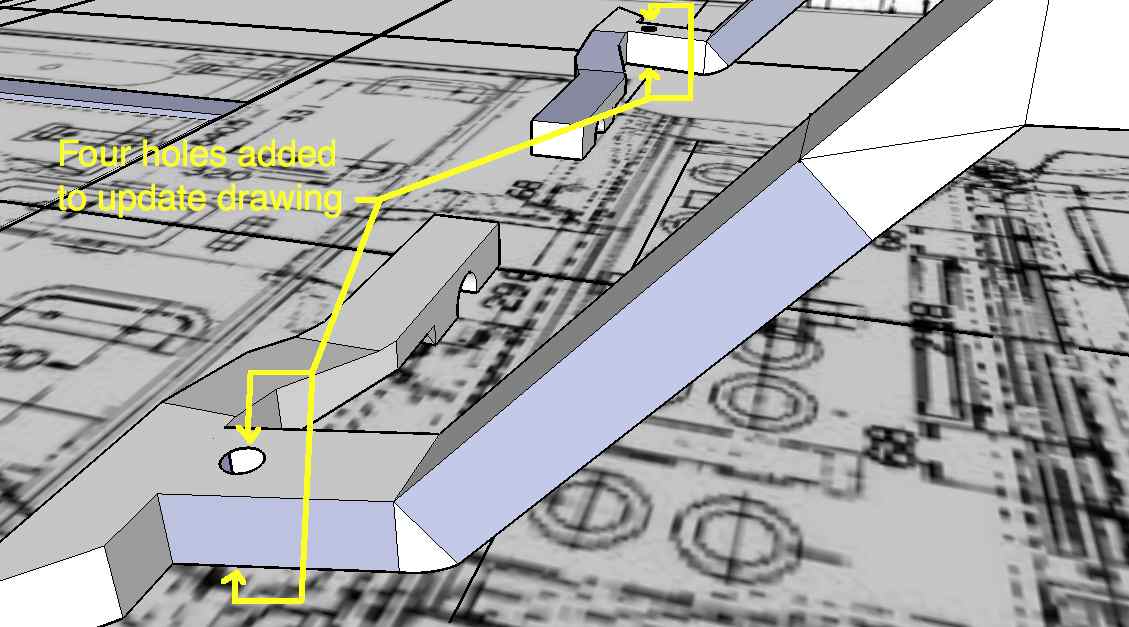
There are a total of four holes added to this drawing from the original, two behind each seat. They are in the same location on the floor on a 1/1970 car and on a 1/1972 car where I have seen them. The two holes behind the drivers side seat are in line with each other vertically so that with the plugs out you can look straight down from inside the car and see the street. Same situation for passenger side, trying for clarity here. The holes are 20 mm in diameter. The holes are in the middle of the frame rail that heads back and up towards the floor beside the shock towers.

2014 March 30- Updated drawing to correct the diameter of rear frame holes next to spare tire just forward of the tail lights. Also the rear crossmember in front of the rear bumper is now shown correctly as being open on both ends, before it was shown as closed off.

The attached sketchup drawing is done to scale and includes the front and rear frame for a 240Z. Can be viewed with the free program sketchup, download from Google (Mac or PC, can work with Linux). Can be zoomed in and viewed from any angle. The drawing was made from measurements from my own car and from the chassis dimension drawings to maximize accuracy.

Can be converted to Autocad readable .DXF with Sketchup pro for importing into Autocad. May need an older version of Sketchup pro to make the resulting .DXF work with an earlier version of Autocad.

I found it interesting that the inside frame rail to frame rail measurement on the rear frame rails where the spare tire well is on my car measured about 10 MM further apart than on the chassis dimension drawing. The manufacturer must have made a slight change there unless whoever made the chassis drawings was off a bit in that area. I made my sketchup drawing agree with the dimension on my car.

Drawing does not show narrowed section on both front rails located about 5 inches behind the radiator support. I could not accurately define that narrowing with the tools I have so I left that off for now.

Litecoin QR code for donation:

blogentry-18366-14217593898798_thumb.png

7 Comments


Recommended Comments

Hi Stanley,

The free Sketchup will import pictures by selecting file, then import. The only thing I know for sure that the pro version will do that the free one won't is it will save the drawing into an Autocad compatible .DXF format. I must be honest here, getting those two pictures to line up 90 degrees with each other and be the right size was a bear for me. If you just want to import a picture and draw on it that much is easy (and fun!). What I do is draw a couple of right angle lines that come together where I want a corner of the picture to be such as the lower left then I import the picture and click on the corner where those two lines converge. Move the mouse away from the corner and click when you have the size you want. Google has videos available that teach various aspects and their technique is likely better than mine, I have watched a couple of them.

How do you use Sketchup?

Mike

Link to comment

I'm a self-unemployed engineer civil/structural - use SU if I can't visualise how something would look, say a guardrail or a roof, or if I want to show it to a client for approval. Some clients use SU, they revise the drawing and send it back. I'd like to be able to import a CAD file floor plan and use SU to make a 3D like you did here. Will try it. Tried drawing the Z carbs and float bowls but got sidetracked. SU has a lot of cool features. Wish I could afford the pro version, but probably don't really need it. If I wanted to put a (view of) SU drawing in a CAD sheet I could just make a PDF and import that to the CAD. It's a little too sketchy looking for 3D steel connection details though.

Link to comment

Thank you for sharing. I think it would be really neat to have a sketchup drawing of the Z carbs. I have a dream of grandeur where the drawing could be animated to show normal operation and faults with solutions. Sigh, my imagination for use of SU is better than my skill level I think. I imagine your floor plan idea will work. We have SU pro at work. I notice from using the pro version that it has a built in access to a 3D warehouse with a search function. We wanted to draw a bathroom remodel for a project and I found an existing bathroom I could use and modified it. I had to "explode" the download before I could edit it and accidentally discovered how grouping can have subgroups that can be further exploded for further editing. Once the whole bathroom was exploded the sink and other fixtures could then be exploded. Get me to talking about drawings and we will be here all day. heh heh.

Link to comment

Started the float bowl drawings to find how the front/rear bowls reacted to fluid level tilting on acceleration. Read that it was the reason for the ears on the front bowl being 2mm lower. But when I used an angle meter on the motor, checked the distance between nozzle and float bowl drain, and did the trig, saw that the 2mm is about right for the motor tilt. so gave up on the drawing. The accelaration may still have an effect.

The carb project sounds good - but might be easier with a 3D CAD due to dimensioning, even though SU is easier and faster. I use Solid edge 2D, they have a 3D I wish I could afford. Have Viacad3D but can't seem to do much with it.

Link to comment

I agree, Sketchup would allow more to make use of a drawing of an SU carb.

It would be easier to make a Sketchup drawing of an SU carb if one had a spare carb to make measurements off of.

I experimented with importing higher resolution pictures into SU. I think I read that if the pictures get large in size it impacts performance.

Link to comment

Create an account or sign in to comment

You need to be a member in order to leave a comment

Create an account

Sign up for a new account in our community. It's easy!

Register a new account

Sign in

Already have an account? Sign in here.

Sign In Now


  • Blog Statistics

    • Total Blogs
      167
    • Total Entries
      251
  • Blog Comments

    • I'm still waiting on a hoist to free up before I can start bolting the new brake parts on my Z, but I did make the drill jig today.  I started with a 12mm thick Mustang wheel spacer with a pilot.  I then made a drawing to layout the holes needed.  I transfered the drawing onto the spacer and I drilled three new 1/8" holes through the jig (spacer) so I'd have the correct 4x114.3mm holes.  One hole is shared from the original 5 lug rotor.  I then bolted the jig onto the Mustang rotor and simply dr
    • Local radiator repair shops used to be plentiful but getting harder to find.  Some of them just specialize in big truck-heavy equipment radiators.  I will be needing to do the same for my project.  I have heard good reports on gas tank RENU but there are none of those franchises in my area.  Good luck, John-Lugoff, SC
    • Decided to go with the 240sx conversion. Main reason is it’s strictly for the street and the parts were easy to source. What I didn’t realize was the 14” wheels won’t clear the caliper. Now looking for a set of 4 lug 15” rims and tires I can use during the build process. Can anyone recommend a temporary solution as far as make and model preferably a steel wheel that I can use until I’m ready to buy the wheel and tire combination at the end of the project? Thanks again for all the help out there.
    • There are several reasons to use the S197 rear brakes.  The rotors are larger diameter than the SVO rotors and they are vented.  The calipers have larger pistons to give them more power.  The big beef with the Maxima rears is that they don't offer as much stopping power as the stock drums.  The S197 rears allow the addition of an adjustable proportioning valve.  The Maxima rears cannot utilize an adjustable prop since the prop needs to be all the way open to get close to enough rear bias. 
    • Any particular reason to use S197 Mustang 5-lug brakes?  The Fox body SVO Mustangs had rear discs with 4-lug.  It's a popular swap to use SVO or T-bird Turbo Coupe rear brakes to retrofit discs to other Fox body Mustangs.  These parts are still pretty common (probably available as a kit).  Might be worth checking to see if they'll fit.
×
×
  • Create New...

Important Information

By using this site, you agree to our Privacy Policy and Guidelines. We have placed cookies on your device to help make this website better. You can adjust your cookie settings, otherwise we'll assume you're okay to continue.