Seppi72
 Subscriber
-
Joined
-
Last visited
Everything posted by Seppi72
-
 Glad to hear that you've made the move and I can only imagine the hurt of having to leave your ride behind. But I know you've got your hands full with family matters and that comes first. Then comes the job search. I surely hope the economy doesn't "plant" itself but, even absent that, it's going to be quite a row to hoe. Now that you're here, PM me so we can talk about things.
 -
and don't forget to visit the HybridZ Web site too. It will have loads of info for you on this mod.
-
Don't be surprized if you miss one (or two) welds that are close in to the firewall. You'll see them soon enough when you go to pull the tray and it says "nuh uh." I would say that the only structural involvement of the sheet metal under the battery tray is for "crumple" in the case of a bad shunt. A weld-in patch is, I believe, the SOP for fixing this region. Fortunately, I don't have this problem on my car but I do have probably 8 of the Top 10 rust issues. Testament to the powers of Iowa, West Virginia and Pennsylvania winters, I suppose.:cross-eye
-
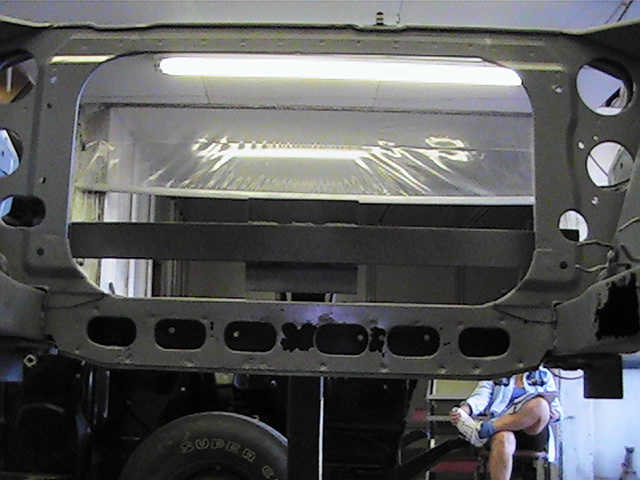
Jeff: I noticed on that shot of the front end that there is no battery tray mounted in the engine compartment. Nor do I see any wiring harness clips along the RH frame rail (perhaps you replaced the original one?). Are you going to be relocating the battery? How are you going to secure the harness? I'm asking because I'm facing the same questions in my '72 rebuild.
-
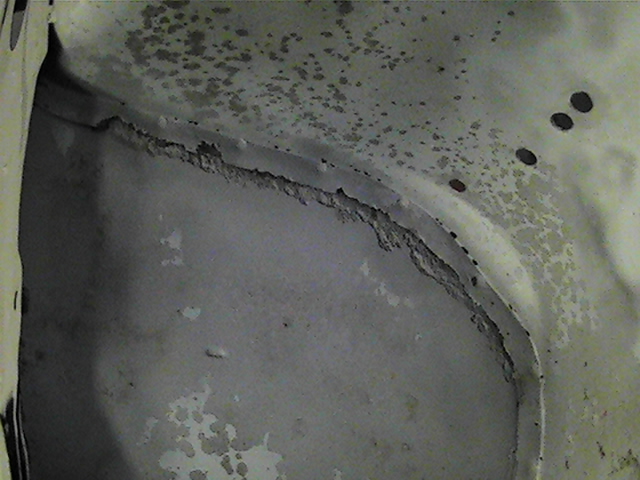
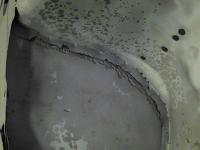
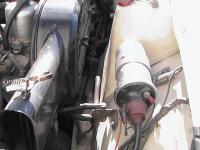
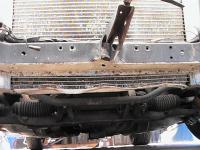
Guys: I recently had to remove the tray from my '72 before it went to sandblasting. The first thing to note is that you have to locate all the spot welds from inside the RH fender well. Thus, you need to remove whatever undercoating is in that region. Assuming you do a good job, you'll be able to see the numerous weld indentations. You now have two choices. You can (1) use a punch tool to mark the center of each spot weld and then eventually place the self-centering point of the spot weld cutter on those locations or (2) use an 1/8" drill bit to drill through the spot welds (and likely the tray metal too) and these will serve to center the spot weld cutter later on. Either way, there will be holes that eventualy will need to be welded shut. Your choice. After you use the cutter, you will have a fender well that looks somewhat like the attached picture of my car (looking back and upward at the firewall/wheel well intersection). The holes don't look pretty, but the tray is out and R&R can begin.
-
My title is a variant on the line that Ronald Reagan used about the Soviet Union; i.e., "Trust, but verify." It is probably the only thing on which RWR and I have ever agreed, but right is right, and he was right on that. IMO, anyone who is selling some bolt-on performance part should be asked to "show me the numbers." (I guess I'm into paraphrasing today.) What I mean is that for about $200 they could get dyno runs of the car before and after the bolt-on installation and have them verified, witnessed, notarized and available for inspection. If a business isn't willing to invest that much money in a commercial product on which they expect to make many, many times that much in profits, you can pretty much write the mod off as crap.:sick:
-
Dave and Mike: Firstly, we were able to check the operationality of the car's headlights using my '72 switch simply because the H/L wires are not part of the multi-connector plug, although the parking lights are. The R and WR wires for the H/Ls connect to the dash harness using individual "barrel" connectors ( I think that's what they are called). We thus proved that the original switch was the source of the problem. I took the switch home with me last night and used your R&R technique, Mike. The contacts were very dirty and one was pitted. I cleaned them with 400 grit paper (the finest I had at home) and after rocker reversal and reassembly, there is continuity when the switch contacts are engaged. I'm going to try it out in my buddy's car this afternoon as soon as the shop owner gets there to sit on his arse.:cheeky: Don't get me wrong, the shop owner is a great guy and he's the fellow who's doing both the rebuild bodywork on my original owner '72 as well as whatever repair work will be needed on my recently-crashed '72. It's just that at age 63, he mostly spends the weekends in his shop waiting for friends and buddies to come calling so we can all shoot the breeze. In fact, my wife and I make a point of stopping by his shop for 30-60 minutes every Saturday after our late morning breakfast in town following our workouts at the YMCA. However, getting back to the problem at hand, I'm sort of blown away that a dash having a '71 VIN has a wiring harness from '73 or later. That seems lke someone went to a lot of trouble for very little gain.:stupid:
-
At what time in the S30 run did the change occur from 2-speed to 3-speed wipers? I, frankly, wasn't even aware that there were 3-speed wipers as the only S30s I've ever been in are '72s, which AFAIK have the 2-speed version. The reason I ask is because a local friend has a problem with his combination switch and it's of the 3-speed variety. His problem (so far) is that the headlights don't work. We can get them to work if I plug in a switch from my '72. I'm testing the continuity in his switch, but don't have any results yet. However, it's more complicated than it appears. His chassis is HLS30-143954(stamped in the firewall), which tells me it is a mid-'73 car. However, it has a dashboard with a VIN in the low 41000s, which would be from a mid-'71 car. And then he has this 3-speed wiper combination switch. The switch has a 3x3 square multi-connector box in addition to all the usual single-contact connectors. Unfortunately, I don't have a digital camera this weekend to take a photo. For now, I'll settle for knowing when the 3-speed switch went into the cars. Later, I might need some troubleshooting assistance.
-
Thanks for the info, John. I figure that a long-time racer such as yourself has seen a bent frame rail or two over the years. In addition, your fabrication skills lend credence to anything you say about "metal matters." I was certainly going to follow a similar path before committing to a $2000 cut-out-and-weld-in R&R job by my body man.:stupid: I just didn't know what thicknesses and lengths of angle iron would do the job. You (and a PM from Diseazd) have set my mind at somewhat more ease. It also doesn't hurt that my body man's shop is located directly adjacent to a steel fabrication business.:classic: I'm going to step back from this problem for a couple a weeks and tackle it anew in early October.
-
Dave: Now that you've established (1) how easy this kit was to install and (2) that it remains functional after an extended use period, it is time for you to "cut and paste" a stand-alone Technical Article about the modfication on this Web site - one that will not have all the extraneous comments and would simply be the documentation of all your efforts. I know that this is something I definitely want to do on my '72 during its rebuild, so your trailblazing is of great value to me. I'd also like to see a similar Technical Aricle about your power door locks. I'm not "sold" on doing this mod yet, but others might be after they see what all was involved.
-
Not only for your reply above, but for the PMs you sent. We had a second frame guy look at the car and he agrees that cutting out the frame rail is the way to go. We'll also have to replace at least the front part of the floor support rail too. Consequently, I'm getting both parts from Charlie Osbourne at Zedd Findings. He truly is a pleasure to deal with. Now I have to convince the insurance adjuster that this is the way to go. It wouldn't be to bad except he's now busier than a one-armed wallpapaer hanger since Hurricane Ike sent a monster wind storm through Ohio on Sunday. Some folks around Columbus won't be seeing power until next week. I really feel for those of your who not only catch the wind from these storms, but get the rain too (we got no rain). And then there's tidal surges. I can't even comprehend what those must be like.
-
Before you shell out for these rims, check out the range of 14" tires that are available. Go to Tire Rack's Web site. I've found that 14" performance tires are VERY scarce. Even 15" tires are not all that plentiful. I've chosen to use 225/50-15 Yokohama AVS ES100 tires on one my cars with 15x6.5 rims and I'm happy with them. However, they are dry weather performance tires. That shouldn't be too much of a issue for you in Florida. It's almost too bad because I have a set of 14x6 true American Racing Libres that I would love to put on one of my cars, but I can't find decent tires for that rim size anymore.:cross-eye
-
I've been looking at Caswell Plating https://www.caswellplating.com/ as a potential source of chemicals and equipment to do my own plating when it comes to it. They are a bit pricey, considering what the chemicals cost on the open market, but where else is an individual going to do better?
-
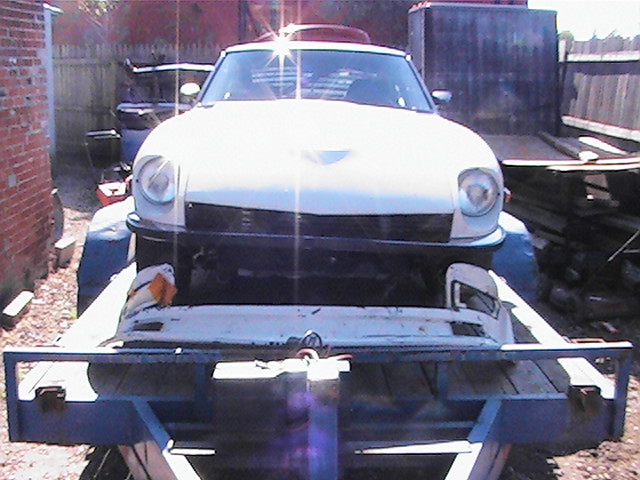
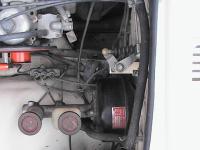
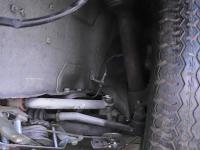
As many of you know, I had an "off" on 9/6/08 and did some front end damage to my '72. The front left frame rail is bent inwards (you can see how much in the two pix attached - look below the two air horns on the carbs - although it's tough to get a true overhead shot of the car as it sits right now) and I am discussing the repair process with both the body shop owner and the insurance adjuster. Initially, we thought that the car could be placed on a frame rack and pulled back into shape. My body man knows at least two local folks who have such equipment (and whom he respects) and he had one come out to look at the car. This guy ended up saying the he didn't know where he would be able to "hook up" the car to do the straightening. I find that very hard to accept and I'm wondering exactly how experienced this guy might be. I've told the body man to have the other local guy look at it too. If the car can't be put on a frame rack, my body man says the alternative is to cut out the bent frame rail, use a portapack hydraulic cylinder to put the front corner back into position and then weld in a new frame rail (which I would get from Zedd Findings). I am hesitant to go this route simply because a body man with a portapack is not, IMO, a good substitute for a frame rack. In addition, all the cutting and welding will drive up the repair costs substantially.:stupid: I found only one previous thread on this topic (#16933 from March 2005) and it didn't come to any satisfactory conclusion. I've PMed the originator, but haven't heard anything back yet. I'm thinking that I need to expand the search for a competent frame shop that will do the necessary work. I'm sure that being close to Columbus, Ohio will allow me to find such a shop. I just would like to get the opinions of folks who might have gone down this route before with an S30.
-
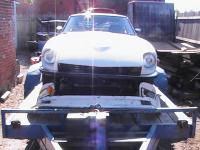
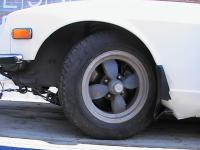
The Hagerty Insurance adjuster came by my bodyman's shop yesterday afternoon and this was the first time the car was in sunlight since the wreck happened. I still haven't gotten decent pix of all the damage - at least not decent enough for this bunch of Z afficianados. The late afternoon light was just too much for the auto-exposure control on the camera. I'll get better pix this weekend now that we can start taking parts off the car. The one that tells it all is the one showing how far back the LF wheel is displaced. On all the others, there's too much shadow. And no, the AR Libre wheels weren't on the car when it happened. The damaged 15" wheel wouldn't hold air so I put on my old 14" Libres to get it on the trailer. Preliminary estimate is $7400, but I hope we can get it back on the road for under $6000.


-
I am with you on that, Carl. Personally, I have never found a street tire that is more grippy than the brakes already on my S30 cars. I upgraded to the Toyota dual-piston front calipers on this one a few years ago and I run Yokohama AVS E100 205/50-15. I have locked up the front twice now (the first was a guy not looking when he pulled out of his driveway - no contact). I recall back in the mid-70s, there was a device that I saw advertised in SCCA magazine called the Safety Braker. It was a mechanical device that sensed when lock-up was about to happen and somehow prevented it. I always wanted to get this put on my Z, but by the time I had enough money to make mods, the product had disappeared. Probably too much liability selling that type of thing - even to racers. The device can be seen here (http://www.cwnicholls.com/spitfire02a.html). It's the hexagonal part near the top of the first photo. A "modern" version may have been created by Stewart Development (http://www.stewartdevelopment.com/products.html), now being sold through DPI Performance Racing Products of Petaluma, CA (http://www.dpiracingproducts.com/brksysnacessrys.htm).
-
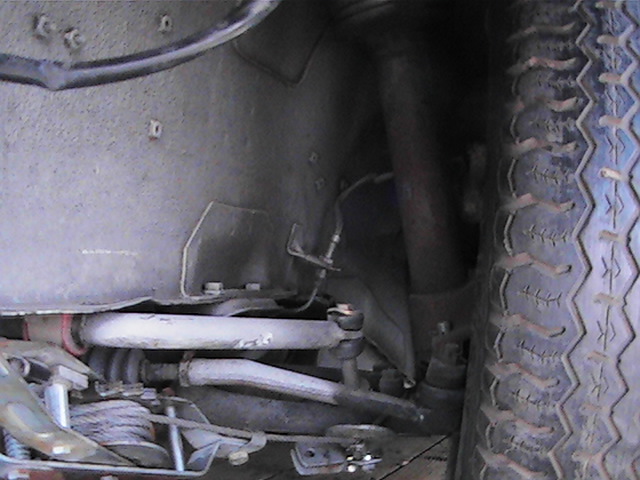
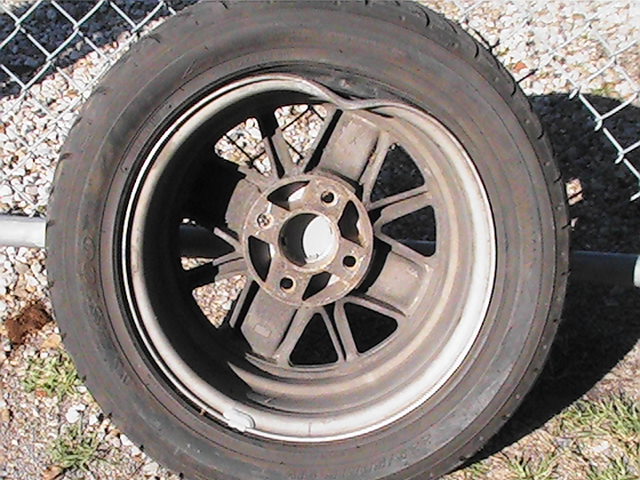
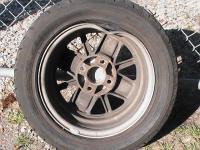
I've devised and coordinated my local club's (ZROC) so-called "Western Run" in the hills of Logan, Union and Champaign counties in central Ohio for five years now. This past Saturday afternoon, an absolutely clear and dry day, my wife and I were laying out this year's route to be driven this coming weekend. We were on Logan County Road 29 headed west. I'd never been on this section of road before, but it is reasonably wide and has a good paved surface. We were on the downhill part of the road and had entered a portion having an S-turn warning sign with a suggested 35 MPH speed. The initial lefthand portion was easily taken at, perhaps, 60 with no issues. We were on the straight section before the righthand portion. The sun was directly ahead of us (~5:20 p.m. EDT) and glinting off the road. I saw the entrance to the turn. I also saw what I thought was a deer step out of the woods at the inside entrance to the turn. I got on the brakes hard. Too hard, it turned out, and the fronts locked up. We went straight off the turn and got airborne over a 2-foot deep ditch. The car flys fairly well. It doesn't land too well though. We were on a flat, heavily weed-overgrown field and moving right along mowing those weeds down. After 100 feet or so, we nosed into an overgrown mound of dirt and came to a stop at about a 30 degree up angle. No injuries other than an abrasion on my left elbow and both of us with stiff necks from the landing jolt. The car wasn't as lucky. Front airdam torn off. Lower grill locators torn off. Both fiberglass headlight nacelles cracked. Front bumper distorted somewhat. Left front wheel, strut, etc. pushed back about 6 inches. Left front frame rail bent and pushed into the firewall. Left engine compartment wall pushed in a couple of inches. Front bulkhead lower crossmember pushed in about 2 inches and the bottom of the aluminum radiator is bent too. At least three bent aluminum wheels with the inner right rear rim being the worst - pushed in about 4 inches. Amazingly, there is no damage to hood and only slight damage to the front fenders where the airdam was mounted. No sheet metal creases at all. Both doors open easily. No discernable rear suspension damage. No apparent damage to the engine or drivetrain. I'll get pix taken soon and post them to this thread. The insurance adjuster will probably take a look at the car tomorrow after I get it trailered to the shop that did its minor rust repair work and new paint back in 2004/2005 and is currently doing major rust repair work on my orginal owner ’72. I'll be needing to get front suspension parts, certainly front control arms and perhaps a new front crossmember (if it can't be straigthened easily), so those of you with such parted-out items please feel free to contact me. Also, if the wheels can't be fixed, I'd like to replace them. The car has 15x7" wheels that come from a Mitsubishi Starion (or so I'm told). I know they are Mitsu parts because they have the three diamond logo cast onto the inside. I'll get a picture of the wheel posted too so perhaps you West Coast boneyard buzzards can be on the lookout for me. I don't think anyone in Ohio would even recall what a Starion was. More later.
-
As long as you realize that you will undoubtedly have at least $5000 spent on this car by the time you're done, it's your call. Project cars are great as long as you know what you're getting in to. That's the value of having "friends" like us to lean on. Our combined experiences make all of us vastly more knowledgeable. When you visit the car ths weekend, take a jack and pull all the wheels so you can check the wheel wells for rust using a screwdriver probe. If you don't know where to probe, you can look at my gallery or PM me. My original owner '72 has every rust condition known to Z-dom to one extent or another. Your potential purchase looks pristine by comparison. I'm gong to spend well over $10k getting my car resurrected, but that's my sentimental choice. Some may gasp at my folly, but where else can you end up with a screamer for that kind of money? Besides, at 57, I'm only going to do this once.
-
The level of ZDDP has been reduced in recent years because of the effect the phosphorus (P) has on the catalytic converter life. The levels went from 1200 ppm P to 800 ppm P. There is excellent info on this very topic in the latest edition (Fall 2008) of Hagerty's magazine. I just got mine yesterday and it's at home right now. It's the one with vintage racers on the cover. It's not on their Web site yet, however.
-
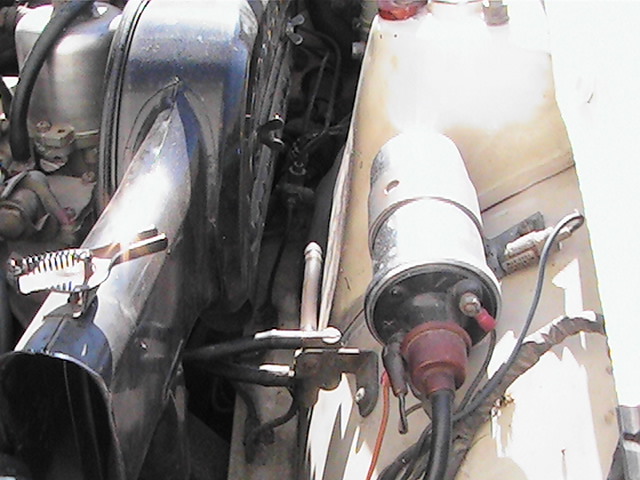
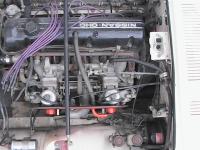
I've never noticed the "look" of a tranny base and I'll have to check that out. I just saw in that first picture of your engine bay that the tranny has "280ZX" written on it and know that's how most boneyards ID things when they've been pulled for safekeeping. I'll flip out if my local one ever starts using notebooks to record its inventory. By the time I "check out" decades hence, they may have upgraded to a Timex-Sinclair:p
-
Well, you know, Jason, that if you want to take the car to "stock" you're going to have to give up that 5-speed and probable 3.90 rear end. Now, I just happen to have a gen-u-ine 4-speed and 3.54 rear from my old '72 with only 46,500 honest miles. Even though you're out west, wanna trade?:classic:
-
Your S30 looks to be a fairly sweet ride as it was when you brought it home. I hope that the chassis is in good shape so you don't have to mess up your paint job. The engine compartment looks fairly stock for a '72 although it does appear that you have a ZX 5-speed tranny and some kind of custom exhaust. What's your intention in working on the car? I doubt there's any S30 knowledge that would help you with your 350Z (Z33 ?) and vice versa. Or maybe it's that you want an engine you can understand intuitively. That's why I love my S30 cars.
-
We are all here to help each other enjoy our cars. I shall be happy to assist you in any way that I can. Where are you located in Mexico? If you are close enough to the U.S. to drive across the border for parts, that will make probably your project go much easier.
-
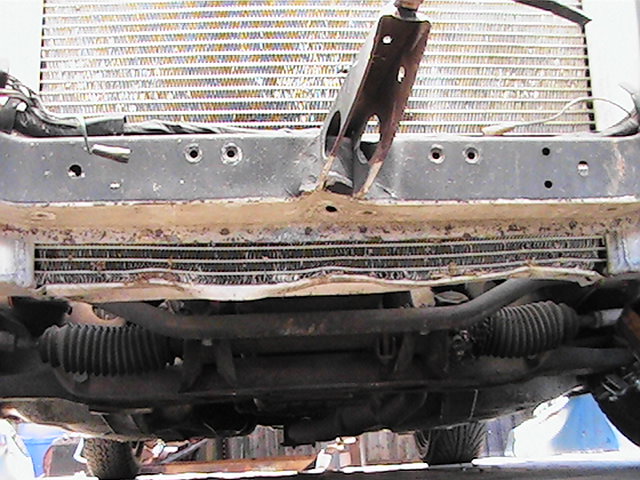
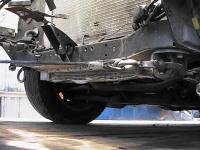
My '72 is all sandblasted and epoxy primed and rust repair is underway.:classic: I know what's ahead of me for the next few weeks, but I'd like the opinions of those who have "gone before me" on one aspect. That is what to do when repairing the rust damage on the front crossmember. A photo of the current situation is attached. While it's not blatantly obvious from the photo, there is rust-through on the backside of the x-member between the oval openings. It is worse between some than between others. Numbering the ovals 1-6 from L to R, there is no apparent rust between 1-2 and the worst is between 3-4. I think you can see the extent on the others. My thought is to (1) remove the entire back "wall" of the x-member, (2) treat the inside surfaces with sandblasting, Ospho and an appropriate coating (POR-15 ?), and (3) weld in a solid wall piece. I frankly don't understand the purpose of the factory openings and I don't see what harm would attach to eliminating them in my rebuild. There are plenty of drainage openings on the underside of the x-member and I could always create more. Besides, I could always create a template and paint black ovals on the new solid piece to give the OEM effect. Let me state that I am NOT going for a restoration here and this car will NEVER see winter driving while I own it although it will likely see some rain. So, if any of you have insight into what Datsun was thinking regarding the design of this piece, I'd like to know. And, certainly, I want to know what you think of my proposed fix - pro, con or ambivalent.

-
I'd say you have the same problem I do with my '72; viz., the choke on the aft carb is not resetting when the lever is pushed in. I have to manually reach underneath the carb and push the piston to the "home" position. I'll take care of this come winter when I have the carbs off to install a new header. In the case of FI, is it possible that one (or more) injector(s) is(are) not "resetting" as things heat up? I honestly don't know how these injectors are controlled (a "chip" somewhere, I presume) and the problem could just as well be mechanical as electronic.