.JPG.cfcada9cf1c1b502df3f5f2f2ca3ff36.JPG)

SteveJ
Free Member
-
Joined
-
Last visited
Everything posted by SteveJ
-
 Yes there are holes in the lobes just before the lobes make contact with the rockers. If your head doesn't have a spray bar, and the cam isn't internally oiled, you would have toasted your cam already due to the lack of lubrication.
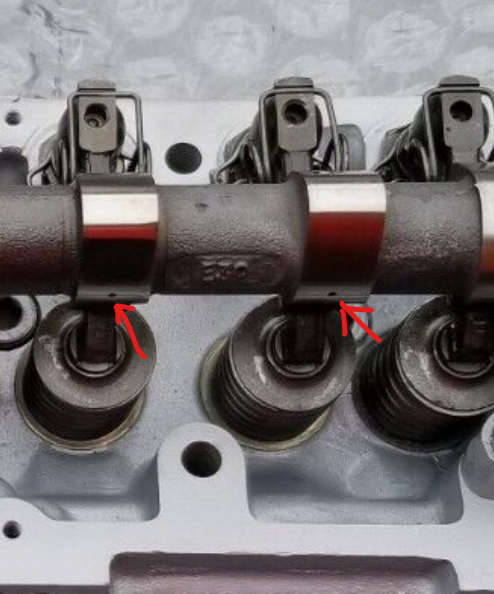
-
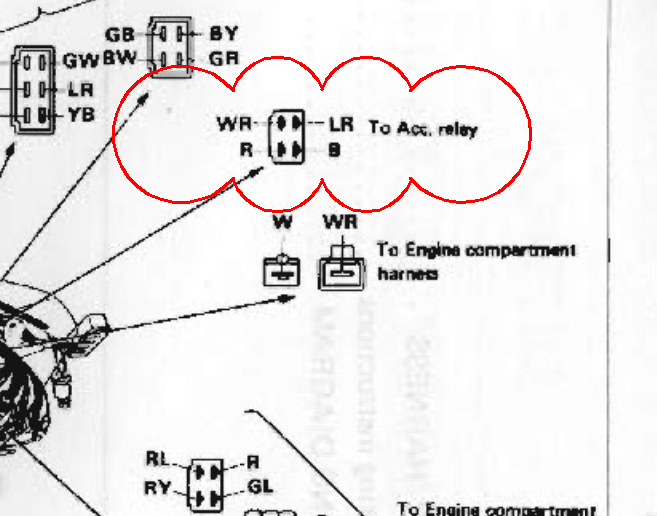
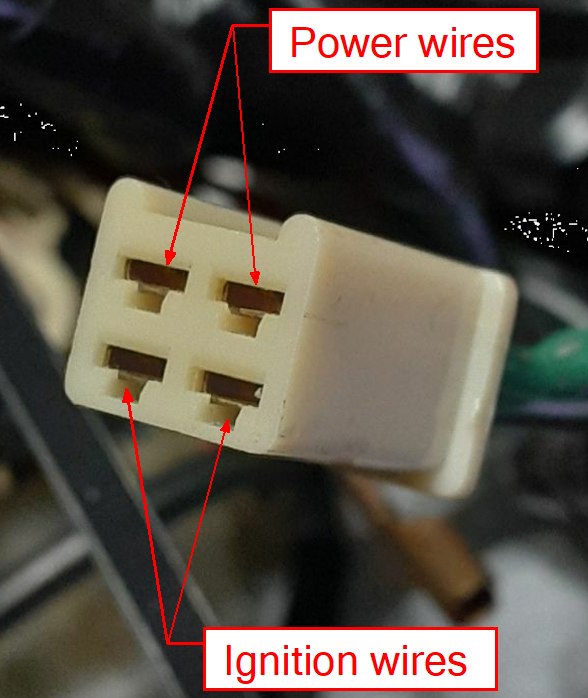
There are two ways to do the splice. You can crimp the wires together (typical for production wiring), or you can solder. If I was doing it, I would use the crimp connectors. I bought this kit last year for future projects: https://www.amazon.com/gp/product/B08XTV93GD. To understand the size of the crimp connectors you need, here is a handy chart showing wire cross sectional areas for a given AWG size: https://www.engineeringtoolbox.com/awg-wire-gauge-d_731.html. If you are doing a couple of 10 AWG wires, that would require soldering over crimping due readily available crimps being too small for two wires of that size. To answer your questions, you are correct. The red and black wires would pass through. That does look like the accessory relay in your photo.
-
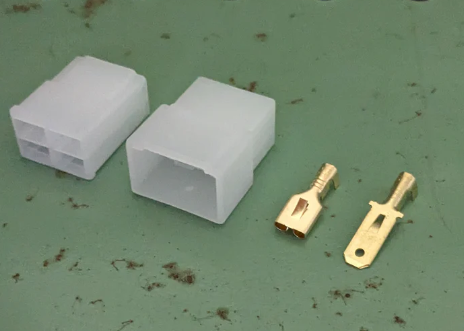
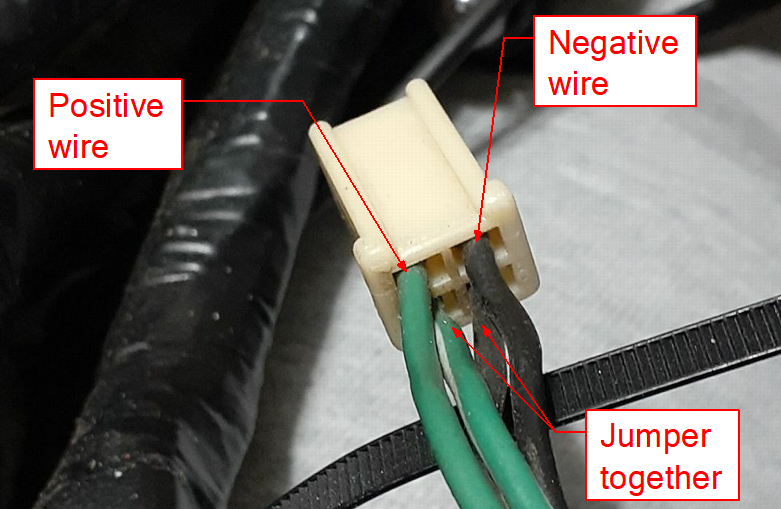
Here are my suggestions for power sources: Power door locks - Full time power Power windows - Accessory power 2 Power outlets - Accessory power Hatch popper - Full time power So now you need to know how to go about getting this power. I like to construct "jumper harnesses" myself. That is a short wiring harness that goes between two factory connectors that branches off to the new circuit. In the past I have used the "bullet" connectors in the jumper harnesses to branch off, but now I would add splices soldered into the wire of interest. In your case, there is a great connector to add a jumper harness, the accessory relay. The WR (white/red stripe) wire is constant power, and the LR (blue/red) wire is hot when the accessory relay closes the contacts. How would you make a jumper harness? Vintage Connections has most of what you would need, including wires with the proper coloring if you want to stay consistent with the factory colors. In this case I would suggest the following: A 4-pin non-latching connector 2 1-pin non-latching connectors (Note: you can also use 1 2-pin non-latching, but that is a discussion for later.) 2 inline fuses, probably sourced from Amazon, like this: https://www.amazon.com/Inline-VANTRONIK-Waterproof-Standard-standard/dp/B081YDV8PS for at the jumper harness and use the others for a couple of the branch circuits 14 AWG wire 16 AWG wire (for the power outlets) 2-pin non-latching connectors for each of the devices. 4-pin non-latching from Vintage Connections I would drop down the wire gauge on the power outlets and use 16 AWG on those. (Use 5 A fuses in the inline fuse holder.) I would use 10 A fuses in the fuse holder for the branches coming off the jumper harness. That should give your wiring adequate protection.
-
The 720 box isn't bad. I did find confirming information with your ratios, too. https://www.zhome.com/ZCMnL/tech/GearRatios.html

-
From searching for ZL71B#3, I would say that is a 720 transmission.
-
@Terrapin Z I'm pretty sure you are correct about which bracket belongs on which car. I'm positive the larger one is for the 74.
-
You can always buy them from Bel Metric. They have JIS spec bolts For the M8: https://belmetric.com/m8x1-25-coarse-jis-b-1180-hex-bolt-class-8-8-wrench-12mm/? Buy a variety of lengths in case you need M8 bolts in the future. Also consider buying some M8 nuts. Normal: https://belmetric.com/nuts/jis-wrench/?FilterSpecification=JIS__B1181 Flanged: https://belmetric.com/nuts/flanged-nuts/?FilterSpecification=JIS__B1190
-
It's always a great thing to see one of these projects getting out into the light of day again. I hope you have a great time enjoying it.
-
I'm not sure why you think the tach needs recalibration. Have you changed something in the ignition system? Assuming the tachometer is ready to be replaced, I'll use Speed Hut as an example. Why? I have wired them before, and there are mounting adapters available. See gauge link, gauge adapters, and instructions. Would the Autometer tachometer work with the gauge adapter? I don't know, and frankly I don't care. Here's an approximate list of steps: Get a 4 pin non-latching 2.8mm connector from Vintage Connections. This will allow you to wire the tach to stock wiring. You will need the male side of the connector. See the photos below for the dash side of the harness. You should also probably get two 2 pin latching 2.8mm connectors for the other wiring modifications. If you don't have a proper crimping tool for open barrel connectors, they have that, too. Use a short piece of 16 or 18 gauge wire crimp the 2.8mm pins to either end. Insert that jumper into the bottom terminals of the 4 pin connector. That will ensure your ignition wiring out to the positive side of the coil stays intact. Crimp the 2.8mm terminals onto the tachometer wires. Install those terminals on the correct sides of the connector. See photos below Remove the two wing nuts holding the tachometer in place, cursing about how small the hands must have been on the person who installed it. If you don't have a dash cap, pull the tachometer out enough to disconnect it. If you have a dash cap, curse the day you or the previous owner installed it and figure out how to get the tachometer past it. (Sorry, no help from me on the dash cap.) As you pull out the gauge, disconnect the bulbs and 4 pin connector from the back of the tachometer. Cut the socket off the red/blue wire on the lower gauge bulb. Contort yourself in a strange way to strip about 1/4 inch of insulation off that wire and crimp a female 2.8mm terminal onto it. Strip about 1/4 insulation off the white wires on the gauge and crimp both to the same 2.8mm male terminal. Install those terminals into their respective connectors for when you put the gauge in. Run a length of 16 AWG wire from the negative of the coil to up under the dash. Protect this wire with 1/4 split loom or other durable cover. Connect one end of the wire to coil negative. Crimp the other end of the wire to a 2.8mm female terminal. Note: I can't see anything about a resistor between this wire and the tachometer. You will want to verify with Speed Hut. Crimp a 2.8 mm male terminal onto the yellow wire. Put those terminals into the respective connectors. Attach the connectors. Slide the tachometer into place. Note: I'm not sure about how to secure the tachometer. Program the tachometer according to the Speed Hut directions. Keep in mind that none of the aftermarket tachometers have turn indicators in the gauge. Speed Hut has them in the speedometer. By the time you are done with the install, you are probably at least up to the low side of the cost of fixing your old tachometer. Why don't you say what your tach is or is not doing? Shoot some video of it. Post the video on YouTube and link it here. We may be able to guide you through a cheaper fix.
-
My friend replaced the wheel bearings in my 260Z a few years back. The right side didn't budge until I was hitting it with a slide hammer while he was on the other side with an air hammer. Sometimes they are just that stubborn.
-
I'm glad you came to a definitive diagnosis. OTOH I hope you are never caught out in weather that would require you to use your wipers. 😄
-
I went back and looked, but I didn't see any electrical circuits that were wrong. 😁
-
No problem. That's the main character of a show from the 1980s called ALF. https://en.wikipedia.org/wiki/ALF_(TV_series) From that article:
-
-
This may work as a refill: https://www.ebay.com/itm/372381862823?chn=ps&mkevt=1&mkcid=28&srsltid=AfmBOork85zINr1I7vDqi1EE8txMRzlB3Rdt3yqsD9J0r8v6-opGAn7c44M Also look up OER F309 as a possibility. Here's one you could try if you like taking chances: https://shop.remotepracticemanagers.com/products/car-windscreen-wiper-blade-insert-natural-rubber-strip-nr-6mm-refill-1416171819202122242628-1pcs-car-accessories?variant=43954329026790
-
A search in Google is showing a lot of "out of stock" on that part. I bought some the previous time you mentioned them. More and more parts are just unobtainable.
-
Don't be too quick with that suggestion. I have searched on Trico 33-183 before. At Summit, this is the picture they show with that part number: In digging deeper, I read the reviews on Amazon for the 33-183, and people say the bayonet adapter is plastic. https://www.amazon.com/Trico-33-183-Classic-Wiper-Blade/product-reviews/B000CRMNJC/ref=cm_cr_dp_d_show_all_btm?ie=UTF8&reviewerType=all_reviews

-
Unless you got the differential from Japan (or someone modified it), I doubt you have a 3.9 rear end. Reference: https://www.zhome.com/ZCMnL/tech/GearRatios.html
-
My 73 was a retrofit. Unfortunately I can't remember if there was even a filter mount back by the fuel pump. I think the electric fuel pump is still mounted. I'll see if I can get a photo of the area while I'm off.
-
Hmm, there may be a way to make this work, too. I like that it's threaded. That could give you the adjustability you need for a creative application. It's also relatively cheap. https://www.jbugs.com/product/049129412C.html?utm_content=shopping&gclid=Cj0KCQiApOyqBhDlARIsAGfnyMrYlnwBku6XT-gmx765EpQ_c_n1XtiWz4JO2P3e6vYVxrxMArI5hqIaAo1QEALw_wcB
-
So to see what I could find, I ran across the Edelbrock 8059. (Not me pointing) $245? Maybe it could be done cheaper. Hey, my friend Google suggested a Quadrajet solenoid. Okay, but what cars what the Quadrajet? Chevy V8s after 1966. Let me check with Rockauto about a 73 Camaro with a 350. Hmm, This could work, though it would need a bracket fabricated: https://www.rockauto.com/en/moreinfo.php?pk=39841&cc=1034941&pt=10687&jsn=916. It's only $59. Now, where do you mount it? There is a pad on the throttle linkage by the EGR that could be pressed by the solenoid. The bracket could be mounted on the EGR (or on the blocking plate if the EGR has been deleted. How's that?


-
That was the brand VR I found in my 260Z.
-
Here's a few for anyone with a lot of money burning a hole in his pocket: https://www.mecum.com/auctions/kissimmee-2024/lots/?auction[0]=Kissimmee 2024|1704153600|1705190400&q=datsun&sortBy=wp_posts_lot_sort_order_asc And if you're looking for later gen Z to round out your stable, there are some opportunities as well: https://www.mecum.com/auctions/kissimmee-2024/lots/?auction[0]=Kissimmee 2024|1704153600|1705190400&q=Nissan&sortBy=wp_posts_lot_sort_order_asc
-
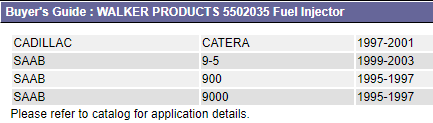
And if you're REALLY daring, you can pick up a set of 6 fine Chinesium knock-offs for the price of one Walker injector. https://www.amazon.com/YOMTOVM-Injector-0280155712-Compatible-Cadillac/dp/B0CN431KFK Anybody up for a car-b-que? Anyway, searching for the Bosch part number on Amazon shows a lot of refurbs and clones.
-
I did a search on RockAuto for the part number @HusseinHolland provided. A Walker fuel injector crossed with that part number. Here is the applications list they had for the Walker part. Now given that the Catera was developed from an Opel, I don't know how much carried over from the Opel powertrain.