Ed
Free Member
-
Joined
-
Last visited
Everything posted by Ed
-
Getting the intake welded shouldn't be a problem. Look in the phone book under "welding". The bad thing is the color of the welded aluminum probably won't match and you will loose the textured surface. If you do go this route take a dremmel tool and clean the runner to remove any casting slag or weld. Removing the studs isn't that hard you can double nut the stud to prevent damaging it. Or you could buy new studs at your local NAPA. They cost about $1.00 a piece . Good luck
-
Those are the correct bumpers for a 73. The rear bumper guards are O.K. It does appear to have been "pushed in" towards the body. Kind of looks a little tweaked. The front bumper is missing the black rubber trim piece that sits behind the bumper in between the supports. Another thing I noticed are the door panels. The chrome strip isn't chrome anymore it's nice and blue. The engine bay looks like it had some silver touch-up paint applied to the heat shield with some overspray. Other than the other things that the other members have pointed out I can't see anything else. Pretty nice car though. Very clean!
-
The brake light switch is located on the brake pedal under the steering column. I'm no electrician but that's where I would start. Use a voltmeter or tester and follow the wires until you find a drop in voltage. And like Inf mentioned check and clean your connections. Also check your wires to make sure there isn't a short somewhere. You can purchase this stuff called "dielectric grease (sp?)". It's used for ignition wires to prevent corrosion and to aid in conducting electricity. Try putting some of that on the connectors after you clean them.
-
-
C-ya Sunday.
-
When I did my lines the fuel return line was the only one that was plugged. I tried running a wire through it but I guess it was too thin it went in to the first 90 degree turn and then stopped, and the wire would bend where I tried to push it in. Maybe because it's a real skinny line? Luck for me the plug was close to the end. I poked then I used the compressed air to clear. I noticed that if you blow air at a 90 degree angle to the opening it acts as a vacume and sucks out the debree.
-
Carl, I was trying to figure this one out and this is what came to me: The arm on the adjuster won't allow it to tighten past a certain point of resistance (shoe on the drum), that's why the "lugs" on the adjuster are canted and not straight cut. If your idea were the case, you could only use the E-brake once in the life of the car.
-
Symon, I'd be glad to do it for you. PM me with the name of the book, author and your address. I'll order the book for you. Ed
-
Ooops, glad you caught that Carl, sorry bad idea :stupid: .
-
There IS rust on the battery tray. And why would it have a different hood, fenders, grill and headlight buckets? You got it, accident!
-
Hey Vicky, I never heard anything negative about leaving a car parked in gear. Maybe one of the tranny experts can elaborate. About leaving the e-brake on for a long period. I know that the brake shoes can freeze in place (rust). I've seen where some of them are frozen so bad that the wheel won't move. Maybe try pulling and releasing the brake a couple of times before you go to move the car. Another suggestion like you said putting something behind the tires. I've seen these plastic "chalks" that you could probably buy at an automotive supply store. They are used in the garage and you just drive on them. They are to help you guage where to park your car in the garage. The bump on them is small enough to drive over but big enough to feel. They would be big enough to prevent the car from rolling away. Ed
-
Not being from Maryland and seeing you got no responses I would suggest looking in the phone book under automotive reapair. Try and find a foreign car specialist. Call them and see if they could suggest a machine shop for you.
-
Have you checked the timing?
-
There are a few bolt on modifications that you could do to add a few more ponies. Unfortunately none of them will be felt in the "seat of the pants". Headers-exhaust maybe 10+ hp, Cam maybe another 10+ hp. Upgrade the ignition, and a proper tune. Your looking at maybe 150 hp. Do a compression test to determine the current condition of your engine. Maybe you need a rebuild? One of the biggest upgrades you will notice is people swapping out the L24 for a L28 (280 ZX motor). It really all depends on how fat your wallet is and how fast you want to go. You could go Turbo or even the dreaded V8 swap. But with all swaps you must realize that you must also be able to stop the car. A suspension rebuild and a brake upgrade is the first step. Let us know what your dream is and we'll help you if we can.
-
Rob, one more thing. Put a piece of thin plastic (the kind used for covering food) over the can before you close the lid. It will help prevent the lid from sticking to the can.
-
Hey Alfadog, It's Glass bead blasting, other blasting media is too agressive and will destroy your aluminium. You can use a regular "sand blasting cabinet" to do the work just make sure you use Glass bead instead of sand. If you don't blast the item first you will spend 5X the time cleaning your part. A small cabinet with isn't more than $100 U.S. but then you also need an air compressor.
-
I don't think there is anything that is supposed to go in between the two. But, if you don't then eventually the guards will scratch the bumper leaving marks. I have seen where someone has taken some 1/4" clear tubing and cut it down the center (lengthwise). Then you put the tube over the edge of the guard. Now you have the tube between the guard and the bumper to prevent scratches.
-
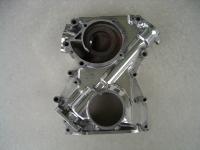
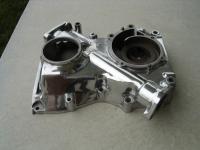
Hey, you Florida members, hat's off to ya! I lived in Okinawa for 4 years and we had all kinds of typhoon's. Nothing as bad as this 1-2 ya'll just got (Charlie-Frances). For you people that want to do something like this yourselves do a search and put "rouge" in the query. That's what I did and found lot's of info. For those that don't want to do a search, I started by Glass bead blasting, then I smoothed the surface with 220 grit wet/dry. From there 320 grit. Then 600 grit. Followed by the "red" rouge that I got at Sears Hardware. On a soft cotton wheel. If you guys have the patience I 'm going to post pics of my engine when I'm done (unfortunately this will be a couple of months) :classic: .
-
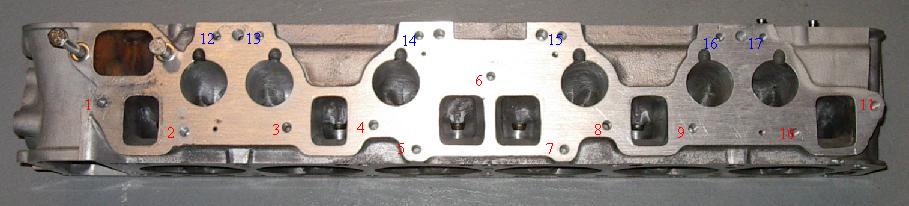
Here is a picture of a N42 head that might help you do the notches. Ignore the number as those where used for something else.
-
 Awesome! Unfortunately I think you lost your hood.
 -
I would suggest building some way of suspending the diff so that you could paint the whole thing in one step. First things first. Safety, wear gloves! The Marine clean will dry your skin and the paint won't come off. After you have removed all of the crud on the diff and the entire surface is clean spray on the Marine Clean. I use a brush to work it into the creases and loosen any remaining crud. Let it sit for about 5 minutes to get all the grease off. Rinse with water. Let it dry. Next the Metal ready, spray it on and work this also with a brush, keep the surface wet with Metal ready for atleast 15-20 minutes. The Metal ready will neutralize the rust and gently etch the metal surface. Rinse with water. Next is to thoroughly dry the diff. Don't use towels or anything that would apply waxes or other contaminates. Use a blow dryer. I would say leave it in the sun for a couple of hours but I notice you live in the U.K. :laugh: After the diff is completely dry you can paint. Mask off any areas you don't want to paint. One coat will be enough but if you want to apply a second coat wait about 1 hour. Do the "finger drag" check. If it feels tacky but not wet then it's ready for the second coat. Try not to breath the fumes because they are toxic, use a respirator. Or in a well ventilated area.
-
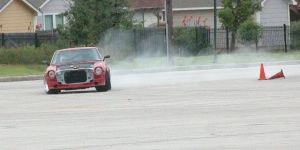
I know some of you partied. Some worked. Others got to ride around in there Zed's. Me I spent it rubbing a piece of metal.
-
Will, doesn't the lubricant in the transmission flow by the rotation of the gears? When in neutral and standing still the engine wouldn't flow lubricant because there is nothing rotating. But with the rear tires driving the gears you will have lubricant flowing. Most of which will be towards the rear since the car will be at an angle. The lubricant that pours out when you remove the driveshaft is what will be lubricating the gears. Atleast thats the way I see it if I'm wrong please explain. Ed
-
A dolly would be fine. And you don't have to pull it backwards to get the drive wheels off the ground. Getting the drive wheel off the ground is a automatic transmission thing.
-
While the engine is out would be a good time to clean the engine bay. Around the frame rails, cross member etc.. Also when was the last time the clutch was replaced?