


240260280
Free Member
-
Joined
-
Last visited
Everything posted by 240260280
-
 I would recommend SK Racing/ OER carbs over Weber. They have more useful advancements in the design yet they use the Weber jets and E-tubes that are available everywhere.
 -
If you use 28mm chokes in the Webers you will get huge low end torque.... very nice.
-
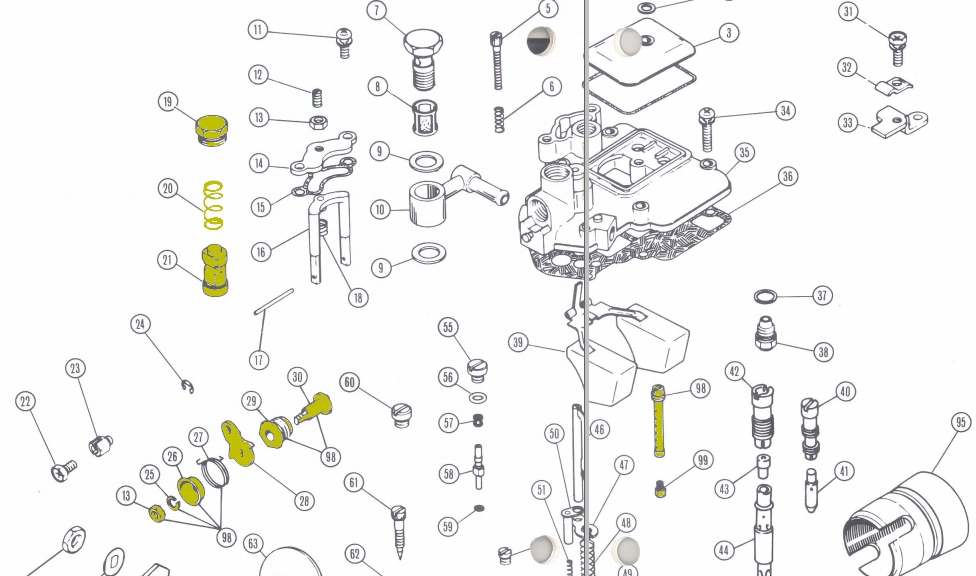
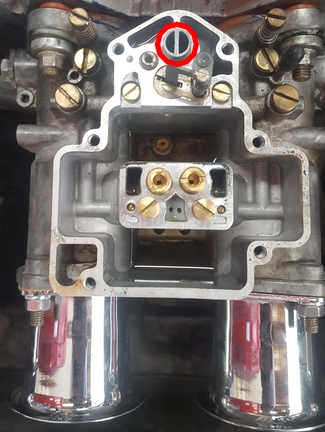
Duh.... I am dumb! The SK's have the cold start plunger up in the lid... so it is easy to take apart! Part #21 is the plunger. For quick and dirty check, you may be able to cover this port (below) with tape to block any leak to manifold at idle:
-
Process of elimination. You need to remove carb lid and disassemble choke assembly to inspect thoroughly.
-
btw the vacuum ports for tuning are not leaking or opened?
-
OK then it is probably the rare case where the cold start circuit is not sealing on carb #2. Check it out.
-
Maybe the throttle rod in carb #2 is twisted. Did you look in progression holes to see where throttle plates come to rest in the throat with the stop screws back off all the way? Compare all 6. Carb two is not closing enough.
-
fuel flow check: Just hold the lid to your face and blow air through the fuel entrance in the lid. Open and close the needle valve by moving the float and you should hear the air stop and start when the valve opens and closes. Balancing: Too much vacuum on one carb at idle means it is doing all the work and the other two are not. You need to close the throttle valve stops on all to be the same before you start balancing. Also ensure the idle enrichment screws are all backed out by the same amount at start. Do not turn any enrichment screws until the air is first balanced. Here are the steps to follow: 1. Gently turn all 6 idle enrichment screws in until they stop then back each out 1 full turn (note: some recommend anywhere between 1.5 turns to 2.5turns however the SK Carb manual recommends between 3/4 to 1 full turn so 1 full turn should do) 2. Disconnect push rods from carb arms. 3. Turn back all 3 idle stop screws until each is not touching the idle stop. Then turn each in until it just kisses the stop, then give each an additional 2 turns to open the throttles a crack. 4. Start the engine and let it warm up for 10 min until it is nice and hot. (Don't worry about rpms unless they are too low). 5. Measure the air flow into each carb and adjust the idle stop screws until you get the air balanced AND such that you have lowered the rpms to between 650 and 850rpms. Hopefully this will get you in the ball park before you have to mess with the enrichment screws and linkage.
-
How does the fuel level in carb 2 compare against the other two when you remove the lid. Also does the fuel needle valve work properly in #2? If it is not a fuel issue causing the lean cylinders then maybe it is valves.
-
Also check needle valve on carb #2 to make sure fuel delivery is not clogged or valve stuck.
-
The fuel routing is a little unorthodox. Try running a rubber line directly from the pump to carb 1 and block after carb 3.
-
Are fuel levels the same? Are any gaskets leaking? What are jet sizes in each carb?
-
You are a machine! I get tired just reading your threads!
-
You could put adhesive sound deadener on the roof (except where the patch is) to make it level then put the roof liner on it.
-
Remove the screws and fill with same adhesive then skim bondo over.
-
"Mr. Chips" of the car world!
-
Good luck. Sometimes you can feel for the blast from an exhaust leak or see a build up of soot.
-
Ditto. They must have had an apprentice do the front 3 then the expert had enough and stepped in for the back 3. I blame "the kid" Now if you went the S20 way:
-
Oops! I forgot to push to the web site. They are uploading now.
-
Here is a work in progress reference for Weber DCOE's: http://240260280.com/Tech/Carbs/Weber/DCOE Theory Operation and Tuning.html A document link at the bottom has Dellorto information.
-
Excellent work! You are brave to dive into the carbs like that!Good Stuff.
-
Convergent thinking
-
btw here is an inexpensive higher temperature duct tape available at Home Depot (212F). I think John and the gang at ZCCNE liek the name: http://www.homedepot.com/p/Nashua-Tape-1-89-in-x-30-yd-Dryer-Vent-Installation-Tape-1390801/207203955 And another from 3M (600F): https://www.walmart.com/ip/3M-High-Temperature-Flue-Tape-1-5-x-15/21176959
-
Nice routing! It triggered me to think of another alternate dead-head routing: 1. Use Evap vent line with electric pump in back 2. Tap into this line at front of transmission tunnel. 3. Run rubber to FPR on fire wall then to rear carb. 4. Some heat shield from exhaust may be needed.
-
I agree with your theory...tensioner came apart and they just ignored the spring when returning the tensioner to its home. Chain timing was off when they put the tensioner back or it skipped a link or two due to the missing spring and caused the valve/piston contact. The timing chain being off also contributed to the lower compression and the bent valves contributed to the variance in compression.

