


CDL1542
Free Member
-
Joined
-
Last visited
Everything posted by CDL1542
-
From the album: Series One Work In Progress
-
From the album: Series One Work In Progress
-
From the album: Series One Work In Progress
-
From the album: Series One Work In Progress
-
From the album: Series One Work In Progress
-
From the album: Series One Work In Progress
-
From the album: Series One Work In Progress
-
From the album: Series One Work In Progress
-
From the album: Series One Work In Progress
-

From the album: Series One Work In Progress
-
From the album: Series One Work In Progress
-
From the album: Series One Work In Progress
-
-
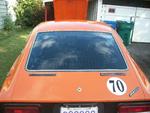
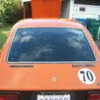
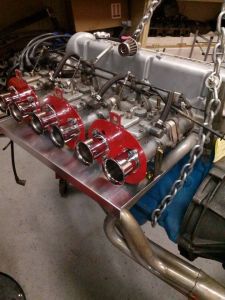
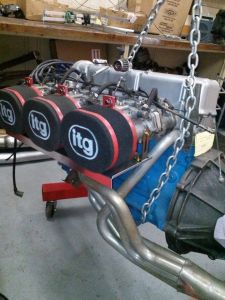
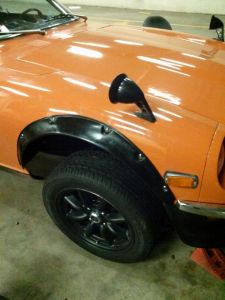
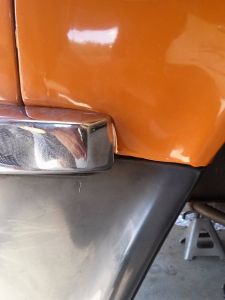
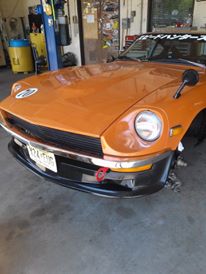
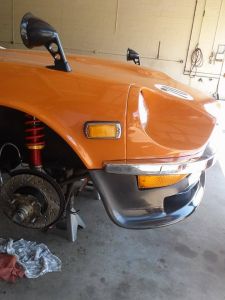
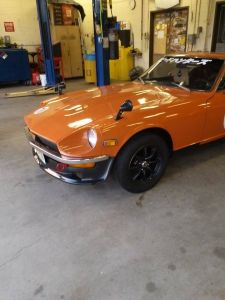
This picture just shows how flush the air dam and bumpers fit once I got them on. I was really thrilled with my craftsmanship here. The big gap between the wheel and the fender is because I had the car jacked up and just lowered it down. You really can't see it here but there are toyota 4 piston calipers in the front. I wanted the bigger brakes without them being obnoxious and ruin the aesthetic aspect of the car. I think the black calipers compliment the watanabe wheels quite well. As for the big lettering on the windshield, I'm a big speedhunters fan... Some might hate it, but then again it's just a sticker. The driver's side rear quarter window is also my designated sticker spot minus one on the back glass directly behind the driver's seat. These two spots don't block the view at all when driving either. One thing I'm personally not a huge fan of on Z's is spoilers. The rear 3/4 view and the smooth hatchback lines look better without it to me. That didn't stop me from doing a ton of research on fairladyZ emblem placement on cars without spoilers and replicating it. I'm not going to do any forward fender emblems though. Then I did the first of the front flares (and yes, this is taken while on jackstands!). I even used the allen head bolts and welting strip for the right look. Then the second one. And here's the last picture I took of the first half of the rear suspension once I pulled it all out. This was by far the hardest thing I've done on the Z to date. I had to cut the spindle pins and wrestle everything apart with more 4 letter words than I'd even like to admit. That side is at about 95% put back together right now and once I get it 100% and rebuild the rear drums I'll either start the other side or start on flares in the rear. And last but not least is the 3.1L stroker. 10:1 compression. Triple Mikuni 44's on an interpart manifold (all bored and polished to match the head). Forged pistons, diesel crank, aggressive cam, upgraded alternator, high torque starter, 5 speed tranny, dual centerforce clutch on an 8lb flywheel, and from the 6-1 manifold is going to be running a 3" exhaust all the way back. Also going to be using SS lines with AN fittings. I'm basing my fuel setup off of Z wolf's on hybrid Z here: http://forums.hybridz.org/topic/100736-1971-240z-series-1-z-wolf/
-
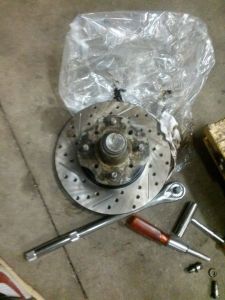
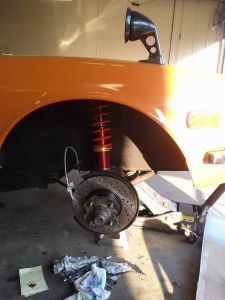
Took some vice grips to the old brake line to prevent air from getting into the system and also prevent fluid from dripping. These were dry rotted and replaced. What you can't see here is that I took the original strut insulator and modified it to fit the new coilovers. I opted for no camber adjustment plates because I didn't want to cut the strut towers. I also went for the pre-fabbed T3 components for this and am VERY happy that I did. For me it was worth the extra price. You can also see the new rotors and SS hoses here. I'm using 4 piston calipers (not shown) which I painted black. Then I did the front left side. Then I decided to take a break from the performance aspect and put the air dam on the car. Also I had to wait to get some caliper paint (there was no way I was going to paint them red!) I've read horror stories about them not lining up right and having to drill the holes yourself but this was a breeze. I drilled all the holes by hand (not with a drill) and marked, measured and remeasured everything to get it to line up right and it fit flush as could be. Very happy with this and I took quite a few pictures after I got it on too.
-
-
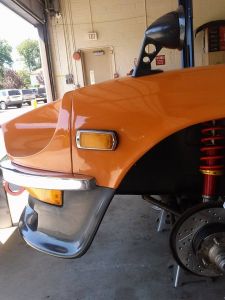
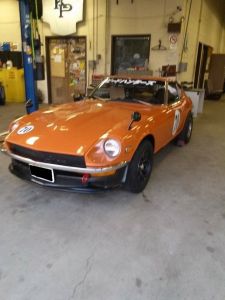
I have some lower quality cell phone pictures but it'll do for now. I'm really into the fairlady styling and Japanese classic cars and car culture, so flares and fender mirrors and the like are a part of my build. But performance is necessary so brakes, suspension, engine, transmission etc are all being redone. Posted a couple pictures of the 3.1L Stroker going in there as well. I've done too much time looking up pictures an information but I have a solid idea of what I'm going for with this. Basically a fairlady tribute with a classic race engine. This is the first day it was in the shop after a couple months of not being able to work on it. I did a ton of work prior but this is where I'll start. Fender mirrors were a must for me. I always loved the style of them. Somewhere down the line I might break the bank with some JDM ones but these will do for now. The black complements the car well in my opinion.
-
-
Just adding an update on this. I have installed front coilovers from T3 with drilled and slotted rotors and 4 piston calipers with SS lines. Also bit the bullet and cut the front fenders and installed flares (correctly too!). The Z also has forward fender mirrors and a front air dam. I'm working on the rear right now. Have one side 95% completed and going to get to work on the other side and rear flares shortly before the stroker goes in!
-
I'm doing coilovers right now. I went with the T3 ones that are pre-fabbed. It is a TON of work though so buckle down for a project if you're planning on going that route. The front ones are fairly straightforward and easy, but the rear ones are a pain. It's more of dissembling the old parts but in the end it should be worth it!
-
Zed head. When I pull the linkage and the motor out and leave it hooked up to the wiring harness, the motor operates smoothly at both high and low speeds. It does cycle back to the original (park position). When the linkage and the motor are installed, the motor will not rotate the linkage properly. I'm not sure what is causing it to seize up. The linkage additionally operates smoothly when not installed in the car as well.
-
-
-
Got the first one apart! You are definitely right about that. By far the biggest pain I've dealt with to date on this car.
-
So I've been working like a madman on my 240z and replaced the wiper motor AND linkage (which I thought was the issue). The thing is this: Before installation, the motor works great and I can even turn the linkages freely by hand without issue. Once installed, the wipers won't move. This isn't the standard "wet glass needed" situation either. Without wipers on, the pegs don't rotate. Figured I'd ask for some help. The connections are all good, wiring is solid and the battery is fully charged. Thanks for the help!! Chris
