Carl Beck
Free Member
-
Joined
-
Last visited
Everything posted by Carl Beck
-
Hi Basil: Great to hear from you. Your 260Z looks fabulous!! The picture is a little small for my old eyes - but that looks a lot like an L28 with Fuel Injection in the engine bay. {aka 280Z}. A 10 day Road Trip in a Z with Jess - - - No man should be that LUCKY!! Be sure to Post lots of pictures from your trip - - {mostly of Jess} ... Your "English" is perfectly good enough for US. You said you are "living in Switzerland".... Where are you originally from? Enjoy The Drive.. Carl B.
-
Hi Dave: All the 12xxx VIN cars I have collected info on - have build dates of 10/70. The Series I cars ended production in 01/70 with VIN's in the 20xxx range. Then the Series II cars started production in 01/70 with VIN's in the 21xxx range. The last car sold and registered/titled as a 1970 240Z here in North America - that has been reported so far - is a 13,xxx car with a build date of 11/70. FWIW, Carl B.
-
Hi John: If you plan to drive the car in the winter, or in the mountains - I'd say that not having hot water going through the carb.'s could cause a problem. With the right temp. / humidity mix, you can wind up with carb.'s icing up, and/or very poor air/fuel mixtures. Not to mention prolonged warm-up times before the engine starts to run properly. In Idaho I would not recommend elimination of the water flow through the manifold. FWIW, Carl B.
-
I'd put the engine in - after the car is painted if at all possible. Otherwise, you'll end up with overspary all over the engine and engine compartment, which will just cause a lot of un-necessary work later. There is LOTS of room in the engine bay - and it is very easy to drop an L24 in there without hitting anything as long as you have a couple of people doing the install. I also agree with Adam - plate or paint all the bolts/nuts - as they will develop surface rust quickly. I take it that you do not plan on running a heater/defroster? Or do you plan to make some other sort of "T" for the heater/defroster take off? Overall it looks like you've done a pretty good job.. now just take your time as you go forward with the project. FWIW, Carl B.
-
I had the BRE Z glass bead blasted. The car's sheetmetal was in amazing rust free condition, and it only had a couple small door dings that had been skim coated before. I would have had the body shop strip it by hand - and that is really what they wanted to do. The probem was that the PO had reinstalled a complete stock interior.. and in so doing he had glued the jute pads to the metal, then glued the new carpet to the jute pads. What a mess... I tried stripping the glue off by hand with a very strong glue remover - but after doing a small area I decided it just wasn't going to happen. So I really sent the car to be bead blasted - to remove all the glue on the interior! I believe the shop said that they had to use walunt shells to get the glue off - as the glass beads were not good at all for removing soft, sticky materials... like the glue or body sealers etc... Whatever they used - it came back clean as new metal... After doing the interior, there wasn't much more to do on the exterior, and what the heck might as well do the engine compartment while it's there... The main problem is - when the body shop got ready to shoot the epoxy primer... we had media blowing out of every crack and crevasse... STOP.... take the day and blow or vacuum the hell out of the body.. blow and vacuum some more. The next day it was again ready for primer. After the paint job was done - and after I got the car back together - The first trip down the road resulted in medial blowing all over the inside of the car - don't ask me where it came from - it seemed to come from everywhere.. Got home vacuumed and cleaned again. For the next five to seven road trips as I was trying to break in the engine and brakes.. same thing... media blowing out of everywhere... If I had it to do again - I wouldn't. I would just pay someone else to strip the interior of glue... You might have an easier time - washing the soda off - and out of the hiding places... FWIW, Carl B.
-
This might help some in the future: http://Zhome.com/ZCMnL/tech/69-83TrannyShifterDrawing.jpg The one on the Left is not out of a roadster, as they used the Type A transmissions in both 4 and 5 spd. versions. As I recall most truck transmissions were shorter.. ie had shorter tail shafts... FWIW Carl B.
-
If I had to guess - I'd say it was for an early 78 280Z most likely produced at or near the end of 1977... FWIW, Carl B.
-
Hi Rich: That is even more amazing!! It looked like it had less than 30K miles on it before you started detailing it. Your Father must have taken exceptional care of that car.. way beyond exceptional.. FWIW, Carl B.
-
Looking GREAT - don't forget that you'll have to take the intake manifolds back off - to get the Air Injection Tube's back in... Keep the pictures comming - BTW - did you ever say how many miles your Z has on it at this point? FWIW, Carl B.
-
Hi Bo: I should have said "the largest set of wheels/tires that would fit on the 240Z without modification - was a 215R50x16". Nonetheless it's good to see/hear what can be done with minor modifications and the right size/offset wheels. Many people don't want to cut the body up and add flairs...
-
Hi Jerry: If it is "ready to install" - why are you - or why do you have to modify it with connectors from VintageConnectors.com? Post some pictures if you can - I'd like to see it... BTW - did you really mean Vintage Connections - www.vintageconnections.com/ FWIW, Carl B.
-
Hi Guys: For decades it was "common knowledge".. that the largest wheel/tire that would fit on the 240Z was a 215R50x16... usual wheel was 15mm offset. Are there no 215R50's available? Just curious...
-
Hi Guy: Copied below - simply for information purposes, is the note I sent and the reply I received from WeldCraftWheels.com . If anyone has any interest feel free to contact James directly. = = = = = = = = = == = = From: "James" <james@weldcraftwheels.com> To: "Carl Beck" <beck@becksystems.com> Subject: Re: Wheels - Panasport Aluminum Date: Mon, 6 Jul 2009 07:56:14 -0400 Hello, I have welded forged and cast aluminum wheels as well as spun aluminum wheels .... no problems. What size are your wheels and how much do you want to add? James ----- Original Message ----- From: "Carl Beck" <beck@becksystems.com> To: <James@Weldcraftwheels.com> Sent: Friday, July 03, 2009 2:46 PM Subject: Wheels - Panasport Aluminum Hello James: I was looking at your Web Site - because a friend of mine ask about widening his Panasport Aluminum wheels. Another friend tells us that the Panasports can not be widened/repaired because they are Forged Aluminum Wheels. I don't believe that is the case, as everything I can find indicates that they are cast aluminum alloy. Nonetheless - I don't see any exception noted on your Web Site related to "Forged Aluminum" wheels. So I thought I'd contact you to see what you say? If one had a set of Forged Aluminum wheels, is there any reason they couldn't be modified? thanks, Carl Carl Beck, President Internet Z Car Club Clearwater, FL USA http://ZHome.com
-
Hi John: Welcome to the group. I bought my first 240-Z from Paul Jaremko at Valley Datsun in March of 1970 {now Jaremko Nissan/SAAB} and I've been driving them ever since. Paul and I are friends to this day as well. I still have the Metallic Blue 72 240-Z that I bought at the end of 71, it's the only car I never wanted to get rid of. If you have metal fabricating and welding skills - you are in better shape than most of us. The mechanical aspects of the 240-Z are very easy to master. As mentioned, Post some Pictures A little rust in the rear threshold plate {below the deck lid} and the doglegs are pretty common on the 72's. But in general they didn't rust nearly as quickly nor as extensively as the Series I cars did. Pre-fabricated patch panels are available for the dog legs {area at the front lower part of the rear quarter panels}. Remember - this is supposed to be fun. Enjoy the process and the end result will take care of itself. good luck, Carl B.
-
He needs to come up with something far more "original"...
-
Hi Les: Everything I can find says that the Panasports are cast aluminum alloy - not forged wheels. Earlier discussion here: http://www.classiczcars.com/forums/showthread.php?t=29585 It seems that everyone was saying that a forged wheel would be far lighter and stronger than either the Street or Racing Panasports. Panasports Web site mentions only casting.. Am I missing something some where? FWIW, Carl B.
-
A 7" wide wheel with a "0" offset will have 3.5" to each side of the centerline that runs across the mounting surface of the wheel/hub interface. Because a 7" wide wheel measures 7" inside the rim lips, it is usually 8" wide measured to the outside of the rim lips. Backspace - is measurement taken from the mounting surface of the wheel to the outside of the rim lip on the back side of the wheel. It is always better to actually measure the wheel for "Backspace" - but you can usually get close by calculating it. On the wheel above with "0" offset, you would add the 3.5" width inside the rim lip determined by the offset being "0" - and the additional 0.5" thickness of the rim lip itself - to get a 4" backspace. Jon said you can use a 5.25" Backspace. So if you wanted to stay with the 7" wide rims which should be about 8" wide measured outside the rim lips - your new wheel would have 5.25" of the 8" width to the inside of the car and 2.75" to the outside. Converting "Backspace" to "offset" then, you would subtract 0.5" from the 5.25" and get 4.75". That would then be 1.25" {31.75mm} offset. {3.5" of the "0" offset wheels from 4.75" = 1.25"} That however might leave your wheels looking like they are set too far to the inside.... Do you need an additional 1.25" of clearance on the outside to get the tires past the fender lips? Maybe go to a 7.5" width with a 5.25" Backspace and/or a 32mm off-set. Or don't use the full 5.25" Backspace and go with a 7" wheel with 15mm offset. Just keep in mind that "offset" deals with the width of the wheel measured inside the mounting lips. "Backspace" deals with the the distance from the wheels mounting surface to the outside of the rim lip on the back side of the wheel. Most aluminum rims have at least 0.5" thick lips. Another option for tire clearance is to simply have your body man roll the fender lips under. In the old days, we simply cut slots about 12" apart around the fender lips, so they could be bent up inside the fenders. Then we put a baseball bat between the tires and the fender lips and rolled the car forward/backward... adjusting the bat to use an ever thicker part to roll the fender lips up... hope that helps... FWIW, Carl B.
-
Hi Tristan: Thanks for the update. The split image pictures are a GREAT way of showing the improvements. FWIW, Carl B.
-
Hi Chris: On my listings I have L24-2476 as the lowest engine number used in March 70, and L24-005562 as the highest reported. So that I could sort numbers - my list eliminates Zero's to the left of the first significant whole number. Nonetheless - as reported by the owners - several report L24 0055xx, several others report L24 055xx... So it would at least seem that for some reason, some engines got four digit numbers, some got five digit numbers and some got six digit numbers - if the owners reported them correctly. With the exception of #2476 & #2497 which were reported as being in cars produced in March 70 - - all engine numbers below #3606 were installed in 69 Production units and 01/70 units. So by Feb 70 all the engines had eight counterweighted cranks. You may have got "August" as the date that the TSO was published. I don't recall Rich saying that - but I do recall someone else mentioning that it might be possible his engine had the three different lengths. As mentioned above - owners report numbers with four, five and six digits... but all have only four siginificant digits. Could have been a way for the foundry to keep track of different lots produced... Who knows? FWIW, Carl B.
-
Hi Guy: That's easy. As Arne mentioned you want a 10mm off-set, not a -10mm off-set. You take the wheel to a wheel widening speciality shop and have them add 10mm to the width on the back side of the wheel. Street rod'ers have wheels made wider all the time. Just google "widen aluminum wheels" and most likely find someone in your area. If not, try the Yellow Pages.. BTW the stock steel wheels on the 240-Z's had a 15mm off-set {.59"}. FWIW, Carl B.
-
Hi Rich: When you drop the steering rack to replace the bushings I'd suggest that you add a strip of lead stick-on wheel weights - across the top rubber bushing. This will tighten up grip that the clamps have on the steering rack. This really should not be considered an "up-grade" so much as a bit of reinforcement to the OEM bushings - they were too soft and too weak right from the beginning. Either do that, or use steering rack bushings made from more modern materials. You will also notice what looks like a muffler clamp - around your steering rack. That clamp has a rubber nose on it that presses against the front cross member. Normal by now the glue that held the rubber nose on the clamp drys out and the rubber nose falls of. Make sure you glue it back on if that is the case and reinstall it. Nissan added these clamps to help keep the steering racks from walking around in the soft rubber rack bushings - which puts unnecessary stress on the tie-rod ball joints. FWIW, Carl B.
-
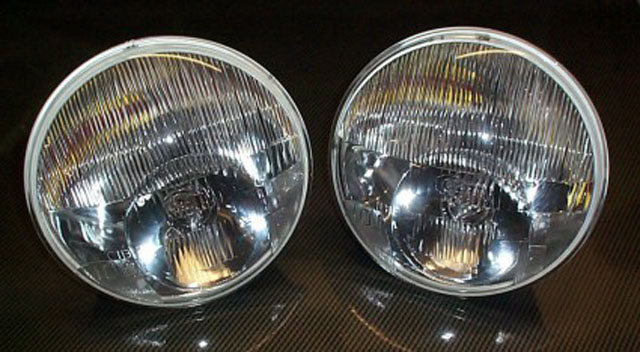
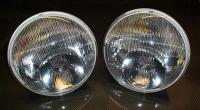
In 1970 I installed a set of CIBIE Biodes in my 70 Z. Wish I could buy a new set today... They were among the first 7" round halogen replacements for the OEM headlights. They had two halogen H1 bulbs - one for the low beam that utilized the standard large reflector.. and one for the high beam that was inside it's own smaller reflector.. a projector beam more or less. When the high beams were on, both H1's were on. Very directional lens and the high beams were amazing! You could see highway signs light up as the light from the projector beams hit them more than a half mile away at night. When installed in the Z - you had to insulate the metal mounting taps on the back of the lights - otherwise they would short out to the body - and that would burn your engine wiring harness out!! The sealed beams that are OEM have glass mounting tab's on the back of the glass lens.... and as we know the ground for the headlighs runs through the wiring harness. Picture courtesy of TRE Motorsports FWIW, Carl B.
-
Hi Mike: Sorry to hear that - but you are not the only person that has happened to. One guy found a "body man" that took his car apart - collected the money for replacement parts and body shop supplies.. then left town. The "body man" was working on the car out of a rental garage, on which the rent hadn't been paid for several months. The owner of the car wound up paying several months back rent - just so he could get in the garage and get his car out - in boxes. After that he found that not only were there no new parts, but many of his parts were missing. It could be a 76 L28E with an aftermarket turbo set up. Or it could be an 81-83 L28ET factory turbo engine. Most likely quite a difference between the two possibilities. Get the engine serial number off the block and Post it - then we'd have a better idea of what your dealing with. The engine serial number should be stamped into the block, just below the #6 spark plug. There are several options, among them are: 1. fuel tank from a 75/76 280Z {edited per sblake01 below -thanks Stephen} 2. modify the fuel tank from the 240Z (hard to do) 3. install a serge tank You can't use a stock 240Z fuel tank as it isn't baffled properly to supply constant fuel to the pickup - a lean condition on a turbo engine can melt pistons in a heart beat. By all means post some pictures ... FWIW, Carl B.
-
Timing Is Everything... but he should have removed the reserve by now... and grab the $15K...That's a strong bid in todays market... FWIW Carl B.
-
The first thing you want to do is compare the original engine serial number on the Data Tag - to the engine serial number on the block. Ask for clear pictures of both.. With a VIN of HLS30 06513 that car would have had a build date of 07/70. Not really what most of us think of as an "Early 70" - - more a mid-year 70. If it was built in July of 70 - it most likely arrived in North America around Aug or Sept. Most likely sold as a 1971 Model Year - although it could have been sold as a 1970 Model Year... True that the very early Z's into Canada were not equipped with the Air Pump, nor gasoline vapor recovery systems... but for the most part they were built in 69 or the first three months of 1970. The original engine serial numbers for July of 1970 build dates seem to run mostly in the L24-94xx to L24-97xxx range. Although that is not absolute.. To tell you the truth - I personally can't see enough clear details related to the SU's to tell much about them.. Could be an earlier engine swapped into a later car.. ie a non-matching number car... Still worth the price if there is indeed very little rust. FWIW, Carl B.