


Hardway
Free Member
-
Joined
-
Last visited
Everything posted by Hardway
-
 Thank you for the compliments Torby. The large washers came with the new AC Delco tension rod bushings. It's a complete kit and a very good deal in my opinion. I see you are in Norway so finding them local may be a challenge but I had to buy mine off EBay as no one local could get them.
 -
I feel ya Kselcher and I was in the same boat with my Z, thank for the kudos by the way. You definitely have some work ahead of you regarding the rust but its not impossible by any stretch. Your desire to document and share is the same that drives me, hoping my efforts might help someone in the future and I just like doing it. I look forward to your updates and know the rest of the Z community will pitch in whenever you need us.
-
Glad to hear you are making some great progress Kelly. Getting it back on the road is always a great feeling and will provide more motivation to move forward. The coolant leak you have combined with the noise and wobbly fan makes it sound like you water pump is shot. Replacing it should kill 2 birds off the bat. Your carbs sound like they need some attention but its possible you make have an issue with your fuel delivery system. Your brakes sound like they may need to bled or at the very least adjusted some more. If your special someone will lend you a foot bleeding them should not be hard. Keep up the great work as we look forward to more updates.
-
As the article points out, finding a 280zx in really good shape is hard and people are starting to notice. I have seen a few really clean ones up close and I think they are nice cars. Would I ever own one? Probably not but I still like and respect them.
-
Now that's a story Stanley. We look forward to seeing some pics of your Z as well as some more updates. Good luck with it!
-
Just have to say, great story and thank you for sharing! It has truly made my day. I have had the pleasure of talking to long time previous owners of cars I bought, one being a 1989 Turbo Trans Am Pace Car with 189K miles on it, all put on by the second owner as he bought it with only like 10K miles. Despite the miles it was in really good shape when I bought and regret going down the road I did with it and selling it. Oh well, I have 2 Z's now and I am happy.
-
Its his first post too so got to give them some credit for going big. As stated above, if he or she is dead set on using them they are looking at some real fabrication along with larger wheels to accommodate them. Of course given enough time and money anything is possible. Who knows, maybe he is a tech keeping stealth bombers in the air, then getting corvette brakes on an old Japanese sports car is not outside the realm of possibilities for them. However, back to ground level. It is very ambitious and going with a setup that is tried true is a better route. I look forward to their updates.
-
Go on to Uship.com and post up an auction. I just used them to ship a 300zx I bought from Louisiana to Austin TX and had another great experience with them. Ran me $450 through a small transporter so I think $800 - $1000 is what it would cost to go from West TX to LA.
-
I think everyone has made some good points above but I will add a few of my own. I can certainly understand and appreciate the situation you are in. Starting with something small like the fuseable links is probably the best thing to do. No need to rush to sell it unless you need the space in the garage. You won't get much money for it in a non-running state so getting a decent amount of money in your pocket is a moot point. If you find that you do not enjoy working on it anymore and do not want to pay to have it fixed then I agree it is time to sell. It will continue to age and deteriorate and so it would be time to let someone else take it on as a project and get it running again. I will second Siteunseen's point and carry it a bit further. In the end, it is just a car. Having people in your life that make you happy is much more important and harder to find. Sounds like you have a good person now and in reality your time is probably better spent with them doing stuff you both enjoy. If she likes the Z cars maybe it is best to sell your current car, save some money, and buy one that does not need anything so you can enjoy it together. If she is not a fan of the Z but likes other classic cars then maybe that is a direction to consider. But like I said earlier, its just a car. Once it stops making you happy its time to let it go. Best of luck with whatever you decide to do and keep us posted.
-
Thanks for the compliments guys. Even though I was hoping to find a Shiro, this is not one. All Shiros were pearl white, had factory Recaro's, a euro chin spoiler, matching white wheels, stiffer springs, and non-electric control shocks & struts. This is as close as I could get to one. For the mileage and the money I think I did okay.
-
-
Not a classic Z but one that I feel was the last Z car that shared truly shared a lineage with the original, a 1988 300zx Turbo 5-speed GS. A fellow Z31 owner sent this one my way as it was located in Baton Rouge LA and I had it shipped to Austin TX. I had been looking for a Shiro edition 300zx for awhile but every one I came across was either too expensive, too many miles, or modified beyond my taste so this is the next best thing. Like any car you buy site unseen there are a few disappointments but for the most part the car is very solid. It is all stock except for the Ronal wheels which I have no plans to change. It spent most of its life in California and is truly rust free. Except for the scratches on the front fenders and faded front bumper cover the body is in really good shape. I plan to have the front clip and hood sprayed in the near future and then she will pretty much be perfect on the outside. The inside is in great shape with the seats seeing very minimal fading, all gauges and lighting in proper working order, cold AC, and only the headliner and rear carpet needing some attention later down the road. The drivetrain is solid and very clean, turbo spools up nice and smooth, and the transmission shifts with ease. The short list of items it will recieve in the near future include one rear tire, a new muffler, and passgener side headlight bucket as the original is rusting on the inside from moisture. Below is a link to some more pics of it. Be warned I have not cleaned or detailed it, just did a quick vacuum and cleaned the glass off. For anyone that is wondering about my 240z, it definitely will not be put on the back burner. In fact I made some more progress on it this morning and took some spirited laps around my neighborhood in it. 1988 300zx Turbo Photos by camaroguy1969 | Photobucket
-
No pics this time but an update none the less. I got the clutch and brakes adjusted almost spot on this morning. I put 5 gallons of fresh gas in it and took some spirited laps around the block. It runs really good but the carbs need a rebuild and I still need to cut the front springs half a coil, get it aligned, get the exhaust collar welded on, and inspected. Once I reach that point, phase 1 will be complete. It felt good to get behind the wheel again. I had forgotten how quick it was and look forward to getting the final items wrapped up so I can drive it some more.
-
Just want to say thank you and let everyone know they were correct. I adjusted it up a little more and now it shifts perfect with plenty of clutch pedal pressure and feedback.
-
Hey Craig. I ran in to this when I was installing my Brute Force solid u-joints in to my half shafts. You have to make sure the u-joint is exactly in the middle and that your yoke is not slightly crushed on the sides. If it is slightly crushed you can you a bench vise to help spread it apart.
-
Good work there Comhosa! Looks like you are making great progress. I also see a white Z car in the background. Are you a painter by trade or a skilled enthusiast? We look forward to more updates.
-
The clutch slave that was on was a Nabco unit and leaking very bad. I have only driven the car a mile so I cannot give a lot of feedback on how it performed before I installed the new master and slave cylinders. The reason I changed the master was because everyone says if you change one you need to change the other. I could dig the old Nabco unit out of the trash but from what I have read they do not rebuild well unless they are re-sleeved.
-
Thank you for the compliments Diseazd and the suggestions. I too have been eye'ing the wheel wells and more than likely I will paint them black versus the lime green as I am not 100% sure I will stick with the lime green later down the road. A member on here had a restored orange 240z and with the wheel wells painted orange it was just too much. Plus black is easier to keep clean. As of right now it is a low priority since its not hard to wrap up everything to mask it and then paint it. In regards to the Eibach springs, I had seen others post up shots of how much travel their struts had with the bump stop and it did not offer enough travel. If I cannot get the Chevette springs to work the way I want then I will consider a set as I have used their springs in the past on other non-Z cars with much success.
-
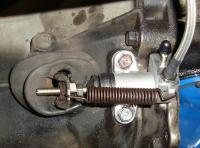
No responses yet? I have added a picture to show what it currently looks like.
-
Right on E-Tek! +1 for Christmas in April. That is a ton of stuff you got there, looks like a lot of smalls too which as we all know, the devil is in the details.
-
I believe EuroDat is correct. The front control arms will move with only moderate effort even with everything torqued. When I had the front together the first time it say too low due to the lower springs that were on it, now it sits too high. I may let it settle this week before messing with it. First and foremost I need to get the brakes and clutch sorted out as it would be nice to drive it a little and give it a chance to absorb some bumps before cutting the springs.
-
My '72 240z has a 5spd from a '81 280zx. I just recently replaced the clutch master with one for a 240z as well as a clutch slave for a 240z since the one on the car had the threaded adjustable push rod like one for a 240z. I also swapped the longer push rod from the old master cylinder to the new one. After several bleed and adjustments I am at a point that it goes in to gear fine except for reverse. The threaded rod on the master cylinder is maxed out. My question is, should I get a clutch slave for a '81 280zx? Since my fork has a hole in it for the threaded rod to go through I suspect the answer is no but wanted to post the question here. Another issue which I discovered on both the clutch and brake pedal is that the holes have been elongated thus building in 3-5mm of movement which needs to be corrected.
-
Thanks for the info Chase. I am going to bleed the clutch and brakes again before messing with it. In order to pull the springs off to cut them I would have to disconnect the brake line so I have no problem giving it some time to settle. The Chevette springs I put on it are around 100lbs stronger than the stock 240z springs so I am not surprised they are sitting a little high.
-
With another weekend ahead of me and making progress during the week with the final strut tube I was bound and determined to get the car back on the ground and moving under its own power. For starters I got the passenger side strut assembly wrapped up and on the car along with all the brake components on Saturday. Since I had the car in the air I wanted to replace the clutch slave since it was leaking so I attacked that on Sunday. I also picked up a new clutch master cylinder and braided SS hose. Once I had everything off the car I noticed the difference in push rod lengths on the master cylinders. After some quick checking here on the forums it was confirmed I needed to switch these. All in all it is an easy task, the spring clip in the original can be a little difficult but its nothing some coordinated work with two picks could not solve. The new one bolted up just fine along with the new clutch slave. My wife was a big help today as she helped me bleed the clutch and brake system. Once I was satisfied with how everything looked and felt I put the car on the ground and quickly noticed it was sitting a bit nose high. No biggie, I will cut off half a coil on each spring next weekend as I am happy with how the rear looks. That should bring it down and help it sit level. So I reconnected the battery, hopped in, and turned the key… it fired it up for the first time in over six months and with little hesitation. As I eased it out of the garage several things became apparent. One, I need to adjust and possibly bleed the clutch some more as it was barely disengaging. Two, the brakes need to be bled again since as soon as the booster got vacuum the pedal was pretty soft. Three, I need to take up the rear brakes a little more. And four, the driver side backing plate is rubbing against the drum so that needs to be addressed. All in all I accomplished what I wanted to and my wife brought home a Dairy Queen Blizzard to celebrate the occasion. I was really happy to get it to this point and even happier to get it out of the garage so I could sweep and clean everything up. I did take the Z to the end of my cult-a-sac and back so I could turn it around. It’s great to have it running again!
-
Good news! I dropped 2 washers in the bottom, put the strut in, screwed the gland nut on and it is done. It is showing about a half of a thread and snug. I could have probably gotten away with just one washer but I would have hated to use just one and then find that it was not enough once I put it back together. I cleaned up the tube and sanded down the jaw marks from the vise at the shop I took it to and now letting it dry with some fresh paint on it. Thank you everyone for all your replies and advice in helping me get through this!
