


Captain Obvious
Free Member
-
Joined
-
Last visited
Everything posted by Captain Obvious
-
 Another simpler option would be to simply disconnect the oil pressure sender connector and let it hang. The fuel pump will run any time the key is ON.. Of course, the oil pressure gauge won't work with that connector off, but for the trip to AZ, it would be OK.
 -
Oh, and I took a quick look at the wiring diagram for the 78. There are two relays up in the engine compartment that deal with the fuel pump. The "fuel pump control relay" (which has five wires) and the "fuel pump relay" which has four. If you pull the connector completely off the relay with five wires, there should be two W/B wires leading into the connector. Short those two W/B wires together and it disables the interlocking. The fuel pump should run any time the key is in the ON position. Let it hanging off the relay with just those two wires shorted together and put some tape on it? As a quick alternative, that might get you through the time crunch? However, I just took a quick look... If you're going to do this mod, let me know beforehand and I'll look into it a little more thoroughly.
-
Yes, when the check valve is working, then everything after the pump stays full of fuel and pressurized. Supply line from pump the engine bay, filter, rail, injectors... Everything between the pump and the pressure regulator. And yes, if you put the check valve up in the engine compartment, then you will not have pressure in the line between the pump and the engine bay, but everything else should be pressurized. I'm not sure the problem is the pump losing prime. I've found that if you disconnect the supply line to the pump, fuel comes out. Implication being that the pump is gravity primed. I'm thinking that maybe the fuel is "siphoning" out of the rail somehow to achieve an equilibrium point where everything is even. That point may not be as low as the pump, but it might be lower than the rail. If that's the case, you would have to run the pump to refill the rail, but the pump itself has not lost prime. In other words, I'm thinking that the check valve does two things: 1) It keeps everything pressurized 2) It prevents "backflow" through the system that would allow the rail to drain from gravity? Just a theory.
-
The original check valve is screwed into the outlet side of the pump. So in "circuit" it's installed between the pump and the rail, not between the tank and the pump. That said, for a quick fix, I think you could put something right before or after the filter. Putting something up in the engine compartment would certainly be faster and easier than dealing with anything underneath the car back by the tank. Another option might be to do a (simple?) wiring modification so that the fuel pump is always running with the key in the ON position? Wouldn't have the safety feature of shutting off the pump in the event of a collision, but you would just hope the movers don't get involved in a big pileup with the car loading it onto the trailer. I'm thinking that would allow the fuel pump to prime like the newer cars do. Just tell the movers to turn the key to ON and count to five before trying to start the engine?
-
IMHO, there's no need for the switch to be a waterproof type. If you're limiting your search to switches that are sealed, you might get more results if you are willing to accept something that is not weathertight.
-
I put O-rings on the shafts. I'm sure it's not as good as installing completely new unworn shafts, but it's something I can do here with the machines I have.
-
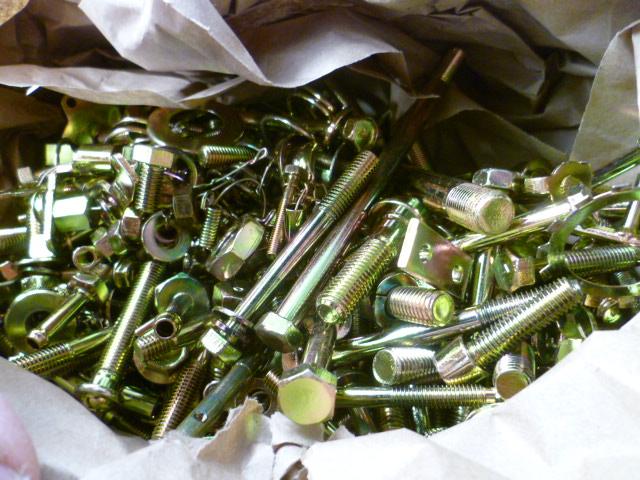
Couple of questions/comments... In your box of things to be plated I see a piece of throttle linkage with the plastic ends. Some people send those out for plating and they turn out fine. My experience was not so great. Not sure if my guy used stronger acid or a longer soak time, but the plastic shows some damage from the process. Still usable, but damaged. Also if you are going to send the linkage bits, I would take the adjustable end and lock nut off first. My thought is that you don't want to end up in a situation where future adjustment exposes a part of the linkage that did not get fresh plating. Lastly, I see the outer ring from the master cylinder cap. Are you planning to send the other portion with the rubber seal on it? Is that in there somewhere?
-
I've been wondering about the changes made to the round tops through the years as well. I mean, I know that the four screws were used from the start through the 71 model year, and then they switched to the 3-screw version for 72, but that's about all I know. There seems to be differences in the 4-screw versions used over the years (as described on the Z-therapy spotter's guide), but the pics are so small and the details so vague that I'm looking for something clearer. Do we have any experts on the finer points of the different versions used over the years? There was some stuff mentioned in that thread about the supposedly 31K mile car on BAT (the one that had the 3-screw carbs on it when it should have had 4-scew). They talked about tabs on the linkage ears and rear pointing vacuum ports... Anyone know the details? Tab width (seems all the 4-screws are narrow) Float chamber lid shape and mounting screw tabs Steel or plastic dashpot knobs Vacuum tab location on balance tube Hook or no hook on the linkage between the two carbs Linkage ears (is this the same as the hook?) Here's the post from the 31K BAT car: https://www.classiczcars.com/forums/topic/64539-31k-miles-series-i-240z-up-for-auction-on-bat-over-100k-on-first-day/?page=3&tab=comments#comment-608149
-
I don't really need the spring back. Keep your distributor together in the event that you need to put it back in for some reason. As for the problem you're having with your tach, there are a couple people here on the forum who have done the 123 ignition thing... Hopefully some of them will chime in with some help? I've not messed with that unit myself, but if you can't seem to generate any help elsewhere, I'll do what I can.
-
Hahaha!!! Someone had to do it!
-
This is awesome... I don't have to even get involved!!
-
I might have a pair of white armrests. SEM sprayed black. Seriously. I'll check. As I remember, it comes off pretty easily. Haha!
-
I'm all kinds of confused... Either I don't know what you're looking for, or you don't know what you're looking for. Or maybe both. You say you want a digital temp signal to your ECU, but then you say you're running carbs. What is this ECU doing if it's not controlling the engine? Is it some aftermarket ECU who's name we might recognize? Controlling ignition timing only or something? And I don't think there's any sensor that is going to send a DIGITAL signal to any ECU. I think they're all analog sensors and converted to digital by the ECU. Are they actually using DIGITAL sensors on the new cars?
-
Thanks for filling in the details. I took a look through my pics and now that I look through them, I'm not sure my bracket has been shortened at all. I've got a pic of an alternator with file marks on the inside of one of the mounting ears. I took the pics, and it was important to me at the time to concentrate on the mounting ears. The implication being two things: 1) It may have been my alternator which was modified, not the bracket, and 2) My memory has reached the point where the details are falling out the bottom. My brain is full.
-
Haha! Now that's a possibility I had not considered! Quite possible! I think I've distracted this thread enough...
-
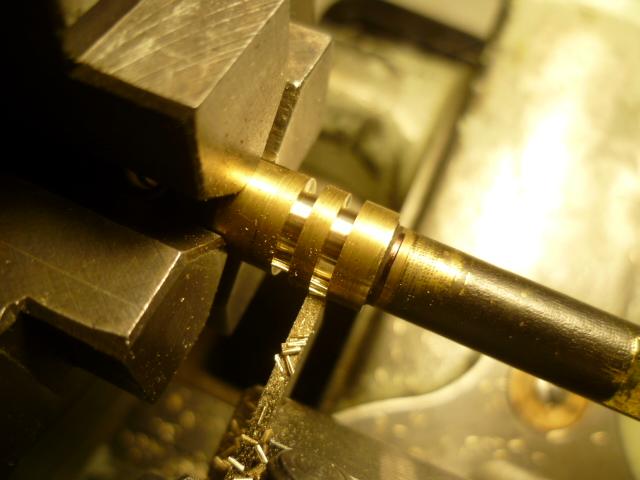
Yes, the O-rings are carefully placed so they run inside the bushings, thereby providing a seal (in theory). As for what the shaft is contacting while rotating... I haven't done any high level study to actually scientifically determine the contact locations, but my expectation is that there will be still be contact between the shaft and the bushings, but the O-rings will act as sort of a "spring" to center the shaft in the bushing. My belief is that centering spring will do two things: First, it will reduce the contact pressure (and hence future wear) between the shaft and the bushing, and... Second, the compliance of the O-ring will provide a seal against vacuum leaks "on the big gap side" even when the shaft is pressed fully to one side inside the bushing. I lube them when I put them in and haven't had any problems, and while my sample size is small, I haven't had any problems so far. One set has been running trouble free for a couple years now. Just another technique I sometimes employ in my carb servicing "business".
-
Haha! I'm a former Alfa owner, and while not currently part of that community, I can tell you that there are two things that really get under the craw of Alfa owners... "Alpha", and "Romero". Just poking a little fun at Bill's typo. Hopefully good natured.....
-
Building back up with new chrome is a technique used often to repair shafts. But they're expensive shafts that make a $450 replacement seem like a bargain. Big hydraulic cylinders, etc. So yes, that's absolutely a viable technique to fix the wear, but might not be cost effective. I don't think you want to entertain turning down the shaft ends just for sleeves. Alignment would be very difficult. Would probably be easier to just make a whole new shaft. As for sealing the vacuum leaks, you're right... Plugging the short end is easy. It's the inboard ends that are more difficult because of the linkage stuff. My solution is O-rings on the shafts. This pic is for a flat-top I'm working on, but the concept is the same:
-
-
I'm confused... A real Alfa owner would never, ever, never, ever, ever call their car an Alfa "Romero". Ever.
-
What modification(s) do you have to make in order to run the GM alternator? The reason I ask is that I have a lower mount here that has been modified (slightly shortened by my PO), and I'm not going to use it. So if it works for you, it's yours for the cost of shipping? I ran it for a while with a washer or two to take up the resultant gap, but have since switched back to an OEM mount that has not been modified.
-
All of the bushings I've seen in the Hitachi carbs are steel. I've never seen one made from brass or bronze. For you guys saying the bushings are brass or bronze (@RIP260Z and @Namerow), Have you seen brass or bronze bushings with your own two eyes? Have you used a magnet to verify? Also, I've never seen a steel throttle shaft. Everything I've seen are coated brass. Early ones are chrome plated and later ones are low friction greenish coating, but they're all made from brass underneath. Again, can anyone confirm that they have really really seen steel shafts? Got any pics?
-
Out of curiosity... If someone buys this car for $5K, can it be used as a Lemons car again? Haha!!
-
Oh. Well nevermind then. All the timing covers are the same. I've got all the hardware for the ZX timing plates, so we're all set. It's all in the box:
-
Makes you wonder if they did it on purpose as a gimmick. Haha!!

