


Captain Obvious
Free Member
-
Joined
-
Last visited
Everything posted by Captain Obvious
-
 Well that's certainly not the smoking gun we were looking for. Wish I could provide more help on figuring out exactly what's going on.
 -
Woot!! Those multiple failure point situations can get really tough! Glad you finally got it!!
-
-
Man, I hate unexplained things... I sure hope you figure out what's going on with those readings. Do you know what it is that the Swedish enlarger pump is looking for? What chemical(s) is it supposed to detect?
-
Glad to help. Hope it's as simple as a bad flasher. That would be easy!
-
This sounds like another fantastic opportunity for you to film yourself doing something entertaining. Pics or it didn't happen!!
-
Haha!! I'm thinking maybe you should be the one that's worried!!
-
Wait... Are you saying the noise went away and it's all good now?
-
I wouldn't worry about the grease holes. They'll be sealed up by the gasket on the mounting face. And if you don't tell anyone about them, nobody will ever know. And about that hole for the ported vacuum... If one were to assume that the previous owner drilled the original vacuum nipple out of the carb body, and did it "concentric to the original center of the hole", then one could make an insert with the appropriate diameter small hole through it*. Press or loctite it in place and very carefully file the inside flush with the curved surface of the carb throat. I could do it. At least if the center line of the enlarged hole is in the same location as the center line of the original port hole. If they ham handed the removal of the original tube and drilled off center or something, then the location of the new port will be mis-located accordingly. * Or get extremely lucky and find some piece of tubing off the shelf that already has the correct ID and OD. Extremely lucky....
-
To provide additional detail to the above... It sounds like your flasher unit is not making a good solid connection across it. It's a low enough resistance to provide 12V at the turn signal switch when the switch is in the center position (driving nothing). But as soon as you move the turn signal lever up or down, the low resistance of the signal bulbs drags the voltage on the white wire out of the flasher down to zero. I'm thinking your flasher is fubar. Or the connections on the base are corroded. Something like that. I assume you already checked the connector condition right there at the turn signal switch? Everything all nice and clean and shiny?
-
The simplest, most straight forward answer is "your turn signal flasher unit is bad". Have you tried another one?
-
Water does expand with the heat. Just not as much (volumetricly) as gasses do. So even if there isn't any air in the system, the water will expand as the system heats up. And that expansion will start as soon as the engine is started. Now granted... If there is air trapped somewhere, or if you do manage to boil some of that water, it will expand orders of magnitude more than water. But even just the water will expand (even if it doesn't change state).
-
Glad to help. So for the vacuum advance thing... The ported vacuum will have a sharp narrow peak just above idle. At idle, there will be very little advance, and above light cruise, there will also be very little advance. In contrast, the direct manifold vacuum will be highest at idle and gradually drop from there to zero advance at WOT. The profile is very different than the ported source. That said, there are plenty of people who think that direct manifold vacuum is actually better, and plenty of other people who think that all the vacuum advance can be removed completely and just set the base timing higher instead. Here's a discussion we had a long time ago about such things. Quickly went over my head: https://www.classiczcars.com/forums/topic/41935-ignition-timing-theory-port-source-vs-manifold-source/#comment-377416
-
Oh, and here's a pic of what the carb mounting surface is supposed to look like. Without the grease lube holes:

-
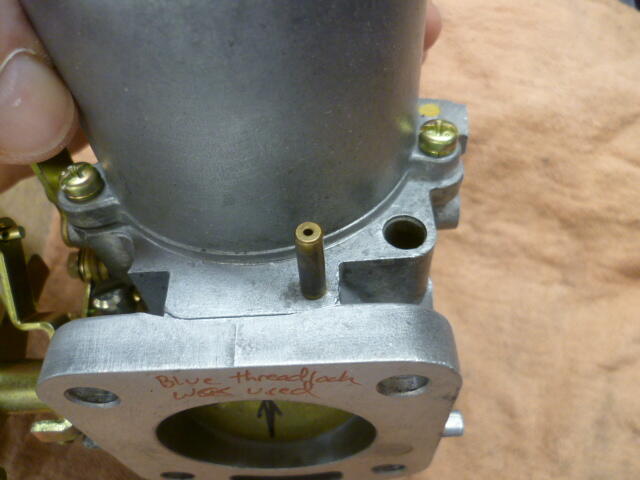
Here's a couple pics of the 72 carbs (which is what you have in your car) and the vacuum nipple: And here's the port on the inside. Note that I'm holding the butterfly open a little bit so you can see the hole. With the butterfly all the way closed, the hole is completely covered. Also note how small the hole should be:

-
Well that sounds like significant progress. I skipped through the video really fast though. I'm not much on videos, especially long ones. Maybe it's just me, but I'd just rather read a couple sentences about it instead of having to watch a 15 minute video about it. A text synopsis about the video would be better for me. "We removed the nail. Put the carbs back on the car and the idle was down where it was supposed to be. Now that the carbs were behaving like they should be, we did a quick tune and set the idle speed and sync of the carbs using a uni-sync tool. After that, it was running well enough that we actually took it out on the road for a quick road test. Did great, all things considering." That would be better for me. So about that ported vacuum source for your distributor advance... I'm not sure what you have is salvageable, at least not without extraordinary means. The problem is that the hole into your carb throat is way bigger than it should be. Looks like when they snapped off the vacuum nipple, they drilled out the remains and went too deep. Like all the way into the carb throat deep. In other words... Some previous owner drilled through your carb body and ruined it. The vacuum hole is supposed to be small. Thirty thousandths maybe? And the one in your carb looks like it's an eighth inch or larger. The bottom line is that both the size of that hole and the location are critical and yours has been wallowed out to three or four times it's normal size. So if you want to run ported vacuum, you'll need a new front carb. Not a lot of fun.
-
Oh, and DadAndLadZ, forgot to mention.... Now that you have that nail pulled out and all the idle screws backed completely out, both carbs should be shutting tight-tight. And if that's the case, it probably won't even idle. You might find that you have to manually hold the throttle open a little bit or screw the idle screws back in some just to get it to run at all. Or you could pull the choke lever. As you saw, it should open the throttle plates a small amount. Pretty sure you would have figured that out, but just throwing that out there.
-
Yeah, I think I would recommend running a return line, but that (like a lot of other details) can wait. I just want it to idle correctly for now! Haha! I'm no regulator expert, but I'm not a big fan of dead-headed systems in carb applications. This non-expert would prefer a bypass regulator system with a return line.
-
I have very little doubt that things will be a whole lot better now, but after four pages, I just want to hear it from you to be sure!
-
If the blue wire is disconnected, the rest of the ignition module is just along for the ride. It'll still be reading the input signal and switching it's output stage, but that output stage will not be connected to anything, so it will have no effect.
-
Well that vacuum connection you are using now is full manifold vacuum, but the system was designed to use a ported source that peaked advance at light cruise throttle (slightly above idle). With your direct manifold vacuum source, you will have peak advance at idle, and it will drop from there. I'm no timing expert, but I'm not sure that's what you want. And I don't think your vacuum connection is really a remnant of mixing and matching parts from different years. I think it's a remnant of snapping off the original ported vacuum nipple and then looking for some place else to connect that vacuum line. Either way... So when will we get an idle report to see if taking that nail out allows the front carb to operate properly?
-
And can I just point out that when I said "I'm thinking that something within the carb itself is keeping that front throttle butterfly from closing completely"... I nailed it! HAHAHAHAHA!!!!!
-
Well THERE'S your problem!! Yes, that nail was holding your butterfly open and not allowing it to close completely. Some answers to additional questions: That hole is intended to be a ported vacuum source to drive the distributor advance. There is supposed to be a vacuum tube nipple pressed into the carb body that allows you to connect a rubber tube between the front carb and the distributor advance diaphragm. It appears someone sheared the nipple off and decided to plug that hole with a nail instead. And about the "insert grease" engravings... It appears that someone drilled little holes in the carb mounting face with the intent of using them as lubrication grease ports to lube the throttle shafts. Probably a waste of time, but since they are sealed off by the gasket between the intake manifolds and the carb faces, it probably doesn't cause any harm either. So for both of those items... THAT'S something I've not seen before!! Bottom line... Plug that vacuum nipple with something that does not stick down into the carb throat and I bet your idle issue will be pretty much taken care of.
-
Well I stand by the belief that the problem is in front if the transmission somewhere and not internal to the tranny itself. Is this an accurate description of what's going on in your sound byte? Put it in first and rev the engine with the car not moving. All quiet. Let the clutch out a little bit and let the car creep forward. Push the clutch in and come to a stop with it still in first and rev the engine. Unpleasant noise. If that's what's happening, I really don't think the problem is inside the tranny case. I think it's something in the clutch system. I don't have any strong theories about exactly what is going on, but I think something is chattering around in there. Disk on the splines as ZH suggested above? Is there any possibility the starter is involved? Something shifting somehow and the starter gear is buzzing against the ring gear on the flywheel? Seems hard to come up with an explanation of the sequence of events, but just tossing that out there as something to think about.
-
Well I think you're being a little too hard on yourself with the dunce moniker. You had a problem, searched for the root cause, and found it. Right? Note that I was going to suggest you check the fuse, but instead suggested the more general "you'll need to start poking around upstream". Of course, the fuse is part of that investigation. But whatever... Your radio works now. Good deal!


