Captain Obvious
Free Member
-
Joined
-
Last visited
Everything posted by Captain Obvious
-
 Wow. That's way cheaper than I would have predicted. Did he supply the stock material as well? Cut them out to shape? Looking at the pics, it appears to be black and red sick screening on a white plastic substrate? Are they thicker than the originals?
 -
Actually it doesn't matter which side the force comes from. If it's not supported correctly, you run the risk of bending something. And you're not really "pulling", you're just pushing on the other side. In order to PULL it, you would need to put the bushing shell in tension, and you're not. So pedantic aside... The bottom line is you are correct. You need to support the correct area and press in a normal direction in the correct different area.
-
That should be fine. I got zoom on my screen.
-
Wait... Poly everywhere? I sure hope you can still get some rubber stuff.
-
Well I'm not claiming to be qualified to check anyone's work, but I have a couple comments... First, the metal portions of those floats looks like they have bent away from the floaty portion of the float. And one of them worse than the other. From what I've seen, the metal hinge part of the float should be pretty much parallel to the top of the float foam portion. Yours look like they have been pulled away from the foam. Second, you are working on a pair of three screw round tops and they were designed to operate with different float levels in front and rear. So if you mechanically set both floats the same distance from the underside of the lid, I'm not positive that's going to translate to the same level once they are wet in the car. The other changes may come out in the wash, might not. And last, don't forget that the mechanical set you did there is just to get them in the ballpark. A wet set with a clear tube is the way to confirm that the levels are correct. Any mechanical means is just a preliminary ballpark setting that must be confirmed wet.
-
So I assume from the banter about burning out the mustache bushing... I'm assuming you're putting poly in the old shells? And if you've got the hydraulic press, dealing with the outer rear bushings isn't that difficult either. Getting something fixtured square and supported correctly underneath is always the hardest part. In other words, once your sure you are getting all the force on the correct parts and in the correct direction, the rest is usually easy.
-
Now that's cool. You had those silk screened? That couldn't have been cheap.
-
Haha!! Trust me... It'll be worth it. The video will help a lot of people understand what's going on.
-
Naaa. A trace on a scope just wouldn't have the same impact as watching the needle swing. I think seeing the needle swing with the current switching would give the best sense of what is going on. I think that would convey the concept the best. I'm not sure I have an analog meter around here anymore either. I'll take a look, but I don't think so.
-
Yup. It would be cool to run that test again using an analog ammeter in series with the gauge. That way, you would be able to see a better representation of the PWM regulator current.
-
Datsun put one regulator device in each of the gauge cases. So the TEMP/OIL gauge has one regulator that is in series with both of the needle moving heating strips, while the FUEL gauge has it's own regulator. Note that the AMP and VOLT gauges do not use a regulator because they do not use a heated bi-metallic strip to move the needle. The AMP and VOLT gauges use a D’Arsonval permanent magnet method instead of the heated strip, and hence do not need a regulator. So the TEMP/OIL gauge "can" contains one regulator shared (in series with) by both of the meters, and if that regulator develops a problem, that problem will show up in both gauges. As for what may be happening... If the shared regulator has dirty contacts and isn't making good contact, both gauges drop to zero at the same time. Note that the problem may be in the incoming power wiring and not the regulator at all, but based on the cyclical nature of the issue, I suspect the regulator. When it's stone cold, key just turned to ON, the regulator strip will be it's coldest and the pressure on it's contacts will be at it's greatest. Once that strip warms up and the system moves closer to equilibrium (PWM equilibrium), the contact pressure will decrease. I'm thinking when it's stone cold, the higher contact pressure makes a contact, but once it warms up and the contact pressure decreases, it goes intermittent. Of course, troubleshooting electrical stuff over the interwebs is never an exact science. But that's my read from a distance.
-
I just pulled the gauge theory stuff together in a standalone thread: https://www.classiczcars.com/forums/topic/67803-how-the-gauges-work/ Have a nagging suspicion that I did that already some time before, but couldn't find anything?
-
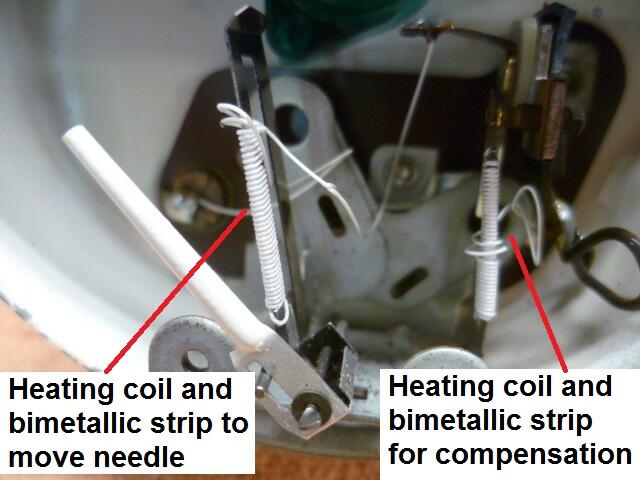
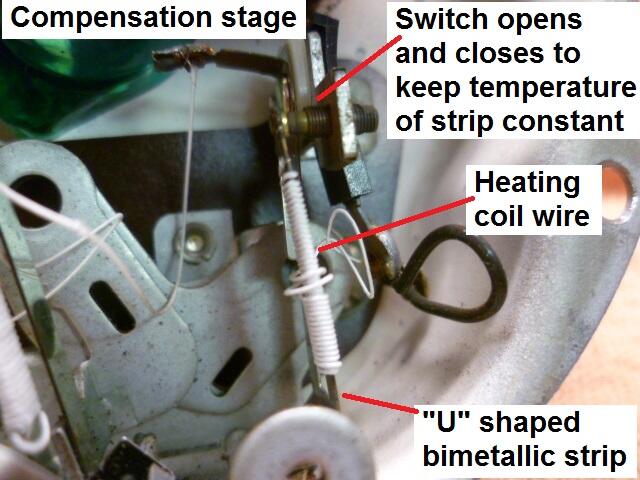
Here's a pic of one of the gauges. You can see the two different heating coils wrapped around two different "U" shaped bimetallic strips. Interesting to note that internets research indicates that "U" shape is part of the compensation as well. The concept is that the unheated side will compensate some for changes in ambient temperature. "They say" it doesn't get rid of all of the temperature based effects, but it helps some. Between that "U" shape and the compensation stage, the gauges seem to be really stable. So this is an example of the compensated gauge with the two stages: And here's a closer-upper pic of the compensation stage showing it's parts: The switch opens and closes to keep the temperature of the compensation strip at a constant temperature (ave). If you put a Voltmeter on the sender unit, you'll see that it isn't a steady voltage, but is instead a square wave.
-
So the basic gauge system described above works, but there are inaccuracies caused by ambient temperature (cold day vs. hot day), and variations caused by system voltage (low alternator output voltage vs. higher alternator output voltage. In order to compensate for those real world conditions, the gauges are a little more complicated than the simple system described above. There are two "stages" to the compensated gauge. One of those stages is he simple gauge we already talked about above. The other stage is the compensating or regulating stage. It's job is to compensate for changes in ambient temperature and varying system voltage. The compensation stage consists of another heating coil wrapped around another bimetallic strip. This bimetallic strip forms an electrical switch such that when the strip heats up, it breaks contact. And when it cools down, it re-establishes contact. The trick is, that it makes and breaks contact to it's own power source and the power source for the simple gauge stage. The result is that this second strip/heating coil combo will make and break the power source such that it will always achieve the same average temperature. Of course the temperature is rising and falling some, making and breaking connection, but the AVERAGE is always the same. Colder day? Power to the compensation strip will have to be on longer to reach the temp that bends the strip to the point where it breaks the switch connection. Hot day? Just the opposite. Power will be on for a shorter time. Low system voltage? Again, power will have to be connected longer in order to heat the strip to the desired temperature,. And conversely, if the voltage is higher, it'll take less time. The result is that the compensation stage creates an ON/OFF/ON/OFF pulse train whose duty cycle and frequency will change depending on the ambient temperature and system voltage. This effectively creates a voltage source that will always supply a constant amount of POWER to the gauge system under all conditions. Clear as mud? Connect that constant power source to the simple gauge from above, and you have this: If you put your key in and turn it to "ON" you should see the gauges start to rise. Don't start the car. Just pick a needle and watch carefully. You'll see the needle start to rise, but probably before it reaches it's final position, it'll pause... Then start rising again. Then pause again. This will continue until it finally reaches it's final position. And even then, if you watch carefully, you'll see the needle actually wiggles a tiny bit. This effect can most easily be seen with a needle that's moving well above minimum like a full tank of gas. That pausing and wiggling is the compensation stage opening and closing.

-
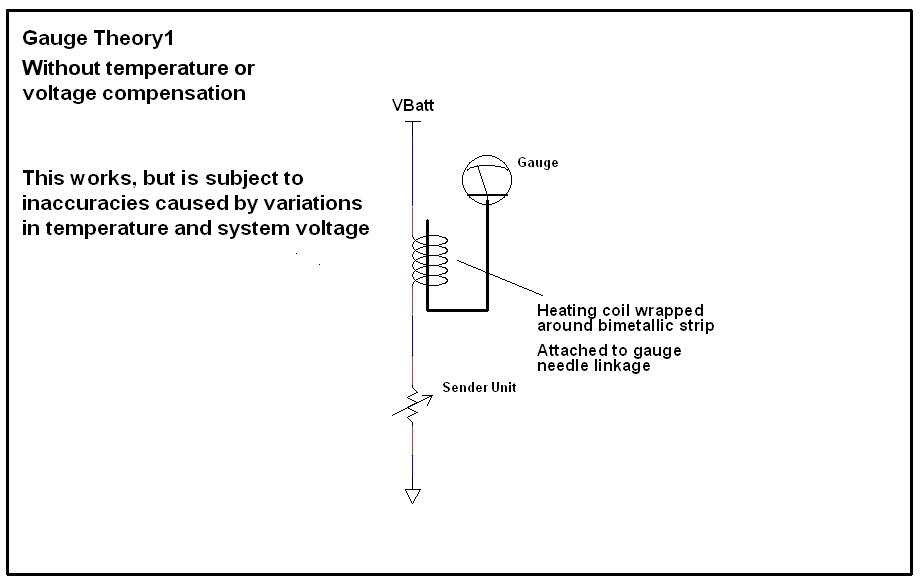
Many moons ago I promised to describe how the gauges work... So in order to understand how the gauge system works, I think it would be a little easier to first understand how they DON'T work. I think everyone already has a good handle on this simple system, but it's an important place to start. Here's a pic of a simple (uncompensated) gauge design. Wrap a heating coil around a bimetallic strip and mechanically attach that strip to the linkage of a gauge needle. Flow current through that heating coil and to a sender unit who's resistance reflects the level of whatever you're trying to measure (temp, oil, fuel, whatever). As the resistance of the sender unit changes, the current through the heating coil changes and that changes how hot the bi-metallic strip gets. The lower the sender resistance, the higher the current. The higher the current, the hotter the bimetallic strip gets The hotter the strip, the more the needle moves. Here's a pic: This simple uncompensated gauge system does "work", but it is subject to a few real-world outside influences that can affect the accuracy: First, since the whole thing works on the temperature of the bimetallic strip, the gauge will read differently on a hot day than on a cold day. And second, since the gauges are powered by the battery system of the car, changes in that system voltage will affect the gauge readings. The gauges would read differently sitting with the engine off than they would with the engine spinning at 3000 RPM when the alternator has kicked up the voltage a bunch. The system voltage can vary from about 12V to over 14V and the gauge readings would change as the voltage varied. So the basic gauge system above sorta works, but these two real-wold effects are undesirable. If the above basic gauge system makes sense, I'll get into how they compensate for those two real-world effects.
-
https://www.classiczcars.com/forums/topic/64427-no-oil-pressure-after-rebuild/#comment-607221
-
Yeah, you and every other Z owner who didn't buy it new. Figuring out what previous owners did do, didn't do, and/or screwed up... It's a sport.
-
My thoughts on the knob you bought from ebay... It sure looks like a stock knob to me. What was throwing me was the shift map doesn't look green like it's supposed to. Must be a trick of the light. Looks pretty much black in the pics, but it's probably green and just taken with weird lighting. Other thought is that most of the stock knobs are stripped out in the bottom where the mounting threads are, and I suspect the one you bought is just like that... Threads all gone inside. Not an insurmountable issue, but something to watch for. At $40, a good buy. You'll have to probably fix the threads, but that's not unusual.
-
So I went to ebay and didn't see any stock knobs. Now that you've bought it (and someone can't snipe it away from you) what was the item number so I can have a look at it?
-
Well unfortunately, the knobs in that pic aren't mine. That's a pic I hoovered some time ago to show the different options. I wish that was my collection! Sorry for the confusion, and I edited my post above to make that clear.
-
From my (limited) research, that's a good price. Haha! I don't think I'd let mine go for that!
-
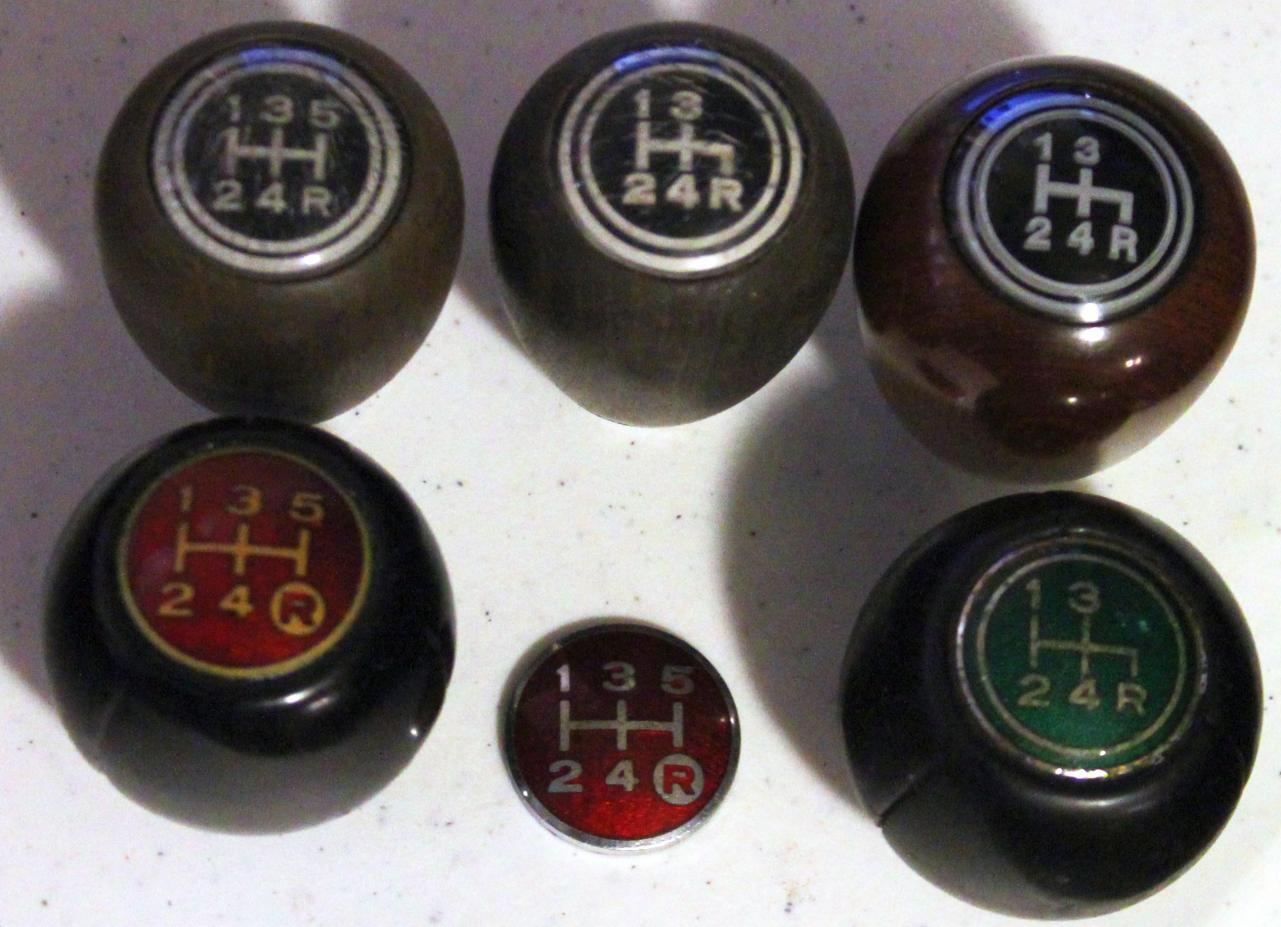
Actually, those two knobs do look a little different. One seems to have the "splits between segments" at 120 degrees and the other has them at 180 degrees. In other words, one of those knobs simulates two pieces of leather, and the other one simulates three pieces of leather. The one I'm familiar with has the splits at 120 degrees. Here's a hoovered pic showing a couple of the different knob offerings over the years. Not my collection, but a good pic hoovered from the web some time ago:

-
Everything I've seen says the original 77 shift knob was the green faced one in your other post. And it's a hard rubberized plastic (maybe vinyl?), not leather. I've got one of those here and it's available. Problem is putting a price on such a thing. I've not seen one for sale in quite some time, so I'm not sure how to value it. Send me a PM if you want to talk about it. Here's your pic from your wanted thread: The original knob surface was textured to look "leather-like", but most of that texturing wore off quickly and became smooth where the knob got the most grab.
-
Couple thoughts: After watching the video, you can see that BOTH sides of the Woodruff key shot have cracked. You can see the rough grainy surface of the cast iron on both sides of the groove (or where the groove is supposed to be). One side is a huge chunk missing. Other side is a smaller piece missing. It would be important to find all the loose metal. The little rubber ring and round spring are what's left of your front oil seal when it disintegrated. So when you say "The seal itself looks fine"... That would not be the case. The little rubber ring is the sealing lip that has been sheared off, and the round spring is the garter spring that is supposed to provide the pressure on the back (wet) side of the seal. I'm coming back to thinking it was broken upon installation and has been cracked for some time. Surprised there was still enough of a seal to keep it from spraying oil out at an impressive rate, but I guess it depends on just how much oil is flinging around behind that pulley. Maybe the oil slinger was doing exactly what it's supposed to do. Woof. Last thought is about having that balancer rebuilt... I'm no expert on the topic, but I don't think you're going to find a company to fix that. The companies that rebuild those things specialize in vulcanizing rubber and balancing the result. I would not expect them to make new parts, just rejoin old parts.
-
I got an idea... the front oil seal rides on the snout of the balancer, right? I'm thinkingif it were broken before you took it off, wouldn't it have leaked oil like crazy out the front. With that in mind, I'm thinking it broke when you pulled it.