


Captain Obvious
Free Member
-
Joined
-
Last visited
Everything posted by Captain Obvious
-
 I was going to tell you to get those needles out of the pistons as soon as you could. I didn't like the way they're sticking out of the pistons laying on the bench like that. Too easy to damage them. So I'm no carb expert, but for pulling stuck needles I've had good luck using some thin pieces or (grippy) rubber sheet on the needle and clamping down with a bench vise. Sorry, but I don't have any pics. The rubber sheets will hopefully spread the force out over a large enough area so you don't dent the needles, and the stickiness of the material hopefully provides the friction required to get them to move without slipping. Clamp the whole needle length and a little twist-and-pull. I've had good success with that.
 -
Perfect. I should have known!
-
Happy Birthday!!!
-
Site, You beat me to it!!! How'd you get so funky?
-
Got it! Saved until I don't remember where it came from!
-
"Who? Me?" He asks, sounding a little startled. As if he was interrupted doing something he ought not to be doing...

-
Another option would be to attach the tach to your car and use some other device as a "reference" to calibrate the one you messed with. If you have a timing light with an RPM display, or an oscilloscope, or even meter that will read frequency. You could use one of those to monitor the engine, hold the RPM steady at some level and then compare what you get on your tach to what you see on the reference. Adjust the pot until the two read the same. Not as elegant as calibrating it on the bench with a signal generator, but if you don't have a sig-gen, then you do what you have to do.
-
-
Proof is left to the student. Haha!!
-
Crap. I was worried about that. I found nothing on the internets for either of those numbers. It could be as simple as a resistor or capacitor array, but I suspect it's not. The reason I was worried about them is that I don't see any transistors on the board. And I'm sure there are some transistors at play somewhere in the circuit. They aren't driving the tach completely with just resistors and capacitors. Problem is if you can't see the transistors, then they're probably buried inside those packs. One could potentially infer the function by reverse engineering the rest of the circuit and try to figure out what is inside those packages. Glad it won't be me. LOL. In any event, it sounds like you're out of the woods and that effort is unnecessary.
-
Thanks for the pics. I'll dig through them when I get a chance. But I'm in agreement with crayZlair. I'm thinking that's not a cap at all. What are the long slim rectangular things with a bunch of leads? Can you read the numbers on them? Dark maroon or brown things with seven leads or so?
-
I've got very little direct experience with the whole fuel pump thing, but since I'm planning some evil carb mods with my new motor, I'm going to have to get involved with this as well. And with that in mind, I'll be watching your progress. So one thing to watch for is... Does the pump require some minimum amount of fuel to flow in order to keep the pump itself cool? If so, you must use a bypass style regulator and shunt excess fuel back to the tank. However, if the pump doesn't require cooling like that and is designed to be able to constantly push against a "mostly closed door", then you could get away with a dead-headed arrangement. I've heard with my own ears two of the aftermarket pumps and they were loud. I'll see if I can figure out what they were. My buddy put one in his car and the drone made him crazy. He replaced it with another brand and it still drones, but not as bad as the first one. Maybe @GGRIII come in and tell us what brands he used.
-
That's a great call!! What a sight to behold when you got back from your quick ride on your 1952 Vincent Black Lightning. Good times... Good times.
-
You know Z wants it.

-
Wow that's pretty. Wow that's expensive.
-
I can't tell what the component is from that distance, so I'm not a lot of help there. However, I CAN tell you that the schematic posted above is for the earlier 240 tach with the inductive pickup, and it is not applicable to the 280 version. So not a lot of help there. Can you take a closer up shot of the cracked component? Will your camera focus that close in? And can you take a pic of the circuit board bottom that it solders into? I might be able to figure out what it is by looking at the circuitry. Maybe. Might be able. Maybe.
-
Thanks for the input @240260280. It seems that hydrochloric acid is clearly the most effective. Comes with all the safety downsides, but definitely the most effective. My plater said that everything was going to go through a quick hydrochloric dip before the plating solutions. My thought was to get as much off as I could beforehand and hopefully his quick hydrochloric dip would take care of the rest. I was thinking that his hydrochloric dip would take off any surface rust that developed while the parts sat in boxes waiting until I had everything prepped and ready to go.
-
LOL. I was just thinking that if I really got into it, I could probably program something up to control the heating element for the sensor. But I got bigger fish to fry first. Plenty of other projects in the way before I would get to that point in my list. Haha! I've never messed with the ESP8266 stuff. I've got just enough experience with PICAxe and Arduino stuff to be dangerous. The ESP board is way more powerful than anything I've needed so far.
-
Thanks for all the input guys. I was thinking I would put mine in the glovebox for now as well. I'm still hoping to get a couple weeks more driving out of my car before the season ends though. I don't want to go dropping the exhaust now. It won't be long before they salt the roads and I'll do some of this work then.
-
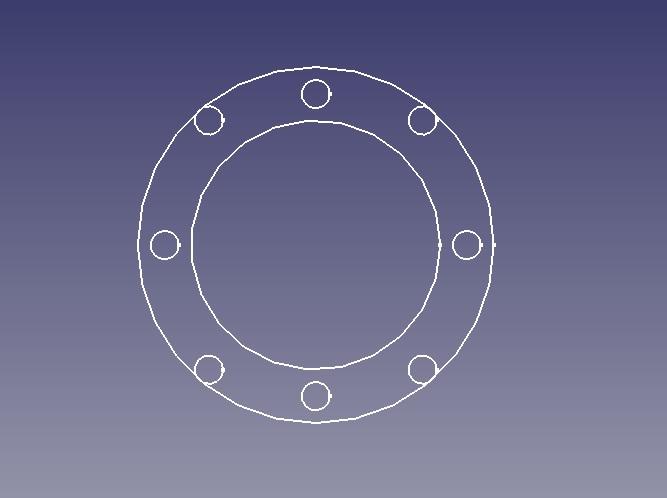
And here's what I was talking about maybe not having enough meat with a 100mm OD. Here's a quick sketch I threw together... 100mm OD, 70mm ID and two sets of bolt holes. One on a 60mm square and the other on a 60x70mm rectangle. All with the centers concentric. It looks to me like you might have some troubles with some of the holes being to close to the edge: So I don't know if the bolt pattern for the 350Z throttle body is 60x70, but I just used what I could discern from your ruler pics earlier. It looks like trouble.
-
Thanks Matthew. I think I understand what you did now. I've had my parking brake handle out a couple times in the past to make some modifications to it and I never dropped the driveshaft, but I did have the seats out. Anyway, I don't remember how bad my rubber seal was, but it was at least good enough that I put it back in. I also don't drive my car in the wet either, so it doesn't matter as much. Thanks again. and maybe I'll do something like that next time
-
I found the solution slowed down removing the original yellow chromate and zinc as it was used. Maybe the rust removing properties stayed about the same, but the original foaming as the yellow disappeared and (what I believe was) the zinc got eaten off slowed down as the solution was used. For that reason, I changed out the solution often and that's why I went through 30 pounds of it. If you haven't tried it yet, put something that still has some of the original plating and chromate on it into the bath and see what happens. It comes out beautiful, but unplated. If you pull it before it's completely done, you can even see the layers being eaten off. Kinda like sanding through multiple layers of paint where the different layers feather out as you sand to the metal at the bottom. Yellow layer, and thin metal layer beneath that which I can only imagine is the original zinc plate. I haven't disposed of the used solution yet either. I didn't just dump it down the drain. If it was just rust and iron, I wouldn't be worried at all and I would just dump it. But that yellow coating (involves chrome?) and the zinc have me a little concerned. I'm going to call the guys at my local water company and see what they think. They may tell me it's no problem, just pour it down the drain, or they may tell me to hold it for one of the local hazardous waste drop-offs we have occasionally.
-
Absolutely! I was geeking out last night, and I plan to do more today. About half the very small parts are hardware bits and pieces for carburetors. The trouble is figuring out what goes with what. As I tossed stuff into a box at the beginning of this project, it was "No problem, I'll remember what this went to". Well now that I'm looking at a vast pile of tiny yellow parts that I took apart starting maybe two months ago? Not so easy... LOL. I tried to wire the small parts together in a configuration that would make them easy to identify and sort into appropriate applications, but even that plan seems to have gone all muddy and indistinct. By the end of the pre-processing, I knew I was running out of time and I stopped being so contentious about what went with what. I just needed to get stuff done and off to the platers. The big stuff like the inspection lamp and coil bracket, etc. That stuff is easy. It's the little nuts and bolts that are the hard part. And it's a mix of round top and flat top carb parts. Anyway, a nice hot cup of tea or two and a comfy stool at the workbench and I'm good to go for the afternoon. That's my plan.
-
That's a neat idea. Too late for me, but neat anyway. The longest springs I had were the return springs for the round top carbs. Next longest was the return springs for the throttle body. Oh well... Maybe next time.
-
Thanks. If you get a chance, can you snap a pic of that black rubber piece laying loose not on the handle? I mean, I don't think I'm going to go pulling my brake handle apart again just to replace that rubber seal, but it would be nice to have options anyway.

