


Captain Obvious
Free Member
-
Joined
-
Last visited
Everything posted by Captain Obvious
-
 AMP - MIC Multiple interlock Connectors MK-1 The mark 2 (MK-2) stuff is easy to find but it won't work. The older MK-1 (Mark-1) is difficult. I'll take a look through my notes, but I don't think I turned up a viable source for small quantities of those.
 -
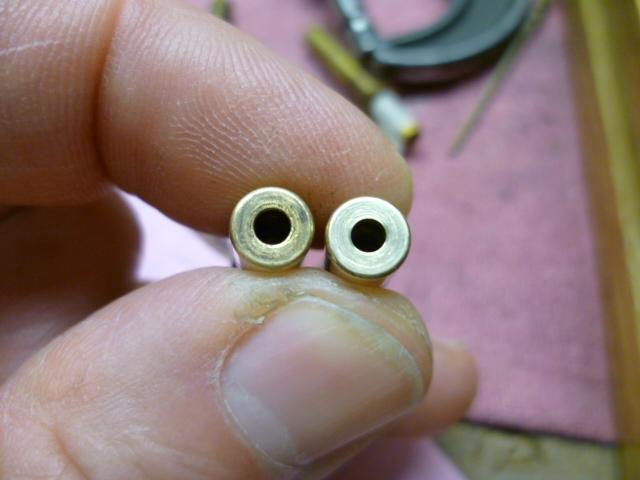
Yeah, it sounds like you're definitely in the market for a new pair of needles, and maybe a pair of nozzles as well. Material removed by corrosion will wreak havoc on your idle mixture. And if there's pitting on the needle, it's certainly possible there's the same kind of corrosion on the nozzle. That may explain why the needles fixed one carb, but not the other. As an example... Here's a pair of nozzles. One enlarged by corrosion and another with an accurate original sized hole. The corrosion ate away so much of the material that I can see the difference with the naked eye. At idle, it takes a very small gap to make a huge difference. So...... Weren't your carbs rebuilt? Sold to you in good working order? Slap-em on and go? Might there be some negotiation and relief there? And as for swapping and mixing and matching parts between carbs... I think it's OK as a test (like you've done), but I would want to keep the original pistons and chambers together with the carb body they came from. You could possibly move the pair (both piston and chamber) over to a different carb body, but you would have to re-align the nozzle. I wouldn't trust that it would line up after moving to a different body. But the best thing would be to just keep them together on the same body. I should go into the carb rebuild business.
-
What is the history of the nozzles? And who did the alignment of the nozzles after the rebuild process? Is that something you did, or did they come to you already aligned?
-
Swapping in a pair of known stock needles would be a good test, and something relatively easy to try. I know you said you are already positive that your float levels are on target and your chokes are not sticking down at all. And with those two things not causing a problem, I'm having a hard time coming up with a scenario that would result in running rich without some sort of damage to a nozzle or a needle or a wrong part installed. Like I said, lean is easy. Rich is more difficult assuming you have already ruled out the easy ways to run rich (float levels and sticky chokes).
-
I agree with the above about the paint. If that's original paint, I'd try hard to preserve it. I also agree about the tranny... Swap it for a manual, but keep all the old parts. So I'm surprised it didn't go higher as well. I'm thinking the high prices for Z's hasn't gotten to the 280's yet. And lucky for you! Beautiful car and you stole it!
-
The factory standard needles are N-27, but a lot of people install SM's instead. That decision works out well for some people and some others report running rich. The number is either stamped or inked onto the hilt and is only able to be seen with the needle removed from the suction piston. However, if they are inked (and not stamped), the ink printing is pretty fragile and is often destroyed with handling or chemicals. In other words... It would not be unusual for you to pull the needles and find only remnants of the number stamp and not be able to tell what they are from the ink printed mark. It's easy to make the carbs run lean, but it's usually a little more difficult to make them run rich*. To run rich, it takes deformation of a needle or a nozzle, or the installation of incompatible parts. Did you ever get in touch with Paltech and ask what needles he used? * Assuming, of course that the float levels are OK and the nozzles are not sticking down with the choke.
-
-
Actually, it was more like this: https://youtu.be/YdElbI77IfY?t=32 Haha!!
-
Haha!! Not me, but I looked pretty much like that! Only cooler. And slower.
-
LOL! You and me both! I can also picture Granny frantically trying to cut the power before any more damage occurred!
-
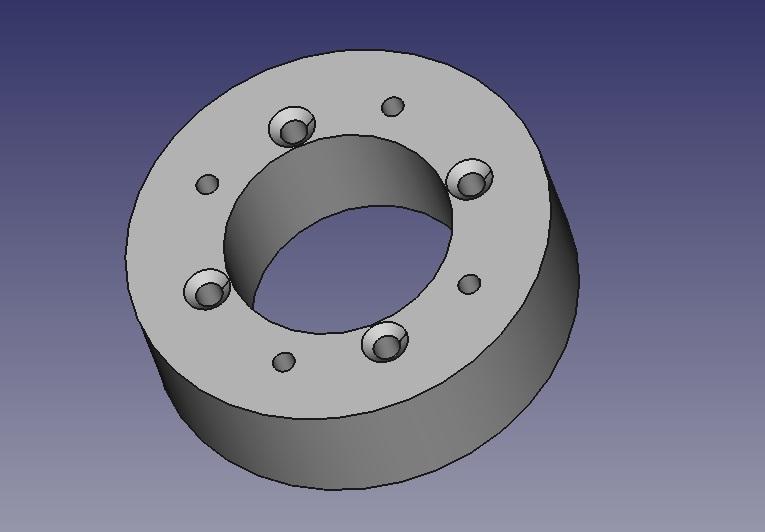
Good. And since I'm not a pain, maybe I just need to try a little harder. So using my (admittedly incomplete) understanding, here's a reality check of what the adapter could look like. 130mm OD and 70mm ID. I tossed in some countersinks too and it highlighted a potential issue. With a 70mm ID, there might not be enough meat for the countersinks. If that's the case, you might have to resort to a counterbore instead. In any event, here's what I whipped up:
-
I wonder where this one will end up. Looks to me like a typical well loved and well used (but not abused) Z from a sunny part of the country. New paint covering worn out faded sun baked paint. Reasonably fitting dash cap covering a presumed sun-baked cracked dash. Missing emblem on the rear. Ill fitting dry-rotted weather stripping and lower door bumper hanging out of it's mounting holes. Holes in the seats (both of them, which IS a little unusual). Sun baked and faded rear carpet. Cracked A pillar trim and console mounting points. Spongy sun baked steering wheel. New fuel pump (which could be indicative od issues). And so on and so on. Nothing unusual and nothing irreparable. Worn (loved), but unmolested. Would just take money. The underside looks intact. Everything else can be bolted on.
-
Agreed. The fabric and plastic rot seems to be the exact same M.O. as what's left of the blue one. I still think an extraterrestrial pathogen may be involved.
-
Well I'm sure I'm just becoming a PITA at this point, but I got some questions about your adapter... First, why the two different sized holes? And if the answer is "the larger holes are clearance pass-thru holes for the screws into the intake manifold and the smaller holes are going to be threaded to accept bolts to hold the new throttle body", then there's a problem... You have the holes swapped. The holes on the smaller circle should be the pass-thru clearance holes and the ones on the larger bolt circle should be threaded. Other question is I don't see the countersinks for the heads of the screws to attach to the intake manifold. Are you just going to put those in manually after it comes out of the CNC? Same with the threads for the other holes? Sorry for being a pain!
-
It just seems like a lot of trouble for a little bit of vibration. Not saying that's not it, but just that it's a lot of trouble for something they lived with just fine for the first nine years. So any time you change gears from forward to back (like from 3 to 4, geometry says the vertical distance between the center of the pivot pin and the bottom of the plastic nub on the lower end of the shifter shaft changes. What is it that accounts for that? Is the hole the plastic nub fits into extra deep? Deeper than it needs to be to account for that? Not sure I'm explaining that well without pics. I've replaced my bushings, but that's as far as I've had to go into the transmission. Thankfully.
-
There are several graphs like that in @blodi thread where he's trying to tune his Webers: https://www.classiczcars.com/forums/topic/56375-weber-selection-and-initial-jet-tuning/ I don't know how applicable his Weber graphs would be to your round tops, but for example, they look like this:
-
Woof. Flying that mess doesn't sound like a lot of fun. Yeah, thankfully I got that final drive in that we were talking about. I meant to get in touch too, but every time I remember, then I forget again. It was nice final drive. Got gas, and then burned a couple gallons of it.
-
Maybe it's just me, but I have never, ever, ever, never seen anything come out of a spray can that even barely resembled chrome. Even if it has "chrome" in the name somewhere.
-
Wow. That's a lot of complexity for NVH. Are you sure it doesn't have anything to do with something more complicated than that? Reverse interlock or something?
-
Yeah, perfect. Just like that. I'm pretty sure you could hit the brown note with that much woofer!!
-
I'm just east of Snowmageddon. We're still probably going to get double digits, but the Poconos are expected to get almost two feet. As the forecasts gelled, I took the opportunity to get myself mentally prepared for the end of Z driving season. My last drive was Sunday afternoon. It rained on Monday, and they salted the roads on Tuesday in preparation for this storm on Weds. So I took the opportunity to go out and drive around for a couple hours since it was the last drive. At least this year, I got enough warning to prepare and go for that drive. The snow blower is now unreachable in the shed out back because I spent the time driving instead of getting it out and ready. Haha!! The snow will eventually melt.
-
Well if you aren't going to store any spare at all, that recess makes a great storage area. Or you could put a big sub-woofer speaker into the wood over it. So I just reused my original 77 taillight panel interior finish panel. Since I was making a new wood floor back there, I just trimmed the edges of the wood so it fit the new lower location on the panel.
-
Glad to help. On my car now, the forward section of my rear decking (from the strut towers forward) is carpet right over the metal decking. In other words, it's just like all the previous years. But further back, I went to a narrower spare tire and made new wood decking pieces for the rearmost section. I relocated the new wood floor as low as I could possibly install it while still fitting over the spare and those metal support braces. So, in the end, I've got a step back there... It's lower right behind the seats and then steps up about 25mm or so with a false floor over the spare. If you aren't going to install a spare at all, you could probably lower that false floor even lower back there.
-
I did pretty much exactly what you are planning. But first... some background. The 70-76 cars had a full sized spare and a full depth spare recess in the back deck. But in 77, they changed all that. They went to the space saver collapsible spare and reduced the depth of the spare tire well such that the spare now sits proud of the rear deck surface. And they also changed all the sheet metal and uni-body pretty much everywhere, including the rear decking. Those metal supports used to be located underneath the deck lid on earlier years, but moved to above the decking for 77. I wasn't there when they did all the modifications, but the rumor on the street is they did all that in order to allow a larger fuel tank for 77. In short... They traded less storage space in the rear for a larger gas tank. So with all that said... I drilled out the spot welds in the original piece spanning the two rear wheels. And no, I'm not worried at all about it changing the rigidity of the vehicle. 1) It never went all the way to the sides (there's about a 25mm gap at each end), and 2) The piece that it was spot welded to is identical to the previous years. They just spot welded an extension to the vertical piece they used from 70 to 76. Here's the piece in question. You can see about half the spot welds drilled out on the near side: And here's what it looks like once you get all the welds drilled and the piece loose from the car: Unfortunately, taking that piece out leaves a rough edge that does not look "finished": So to finish the now rough edge that exposed... I used the same piece they used in the previous years and screwed into place (just like the previous years): And as for the rest of it... I used foam to build up around those rear metal frame members to give me a flatter surface to build a new deck. I don't have any good pics of that process, but I'll see if I can get some of the finished product.


-


