


Captain Obvious
Free Member
-
Joined
-
Last visited
Everything posted by Captain Obvious
-
 Well lets see... If adjusted properly and working as designed, absolutely none of those items should have any effect at all at idle. Charcoal can - Disabled at idle EGR - Disabled at idle BCDD - Disabled at idle Cold star valve - Only active while cranking the engine, so disabled at idle
 -
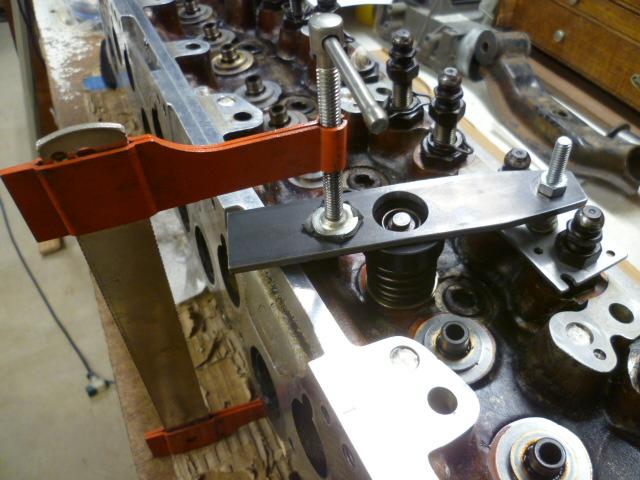
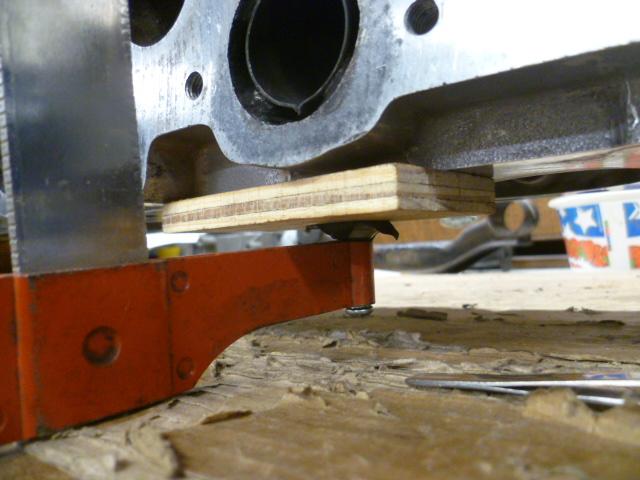
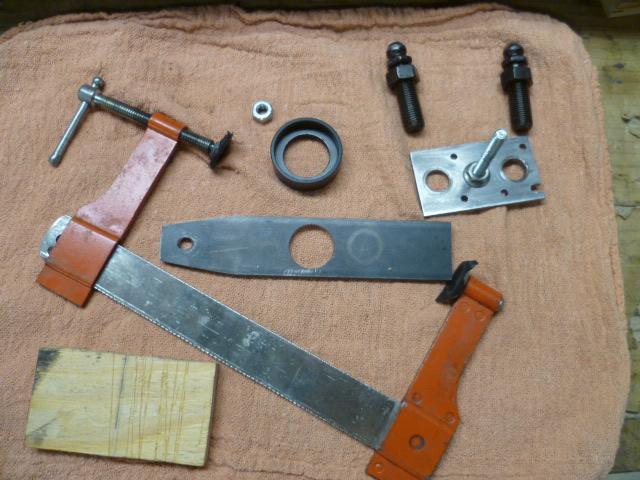
About the spring compression tool... You won't be able to use the "hooks on the cam" version if the cam is removed. (Duh.) Here's some pics of my latest valve spring took contraption. A little faster to use than my previous contraption since there's less wrench turning:
-
I spy something... Old Honda maybe?
-
LOL. I think he woke up not just thinking about one, but in fact, he work up WITH a Disney princess. I think you get significant bonus points for that!
-
Unrelated to the harmonic balancer key, but I got a question. Your timing chain tensioner is really sticking out pretty far... Is the head off, or is everything up top still in place? Timing chain wrapped around the cam gear and everything? if the answer is "yes, everything is installed and engaged", then I think it's time for a new timing chain and guides.
-
Well you've got two obviously bent valves, and marks on other pistons as well. That makes the whole top end suspect to me. The point is, the compression numbers may be more related to issues in the top end than the rings. However... You're this far in and it would suck to do a bunch of work on the top end and put it back together with a tired lower end. Who would ever do such a thing.
-
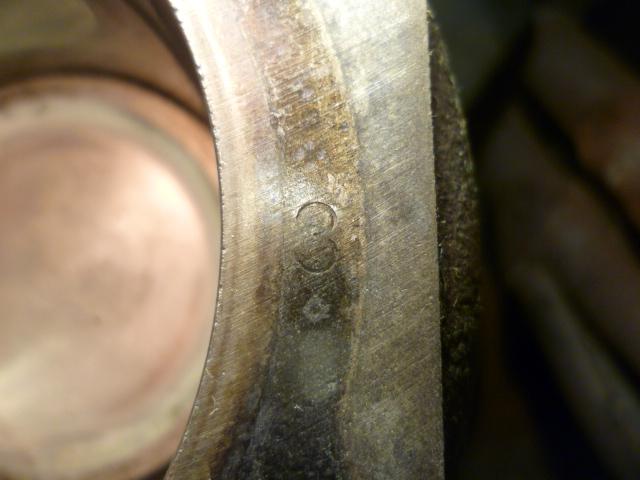
I take it back. Other than the valve dents and occasional other minor blemishes, those pistons don't look bad at all. If you don't have a really good condition other option, I'd run those. Must have been a trick of the camera. I was really expecting serious destruction. And you can see the sizing numbers now. Not cylinder number. It was just luck that the only one you could see before was #3.
-
I think someone did something like that... @zKars maybe?
-
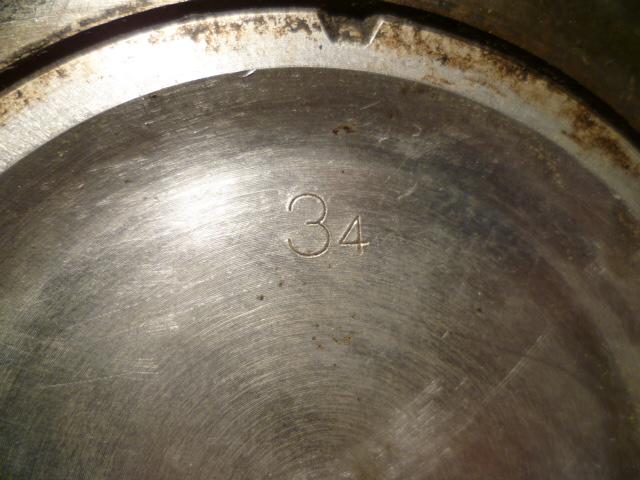
Oh, and about the number stamped on the top of the pistons... The stock pistons should have a number on them, and there should be faint stampings on the block deck surface for each cylinder and the numbers should match. At least the first number. The stock stamping numbers represent "size", not "location". That "3" stamped in your piston does not look like a stock stamping to me though. Here's a couple pics from my engine:
-
Well there's your problem!! Nice to find the smoking gun. Good luck with the project. So you were talking about the condition of the rest of the pistons... Maybe it's just the camera or deposits on top of them, but I don't like the looks of them at all. Other than the dent, number 1 looks OK, but the rest of them worry me. Pitting on top? Detonation maybe? Is it a trick of the camera? Are all the rest of them smooth metal underneath the crud?
-
Happy anniversary!!!

-
Yes, read through the EFI bible. And then read through it again. Compression test. Intake manifold vacuum test. Fuel pressure test. Ohmmeter tests. Ignition timing test. And if you have a few extra minutes, clean some connectors. If you're looking for a place to start, start in the passenger footwell where the heater core leaked and corroded the connectors on the passenger side of the trans tunnel. Also do the temp sensor, the AFM, the fusible links and the fuse block. There are other people who can add much more value about the transmission and driveshaft stuff than I can. I could survive in the wild there if I had to, but there are other people who are experts in that area that will cover you there.
-
LOL. Glad to help my friend!! I'm just a guy with a Z who types a lot, but I try to add value where I think I can.
-
LOL. I like it!
-
IMHO, I think the two first steps would be to a) make sure the electrical connections to the EFI system are clean, tight, and making really good connection. Paying special attention to the temp sensor and the AFM, and b) simplify as much of the tubing as you can in order to minimize vacuum leaks. After you have simplified and gotten the basic system leak free and running well, you can start adding stuff back in. For example... For now, you can just cap off all the stuff running to the carbon can. You can also take off everything having to do with the AAR. The car will idle low until it warms up, but once it's warmed up, the AAR should be doing nothing anyway. I don't remember what they use the TVV stuff for... If it's EGR and EGR only, then you can cap all that stuff off too. Just trying to minimize all the tubing because each end of any tube is a potential vacuum leak. Make it leak free, get the basic system working, and then start putting stuff back on.
-
Here's some pics of the throttle body. You can see there are two small vacuum tube connection nipples on the bottom. The nipple on the left in the pic (points toward the radiator) should run to a "T" and from that T, it runs to both the carbon can and the distributor vacuum. The nipple on the right points downward towards the rear of the car is used for the EGR system (and only the EGR). So if you've removed the EGR stuff, you can cap that one off completely. Here's a closer-upper of the nipples. You want to use the one on the left and cap off the one on the right.:


-
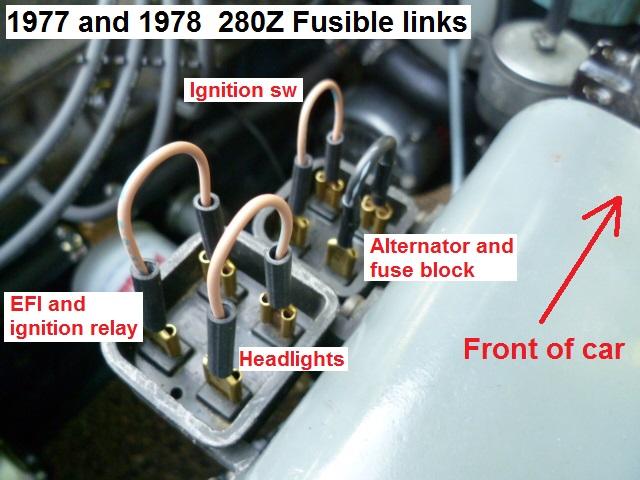
The PCV hoses, while kludgy, are connected fine. The valve cover is correctly connected upstream of the throttle butterfly. Two things catch my eye quickly... First, your fusible links are in the wrong locations. You've got the large BLK link in the back position, and it should be in the front position. It won't explain the performance issues you're having, but fix them now before something goes wrong. They should look like this. The largest link should be the front outboard position: Second, I'm not liking the tube connected to the vacuum port on the bottom of the throttle body... There are two vacuum connections on the throttle body, one that points toward the front of the car, and one that points towards the rear. The one pointing forward is for the distributor vacuum (and carbon can). The one pointing to the rear is for the EGR system. What I'm not liking is there is a hose connected to the vacuum nipple that is pointing rearwards, but you've removed the EGR system. That nipple should be capped off with no tube attached. The hoes you have connected to it seems to wrap around underneath the throttle body, and my suspicion is that you're using it for distributor advance. Is that the case? And lastly... The temperature sensor is often the culprit in lots of EFI issues. Have you taken meter measurements to make sure it's working properly?
-
Haha!! The eyes burning is from your onion running so rich. Happens to lots of them. I'll head over to the other post and see what I can do.
-
Hmmm... With today's prices on the early cars, I'm having a hard time recommending any significant modifications from stock. How about you sell the early one and buy two later ones with the proceeds?
-
Agreed. Looks fantastic!
-
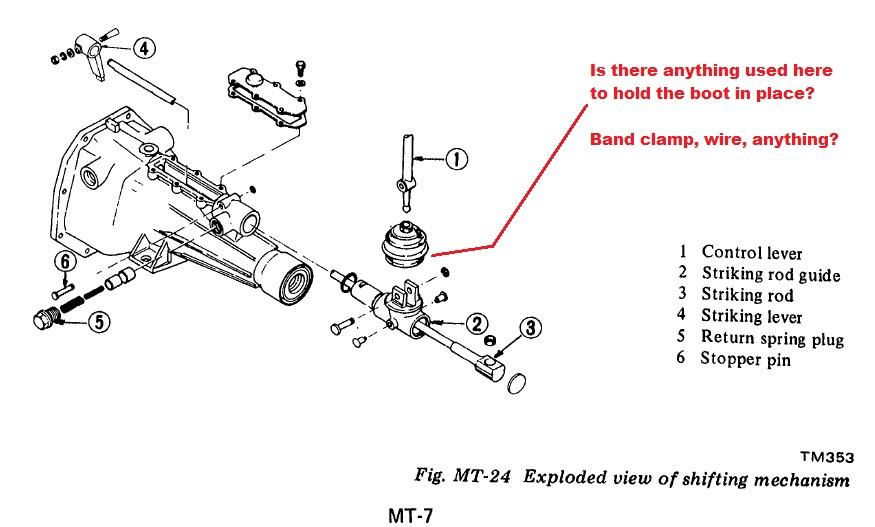
I'm assuming you're talking about the little three inch diameter boot that attaches to the transmission? If that's the case, then no... there is no retainer specified. Here's what I was told: https://www.classiczcars.com/forums/topic/44315-innermost-shifter-boot-any-clamps-holding-in-place/ However... I kinda like the idea of the zip-tie.
-
My general thoughts on the big picture is that it's your typical fuel injected Z that has been sitting for 30 years. Vacuum leaks (small ones all over the place) Dry-rotted leaky intake air ducting Corroded dirty connectors Questionable previous repair workmanship Fuel pressure problems TPS adjustment issues Ignition timing issues AFM that has been adjusted by a PO Maybe even some common issues like having the temp sensor and thermotime swapped Add to that, a list of aftermarket things that have been put into the car over the course of it's history: Injectors of unknown flow rate probably replaced at some point Aftermarket coil that may or may not need a ballast resistor Aftermarket ignition box that may or may not be wired correctly You know... The typical Z. Work on one layer at a time. Like an onion.
-
Quick look at the internets: Moog Parts defines "steering ratio" as the ratio of how far the steering wheel turns to how much the wheels turn. For example, if a 360-degree turn of the steering wheel causes a car's wheels to turn 20 degrees, then that car's steering ratio is 18:1 (360 divided by 20). So you cannot determine steering ratio simply by measuring the distance the rack moves for one revolution of the wheel. However, If everything else in the system is the same (like the lengths of all the other steering members), then the rack that moves more per wheel rev will have a higher ratio, but I'm not sure (in the Z car realm) that we have nailed all that down for sure.
-
Remember that just because you saw it on youtube* does not make it true. (Even if you saw more than one person suggesting that it was.) * or facebook, or twitter, or reddit, or parler, or etc
-
I would have to see the holes under that shiny new block-off plate to be positive, but I believe it is unnecessary to plug those two exhaust holes.* I think the block-off plate seals off the vacuum side of the intake manifold from both those two holes. If you want confirmation, take that plate off and post up a pic of the top-side of the intake manifold where that plate is bolted on. So that would be the good news. The bad news is I don't think that has anything to do with the problem you are having with the car. *other than keeping the mud daubers out of them.

