Captain Obvious
Free Member
-
Joined
-
Last visited
Everything posted by Captain Obvious
-
 Hahaha!!! It's true!! In fact, I just got a new one! And... I hated it so bad* that after a short usage time (one month maybe), I just got ANOTHER new flip phone of a different brand. The new-new one is more advanced than my previous flips. I handed it to my son yesterday and in a matter of minutes he was laughing at funny videos on youtube. So it's got that. I might never use it for that, but it's clearly capable. So ppppbbbbhttttt for all you guys who think I'm stuck in the 1990's. Hahaha!! * IMHO, it should have never left the factory. If I wrote the software on that POS, I would have been fired on the spot.
 -
Stealing a stock Z? For me... Gone in 60 seconds and I wouldn't care at all whether the security screws were broken off or not. You need something more elaborate than that. Great list. Let me add... Break a window, reach in and open the hood, disconnect the steering coupler donut, jumper the starter solenoid, and then use the starter to crank the car to your place while steering by kicking the front tires in the direction you want to go. Bring extra batteries just in case the PO was having alternator troubles. Or a charger and a really long extension cord.
-
Yeah, I'm not sure I did a good job of putting my thoughts into words. Av8ferg did a much better job than I did. So let me try again... So you think this forum exists for the purpose so you can ask us every question and you don't have to do any research yourself? is that why we're here?
-
Yes, they're all polyurethane. The question is "what are the characteristics of the polyurethane?" Just because they're poly, doesn't mean they're "the same". It's like saying "they're made of plastic". But I'm sure you already knew all that.
-
Nice work. You've got access to one of those? That would be really sweet!
-
I suggest your premise is not correct. I believe there would still be a need for this forum even if you googled every question. TATFAW. Better yet... Let's try that to find out.
-
Haha!! Life's funny that way, huh? So durometer would probably be relatively easy. Especially if you're really only interested in the relative difference between the two. But other than that... Maybe you could go back to the office for a visit, and while you're there... Take a spin around the test lab one last time?
-
LOL. I think everyone agrees with you. Steve should never admit it in public, but it's just all way too well done to be "coincidence". No. Absolutely not. That's just about perfect. Maybe the only thing that could have possibly been a tiny bit better would be if you decided that the tire inflator was risky because it generated too much pressure, so the wife had to resort to something a little more gentle. Like blowing into a tube or something.
-
I suspect the specifications you seek would only be available through two sources... 1) The manufacturer(s). And I agree that it would be unlikely they would be willing to share that level of detail. and... 2) Someone who has purchased both and had them analyzed to determine the detailed specs. Maybe you'll find someone who has already done that analysis and is willing to share, but I think it's a long shot. Good luck with the venture. Have you considered using rubber bushings instead?
-
I believe it's around 127 or so.
-
Hahaha!!! Got it!
-
My (hopefully sage) advice would be to start with the small, simple, obvious. Take a pic of the back of your alternator and post it here so we can confirm that you have the right alternator. Start there.
-
That all makes sense. Many people do some of their best thinking in that location!
-
Glad you're happier. So just how corporate are we talking? Are we talking "Now I understand Dilbert, and it's really really funny" kind of corporate? But whatever the details, Just glad you're happier!
-
LOL!!! Here's hoping we didn't run him off with our (hopefully good natured) irreverence !
-
Uhhh... bluez, You know your car isn't blue, right? Seriously though, welcome aboard! 😃
-
There should be a vacuum line coming up out of the squarish portion of both front and rear carbs. The connection from the front carb controls the distributor vacuum, and the one on the rear carb controls the EGR system. If you're not running EGR, you can do without the one on the rear carb, but the front one most likely has to stay. And the air bypass hoses are a requirement. They need to stay. Can you post up a pic of the documentation you are operating from?
-
You said the problem started shortly after you replaced the alternator. So as Captain Obvious, it is my duty to suggest you start your investigation there. I suggest you disconnect your new alternator and see what happens. Also, as a side note,,, For a 76, that front outboard link should be black, not brown. And it should be the largest link you have. That link powers a whooooooole bunch of stuff. Hopefully the issue is in the alternator and you can end the search with that.
-
jonbill's method is the same one I use. Works for me.
-
And about your strut boot fitment... I believe the strut boot is intended to snap onto a bump stop plug. The bump stop goes up under the hat and the boot can be attached to the bump stop either with the boot simply snapping into a groove in the bump stop. or a zip tie if necessary. In other words, the aftermarket boot may not be designed to snap around the flange on the hat like the original, but may snap around the bump stop instead. Like this pic from a generic boot on amazon:
-
My translation... I believe they are referring to jonathanrussell's comment at the top of this page about how do deal with the battery tray refurb: "To me, the best way to restore the battery area is to drill out the spot welds and remove the tray. If you do this, buy a nice, properly sized spot weld drill bit and extender, and practice removing spot welds without drilling through the body. You will then need to weld up the holes in the battery frame...or buy a new one. I use rivet nuts to re-attach the tray to the body."
-
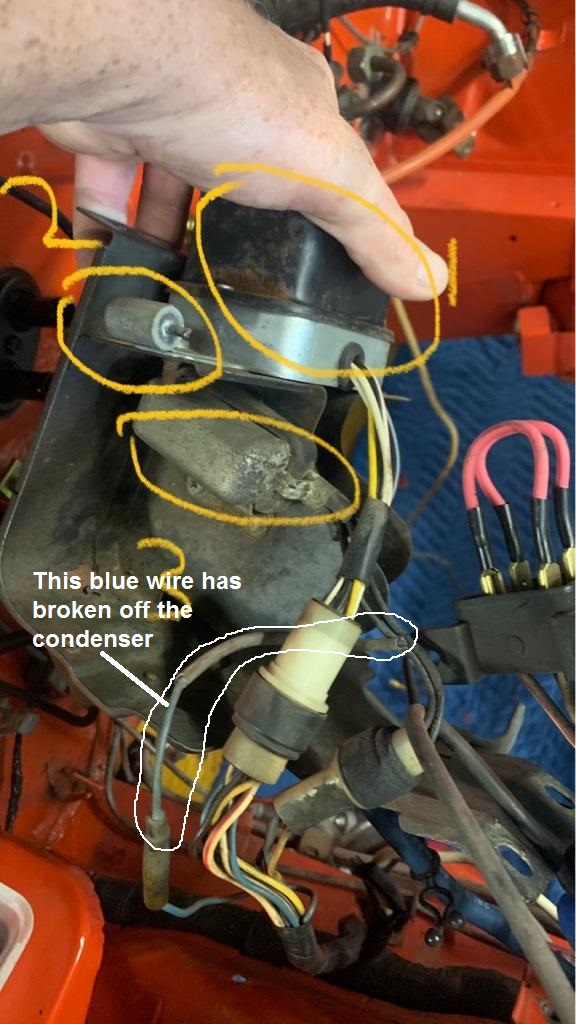
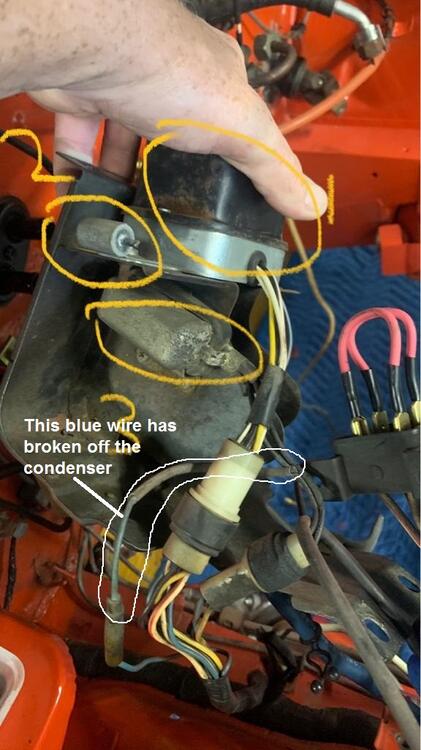
Nevermind... I found your condenser wire. Give me a sec. This should help:
-
According to the wiring diagram, the blue wire that connects to that condenser comes out of the main harness and I would expect it to come out somewhere close to where the voltage regulator branch comes out. It should be a single blue with a bullet connector on the end. I'll look at my car when I get a chance and see if I can find mine. As for what you should do with an alternator choice... If your original alternator and external regulator work fine, then there's nothing wrong with just leaving them be. But if either of those parts (alternator or regulator) give you troubles, then I'd recommend taking the opportunity to mod over to the newer internally regulated version.
-
Yeah really! Way to let us all hanging here!!
-
@Zed Head Not really pertinent to the conversation at hand, but actually I think there's a lot of gray area involved here. I haven't actually scoped deep enough into the ECU to know exactly how they do things, but I believe they are more sophisticated than just using capacitors for duration. I think there ARE actually ones and zeros. You'll notice in the functional description you posted for the ECU, they mention "frequency conversion". To me, that means they are converting the analog signals to a frequency signal (V to F), and then doing "calculations digitally". Now it might not be a computer, but I do think there are adders, timers, counters, multiplexers, summers, integrators, all that kind of stuff. And all that can be done with non-programmable logic circuits. So even though it might not be programmable, I DO think they are converting signals to "digital" and using ones and zeros derived from a highly accurate resonator circuit. It's much more accurate than an R-C time constant.