


Captain Obvious
Free Member
-
Joined
-
Last visited
Everything posted by Captain Obvious
-
 So it really sounds like you've got weak / dirty connections in the EFI system, and that's not unusual at all. Very common situation for these cars. If you're going to take your car in for some tuning work, you need to be absolutely double dog sure that all your EFI connections are clean, solid, and reliable. Top priorities for me? If all of your connectors are still original (except for injector #1 which you have already replaced), I would go ahead and replace the other five injector connectors and polish up the pins on the injectors. I would also replace the temperature sensor connector with new, and polish the temp sensor pins. I would pull and polish up the dropping resistor connections. Lastly, I would inspect the AFM connector and polish up everything there too. Hope it's that simple!
 -
Good point guys. Just because it shows "continuity" doesn't mean it's a good hard low Ohmic connection.
-
He did. (Along with a bunch of other fantastic trouble shooting efforts!) That's why I'm thinking the break is somewhere further up inside the harness. If I were there, I would stick the meter in the connector and start retching the harness around and looking to see if I could see the issue. I'm thinking that it might be a green corroded crimp connector somewhere inside the harness?
-
Oh, and the brightness of the noid light getting brighter at higher RPM's is perfect. It's because the duty cycle of the injector pulse got wider. More wider. More gas at more RPM.
-
I was thinking it was an intermittent break inside the wiring harness (somewhere further up into the harness than right at the connector). But I didn't suggest that because I could not reconcile that with the following: I could explain how connecting the #1 connector onto the #2 injector might cause that injector to work*, but the part I really couldn't deal with was when you put the #2 connector onto injector #1 and it did NOT make that injector start working. That's the part that caused me not to pursue that avenue more thoroughly. *small break inside the harness causing an Intermittent connection.
-
I liked it when Dulcich said that he turned away because he just couldn't watch. And when Freiburger was talking about tipping them into a dumpster. Getting them to teeter juuuuussst right on the lip before giving the final push.
-
I'm watching it on the Motortrend channel on cable TV. Probably depends on if your cable provider carries that channel and what's included in your subscription. I also assume that you can "stream it on demand" as well. Whatever that means.
-
I went back and watched the slant-six thing again where Dulcich was talking about the head gasket. "I actually agonized over the head gasket. There's only four fasteners per cylinder and they are puny 7/16 bolts, so not very good clamping. I was gonna use a little secret sauce on it. And do a little this and that on it. And then, you know, it was late at night. And it says 'USE NO SEALER' right on the gasket. So I'm just gonna slap it on there." What I want to know is... What is his secret sauce, and can I have some more details about what is involved with "this and that".
-
I find Steve Brule simply amazing. I mean the other two guys are no slouches either, but Brule is phenomenal. So about that slant six episode... They popped the head gasket due to the high cylinder pressures* and Dulcich said it was his fault because he put it in dry with no sealer on it. Have you heard him talk about what sealer he WOULD use (if he were using one?) Did he mention that in another episode that you've seen? *running ten pounds of supercharger boost on a 1967 slant six! LOL!!!
-
Yeah, I really like the theory stuff. Pretty much none of it applies to "normally" driven cars, but it's great anyway. The cam timing one I think might be the most applicable to the way most of us drive our cars. I watched the slant-six power last night and really enjoyed it. I was alone watching TV and honestly laughed out loud at least three times!
-
https://www.classiczcars.com/forums/topic/57215-diy-gland-nut-socket-with-pics/ Bow Chicka WOW WOW!
-
Well if you're having the same behavior with a new replacement injector, I don't think it's the injector (directly). And if you've replaced the connector and can swap them around like that and not ever get an RPM drop when you disconnect #1, then I'm running out of ideas. I like ZH's thoughts about a vacuum leak at that cylinder. Maybe right at the injector seal. Although I find it hard to believe the leak would be so bad it would prevent the cylinder from firing. Worth looking into though. Agreed that this is an application where a couple color tunes would really come in handy.
-
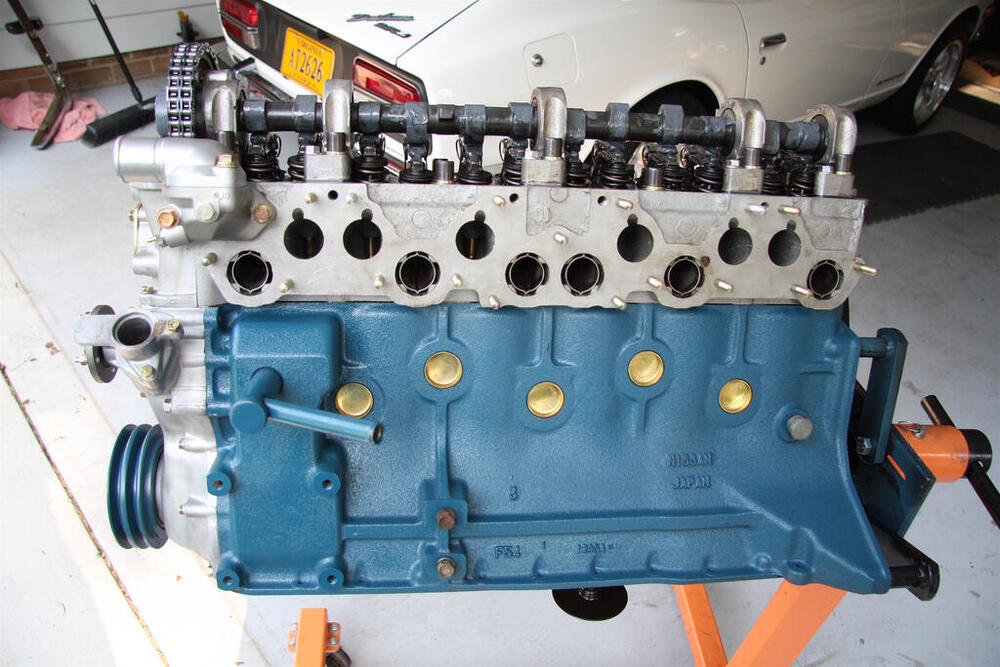
The fuel injected heads have holes drilled and tapped for both carb intake manifolds and FI intake manifolds. What you're seeing there is the peeking out of one of the FI intake manifold mounting holes. Here's a (hoovered) shot of the side of a FI head where you can see all of the holes: So to answer the question about what pitch to use... I believe it is M10 x 1.25. If you can't get that to thread in, maybe the threads are mess up inside the head.
-
I recently started watching a TV show called "Engine Masters" and I really enjoy it. Granted... Most of their work and findings are primarily applicable to WOT drag racing kinda stuff, but I really like when they get into theory and concepts. I also like the friendly banter back and forth between the three guys on the show. Could easily be me and two buddies. I've got the DVR set up to pick it up. If you've got time to relax and want something "light", I recommend it.
-
Respectfully submitted... Distributor cap doesn't really make sense here. He said he's getting good spark at number one. I think it's got to be a fuel problem somehow. Really sounds like an issue with the injector or connector. Puzzling there too though since the diagnostics have been pretty thorough. ckurtz2, You said you replaced the #1 injector and connector. Was the replacement injector new or used? And when you said you replaced the connector, how did you do that? Snip the old one off and connect in one of the aftermarket replacements?
-
Hit it.
-
It's got a cop motor. A 440 cubic inch plant. It's got cop tires. Cop suspension. Cop shocks.
-
That's amazing! I got the same combination on my luggage!
-
Let's hope so. I reported the spam a couple days ago. I think Mike came in and cleaned it up then. I also suggested that it might be time to reevaluate the sign-up procedures. And then this second (larger) wave hit. I'm wondering if Mike is having technical issues at his end... This current wave is severe, and I'm wondering if he's locked out at his end or something. That, or he's sitting in a lounge chair somewhere warm by the pool, sipping fruity drinks!
-
Oh, I get it... I'm not unimpressed with you. I'm unimpressed with HoldPeak's annoying act of "ride the coat tails of a long-standing reputable manufacturer of similar products by conveniently coming up with a name that can easily be misconstrued by the inattentive and make them think they are buying something of higher quality and reputation". That's what I get out of the whole naming thing.
-
Wow... "HoldPeak" meters, huh? So they get to use the abbreviation HP in all their products and model numbers? How convenient.... "For more than a decade, We specialize in R&D, design, production, sales of the digital measurement instrument meter. At present, our products have been exported more than 80 countries and areas around the world, and we established a complete set of after-sales service in Europe, the United States and Australia"
-
Not for the fuel pump. The pump is on the other side (the front side) of the axles. I don't know what that is. My PO must have removed that. My only thought is an anti-puncture shield between the tank and the head of the bolt that holds the rear control arm in? Problem with that theory, is there isn't one on the other side...
-
Hahaha!!!
-
Yes. The change to the different length float valves coincided with the introduction of the 3-screw round tops. In other words... The earlier (70-71) four screw round tops used the same float valve in both carbs. The later (72) three screw round tops used different lengths between front and rear.
-


Important Information
By using this site, you agree to our Privacy Policy and Guidelines. We have placed cookies on your device to help make this website better. You can adjust your cookie settings, otherwise we'll assume you're okay to continue.