Captain Obvious
Free Member
-
Joined
-
Last visited
Everything posted by Captain Obvious
-
 Sorry. I've really been meaning to get on top of my A/C project, but time keeps on slipping, slipping. That said. let me clarify something... I mentioned that I had collected all the stock parts I need to put a system into my car, but I am still opposed to using the original compressor. Even if I use the original hard lines, etc, I still plan to use a newer ubiquitous compressor from something easy to find. And Dave WM has suggested to me that a newer parallel flow condenser is better for R134 than the original serpentine version. Apparently R134 likes a parallel flow, while R12 likes serpentine. So now I'm thinking I would try to retrofit a newer parallel flow condenser instead of the original. But all of this still assumes that I actually get back to working on it...
 -
Haha!!!
-
And some of the aftermarket radios do make use of some of the illumination stuff in some way. I don't see any mention of it on the wiring diagram from Kenwood above though. What Kenwood are you using? I'll see what I can dig up to be sure.
-
They changed some of the wire details over the years, but for 77... The blue is +12V power in. It should be hot when in ACC and ON. If it's not, you'll need to start poking around upstream and find out why. The black is ground. Should be hard ground at all times. Black/red is the original speaker output. Green/White is illumination bulb high side. Goes to the headlight switch. It should go to +12 when the parking lights or headlights are on. Red/Blue is illumination bulb ground side. Goes to the rheostat. It should read a variable voltage depending on where you have the dimmer knob turned. At full brightness, it should read zero volts, and at full dim, it should read close to 12V.
-
I thought your tolerance for no A/C got depleted that year you tried to ice bath yourself while driving. Wasn't there some goofy thing with umbilical cords to a cooler of ice water and a pump?
-
Maybe it's just semantics or wording, but what you have described really makes no sense. Let's start with a premise - "If the car is not moving, and the transmission is in a gear (any gear), then nothing inside the transmission is spinning." With that in mind, when you are sitting still, there really isn't any difference in what's moving inside the transmission regardless of which gear you are in. Neutral is different, but all the gears (including reverse) should result in everything inside the tranny to be stationary. Maybe the shift lever is buzzing on the worn bushings or against the tunnel somehow? Maybe the shift rods inside the tranny are buzzing vibrating when in first or second. Unless I'm misunderstanding the issue (which is totally possible) then this cannot be a bearing issue inside the tranny case.
-
Hahahaha!!!! I'm totally stealing this.
-
Glad you got the hazards working! And what you found makes perfect sense. I was thinking it had to be inside the switch itself, but that's not true. It had to be either inside the switch, or the downstream wiring until it joined with the firewall harness. Good work! That corrosion is from your heater core leaking 20 years ago. Most 260's and 280's have some green fuzz growing in those connectors.
-
Sorry Matthew, but I haven't made any significant progress with my A/C. I have collected all the stock parts I need to put a system into my car, but other than collecting parts, that's it.
-
Glad it was that simple despite the super coincidental nature of the failure. Occam's razor. So you want to send me your dead tach so I can open it up on the operating table and do some reverse engineering?
-
Looks great. Doesn't have to take a lot of tension. Just has to keep the ends from flopping around out in the wind!
-
No biggie. The only reason I could tell it wasn't a ZX was because of the location of the BCDD.
-
So I (actually) read through the details of the thread this time and I think I have a better understanding of what's going on... The issue you are having is that the steering SHAFT that runs through the center of the steering column assembly does not seem to be grounded. The outer shell may be (or may not be), but that isn't good enough to get the horn the actuate. You actually need the rotating steering shaft in the center to be grounded. So, I agree though... I would expect the center shaft to get grounded through the roller bearings, but maybe not? Have you tried grounding the outer tube with a dedicated wire and seeing if that makes your horn work?
-
-
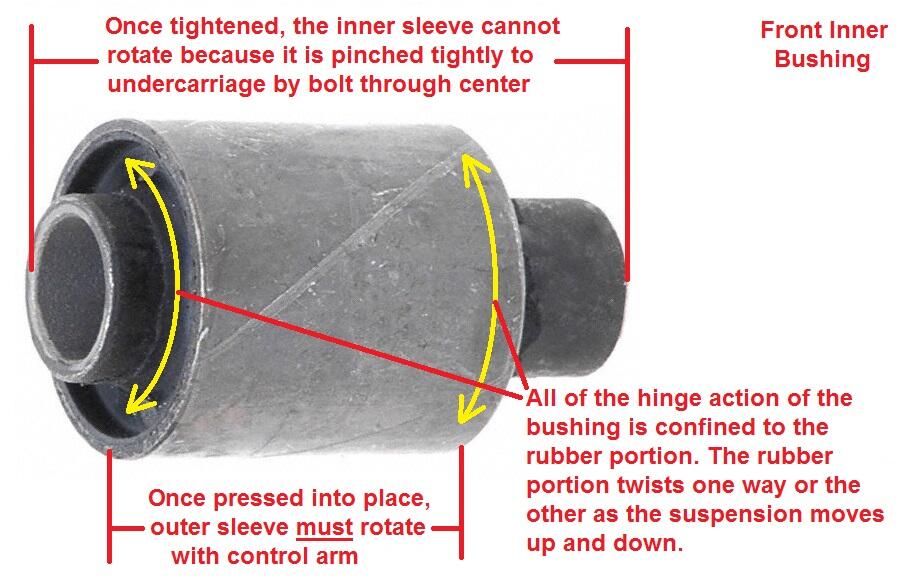
If you've got play like that in the AFM, I'd just replace it with another one. Then after you've got it fixed, I'd autopsy the old one. Grind the stripped out screw heads flush and then pry that cover off. I would expect the sealant to put a fight though. I'd be interested in seeing the insides. It seems hard for me to believe that a bushing has worn out so much there is visible slop in the arm. Wonder what happened and why!
-
-
I have very little 240 experience, but I wouldn't expect the steering coupler to be the "planned" source to ground the steering column. I would expect the steering column to be grounded through the bolts that hold it to the firewall or the bolts that hold it up to the underside of the dash.
-
I'm not sure the Z had a temp controlled vacuum switch. I think the ZX did, but based on the pic above, this is not a ZX. And also on the Z, the ported vacuum signals for the distributor/carb can are a completely different source than the one that is used for the EGR system. Similar in concept, but completely different ports and actuation loads, etc. The "T" pictured above has nothing to do with the EGR system.
-
Correct, those two things you have circled should "T" together along with the carbon can.
-
Yeah. unfortunately that stud was molded into the rubber of the bumper end when it was molded at the factory. As Patcon suggested, about the only thing you could do now is grind it all out and glue something in as a replacement. And once you've gotten good at it by practicing on your bad one, I'd do your "good one" too, cause it looks like it's not long for this world either.
-
I'm lost... What's a "signal fuse"?
-
I think that "T" is supposed to go to the same place your distributor vacuum connects to. It's a ported source on either the front carb, or the EFI throttle body (depending the year) and "T" to the distributor advance and the carbon can.
-
I found a pic of the back of the tach installed. It looks to me like they are grounding the turn signal indicators through the tach body and not through the harness? I don't have a tach here loose to verify, but it looks like that to me. That opens up the possibility for some other ideas. You can also see that they changed a bunch the wire colors on the little stub harness on the back of the tach. So you have to be careful about referencing wire colors since some of them changed at the tach connector:
-
So I got a chance to look at the wiring diagram, and here are my thoughts. First, the indicator lamps in the tach are simply in parallel with the corner lamps. The implication of that is... If all four corners blink with the turn signals, your non-functioning indicators in the tach have nothing to do with either of the flasher modules. It also has nothing to do with the hazard switch. Steve's thought about the ground for those two bulbs being broken is a good one, but I'm thinking if there was a problem with that ground, the tach wouldn't work either. Depends on where it's broken (if it's broken at all). So I have a C.O. question... What is the possibility you swapped the turn signal indicators with the tach illumination bulbs? Maybe you have the bulb sockets swapped? I remember you said that you don't care about the illumination circuit because you don't drive at night... I'm thinking maybe when you put a turn signal on, one of your illumination lamps is blinking and you just can't see it in a bright garage? Just tossing out theories. And for the hazard issue where only the left side blinks... I'm thinking that since all four corners work fine with the turn signals, then that problem must be inside the hazard switch. I took a refresher look and they do have separate circuits coming out of that switch for left and right sides. So it's completely conceivable that one dirty or deformed pair of contacts could knock out one side of the car's hazard lights.
-
Haha!!! I'm going to do my best to make that stick now. And good luck finding someone to let you borrow a mill. !! And glad to hear your pump seems to have survived the ordeal. I'm not surprised. It's not like you ran it for an hour with the milkshake in there. Just a couple seconds and you got it changed out now. I'm thinking it should be fine. Might want to change it again after a shorter than normal run interval just to be sure?