


Captain Obvious
Free Member
-
Joined
-
Last visited
Everything posted by Captain Obvious
-
 Yeah, a lot of individual parts "say" just 31000 miles, but to me, it looks like someone spent a whole lot of time trying to achieve that. Like @inline6 above, I've got a whole host of "Yeah, but then why does this look like this?" situations all over the car. He hit some of them, but I've got others as well. Things like: Dented frame rails, control arms, and floors. Impossibly shiny clean yellow paint marks gratuitously applied on rusted hardware that has had the original plating stripped off. Many other hardware pieces where the original plating has been stripped off or painted over with silver paint. Adjustment witness marks on things that just should never have needed to be adjusted like the door latches. Smeared screw heads on things that should have never needed to come off a 31K mile car like the hood prop arm. I see a well kept Z wearing a well done, but many year old repaint. I see a beautiful Z that I would love to own, but I do not see a survivor.
 -
-
OK, OK... So it did happen. Thanks for the pics. It looks like you're headed for the typical floor and frame rail work. How about the more complicated areas like the doglegs. They look OK?
-
There are similar clips used on the Z to hold the heater air box clamshell together. Not sure they're the exact same clip, but the same idea at least.
-
Since the hatch lock linkage doesn't see any rotational torque force, I think a sloppy hole fit on the back of the cylinder would be fine. You need it to be drawn tight against the back of the cylinder, but the mounting screw takes care of that. I think that hole could be a really loose sloppy fit on the back post and it would still work. You wouldn't be able to do that on the doors because you have to rotate them to get actuation, but on the hatch, that's not the case. It's push to actuate. And when you lock the hatch, it just turns the cylinder so that linkage misses it's target and just waves in the air. So there's no issue there either. It's not like that linkage blocks anything... it misses.
-
Why don't you just use a small flat or square file to file the current rectangle to fit ninety-degrees? Like this. Won't be quits as strong as original, but with a washer under the head of the clamping screw, it ought to work:

-
LOL. You guys are fun. Looking forward to the pics! Whatever they turn out to be! Haha!!
-
Well I got no dog in this fight, but I really don't think that's original paint. There's just too many flags all over the place. In the auction, they never say it has original paint. They do, however, say the following: "The seller reports that a scratch on the right fender and paint chips on the right door were blended in. More than 45 paint-meter readings provided in the photo gallery below show thicker measurements in the aforementioned areas." So what does that mean exactly? To me, that means "We took paint thickness measurements from all over the car and everything looks about the same thickness with the exception of the right side door and fender. Seller reports that those areas were sprayed to fix some issues." I don't think that means the rest of the car is original... All that means is that the rest of the car is CONSISTENT. Like maybe the whole car was sprayed at least once some time in the past, but then the right side was done again? Makes me wonder what the paint thickness would be on a confirmed original paint survivor. Would it be half the thickness they got all over that car? I saw the heater core looped too and I'm guessing the heater core is leaky.
-
Yeah, that's one of the reasons I'm wondering if everyone is in agreement that it's original paint. It's certainly a beautiful car and I'm no expert on what should/could be painted, but I see stuff that makes me wonder.
-
Are we sure that is original paint?
-
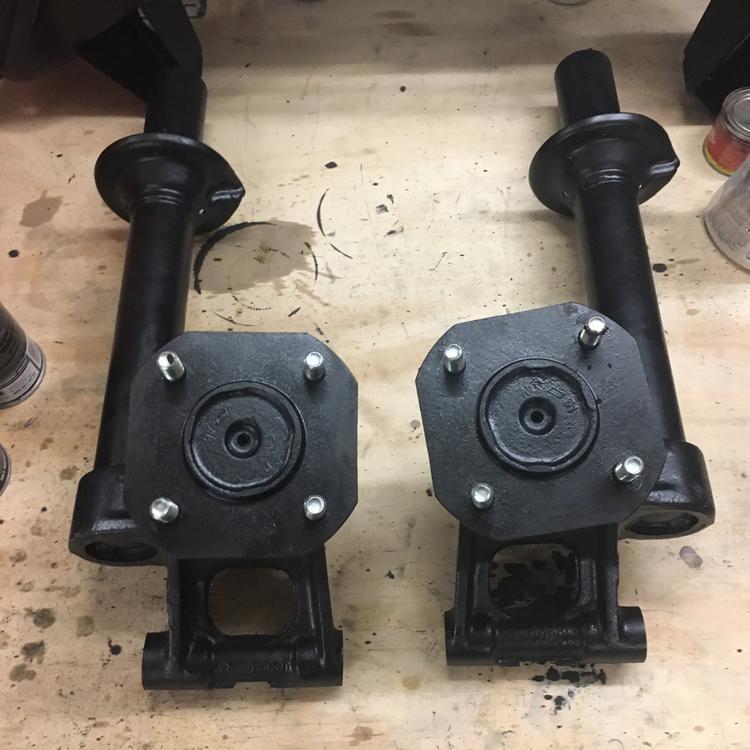
I agree with granny above that hub-centric location could/should be more accurate than stud located if the car you're working with was designed to be used in that way. The problem as I see it is... The Z is not designed for that. (Unless you manage to catch the small lip right near the base of the post) the front hubs have that tapered rough cast surface on the center bearing post. That center of the original hubs might run perfect in the center, or it might not. It certainly wasn't machined to guarantee that it would: And the rears have a machined center area, but I think it may be too short to reach deep enough into wheels to do any registration?

-
Good pics. I can't tell if the needle depths are spot from just pics, but they look good to me. The typical mistake is that they are installed with no shoulder visible and you do not have that issue. They're at least close, so that's good. As for which needle it is, I think it's worth a phone call. Many people replace the original N-27s with SM needles. Some people end up with great results doing that and others end up running rich with the SMs.
-
Yes, the part number is written on the fat end of the needle, and yes you need to pull them out to read them. That said, however... I wasn't thinking you needed to go out and pull the needles right away. I was thinking more along the lines of looking at the literature that came with the carbs from the company that rebuilt them and seeing if there was a listing on there of what needle they used. Failing that, a phone call to the co. would be my next idea. As far as the installation depth goes, you ought to be able to see needle by looking down into the carb throat. Might need a little right angle inspection mirror to see deep enough, but you ought to be able to see if the needles are installed to the proper depth without too much muss/fuss. And if you can't get a good view of them that way, all you have to do is pull the suction cover off and pull the piston out of the carb for a look. Worst thing that would happen is you might have to replace some damper oil if you spill it.
-
Yes, that's what I'm saying. I have no reason to believe that thing is anything other than a simple pressure (or lack thereof) switch. If it were my car, I would put that device in a jar and try to draw a vacuum on it and see what happened, but if I could not get that to work, I would just short the connections and see what happened. Unfortunately I don't know if you would hear or smell any difference... The effect may be subtle enough that you might only be able to see it with diagnostic equipment.
-
So all of that sounds like a significant rich condition. What needles are you running? Stock N-27 or something else? Also, your comment about the needle seating is important... It is possible to install the needles too deep in the suction pistons and if that happened, it can result in a rich mixture.
-
Pics or it didn't happen?
-
Well I'm very glad you're here. Not only because it helps keep you out of trouble, but also because I'm just glad you're here!
-
About the altitude compensator... All of the documentation I have indicates that the altitude compensator is an ON-OFF switch affair, and not an analog resistance device. I don't have one of those devices here for confirmation, but that's what the docs say. (Ref 77 FSM EF-15 and the 1980 FI bible page 85.) I wouldn't worry too much about a dramatic change in engine operation when the switch changed state. They can handle that in the electronics with smoothing and hysteresis. As for the stuff inside the altitude switch... Don't knock that thing around too much. That "spring" inside is actually a hermetically sealed bellows chamber. It's very similar in construction and operation to the bellows in the throttle pull-pull off and the BCDD. Here's a thread that's about the BCDD, but there are some good pics of the BCDD altitude compensating bellows that they used inside there. Looks like this: Here's the thread where those pics came from: https://www.classiczcars.com/forums/topic/58748-info-on-bcdd-boost-controlled-deceleration-device/
-
I would first make sure that you don't have any vacuum leaks anywhere. Any leaks you have will only exacerbate lean running issues you have due to the altitude. Double dog sure. Second thing I would do is check the needle positions in the suction pistons. They should be installed with the shoulder at the correct location. If someone has messed with the needles in the past and put them back in wrong that could contribute the to uneven nature of your two carbs. Maybe one needle is installed different than the other? Beyond that... I'm surprised that 4000' altitude is enough to cause that much of an effect, but I can't argue with your results and success.
-
Yarb, My pleasure. Pochie45566, so as mentioned above... You can't just slap a BCDD blockoff plate on there and call it a day. Doesn't work. And your A/F ratio is 11.5 at 1750 RPM under no load? I'm no expert on the subject, but that's something that probably needs some attention as well.
-
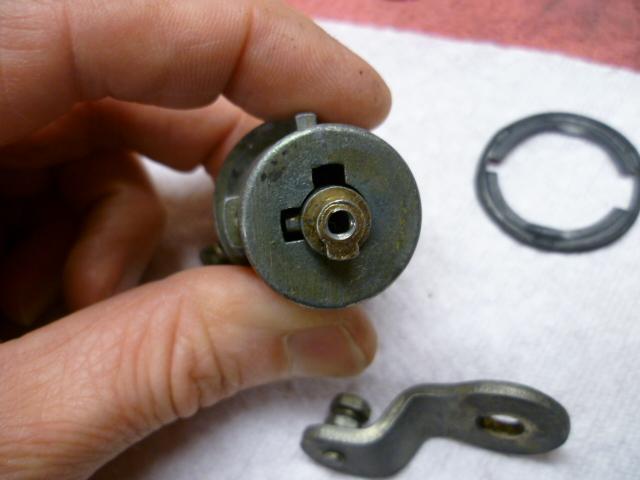
That would be really cool if you can just swap the actuation arms and drop it in. I know there have been people looking for replacements for that hatch lock. There needs to be some sort of non-round feature between the arm and lock cylinder so the arm doesn't slip on the post. Here's how it works for the stock one:
-
Mine does that too. I suspect your fuel check valve on the output side of your fuel pump doesn't hold pressure overnight. It holds for some shorter period of time (seconds, minutes, hours?) but not enough hours for it to have fuel pressure for that first cold start of the day. To test that theory, you can force your fuel pump to run and build pressure before you try to start the key. Couple different ways to accomplish that depending on the year, but the one failsafe version is to disconnect the small spade connector to the starter solenoid and then turn the key to "START". You should hear the fuel pump run. And I bet you'll be able to hear the difference when the pressure has reached normal. After you're convinced the pressure is up to where it should be, reconnect the starter and then start the car.
-
Glad you got it solved. Too bad the bolt stub didn't come out easily, but they never do for me either.
-
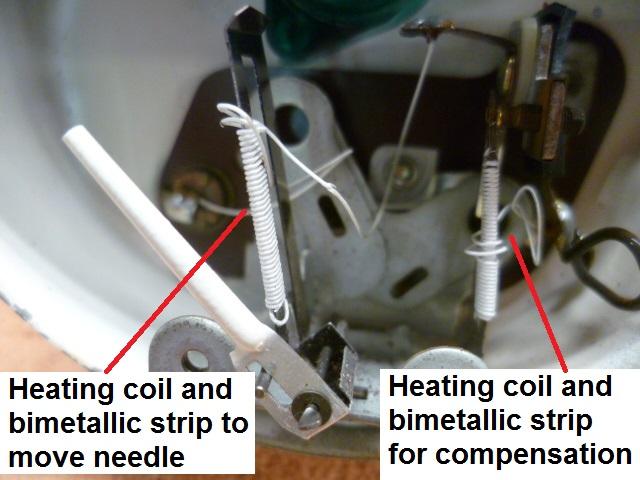
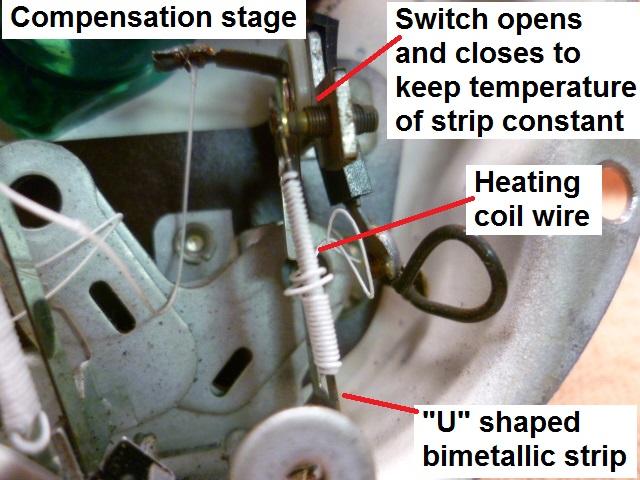
OK, I will convert this stuff to it's own thread when I get a few more minutes to make it read right. In the meantime.... I have more pics. Here's a pic of one of the gauges. You can see the two different heating coils wrapped around two different "U" shaped bimetallic strips. Interesting to note that internets research indicates that "U" shape is part of the compensation as well. The concept is that the unheated side will compensate some for changes in ambient temperature. "They say" it doesn't get rid of all of the temperature based effects, but it helps some. Between that "U" shape and the compensation stage, the gauges seem to be really stable. So this is an example of the compensated gauge with the two stages: And here's a closer-upper pic of the compensation stage showing it's parts: The switch opens and closes to keep the temperature of the compensation strip at a constant temperature (ave). If you put a Voltmeter on the sender unit, you'll see that it isn't a steady voltage, but is instead a square wave.
-
I don't consider it cheating on your first piece.. And even on piece 1000, if you aren't making some special pitch or tight fitting thread spec, it still isn't cheating. I don't remember... Is your lathe equipped to cut metric threads? Glad you're making chips!

