Namerow
Free Member
-
Joined
-
Last visited
Everything posted by Namerow
-
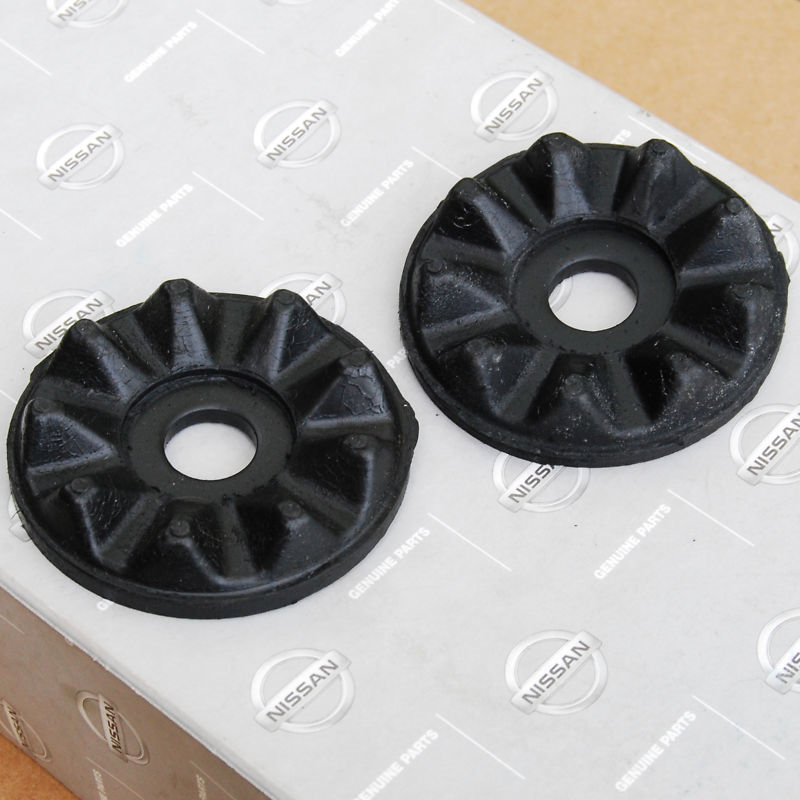
 TS71-18 describes a cobbled-up fix that Nissan came up with to address complaints from owners about powertrain noise in Z's with automatic transmissions. It largely consisted of hanging a big-arse weight off the back to the diff casing. It also doubled up on the number of wavy rubber washers at each of the 4 places where these are located. It's interesting to note that the 'teeth' of the new, add-on washers appear to have been designed to interlock with those of the original washers. That would have really stiffened things up. Although I haven't checked the parts manual, I doubt whether this dealership service kit ever made it into actual production. Nissan probably found a more elegant way to solve the problem with the auto-trans Z's (different final drive ratio, maybe?)
 -
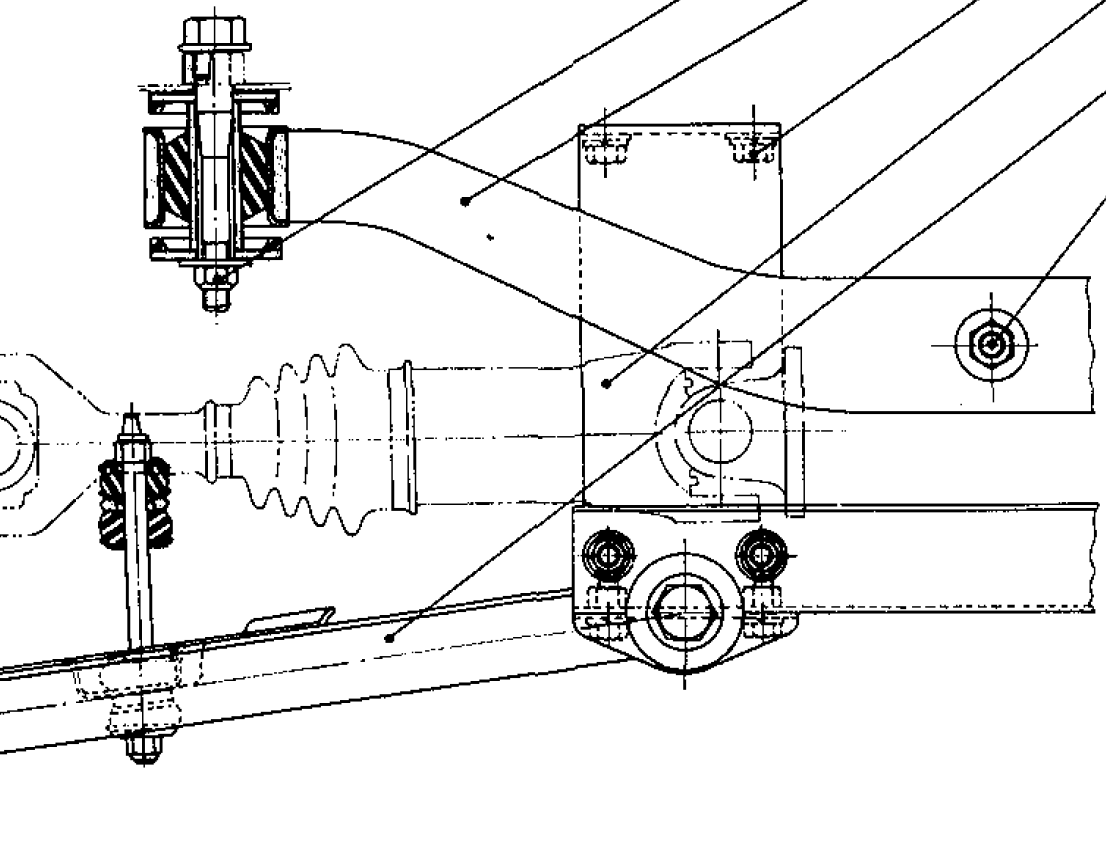
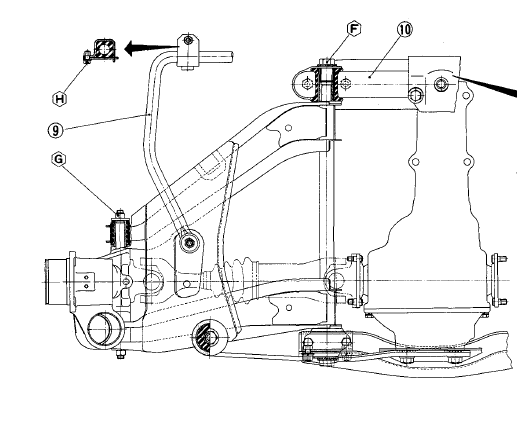
As has been pointed out by others, the moustache bar isn't really part of the rear suspension. It's function is to provide a fixed/flexible rear mounting system for the differential. None of the (primary) suspension loads feed through the differential. See diagram below for more understanding. That said, Steve may find this distinction irrelevant to his overall policy of keeping away from parts that he feels may have high potential for liability issues. I guess we'll have to wait to see whether he responds.
-
-
-
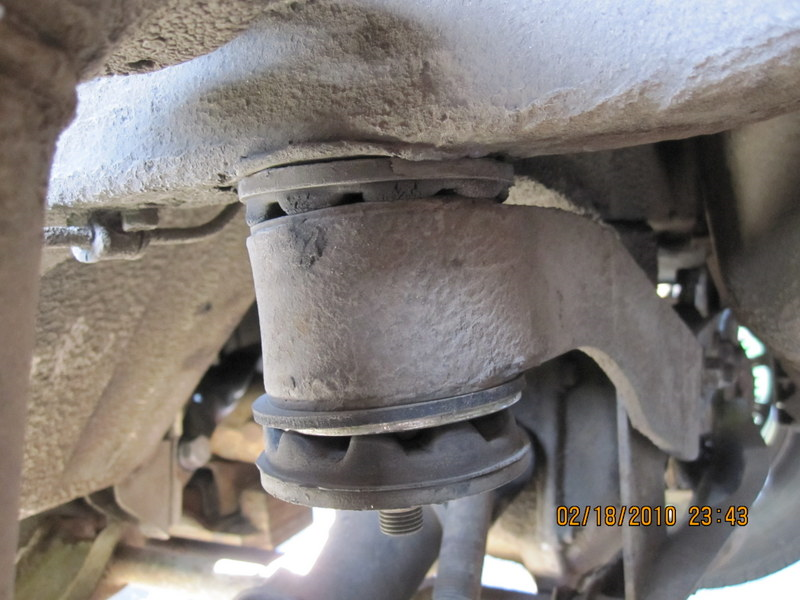
This topic picks up on a mini-conversation that I started on Grannyknot's 280Z build thread. These little washers are an important part of the NVH isolation design for the Z's rear diff. The design, from an engineering perspective, is a lot more sophisticated than meets the eye, so there's an incentive to try to install a proper replacement if your own have deteriorated (which they probably have, if they're 50-year-old originals). Unfortunately, the part is NLA from Nissan and none of the primary Z restoration parts suppliers offer a substitute. There's been some discussion about the need to use vulcanized rubber. I think that's a red herring (look up, 'vulcanized') and was meant to infer that the rubber part needs to be bonded to the metal part. While the originals might have relied on a heat-bonding process, its now 2019 and we have aerospace adhesives for this purpose. So: All we really need is the rubber part. Steve / Nix240 has cobbledup a wide range of rpreviously unavailable rubber parts for our Z's. I see nothing special about re-creating the moustache bar runner washers, other than using a suitable durometer rubber and having access to a good-condition original to create a mold. After that, they could be bonder to a suitable metal washer and, presto, we have another part taken off the NLA list. I think these washers carry across the entire 240-26-280 series without any differences. Maybe even the ZX's? Also: I'm thinking that the same might be the case for the Series 1's diff front insulator. Steve creates the rubber piece, then the owner carves the perished rubber out of his insulator, cleans up the metal armature, and then bonds in the new rubber. @nix240z Steve: What do you think?
-
So as not to hijack Grannyknot's build thread, I'm going to start a new topic about the moustache bar bushings.
-
For another view of fast driving on Irish roads, check out some of the videos available online of the 1950's-era Dunrod Tourist Trophy race. At the time, the drivers (Stirling Moss, Mike Hawthorne, etc) considered it on par for difficulty with the two better-known open-road races, Targa Florio and Mille Miglia. Dunrod was discontinued after a single accident at a blind brow killed two drivers and wrote off three cars. If you're thinking about taking a vacation in Ireland, you should be aware of one important fact: It rains a lot (so more pub time). Other than that, I highly recommend it as a destination. When I was there, I drove the south coast road and used the town of Dingle (south-west tip of the island) as my base.
-
Are those new mustache bar mount bushings (the serrated ones)? If they are, where did you find them?
-
Faceplate and knobs are in great shape. Looks like 'AM2' was the owner's favorite.
-
As I understand it, the felt covers were provided to keep bugs from getting inside and turning the light housing into insect housing. Probably also help to keep out road dust.
-
Magnaflux, the company, has attracted competitors over the years. If you go this route, you (or your machine shop) may decide to use someone else's product. There are two generic methods available. One (UV-illuminated dye penetrant) is suitable for an aluminum part like your cylinder head. The other (magnetization of the part) only works with parts made of ferrous materials (steel, cast iron, etc.). Although I have no direct experience, I would hazard a guess that the dye penetrant check might deliver the best results if you pre-heat the head in an oven before spraying on the dye. Not flaming hot, but maybe 250 degrees F. Read the instructions that come with the kit first, though, to make sure whether this is a good idea or not.
-
Looks like it ran up the support cable that can (I think) just barely be seen running down from the top of the pole. Hidden from view under the car because the upper half has been pushed to the left. Damage to the hood, grill, front and rear valence panel, front and rear bumpers... and maybe the oil pan .
-
Unquestionably a nice example (and very professionally presented), so deserving of a premium price. Still, it's a 73, where prevailing wisdom (now obsolete?) has said that these should be discounted relative to the 70-71 models. Overall, I think we're seeing a solid trend towards 'good' Z's moving up in value by $5K - $10K compared to a year ago. https://bringatrailer.com/listing/1973-datsun-240z-91/
-
Per the commentary on BaT, I certainly see how the rear valence panel is distorted (and the bumper isn't aligned and the hatch sits a little high on one side). However, I'm having trouble finding the distortion that's said to have occurred in the rear deck . It is too bad that it's not a matching-numbers engine. Matters a lot to the high-end collectors. Shifter location in the console opening suggests that at least it's got the correct 'A' 4-speed (original?) Overall, there's a lot to like about this car. Even the floors look not too bad. The dash will need attention, but the collectors didn't seem too bothered about the dash cap and the dash recover on a couple of recent high-$ Z auction cars. Hard to say these days whether an uncracked dash really commands a premium in an otherwise-desirable Z.
-
Thanks for blazing the trail. I may give this a try with some straight braided hose that I have on hand. The early-style engine-side brake vacuum hose is a hard item to find.
-
Graphic illustration of why flatheads aren't very efficient.
-
If you are willing to cross the border, there is a gentleman in the west Montreal region who has a significant collection of S30 body panels. I do not know if he is set up to ship (or is interested). PM me if you want contact details.
-
I don't think the Z seats ever got the credit they really deserved for their styling. Maybe not so excellent from a functional or comfort perspective, but really great to look at and perfectly in tune with the exterior styling.
-
The 5000-lb unit is available in Canada from either Costco (Cdn $1350) or Canadian Tire (Cdn $1500). Unfortunately, no retailer seems to want to stock the 3500-lb unit. It should sell for about $150 less than the 5000-lb unit. The Canadian distributor for QuickJack is located in Mississauga, with a secondary outlet in Surrey, BC.
-
Nice shot. Don't forget to take a matching, 'After' picture when the car is finished.
-
I always figured this came from using the window frame ('sash') as the pull (or push) point for closing the door. Maybe, though, it's just because of the impact loads when window frame meets weatherstrip at high speed.
-
I've been doing a bit of research on recip saws and came across a review of a (relatively) new product entry by Ingersoll-Rand. It's a cordless mini (0.55" stroke) targeted specifically for the auto body repair industry... One of its primary attractions is the ability to make relatively tight-radius curved cuts. It comes with a six 'extra-coarse' 4" blades (3 x 14 tpi + 3 x 18 tpi), rated for thick-ish sheet metal gauges, along with with two 12V Li-ion batteries and a charger stand. The blades may use a proprietary locking design (I've found conflicting reports on this) but, in any case, I-R offers a variety of replacement blade sets, including a 6-pack of 32tpi blades. This looks a lot more versatile than a die grinder or a standard-size recip. It also makes it unnecessary to have a power-tool-sized compressed-air system. A possible drawback, compared with a mini air saw, is that it measures about 12" in length. Weight is 2 lb. Batteries are said to be good for about '1 hour' of use. The manufacturer's webpage can be found here: https://www.ingersollrandproducts.com/en-us/power-tools/products/air-cutting-tools/12v-recip-saw.html A very informative independent review by a restoration shop owner (including a nice video of the saw in action) can be found here: https://shoptoolreviews.com/woodworking/handheld-tools/12v-ingersoll-rand-cordless-reciprocating-saw/ The kit (saw, batteries & charger, carry case) goes for ~ US $220. For my Canadian friends, I've found it available from an authorized Toronto supplier for Cdn $250. Comments welcomed.
-
-
You're probably right.
-
Please explain your process (steps) for getting the whole car up on axle stands when using the pinchweld strips as the jacking point.