Namerow
Free Member
-
Joined
-
Last visited
Everything posted by Namerow
-
 I've been using slotted hockey pucks as lift pads for several years. They work quite well. Just make sure that the slot is wide enough to keep the puck from wedging itself onto the pinch weld strip and deep enough so that the load is taken by the rocker and floor panel metal on either side of the pinch strip (rather than by the pinch strip itself).
 -
I suspect that Nissan, based on its limited world knowledge in the early 1970's, fell victim to expectations that repairs would only be carried out by authorized/factory-trained specialists who lived up to Japanese-market standards. I'll bet there were zero lift-point-related damage issues experienced by Japanese Z owners during the first 2 or 3 generations of ownership. Or maybe never. Until computer-controlled powertrains intervened, the American automotive service industry was the Wild West. Maybe it still is.
-
Faulty PCV valve? Not surprised. The quality control for these 'consumable' automotive parts is atrocious (spark plugs may be the only exception). They can cripple a car's performance, but spotting a defective item is difficult. You really need to install your 'tune-up' parts one at a time. If the car's performance collapses, you know you've just installed a new-but-defective part. Moral: Buy only the best -- even though they're just 'routine maintenance' parts. Even then, be alert and be suspicious. The auto business is a low-margin enterprise. Even name-brand 'replacement parts' manufacturers have to skate close to the edge in order to keep their shareholders happy. p.s. They do a much better job when it comes to supplying parts for new cars b/c now there are new-vehicle warranty costs involved and their customers (the auto manufacturer) will pay more to keep those costs under control. In the auto biz, it's all about $$$. I will defer to others when it comes to your fuel pump circuitry. My thesis is all about making the system (your engine, along with its fuel and electrical systems) as simple as can be, so that problems much easier to diagnose. Once that's done, you can add back the complexity (emissions control equipment) as you see fit. If it were me, living in Panama and driving a carbureted 50-year-old classic, I'd limit that to the PCV system. All the rest of the 240Z's emissions control gear, viewed from a 2025 perspective, is -- not to put too fine point on it -- finicky crap.
-
The 240Z engine is a remarkably simple and well-built device... except for the emissions control system. The latter is a train-wreck, typical of the auto industry's late-1960's, analogue-era, pre-ECU/fuel injection, band-aid solutions. The problem was not unique to Nissan. Whether it was the USA, the UK, Italy, France, Japan -- they were universally bad. Why? Because the technology available to the industry that was 'ready for prime time' (i.e. wouldn't get the manufacturer sued for incompetence) was nothing better than a lash-up. In the end, the only answer proved to be a combination of electronic fuel injection + computer control. It took almost 10 years to get there. In Panama, you are re-living the 1970 Los Angeles nightmare -- high temperatures + traffic jams + complicated, ineffective smog equipment technology. Plus -- as I mentioned in an earlier post -- the pssibility that your local gas may be substandard. My advice: 1) Remove all of the emission control equipment; 2) Run the tank dry and then fill up at the biggest, brand-name gas station in downtown; 3) Place your trust in a top-quality auto shop that has a lead mechanic who has proven credentials with carburetors (preferably SU carburetors); 4) Only if steps 1, 2 and 3 can't get the engine running properly should you consider removing the cylinder head.
-
Colour matching is really important.😎
-
I suspect that JAlex's problems may be the result of poor local fuel quality combined with local high-temp conditions. Not sure that any of us are qualified to provide proper guidance on that combination. Maybe not even Nissan. It may prove difficult to find qualified tech help in Panama. That said, I hope the new mechanic proves to be up to the task and this will end with JAlex piloting Panama's best Z on his local streets and highways.
-
Things in Japan are not as 'obvious' to an outsider as they might be in NA and Europe. I agree with CO, in that Kays may prove invaluable. However, you need to be specific about what it is that you're looking for.
-
Please provide some discussion for the final photo. That looks like an old-tech commercial frame alignment rig... but is that a commercial shop or someone's private garage?
-
I wonder if "60 or 80 grit" was really meant as "360 or 280 grit"? Those would be credible recommendations for paint prep.
-
I suggest that you give Charlie a call, rather then relying on Facebook or email. 613) 389-1397
-
The 'B' transmission's design places the base of the shift lever further forward relative to the front face of the bellhousing, resulting in a number of complications when a B unit is installed in a car that was designed for the A unit... - Base of shift lever hits the front edge of the cutout in the transmission tunnel when 1st or 3rd is selected. - Shifter knob comes too close to the HVAC fascia when 1st or 3rd is selected. I'm curious to know how this issue was handled by the dealer who did the B-for-A transmission swap in your car. p.s. I like the wood cradle that you built to support the car. I know of another Z owner who built a rotisserie from wood.
-
Mounting studs and hardware should be stainless steel. Too bad the same can't be done for the screws that fasten the lens to the housing.
-
A dry cleaner's bag works well for this purpose. Also: The seatback upholstery is easier to install if you do the job outside in direct, afternoon sunlight (solar heating helps to soften the vinyl).
-
I agree... although baby-boom demographics will probably keep the torch burning for at least another 5 years.
-
Thanks for taking the time to create and post these photos. Maybe I'm just getting old*, but Photo #2 is confusing. Did the rubber really sit under the weatherstrip before both were pushed down over the inch strip? Looking at the photo, it seems hard to believe that the weatherstrip would be capable of generating enough clamping force. (* I plead guilty, as I'm sure many others will, of just pulling the rotted old stuff off without giving much thought to how it actually worked.)
-
It would be fascinating to see a video showing how the rear glass was installed at the factory back in the day.
-
If only the SU's designer had included an external adjustment screw for setting the float level.
-
It's a Velcro strip that helps hold the spare wheel cover (pressboard) in place.
-
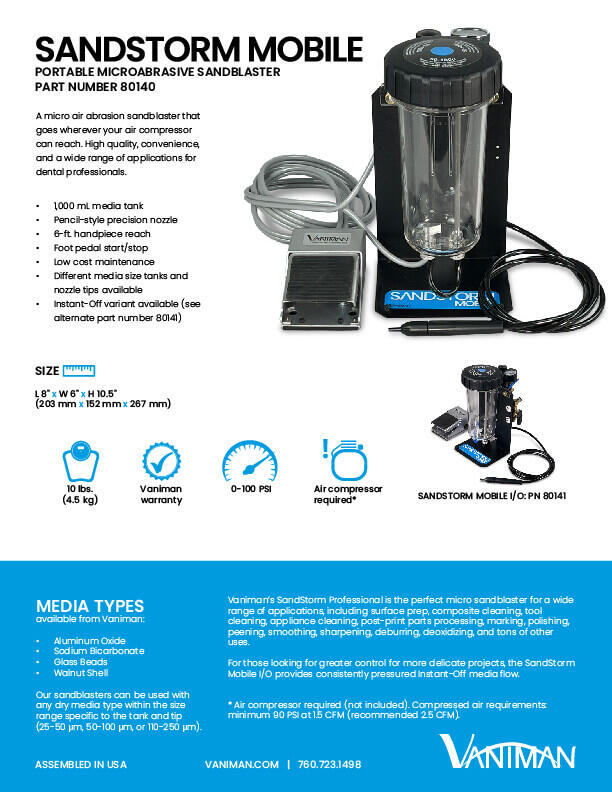
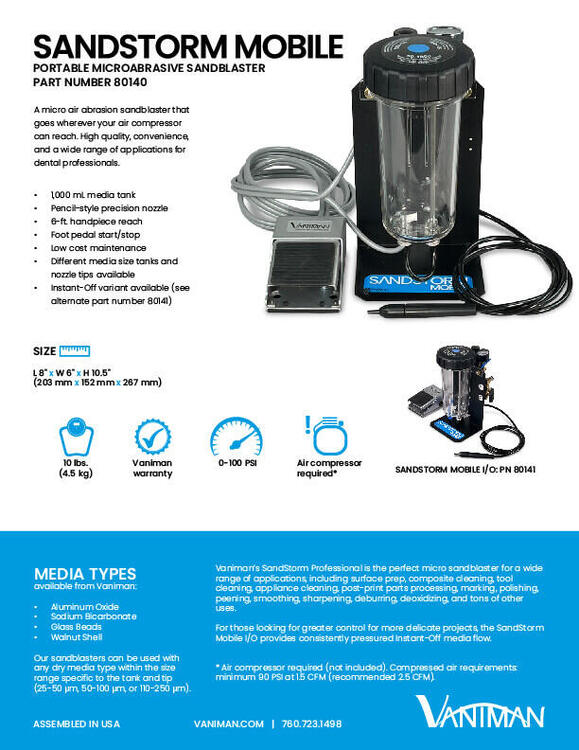
I wonder if it's similar to this dental sandblasting unit?... https://www.vaniman.com/product/sandstorm-mobile-io-80141/ US$540 - ships from manufacturer in California
-
Let's be careful here. Jalex posted a photo of the choke cable for one carb, illustrating two cable screws: the #1 screw (upper screw in the photo) is the one that clamps the choke cable's outer casing to the carb; the #2 screw (bottom screw in the photo) is the one that clamps the choke cable wire to the choke cable linkage. The way I read it, he was asking whether he should loosen both the #1 and #2 screws on both carbs (which, of course, would lead to brand new problems). So, JAlex: If you're reading this, when Mark Maras tells you to loosen 'both screws', he means that you should loosen the #2 screw on both the front and rear carbs. Do not loosen the #1 screw.
-
Great write-up and photo coverage. As someone who also lives in the north-east, it's great to see a project like this that looks 'real' in relation to my own experience (rotted wood, old timber, uneven concrete, dirt, and leaves). Hope you enjoy your upgraded workspace. Epoxied floors?
-
There are two hammers visible in photo #4. The one on the left would normally qualify as a 'BFH', but it looks puny when compared to the one on the right. That one appears to be a shaped piece of concrete with a handle. Did you make it yourself?
-
Nice to be able to check off three items on three different cars, all in one day!
-
That same storm dropped over 4" of rain in Toronto.
-
Can anyone recommend a product that would be a reliable, long-term solution for sealing a cracked gas filler neck? The vehicle in question is my friend's 10-year-old Hyundai Elantra.