


Namerow
Free Member
-
Joined
-
Last visited
Everything posted by Namerow
-
 The plastic nuts are spacers, used to 'adjust' the height of the seat. The one on the top in your picture is in use for this purpose. The one on the bottom is a spare that could -- if you wanted -- be moved to the top and doubled up with the one already there so as to raise the seat higher. The actual retaining nuts are pretty fiddly to remove (there's not much space available for wrench swing). If you've got one, a short ratcheting box-end wrench is the way to go.
 -
Electric impact wrench worked first time for me. And the harmonic balancer/pulley slid off easily afterwards (no need to use a puller). Elsewhere: Although this may be too late to help you now, I had good luck with both the timing cover (and water pump) bolts by using a non-power impact tool (the type that you hit with a hammer). Worth considering if you have yet to start on the timing cover bolts.
-
Very nice work... but very pricey work. I visited Bradford many years ago for a meeting with the now-vanished Marsden Radiator Co. (swallowed up by Calsonic in the 1990's IIRC). Got lost afterwards while attempting to drive across the moors in the dark (cue Heathcliff).
-
Nice car. However, given that it's been repainted and refreshed (i.e. it's not 100% original), it will be interesting to see whether the bidding goes much higher than the current $60K. It's my impression that the extreme ($100K +) values are reserved for #1 condition, 100% original cars.
-
Your hand-scribbled notes in photo #1 say: 2" hole >> 2-1/2" male + 2-3/4" female. So, a few questions: It looks like the 2-3/4" die has a smaller wall thickness (1/16"?) than the other dies (1/8"?), so am I correct in assuming that this pair (2-3/4" with 2-1/2") was used -- after the 2" hole had been cut -- to roll the edge? What are the diameters for the the other two pairs of dies? It would seem that you would need only one additional die set (to punch the 2"hole). So why are there two other die sets? For the punch set, did you put any kind of bevel on the cutting surface of the male (or female) die? For the roll set, did you put any kind of contour on the contact surface of the male (or female) die? It appears that the straps welded across one face of each die were used so that a centering hole could be drilled. Even so, how did you centre the male die over the female die in the press?
-
-
-
Considering the difficulties others have reported in accurately duplicating the horizontal 'crease' in the outer panel, these will probably same a lot of hours in final fitting. Are you planning to use them in the current project or will you save them for something else down the road? The photos of these pieces expose some details that are normally hidden from view and rarely seen in restoration photos. For example, what is the purpose of the tacked on stamping(s) located at the peak of the wheel arch on the driver-side panel? Interesting, too, that Nissan went to the expense of painting that circular black disc on the inside of the panel so the body colour wouldn't peek through the vent holes in the plastic trim panel. I guess they thought that looked cheap.
-
Thanks. That was at the low end of what I was expecting, so learning that they're available for only $0.56 is good news. Out of curiosity, I checked out the Eastwood Tools site. They offer a kit consisting of 10 clecos, 2 side clamps, and one set of pliers for $44. PAT's price (not even bundled as a kit) comes out to just $16.00 so this is definitely a supplier that I'll be adding to my 'preferred' list.
-
-
If it's a 20mm hole, Banzai Motorsports were the only source when I last checked a couple of years ago. Things may have changed since then. Check the usual suppliers. If it's a 25mm hole, both Banzai and Motorsport Auto (and probably others) can help you out.
Somewhat (but not completely) off topic, here's an interesting video that shows how the Volvo P1800ES sportwagon's structure was put together in the day. Offers some good insights into lay-up jigs, spotwelding equipment, etc. These cars were not built to the dimensional standards of the Z and used assembly techniques that were somewhere between custom-build and volume-build (note the use of tin snips), but were very much of the same era. The lead-seam-filling sequences really caught my eye. https://binged.it/2UdwaNG or,
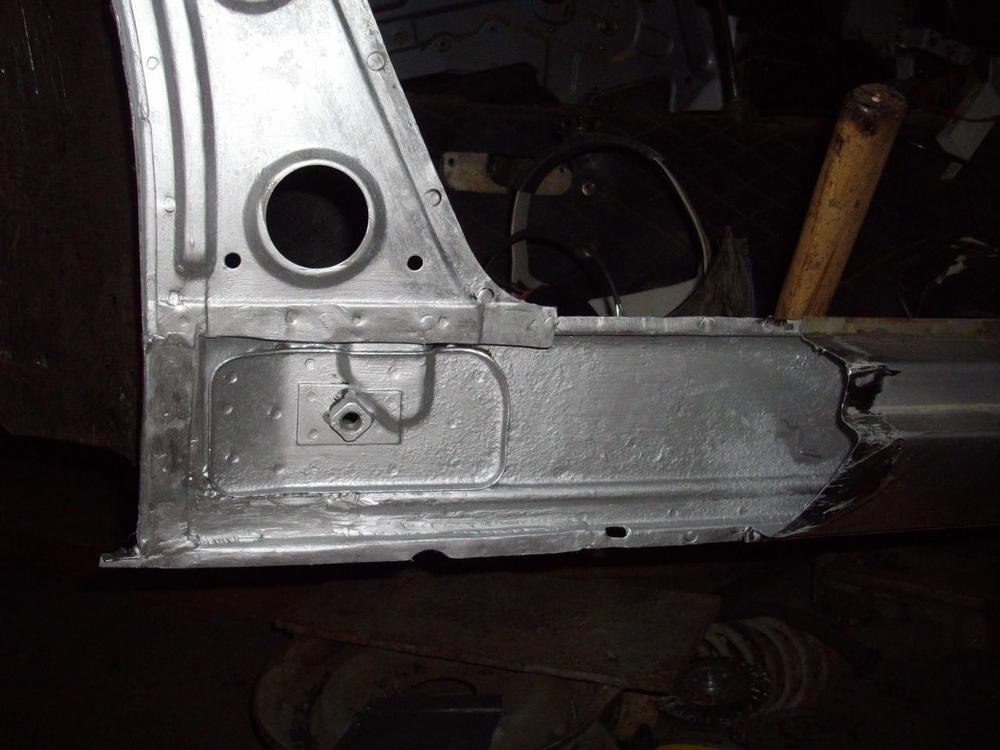
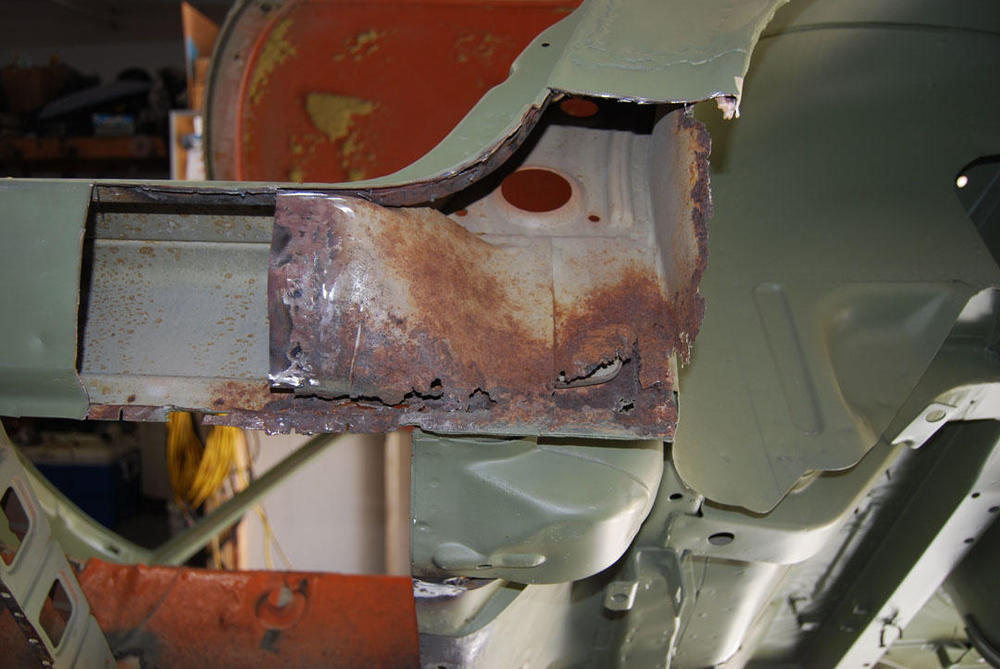
I can never resist a good structural engineering puzzle. Of course, unibody structures are not simple affairs to analyze as the load points and paths are complicated. And automotive design decisions can also be influenced (if not, dictated) by manufacturability and cost. From a structural perspective, we're looking at a long closed-box section that acts as an outboard rib for the floor panel. The floor panel has an equally strong inner rib, in the form of the open-box section created by the transmission tunnel. The rocker structure connections to the A and B-posts have to transfer/resist both axial loads and torques (and not just in simple bending mode, but also torsion, such as when a single wheel hits a pothole or a ridge). After staring at diagrams and photos of the rockers and the (very complicated) dogleg area, think the design solution used by Nissan at the ends of the rocker structures reflects all three considerations: 1. Structural: I think the structural decision was premised on a desire to have all of the loads from the rocker structure to the A and B posts transferred/resisted in shear through a single plane (vertical-longitudinal in this case). It's elegant and simple. It also means that... 2. Manufacturability: The spot welds all occur in that same plane and can be accomplished without the need to rotate the welder electrodes, and... 3. Cost: The inner rocker can be stamped with a single-shot (not need to fold flanges are the rear end to allow joining with the wheel housing. This might also assist in stacking the parts for shipment and storage. This is all just educated guessing, offered by an engineer who should be retired but still needs the money. To assist in further speculation, here are a couple of photos for your consideration (as usual, with apologies to the original posters whose names I failed to record)...
 WD-40 is, in my opinion, essentially useless as a lubricant. It is designed with a very low viscosity so that it flows into holes and openings. Unfortunately, it has minimal effectiveness as a long-term lubricant. It is intended for what I would call, 'household' applications (i.e. good for house door hinges, not so good for automotive work). There are better spray lubes conveniently available. However... I am skeptical that you will be able to get the tip of the spray wand ('straw') to point in the direction needed to properly lubricate the regulator spring. You are welcome to try, but I think you're just going to get spray lube everywhere but where you want it. The regulator is best dealt with after it's been removed from the inside of the door. The main items that need oil are centre pivot pin for the arms (just like a pair of scissors), the pivot shafts for the nylon roller wheels (the ones located at the ends of the regulator arms), and the centre pivot pin for the hand-crank gear. Everything else should be greased (not oiled). Use synthetic grease, not mineral-based. Grease goes on all of the gears. It also goes in the front and rear guide channels. For the big coil spring, I would use spray-on lithium grease (available at hardware or automotive parts stores). The only way to properly apply grease and oil is to take the door apart. THINK CAREFULLY ABOUT WHETHER YOU WANT TO ATTEMPT THIS. Are you confident that you will be able to re-assemble the parts successfully? Are you really sure that the parts desperately need lubrication? IF YOU FIND YOU ARE UNABLE TO PUT THE DOOR BACK TOGETHER, YOU WON'T BE ABLE TO DRIVE THE CAR. Don't make this discovery after you've taken the door apart. Disassembling and re-assembling the door is not rocket science. However, it takes care, patience, and attention to detail. If you lack these, don't try it. In my experience, it's the guide channels that are most likely to have lubrication issues. The original grease tends to turn to hardened crud over the years. In general, I think that lubricating the front guide channel is the item that will give you the greatest results. You can probably get some spray lithium grease into that channel using a long (12" or longer) flexible spray wand. Lower the window all the way. Look down the front of the window slot. After you're sure that you have identified the top of the front guide channel, you will have a target for the spray grease. DON'T OVER-DO IT!. Some of the overspray is going to go on the window glass and that will muck up the felt window channel guides. You cannot grease the rear guide channels without taking the door apart. Other members may have additional or better suggestions. Wait a couple of days before you decide what you want to do.
Can't help with this one. I was involved in some commentary about techniques for seating the snap ring, but that's about it. JR's disassembly photos look pretty definitive, so I expect that that part of the mystery has been solved for you. The missing washer looks pretty generic, provided that you can find one with approx. the right OD and ID. Alternatively, @zKars might have a complete valve assy to offer from his used parts stash.
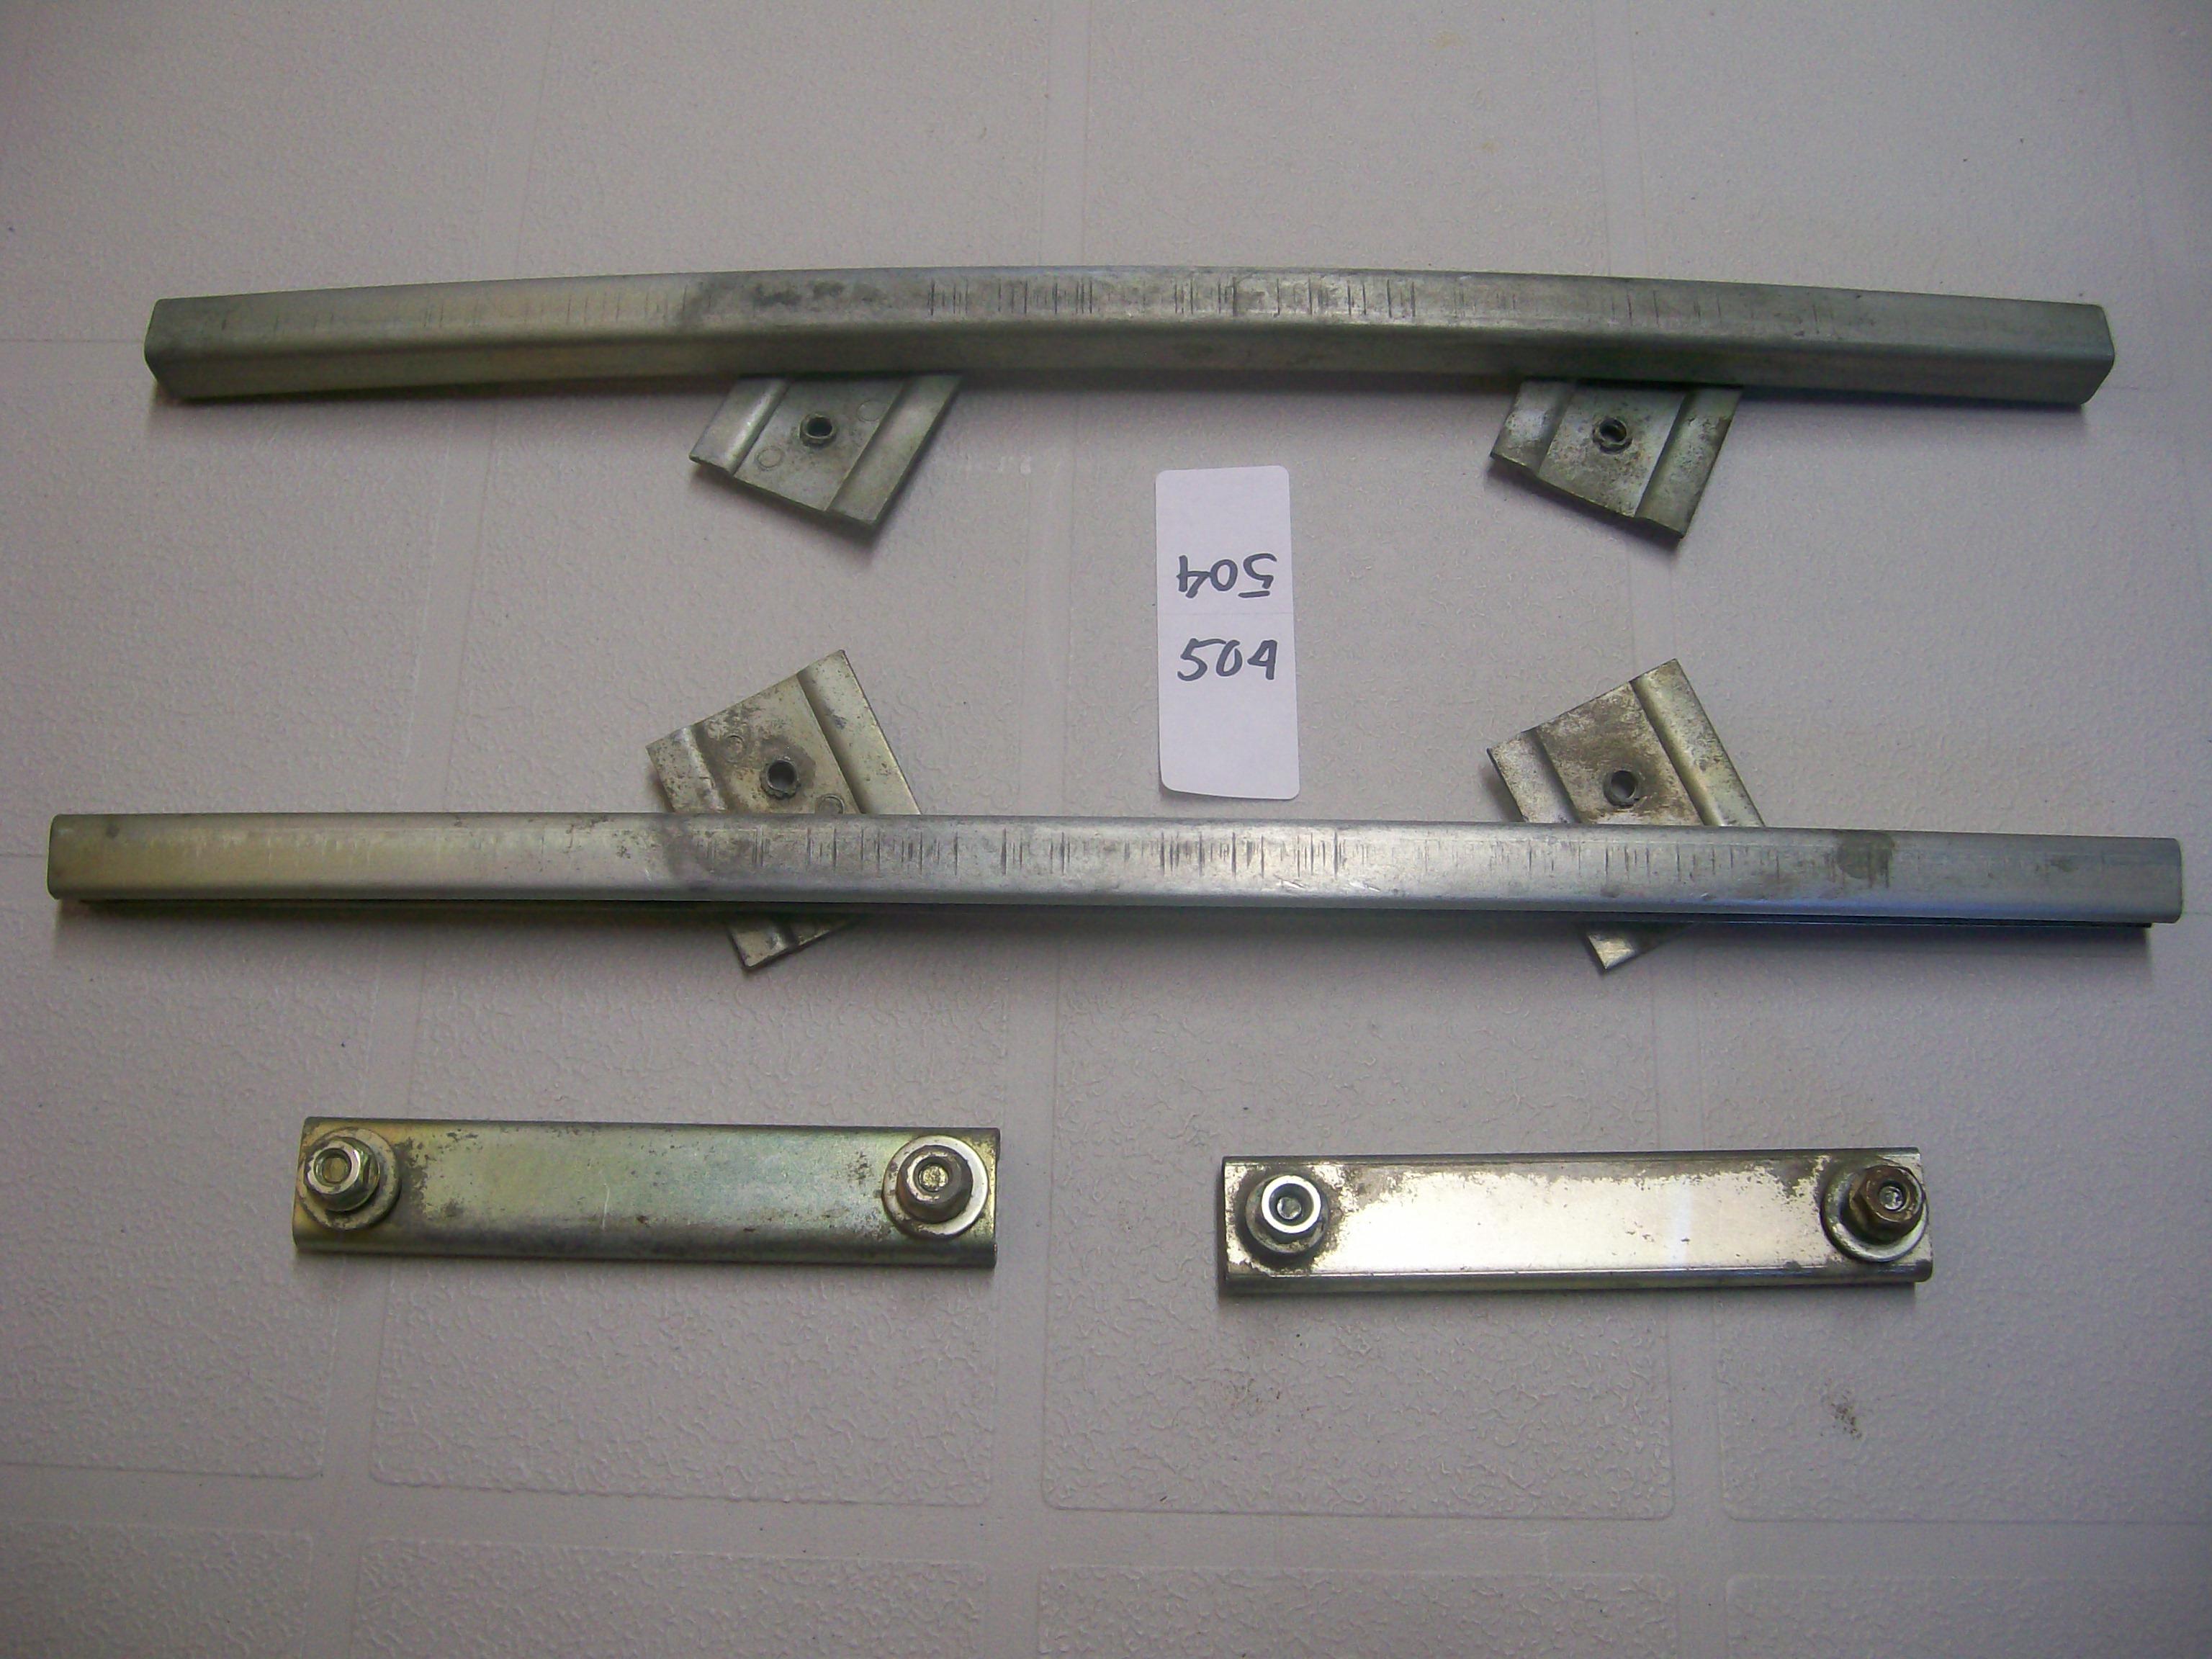
There is something seriously odd going on with that 'short stud'. A butcher-mechanic has been at work here. The threads are mangled and it looks some kind of additional fastener has been added above it. Also, if you look closely, you can also see that the slotted hole in the door panel has been elongated at the bottom to create additional adjustment room. Strictly speaking, this shouldn't have been necessary, but who knows what was going on in the mind of the person who decided this was the right thing to do.. The stud in question is one of two used to secure the the rear 'guide channel' to the inner door panel. The locating holes for this guide channel have some adjustment because the vertical position of the channel determines the max. height that the rear of the window achieves when it`s raised within its sash (chrome window frame). Here's what the rear guide channels look like (note: the rear guide channels are the short ones at the bottom of the photo. The long ones at the top of the photo are the front guide channels): The fasteners look like this (please excuse the rust): The nuts are 'serrated shoulder' design that (theoretically) provides high 'bite' at low torque. Difficult, but not impossible, to source. Any competent metric fastener supply house will stock these (try Bel-Metric, located in Massachussets). Not a big deal, though. An ordinary M6 nut with some Loc-Tite (anaerobic thread-locking fluid, available at hardware stores and auto supply stores) applied will work just fine. Note that the M6 washers have an oversized outside diameter (these are sold as 'fender washers' in auto supply stores. Like the serrated shoulder nuts, these are 'nice to have' but not 'need to have'. The elongated locating holes in the door panel also allow some adjustment to the angle of the guide channel relative to horizontal. After getting the window rise set properly, you may need to play with the angle of the guide channel to achieve smooth action for the regulator assembly as the window glass is raised and lowered. I agree with Zkars that no other fasteners appear to be missing. However, I am concerned by the fact that someone has mangled the locating stud and performed 'modifications' on the fastener and the locating slot. It suggests that bigger issues may be lurking out of sight inside your door (bent regulator arm?) and these may have contributed to the window 'shifting' when you slammed the door. Just how hard did you slam the door? Unless you were mad at the car, I expect that you didn't slam it that hard, so perhaps the problem was already there and just waiting for the appropriate time to surface. Was the window moving up and down smoothly before it 'shifted'? If the action was stiff, then I think you may have regulator issues. The late, great E. Scanlon posted an excellent write-up on this site that outlines the procedures for assembling and adjusting the window and regulator assemblies. I believe you can find it in the new 'Knowledge Base' section. Or maybe someone else can post a link.
WD-40 is, in my opinion, essentially useless as a lubricant. It is designed with a very low viscosity so that it flows into holes and openings. Unfortunately, it has minimal effectiveness as a long-term lubricant. It is intended for what I would call, 'household' applications (i.e. good for house door hinges, not so good for automotive work). There are better spray lubes conveniently available. However... I am skeptical that you will be able to get the tip of the spray wand ('straw') to point in the direction needed to properly lubricate the regulator spring. You are welcome to try, but I think you're just going to get spray lube everywhere but where you want it. The regulator is best dealt with after it's been removed from the inside of the door. The main items that need oil are centre pivot pin for the arms (just like a pair of scissors), the pivot shafts for the nylon roller wheels (the ones located at the ends of the regulator arms), and the centre pivot pin for the hand-crank gear. Everything else should be greased (not oiled). Use synthetic grease, not mineral-based. Grease goes on all of the gears. It also goes in the front and rear guide channels. For the big coil spring, I would use spray-on lithium grease (available at hardware or automotive parts stores). The only way to properly apply grease and oil is to take the door apart. THINK CAREFULLY ABOUT WHETHER YOU WANT TO ATTEMPT THIS. Are you confident that you will be able to re-assemble the parts successfully? Are you really sure that the parts desperately need lubrication? IF YOU FIND YOU ARE UNABLE TO PUT THE DOOR BACK TOGETHER, YOU WON'T BE ABLE TO DRIVE THE CAR. Don't make this discovery after you've taken the door apart. Disassembling and re-assembling the door is not rocket science. However, it takes care, patience, and attention to detail. If you lack these, don't try it. In my experience, it's the guide channels that are most likely to have lubrication issues. The original grease tends to turn to hardened crud over the years. In general, I think that lubricating the front guide channel is the item that will give you the greatest results. You can probably get some spray lithium grease into that channel using a long (12" or longer) flexible spray wand. Lower the window all the way. Look down the front of the window slot. After you're sure that you have identified the top of the front guide channel, you will have a target for the spray grease. DON'T OVER-DO IT!. Some of the overspray is going to go on the window glass and that will muck up the felt window channel guides. You cannot grease the rear guide channels without taking the door apart. Other members may have additional or better suggestions. Wait a couple of days before you decide what you want to do.
Can't help with this one. I was involved in some commentary about techniques for seating the snap ring, but that's about it. JR's disassembly photos look pretty definitive, so I expect that that part of the mystery has been solved for you. The missing washer looks pretty generic, provided that you can find one with approx. the right OD and ID. Alternatively, @zKars might have a complete valve assy to offer from his used parts stash.
There is something seriously odd going on with that 'short stud'. A butcher-mechanic has been at work here. The threads are mangled and it looks some kind of additional fastener has been added above it. Also, if you look closely, you can also see that the slotted hole in the door panel has been elongated at the bottom to create additional adjustment room. Strictly speaking, this shouldn't have been necessary, but who knows what was going on in the mind of the person who decided this was the right thing to do.. The stud in question is one of two used to secure the the rear 'guide channel' to the inner door panel. The locating holes for this guide channel have some adjustment because the vertical position of the channel determines the max. height that the rear of the window achieves when it`s raised within its sash (chrome window frame). Here's what the rear guide channels look like (note: the rear guide channels are the short ones at the bottom of the photo. The long ones at the top of the photo are the front guide channels): The fasteners look like this (please excuse the rust): The nuts are 'serrated shoulder' design that (theoretically) provides high 'bite' at low torque. Difficult, but not impossible, to source. Any competent metric fastener supply house will stock these (try Bel-Metric, located in Massachussets). Not a big deal, though. An ordinary M6 nut with some Loc-Tite (anaerobic thread-locking fluid, available at hardware stores and auto supply stores) applied will work just fine. Note that the M6 washers have an oversized outside diameter (these are sold as 'fender washers' in auto supply stores. Like the serrated shoulder nuts, these are 'nice to have' but not 'need to have'. The elongated locating holes in the door panel also allow some adjustment to the angle of the guide channel relative to horizontal. After getting the window rise set properly, you may need to play with the angle of the guide channel to achieve smooth action for the regulator assembly as the window glass is raised and lowered. I agree with Zkars that no other fasteners appear to be missing. However, I am concerned by the fact that someone has mangled the locating stud and performed 'modifications' on the fastener and the locating slot. It suggests that bigger issues may be lurking out of sight inside your door (bent regulator arm?) and these may have contributed to the window 'shifting' when you slammed the door. Just how hard did you slam the door? Unless you were mad at the car, I expect that you didn't slam it that hard, so perhaps the problem was already there and just waiting for the appropriate time to surface. Was the window moving up and down smoothly before it 'shifted'? If the action was stiff, then I think you may have regulator issues. The late, great E. Scanlon posted an excellent write-up on this site that outlines the procedures for assembling and adjusting the window and regulator assemblies. I believe you can find it in the new 'Knowledge Base' section. Or maybe someone else can post a link.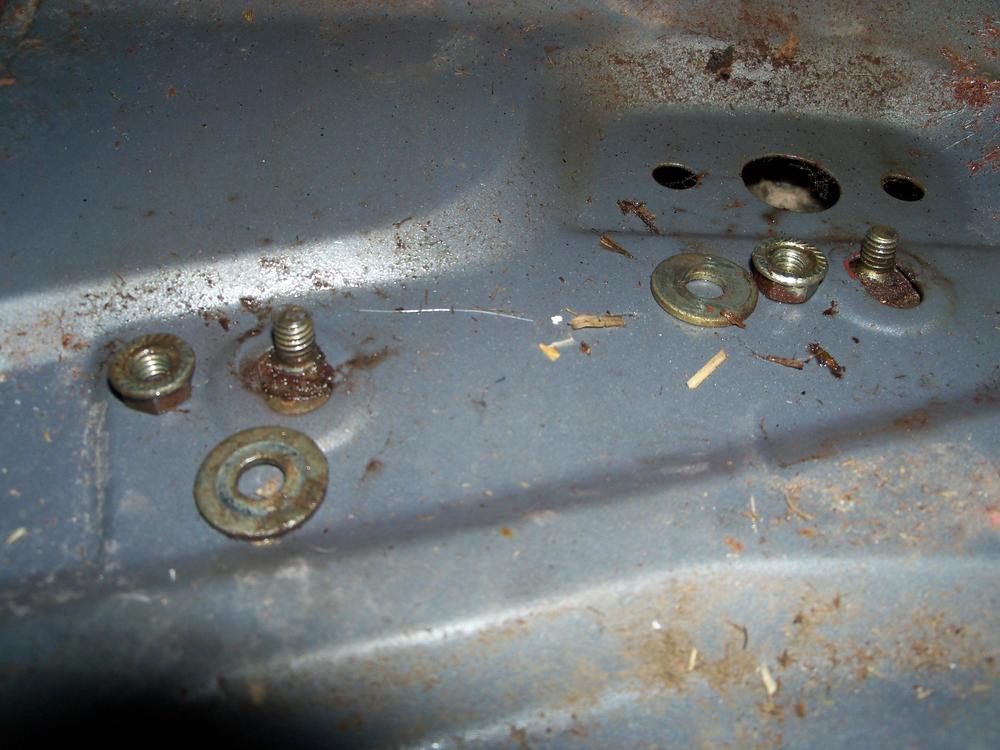
 I've dealt with these folks for 'Continental'-brand cloth-braided coolant hose (full range of sizes available)... Bel-Metric - Tyngsboro, MA https://www.belmetric.com/braided-metric-hose-oem-c-14_138/?zenid=l8q6rc5k16gtctsfllf89onb23 Priced per meter (i.e. if you order 1.3 meters, you pay for 2 meters) The molded radiator and master-vac hoses are always going to be a challenge, unfortunately. They are available but, as Patcon notes, they are expen$ive (esp. the rad hoses). You might be able to fake the master-vac hoses by bending and fitting metal-tube inserts inside the rubber hose (my notes say that the fittings are 10mm OD, so a properly clamped 9mm hose should work, maybe with a bit of sealant for insurance).
And adjusting the hub position to help correct the early design's leading-diff/trailing-hub situation would have made the tire sit even further forward inside the wheel opening. I've heard it explained (source?) that the S30's differential was pushed forward late in the design cycle when Nissan's engineers became concerned over meeting the new US FMVSS requirement for rear impact. The explanation was that they wanted to move the differential further way from the front of the fuel tank to reduce the liklihood that it would puncture the tank when the rear of the car folded up. I don't think this was guess work. They must have observed a potential problem or else they wouldn't have taken such an unnatural design path. There was a lot of confusion and uncertainty within the industry over what form the actual FMVSS rear impact standard would take when made into law (impact speed and fixed vs. moving barrier were still being debated). I wonder if Nissan decided to take an extra-conservative route to begin with and then relaxed the design back to 'normal' when they felt more comfortable? It's all very curious. A lot of parts had to be changed, at enormous expense, and giving back the crash safety margin in the process. This would not have been done unless Nissan felt there was a major problem with offset design. And yet modern-day owners of Z's with the offset design never seem to complain about the expected issues (which are: 1) drivetrain resonance at cruising speed, and; 2) premature halfshaft U-joint wear).
While we're on the topic of amusing news stories from down east, how about this one? "'More stupid than it was criminal:' Judge frees Halifax brothers involved in border standoff" https://www.cbc.ca/news/canada/new-brunswick/halifax-brothers-stand-trial-standoff-at-border-1.5047429
For me, 'unique' isn't the word that came to mind.
I've dealt with these folks for 'Continental'-brand cloth-braided coolant hose (full range of sizes available)... Bel-Metric - Tyngsboro, MA https://www.belmetric.com/braided-metric-hose-oem-c-14_138/?zenid=l8q6rc5k16gtctsfllf89onb23 Priced per meter (i.e. if you order 1.3 meters, you pay for 2 meters) The molded radiator and master-vac hoses are always going to be a challenge, unfortunately. They are available but, as Patcon notes, they are expen$ive (esp. the rad hoses). You might be able to fake the master-vac hoses by bending and fitting metal-tube inserts inside the rubber hose (my notes say that the fittings are 10mm OD, so a properly clamped 9mm hose should work, maybe with a bit of sealant for insurance).
And adjusting the hub position to help correct the early design's leading-diff/trailing-hub situation would have made the tire sit even further forward inside the wheel opening. I've heard it explained (source?) that the S30's differential was pushed forward late in the design cycle when Nissan's engineers became concerned over meeting the new US FMVSS requirement for rear impact. The explanation was that they wanted to move the differential further way from the front of the fuel tank to reduce the liklihood that it would puncture the tank when the rear of the car folded up. I don't think this was guess work. They must have observed a potential problem or else they wouldn't have taken such an unnatural design path. There was a lot of confusion and uncertainty within the industry over what form the actual FMVSS rear impact standard would take when made into law (impact speed and fixed vs. moving barrier were still being debated). I wonder if Nissan decided to take an extra-conservative route to begin with and then relaxed the design back to 'normal' when they felt more comfortable? It's all very curious. A lot of parts had to be changed, at enormous expense, and giving back the crash safety margin in the process. This would not have been done unless Nissan felt there was a major problem with offset design. And yet modern-day owners of Z's with the offset design never seem to complain about the expected issues (which are: 1) drivetrain resonance at cruising speed, and; 2) premature halfshaft U-joint wear).
While we're on the topic of amusing news stories from down east, how about this one? "'More stupid than it was criminal:' Judge frees Halifax brothers involved in border standoff" https://www.cbc.ca/news/canada/new-brunswick/halifax-brothers-stand-trial-standoff-at-border-1.5047429
For me, 'unique' isn't the word that came to mind.


Important Information
By using this site, you agree to our Privacy Policy and Guidelines. We have placed cookies on your device to help make this website better. You can adjust your cookie settings, otherwise we'll assume you're okay to continue.