Zed Head
Free Member
-
Joined
-
Last visited
Everything posted by Zed Head
-
 I've seen someone, maybe FastWoman or SBlake, suggest 5 - 51/2 turns out from all the way in as the factory starting point. I set my 78 AFM there and it was fine. I tried running it in a little to work on that flat spot I described but it just made the exhaust smell gassy so I ran it back out. I usually tune mine by exhaust smell vs. idle quality, unless I have to get emissions tested, then I run it out until I pass the test. Don't forget that the engine is on the idle enrichment circuit when the TPS is at idle. Kind of throws a wrench in the tuning the spring by the fingering the vane method.
 -
I must have looked at the wiring diagram to figure out the operation. I know that I looked at the diagrams to figure out that the 1979 relay would work. I have a 1979 relay in my car now, a 1976 280Z. The part number difference is only for a totally separate blade/pin on the body, for extra grounding, everything else is identical. Yours grounds through the mounting screws. SteveJ may be right on the wiring diagram but I do know that had both solenoids clicking on the bench before I installed it, using a spare 12V battery. You can figure out which wires are the solenoid activators because they will have about 60 ohms (if I recall correctly) resistance through the windings. Good luck with it.
-
Is it the one up by the fuse box? Pretty easy to open up, by bending the tabs back. It might look like mine did. The early ZXs (79 for sure, maybe 80 and 81) used the same basic relay, except that they have one extra pin for a dedicated ground. I got my replacement from the wrecking yard. Harder to get to n the ZX, check the FSM for location. PS - I think that there is a test procedure in the FSM for function of the relay. Worth looking. Involves applying power and checking for continuity. Yous probably has continuity with power off though so pretty easy to verify with an ohm-meter. Probably in Body Electrical.
-
Took my 78 AFM off yesterday to check it out and the vane just had a very slight tweak on a corner. I shined a flashlight through it when closed and decided that there is plenty more leakage possible around the edges of the vane than the small tweak provided by not seating, especially since the air flow is perpendicular to the bend (the air gap is under the edge) once the vane moves off of its bumpers, so left it alone and re-installed it. As I noted above though, this 78 factory AFM is adjusted much leaner than the MSA rebuilt AFM I've had since I got the car running. I got 23 mpg on my second fill-up, compared to ~19-20 mpg typically with the MSA AFM (re-manufactured by Fuel Injection Corporation). Aside from the slight hesitation/stumble at low air flow, I like the old dirty AFM better than the shiny rebuilt MSA unit. I wonder if Fuel Injection Corp. adjusts them rich to be safe or if there's just a lot of variation. Now I'll be checking all of the AFMs I see for bent vanes. Maybe we should start a list.
-
How did these AFMs with the bent vanes run at low throttle opening? I just swapped in a78 AFM that I had, to be sure that it was a good spare, and it works fine but seems extra lean at low air flow, with a little bit of a lean surge/almost a stumble. Not a huge deal because my gas mileage has improved considerably (only on my second tank though, so far) and it runs great at higher RPM and throttle openings, but now I wonder if the vane is bent. Mine appears to be factory stock, with gobs of pale glue over all of the critical adjustments inside (surprisingly messy though). Now I have the urge to take it off again and check the vane.
-
Your AFM has the backfire relief valve so that must have been some big backfire. Maybe it's a funky tuning trick to lean out the low air flow end of the range. I just looked at my spare AFM (MSA rebuild) and the vane is straight, edge-on like your picture, and sits flat when the vane is wide open.
-
Only $251.77 brand new! http://www.courtesyparts.com/assy-bcdd-p-261497.html Still have one dot for availability.
-
These two sites are the best for finding odd parts. $2.69. - http://www.carpartsmanual.com/datsuns30/DatsunZIndex/Engine280Z/CylinderHead/tabid/1600/Default.aspx http://www.courtesyparts.com/gasket-the-p-240439.html
-
One cheap way to see if you have a draw on the battery would be to make up or get a test light and connect it between the negative terminal and the battery post. A pseudo ampmeter. If there is current flowing you should get a glow. Then start pulling fuses or fusible links or disconnecting possible loads until it goes out. If the light doesn't glow at all then the battery load test would be the way to go. Also, if the top of the battery is dirty and moist current can flow between the positive and negative terminals.
-
I've had the same problem with sudden throttle opening from idle, on my 76 280Z with EFI. I cleaned the throttle body, got a softer return spring and lubed up all of the various joints, but still had it. I fixed it by adjusting the linkage so that the bell cranks go less "over-center". Pretty sure that I lengthened the linkage rod that is parallel to the the firewall and shortened another. Or vice-versa. You can tell just by looking which way to adjust. The problem was that the bellcrank would go over center when the throttle was closed, then take a lot of effort to get it to go back over the top when giving some gas, then once over the top you got sudden movement and a jerky throttle response. It made a big difference and I have smooth off-idle throttle control now. Just pop the rods off with a twist of a wide blade screwdriver, loosen the set nut and turn it out. I turned one all the way out. 18 in this picture is one of the two that I adjusted. The other is close to the throttle body (Edit - actually I might have adjusted the one that comes through the firewall also - I just kept adjusting until all of the bellcranks were sitting at about 90 degrees). http://www.carpartsmanual.com/datsunS30/DatsunZIndex/Engine280Z/Accelerator/tabid/1624/Default.aspx After adjusting you'll probably have to re-set the gas pedal stop under the pedal to either avoid bending the linkage or to make sure you get full throttle.
-
Did you use the zcarcreations.com wiring method? I think that method disables the relay, leaving power to the brake check lamp all the time. The relay is under the passenger seat. It cuts power to the light when energized. It is supposed to get power only when the engine is running. I rewired mine to the fuel pump circuit. It shouldn't drain your battery the way you have it but the light will stay on until you get power to the relay. Congratulations on getting it done. Edited.
-
To expound on Blue's notation - it activates another circuit in the ignition module to use the other pickup in the stock 76 Fed model distributor. It advances the timing about six degrees when cold. The purpose is unclear, it might be for raising the idle speed. It's not necessary, but you might notice a low idle speed until the engine fully warms up. If you're distributor or ignition module are not stock, then it's useless.
-
I did the same thing on an engine I took apart (still apart). The details are fuzzy but I think that I could see the washer from above, and I bent a small hook on to the end of a long piece of wire and was able to fish it out. One of those antenna shaped magnetic pickers might work also. You might have lost the orientation of the cam to the crankshaft by a small amount. I've read of using a large adjustable wrench on the cam shaft to wiggle the cam back and forth while trying to get the sprocket aligned. I've also read accounts of using a long screwdriver to get the tensioner back in its hole, if that's what happened to you. Good luck.
-
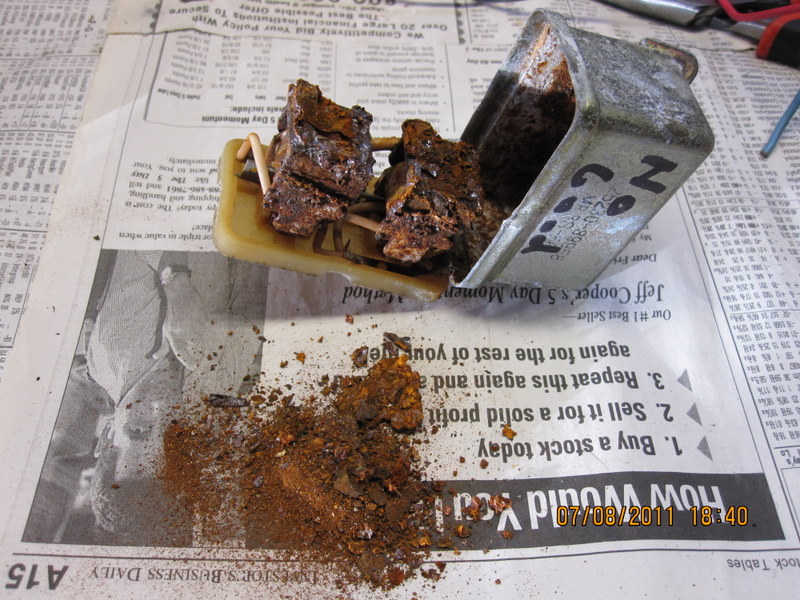
I'm pretty sure that the FSM (76 and 78 anyway) says "NEVER take the BCDD apart", replace the whole thing. So it would be surprising if the internals were available. Could be wrong, but that's my memory.
-
You might have a vacuum leak. When you open the idle screw you're letting more air past the AFM which will add more gas. This counteracts the lean mix that the vacuum leak causes. But all of the extra air leads to a high idle. Does the idle change when you press on the brake pedal? That would be a bad booster, which causes a vacuum leak when the pedal is pressed. The crankcase (this includes the valve cover and all hoses) needs to be completely sealed for the EFI to work right. The oil filler cap, dip stick tube, breather hose from the top of the valve cover, etc. all need to be sealed.
-
Get a new machinist. He told you it was an L26. Then he told you to get standard L28 pistons. Obviously he didn't even take a measurement or know what the bore size should be. He should have given you a bore size number to work with. Even better, he should have ordered the parts himself. He's wasting your time and money and will probably do a poor job. You could have bought a good running engine for less than $500.
-
It's possible that you got a bad alternator housing from the store. The remanufacture process is to tear everything down, sand blast the case, then re-assemble with parts that have tested as "pass". They might have missed stripped threads in the housing. A longer bolt, if you can find one, of the same thread size might catch good threads at the bottom of the hole. Or you can run a smaller bolt through the hole with a washer and nut on the other side, temporarily so that you can tighten it and verify your wiring work before returning the alt, or hope for the best and return it for one with good threads. It would be hard to hold the bolt and the alternator while tightening the nut though, with only two hands. The other bolt I was talking about is the one that bolts the bracket to the engine block. The one that the bracket pivots on. Your nightmare continues. On the bright side (for me) I went to Autozone and got an $8.99 Duralast belt, it went on easy and the low squeak-squeak-squeak noise from my old worn belt is gone.
-
Coincidentally, I just noticed today that my cheapo alternator belt has stretched to the limit of the adjustment slot. $18 for kevlar-reinforced or $5 for another cheapie. Edit - Went out to change the belt and realized that I don't even typically loosen the bottom bolts. Just the two on the adjustment bracket. Loosen two bolts on bracket, insert long screwdriver down between alt and engine block, pry back and tighten outer bolt on bracket. Might not be the best way but it has worked well. Edit 2 = also noticed that the more worn the belt is, the harder it is to get to the outer bolt. It's a pain.
-
It would look something like this, with jumpers. All the wires you need are on the body harness side. (Can't believe a little Paint file is so big...) Alt Swap Jumpers.bmp
-
If nobody knows, I'm pretty sure that they're described in the Electrical section of the FSMs, by model - Fed or California. http://www.xenons130.com/reference.html
-
Can't edit my post for some reason... You can do the alternator swap without cutting any wires. Just make jumpers at the harness plug. If you find out the problem is elsewhere, then you can go back with no damage, if you want to.
-
You might run in to the brake warning lamp check relay problem. Here is a convoluted novel on the subject that I wrote way back when I did the same swap (start at Post #4, or read #1 - 3 for amusement) - http://www.classiczcars.com/forums/showthread.php?36480-1976-280Z-Alternator-Upgrade-Minor-Issue-Battery-Drain
-
By "starter" I think that she means ignition switch. And the problems with the door sound like something came loose in the door linkages to window and lock. The power steering pump shouldn't be too hard to fix, but I've not owned a ZX so can't say for sure. Nothing looks too hard to repair, but it's mostly mechanical, not electronical. If I was looking for ZX, I would go take this one for a test drive. That is low miles for an L6 engine. Offer a discounted price for as-is, she probably doesn't really want to fix anything anyway.
-
Have you sat in it and ran through the gears (while making motor noises)? The shift lever boot looks like a later ZX boot, not an original 76 style. Maybe it has a 5 speed already? 5th is to the right and up, reverse, right and down.
-
I got a lot out of this book - http://www.amazon.com/Rebuild-Modify-Transmission-Motorbooks-Workshop/dp/0760320470/ref=sr_1_1?ie=UTF8&qid=1333848551&sr=8-1 How to Rebuild and Modify Your Manual Transmission (Motorbooks Workshop) by Robert Bowen Lots of pictures, of both good and bad parts, with good descriptions. The dog teeth (the pointy triangle shaped things sticking out from the side of the gear) on that gear in the first picture do look worn. The tops of the triangles should be sharp, not rounded. They look abused. And the rust isn't good, that's actually a splined piece that has a matching splined collar that slides back and forth over it. The collar needs to slide easily over that area. The inside of the collar is probably rusted also. It would probably wear off over time, but might be stiff shifting for a while. Just some thoughts. Someone who's actually rebuilt a transmission could tell you more.