Zed Head
Free Member
-
Joined
-
Last visited
Everything posted by Zed Head
-
 Your pictures might be huge. I can't open them and they lock up the window I'm in when I try. The typical response to "is it worth it?" is "what are your plans and what are your skills?" Looks like an easy fix and it doesn't appear that there's been any flexing. Could just be poor welds.
 -
The modules are kind of expensive. There are some simple tests that you can run but you need to make sure it's connected properly first. And, no offense, but you'll need to do the same with the Crane module.
-
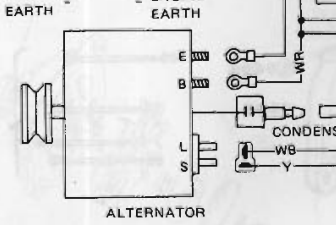
I'm not sure which plug you're talking about. Probably just me, not grasping the words. Once you do this modification the "plug" is essentially gone. Many people cut the plug completely off of the car's wiring harness to connect those wires. The only "plug" that is left is the "T" plug at the alternator. It's also possible that some other part has been modified in your car that used to carry the top wire of the T plug. That is the main problem with those write-ups, there are assumptions that everything else is still stock. For example, on my 76 that wire also powered a relay, that would stay on and drain my battery. I had to do more work and ended up just running my own "S" wire. So what you could do (and other people have done this also) is to run a separate wire from the top of the T to the battery. That should do the job for sensing voltage. You could also just check continuity from the top of the T plug to the wires at your new splice. One of them should be the S wire. I think that atlanitcz site has a better diagram to show what's what. Forgot to say - I've also run male blades connectors in to the back of plugs to make a connection and found that sometimes they just won't stay metal-to-metal. It feels like it's working but it just isn't.
-
Not sure what you mean when you say "connection in place". The diagram in your link is meant for the voltage regulator to be unplugged and the connector cut off of it. Then those wires are connected, with the diode, and it's plugged back in to the car harness. It reroutes power back into the harness to the new places it needs to go. You can do what you described, but you would unplug the VR completely, then run jumpers from 1 - 2, and 6 - diode-5 on the harness connector. I'm not sure which side is male and which female, but the connections have to be on the side that goes back in to the harness. Easy to get those plugs backwards in your brain. Your measurements show that something's wrong. You should battery voltage top and bottom of the T with the key On, for sure. The top is for regulation and the bottom energizes the winding. And I think on the top of the T with the key Off ( not positive on that one). Measure at the alternator T plug, with it disconnected.
-
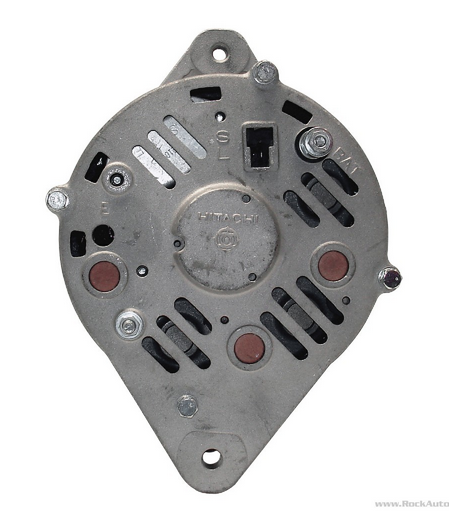
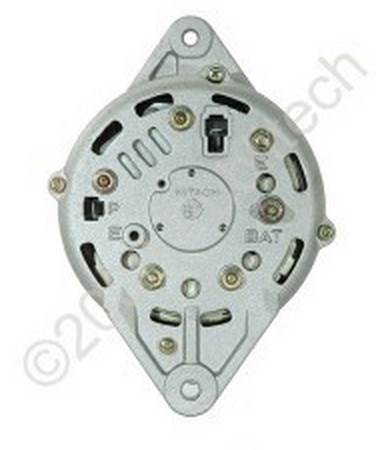
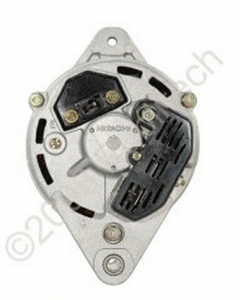
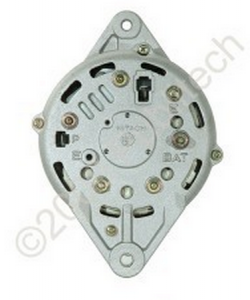
Here are some pictures. Notice the 1978 is internally regulated but has no P terminal. 1981 has the P terminal. And 1975 looks a lot different than either. Did you the atlanticz wiring, or the other one? One check that you can do is to measure voltage on the S wire. It should be the top "cross" of the T. It should show battery voltage. That's the Sensing wire, used to regulate to. The color will be off because it's for 1978.


-
E is the ground stud (Earth). The alternator should be grounding through the alternator case also. You can run another wire to anywhere on the case, or the mounting brackets. Could also be that your engine is not grounded properly since the gorund through the case and brackets is usually enough. You could run a ground wire from a bolt on the engine block to the body or battery negative. Have you converted your wiring to use an internally regulated alternator? You can't just bolt it on and plug it in. I think that one symptom of two regulators is no regulation. 1971 came with an external regulator.
-
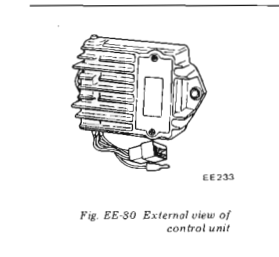
You were so close at 3:48. Just on the other side of the firewall is what you're looking for. Seeing all the daylight through that hole though, I wouldn't be surprised if it's disconnected. The module is in the cabin, probably above and ahead of the fuse box (where it is in 1976 anyway). It is in an aluminum case, with fins. I would use the 1975 Engine Electrical chapter for testing and setting the distributor. It's better written than 1974, I think.
-
Yes it is. If you have a fuel pressure gauge, you can check it while driving. You're on the very well-worn path of checking the first things that you see, because someone else did the same thing and wrote about it. But those typically aren't the problem. I haven't seen a single instance of a stuck cold start valve. It looks like a problem, it's easy to get too, easy to disconnect, but it's never the cause. Many, many people try to "feel" their way through the EFI system, but in the end they almost always have to take a few measurements or do a few structured experiments. Just trying to save you some time. You have about 100 doppelgangers out there.
-
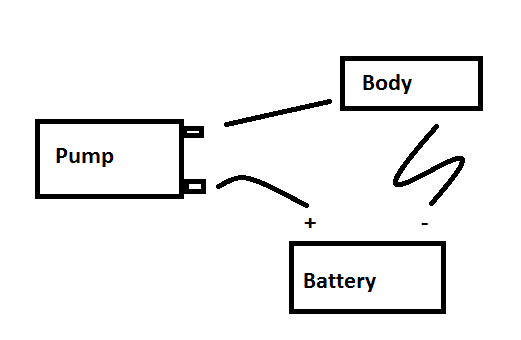
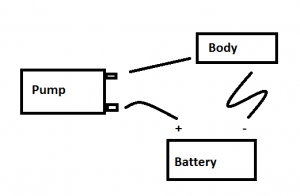
Since you have a wire directly from the battery, you can test the pump separately from the rest of the harness. Make another shorter jumper wire and connect it directly to the car body. Then disconnect both wires from the pump, connect your positive wire from the battery to one of the terminals, doesn't really matter which one, then touch the wire that's connected to the body to the other pump terminal. You should see a spark, showing that the circuit back the battery is complete, through the pump motor. The pump will either spin or it won't. If it doesn't, you might as well tap on it with the wires connected to see if you can break it loose. I think that the ring terminals on the wires are different sizes. Positive is small.
-
Hard to tell what exactly you jumped, and connected. Did you jump the AFM switch, or did you run a jumper from the battery? If you jumped the AFM switch, then you had power at the pump and grounding the negative terminal should have turned the pump. If you ran a jumper from the battery, then you'd want to be sure you had a good circuit through the pump to ground. You said you took both wires off of the pump but it's not clear what you reconnected after seeing sparks. If you have a small mirror or can get your eye n the right place, I think that the + and - are molded in to the plastic by the pump terminals. Also, one is smaller than the other, but I can't remember which is which.
-
Did you wash the engine or get water on it? This is typical of a wet TVS (throttle valve switch). Also, you should describe what the car does now. It's hard to tell if it has all of the problems you described or if some of the old ones are gone and it has new ones. And add amounts of time, like "it drove fine for a week", or only an hour. You said when you bought it ran fine, then it had a problem, then you kept driving it. But for how long did you keep driving it? Minutes or days? If this is the current state - ".i literally couldn't give it any gas, but it would idle. When i would try to gas it, revs would drop low and almost die." - it might be that your AFM (that's what we call it, not a MAF) is disconnected or stuck. Is the cover still on it? At least it's running, It shouldn't be too hard to get it tuned up, but make sure that you take notes about everything that you change. Don't adjust your AFM, don't twist the distributor without a timing light. People often get lost after making random changes and have a hard time fixing the problems they create.
-
Here's a green one from eBay. YEC brand though, like site's. Might be another OEM. Just for looking at. http://www.ebay.ca/itm/NISSAN-240Z-1970-1971-1972-1973-DISTRIBUTOR-CAP-ROTOR-MADE-IN-JAPAN-/311024342440?hash=item486a7ed5a8
-
That's a lot of "Today" posts. Nice to know that there are still some good machinists out there. I notice that those 280Z valves look different from the 240Z valves, in shape. What brand are they? Are you going to measure combustion chamber volume? Looks like it might be smaller than before. Probably good to know.
-
This stuff looks interesting. Not sure why they split the parts up like they do unless it's to avoid sticker shock. If I added right it comes to $545 for the complete front and rear set. Click on Chassis. Goofy web site. https://technotoytuning.com/nissan/240z
-
Look at #8 here - http://forums.hybridz.org/topic/91330-240z-chassis-prep-reinforcements/ More good stuff in the thread. Seems like you could buy a one piece bar for the work already done on the strut mount area, and add the two bars to the firewall yourself. Customize a production bar. The firewall bars are fairly direct to design. Simple gussets to make it strong at the junctions.
-
Is there really a question? Either the price you paid is for the rear bar only, or you take the rear bar off and get the refund. At least they offer a refund. Apparently TEP either has a tweaked jig, or car that they use as a jig, and has for many years, or they made a load of bad product and have been trying to get rid of it for years. http://www.zcar.com/forum/10-70-83-tech-discussion-forum/123392-top-end-performance-strut-brace-not-fitting-pics.html http://www.racetep.com/zfront.html
-
A methodical approach is the key. As said, these same problems were described weeks, maybe even months ago. But the solutions suggested weren't addressed, random work has been done, mechanics who don't seem to know what they're talking about are consulted, and the whole cycle is repeated. Obviously, it's difficult to get good work done down there, but that's why it's even more important to keep track of what's done, and why. And the descriptions of the problem are very important. Clutch chatter and engine shaking due to misfire are two completely different problems.
-
This is just an aside but it might be relevant to your quest. The greenish-gray color might be indicative of an early resin formulation, compared to a modern one (black). Today's caps are probably made from a different resin due to typical cost-saving material changes over time. So the cap you buy today might have the same part number, but be of a "non-original" material. So, if you're trying to determine if the cap is "period-correct" you might do a little more research on the materials used over time, and then test a shaving of yours to see what it is. Unfortunately, the quickest test would be to have someone who knows the smell take a whiff of the vapors from burning a shaving from the cap. Sounds bad, but it's an old test and easy if you know the smells. You could also buy a cap from the dealer and compare them. If you get a gray-green one with aluminum electrodes and the same part numbers, then it's "just" a cap.
-
Are you asking if 4659-2700 = 22612-E3001? Or of the cap is from a 240Z factory car? You can still buy 22612-E3001 from Courtesy Nissan for $26. http://www.courtesyparts.com/cap-dist-p-277372.html Since Hitachi is an Original Equipment Manufacturer (OEM) for Nissan, I think by literal definition, that is an OEM cap. Literally.
-
This is not a sign of a bad pump.
-
I'm in the water-in-gas crowd. If you're seeing water in the filter, then there's water in the tank. You need to drain all of your fuel, flush the lines, dry the tank out, replace the filter, refill, then add HEET or some other drying agent to disperse the remainder of the water. HEET is not going to fix that much water, if you're seeing it in the filter. Plus, the water will soak the paper of the filter, and it will swell and cause a flow restriction. But, are you sure you're seeing water? The filter can get an air bubble and still function just fine.
-
I've seen a few threads about detonation and those small marks that look someone used gravel as shot to clean the pistons are typical of the marks detonation leaves, apparently. Detonation can break rings so you'd want to pull the pistons at least. Not a throw it together and go short block, I'd guess. The big gouges look like foreign object damage. I've also seen in a small block chevy motor that hydrolocked, that when the connecting rod bends sometimes it twists. A piston was twisted in the bore. You might put a straight edge across the top and see if all of the piston notches line up. Looks like it has some good parts though. A 3 pulley damper, new water pump, good front cover. Might be worth parts alone.
-
Body Electrical has a wiring diagram that will show you how the tach works. The coil can't get power unless somebody wired around the tach, The chapter also describes how to remove the tach, No need to tear apart anything. The tachs do go bad. http://www.nicoclub.com/FSM/240z/
-
The 260Z came stock with electronic ignition from the factory. It was the first year of electronic. It's probably the stock ignition system. The wiring schematic and diagrams are in the nicoclub and xenons30 link provided before. Engine Electrical chapter, for one.
-
There's a break-in recommendation in the Owner's Manual. Looks like 1000 or 2000 miles is a common number. But those procedures were written when all oils had ZDDP, and may not even be concerned with cam lobe wear-in. So you're kind of in uncharted territory. Pretty sure I've seen higher numbers recommended, out there on the interweb, specific to the ZDDP problem, for new cams and rocker/lifters. Modern engine procedures won't work since they all have roller rockers or lifters.