


Zed Head
Free Member
-
Joined
-
Last visited
Everything posted by Zed Head
-
 I've done it, and I think that EuroDat has, and Blue has a writeup on the atlanticz web site. If you're handy with a drill and some grinding tools, it's really not too difficult home garage work, if you swap to the smaller countershaft bearing. The most accuracy is required for enlarging the hole for the larger countershaft bearing that Nissan started using in the 71C units. That requires some machinist level skill. Without that, it's fairly common wrenching, some drilling, and some grinding. Then there's finding a shorter driveshaft, and modifying the transmission mount. I cut slots in my stock mount, but some people prefer to cut and weld. Overall, there's some ingenuity required. Several different ways to get it done, but nothing super-difficult. Full disclosure - I have not mounted mine in the car yet. I have everything, just not in yet. I did spin it through the gears on the back of a spare engine that I have in the garage though. No issues. Mine was from a 1985 300ZX.
 -
What do you mean by "full advance"? You twisted the distributor as far as it would twist? After you checked it, where did you set it? Sounds like you're close. And it does sound like a fuel supply problem, since starting fluid works. I would set the timing to 10 degrees and focus on the carbs. I'm not an SU guy for sure, and barely a typical USA style carb guy. But I think that if the pistons in the SU's get stuck, you get no fuel. Since you rebuilt them yourself, might be there's a error. Site has posted some tricks for unjamming a piston, I believe, and I'm sure there are some other good tricks out there.
-
Just curious - what do the rod caps look like? I've seen pictures of some that turn blue from overheating. Sometimes it's the remains of the ones that blew a hole in the side of the block.
-
Any should work if the parts are oriented right. You moved the mount with the distributor so it should be fine. Once you get things oriented correctly. You have spark, just maybe at the wrong time.
-
One way to set initial timing is to put the damper timing mark on about 10 degrees BTDC compression stroke, make sure the rotor is pointed at #1, then rotate the distributor to where the Pertronix trigger is triggering. I think that might actually be the Pertronix instructions for initial installation. That way you have the three important things all coordinated, for ~ 10 degrees static timing. Actually, it looks like Pertronix instructions are pretty vague. Might be Crane or one of the other guys. Anyway, it should work. Don't forget that, apparently, the Pertronix units will burn up if the key is left on. http://static.summitracing.com/global/images/instructions/pnx%20ignitor%20i%20tests.pdf
-
-
Cool. A broken crank bearing, damaged damper keyway on the crank nose, and a cracked piston. Keep looking, there's probably more. Looks like the PO kept driving when he should have stopped. Looked back through the thread and see the title about 1978, and the comment about the spray bar instead of the oil holes in the cam lobes. But, in picture number 1, you have square exhaust ports. That's 1975-76 in the North American market. That's not a 1978 280Z engine from around here. You said you thought maybe it came from Japan, why? I think that I've read that the square ports and even carburetors stuck around much longer in the Asia markets. EFI and round ports with liners were emissions driven things. The Aussies might know for sure about square ports 280Z's. And we've all kind of overlooked the basics of getting the code from the side of the head. It's probably an N42 (75-76), not an N47 (77-80). Regardless, that engine is looking less and less like a good candidate for a rebuild. Why chance it?
-
Do you know what cars they came from? Nice shot of the slot in the Datsun connector, with no retaining wire in it.
-
It shouldn't matter, the fuel pump is on all the time when the engine is running anyway. Plus, on a 240Z, the fuel pump wouldn't normally run on the Accessory circuit. If you're unsure abut fuel pressure you should measure it with a gauge. How much fuel is in the clear filter doesn't tell you anything.
-
Why are you looking in the mirror at 5,500 RPM? To txv - isn't the crank nose key way messed up anyway? Might want to do some math on fixing versus replacing. Actually, do math on whatever you're attempting, there are plenty of used engines out there that just need a freshening, compared to a total rebuild for yours. That looks pretty messed up. The vibration fatiguing from the bad damper might have caused other problems, and might have contributed to the fractured bearing. Who knows.
-
Here's one. Spendy. http://www.thezstore.com/page/TZS/PROD/11-2972 Are you that you actually need one? There are more 300ZX people on zcar.com.
-
I don't know if this will work but it seems like it might, if my limited understanding of how the tach works is close. It uses the GM HEI module as the "pulse" source for the tachometer. One scheme is for the 240Z current-reading tach, and the other is for the voltage-reading 280Z unit. Serendipitously, the factory GM HEI module limits current to about 4 -5 amps, apparently. The current through the 240Z tachometer should be about 4 amps, so it's a pretty close match. 13 / (1.6 + 1.6). Primary circuit coil resistance and ballast resistor are both 1.6 ohms. 13 volts is nominal battery voltage. The 240Z tach just sees voltage rising and falling as the coil charges and discharges. The HEI module charges and discharges the 240Z tach, in essence. The current limiting of the HEI module should protect it from too much current, although I'm not sure if it responds fast enough. Might need a resistor in front to help out. The primary resistance of an HEI coil is about 0.5 ohms. The 280Z just sees voltage rising and falling and has a big resistor in front of it. So all that should be needed there is the connection to the C terminal to see the voltage change. Here are the schematics. I'm no electrical engineer and could be way off. I saw the wiring schemes for the MDS 8920 adapter though and this thought came to me. Please pick away at it, if you know something or have a suggestion. Or just blow it up with massive electronics knowledge. I can take it. My main concern is that the HEI module will burn itself up with no load on the C circuit, but the current-limiting should cover that, I'd think. Or the 240Z tachometer will fry, but again, 5 amps should be handleable. Any experiments could be done with a 5 amp fuse in-line to save parts. One other benefit is the automatic shutdown of the HEI module if there's no activity on the C circuit within a certain time. Just trying to keep the old brain sharpened. 240Z G - ground W - white trigger wire Mount grommet - ground C - ground B - tachometer - battery power HEI module passes ~4 amps, current-limited. 240Z stock has 1.6 ohm primary + 1.6 ohm ballast resistor, 3.2 total. 13 volts (nominal) / 3.2 = 4 amps 280Z G - ground W - white trigger wire Mount grommet - ground C - factory resistor - tachometer B - battery 280Z tach only sees voltage pulses, essentially no current. The module just lets the voltage pulse from ~0 to 13 as the trigger switches the module. It's a "phantom" coil.
-
My point was that without enough air flowing through the AFM to open the vane the contact will stay open. No vane movement, no fuel pump power. The contact can be perfect, just not closing to actuate the fuel pump relay. Maybe you meant that the vane can be seen moving at idle? If it will stay running at higher RPM, even though it's missing, you could open the idle speed screw to let it run by itself.while you watch the pressure gauge and fiddle with hoses and wires. Or put a brick on the throttle pedal. It shouldn't take 3000 RPM though to open the AFM vane. And the reason I suggest these things is because you can't have zero fuel pressure AND 3000 RPM. So there's a disconnect there. There must be fuel pressure, either too high or too low, One way that you can have low pressure but rich air/fuel ratio is if the FPR diaphragm has a hole in it. The vacuum hose to the FPR will pull fuel straight through the FPR in to the manifold. It's not uncommon. Just suggestions.
-
Overall, it looks like you have the typical collection of problems and adjustments to the wrong parts to fix them. It still looks like the fuel pump contact in the AFM is closing because of low air flow, or the AFM is still out of adjustment, causing the vane to stay closed. You need to set the AFM back to where it was so that the vane can open and keep the pump running. Or stick that wire back in there. You can check the function of the fuel system by disconnecting the small wire from the starter solenoid and turning the key to Start. The AFM contact is bypassed at Start and the pump will get power. I think what's happening now is the pump is getting power, then the engine starts and you're letting go of the key. The AFM vane is closed so the power goes away because the Start bypass is gone. When you rev it, the vane opens for a second, the pump gets a second of power, etc. You're about at the point where hot-wiring the pump just to be sure the power stays on, would be the thing to do. I think you might be working on the wrong thing. Get the pump powered permanently, either via hot-wire, or hard-wire in the AFM throat, and start the engine, See what pressure does then. Forgot to say - the old FPR's tend to leak down quickly. So if you try the solenoid wire disconnection test, you'll need to be able to see the gauge while you hold the key to Start. It won't hurt anything, the pump stays on for hours while you're driving.
-
Many of us use our cars as "reasons" to buy new tools/toys but really, cutting wires, stripping the ends, and reconnecting with naked butt connectors and shrink tubing would be a perfectly viable way to get it done, as far as functionality. Makes some people queasy but the method has survived the test of time. Once it's done and the AFM is plugged back in, you might never remove it again.
-
Maybe he already has the head off and is measuring for warpage, and looking for cracks. Could be. 51 degrees in Nampa, good car work weather.
-
Your news came out of nowhere. I hope it was just a random event. Good luck.
-
You've gone 1/2 circle, from not enough pictures to not enough words. If you're trying to indicate that there's definitely water in the oil, then...bummer. Check the cylinders for head-related problems. Spin the engine with no spark plugs. If any water droplets at all show up, you'll need to pull the head. If the PO replaced a head gasket because of overheating he should have had the head checked for warpage. You might have bought a problem engine.
-
People usually do this when they remove an engine or do a big repair. Did the PO say what he had just fixed before you bought it? Looks like you'll have some checking to do, even if you get it running again. Just to be sure. It's all part of the fun.
-
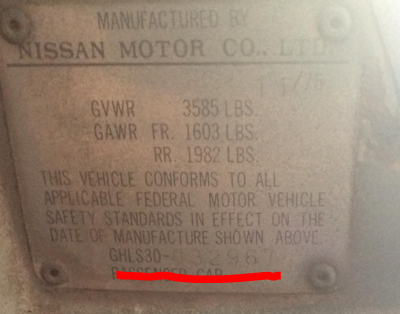
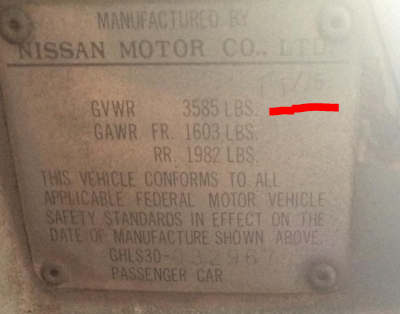
You have a 1976 car. Site was right. That's probably the stock engine. Compare the title VIN to the VIN I underlined below. While you're waiting for the oil to settle down in the clear container (the water will separate to the bottom) get a meter and run the tests shown in the Fuel Injection Guide. Make sure that the coolant temperature sensor reading is correct.
-
If you really want to know, you'll pour the oil in to a clear container. Water will separate out eventually if it's in there.
-
That oil doesn't look milky. It seems clear, I can see the concrete underneath. You might be on a wild goose chase (this would be good). Looking at your engine picture, the blue stuff looks like tape. Are those wire ends that are taped together? Could be that your coolant temperature sensor wire came loose. There's hope, don't do anything crazy. What is the date I underlined in the picture. Can't see it.
-
To SteveJ's point about not trying to start the engine. It might be worthwhile to remove the spark plugs and spin the engine with the starter. See if coolant comes out of any of the spark plug holes. People do see that sometimes if there's a leak in to a cylinder. If there's enough coolant to hydrolock, it will spray from a plug hole.
-
The fuel rail is 75-77 style also. Three piece. Could be a replacement motor. Not a huge deal, but something to be aware of. Good pictures of the oil and the spark plugs will tell something.
-
Not really clear what you're saying. "When we had the car"? When? How long did it run perfectly before you parked it in the garage? Since it's your first car,and first Z, the best thing that you can do is to read through the Service Manual. Engine Fuel chapter. See the link below. Your fuel pressure is too high, for starters, but there's much more in there. On the pictures, I really wanted to see the " chocolatey color, which means water." Dark chocolate would be okay, milk chocolate would be iffy. White chocolate would be bad. Could be that you've assumed the wrong problem though, there are several things that you can do to confirm. Since you put new spark plugs in, the old ones should be available for pictures. Where's the tub full of oil that you drained? If you give more information, you'll get some good ideas from out here. http://www.classiczcars.com/files/category/4-manuals/
